

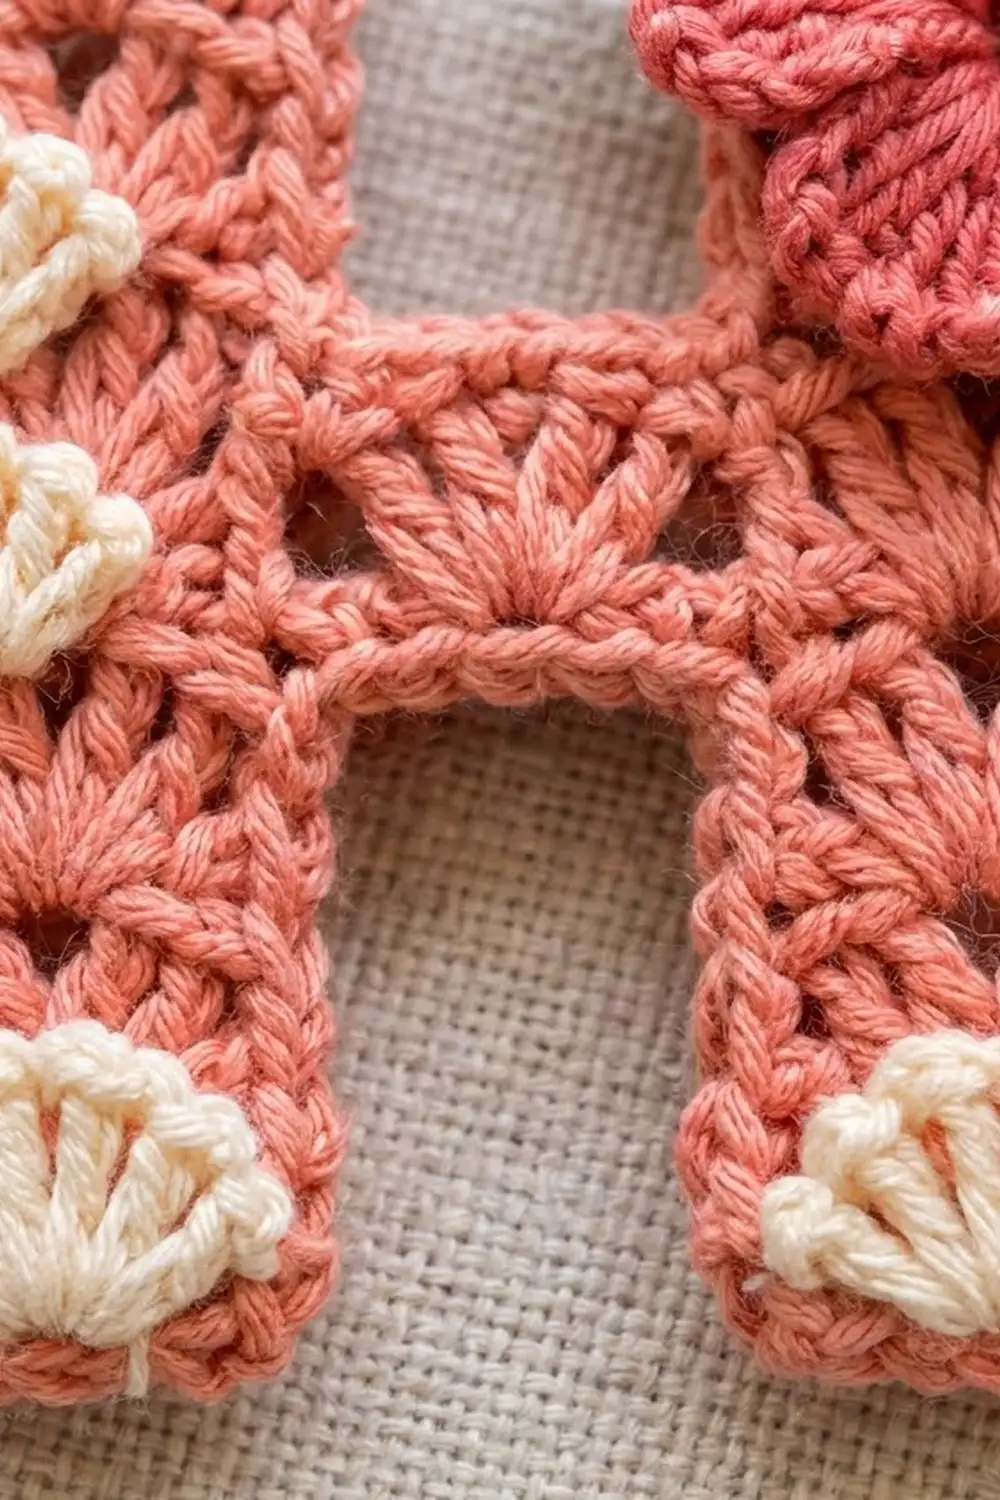
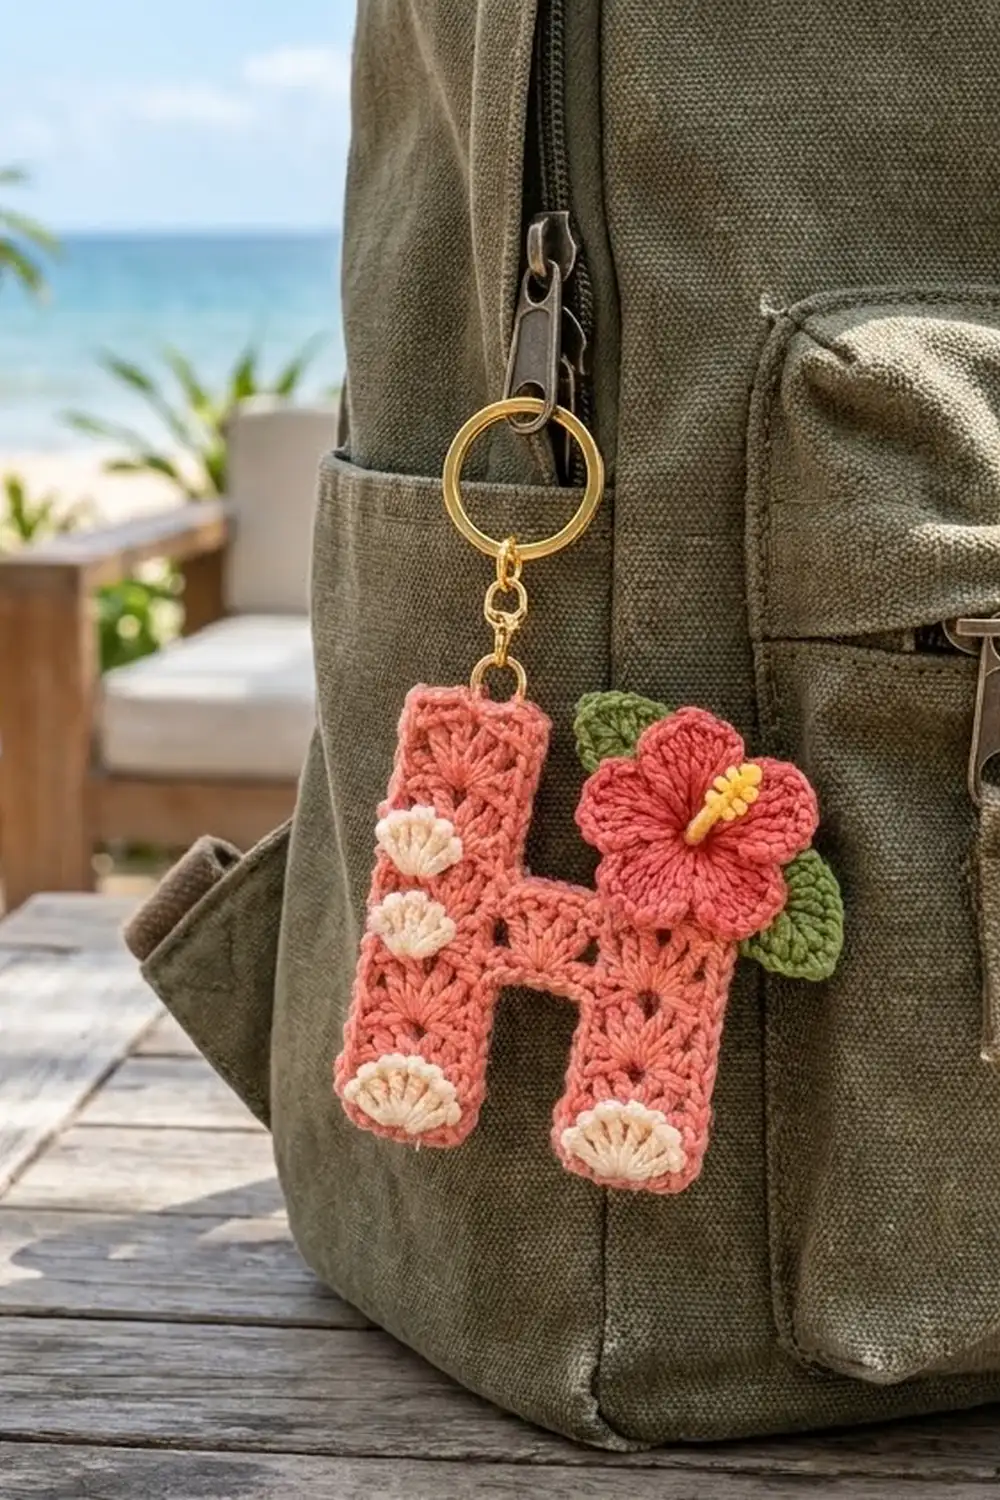
The Island Bloom Letter H Keychain is a small monogram charm with a summery look. The letter body is worked in coral cotton using a shell stitch, so neat rows of tiny fans run up both legs and across the crossbar. Cream seashells and a coral-red hibiscus with a golden stamen give it a beach-bag feel.
The palette has five colors: coral for the letter, cream for the shells, deep coral-red for the flower, golden yellow for the stamen, and leaf green for the two leaves. The style is tidy and graphic, with a crisp single-crochet outline and soft dimensional details on top.
This pattern uses US crochet terms. The finished keychain measures 2.75 in (7.0 cm) wide x 3.75 in (9.5 cm) tall, not including the ring.
You’ll work the letter as one flat piece from the bottom up. Make both bottom legs first, join them with the crossbar rows, then work the two top uprights separately. One round of single crochet outlines the whole H. Finally, make the shells, flower, and leaves, sew them on, and attach a split ring.
Finished Size and Construction
- Finished size: 2.75 in (7.0 cm) wide x 3.75 in (9.5 cm) tall
- Skill level: Easy-intermediate
- Terminology: US crochet terms
- Yarn weight: Sport (#2) cotton
- Hook: 2.75 mm (US C-2)
- Number of pieces: 1 letter body, plus 7 small appliqués (4 shells, 1 flower, 2 leaves)
- Layout: Single letter, no joining of motifs
- Size before border: 2.5 in (6.4 cm) wide x 3.5 in (8.9 cm) tall
- Leg width before border: 0.9 in (2.3 cm); the gap between the legs is 0.7 in (1.8 cm)
- Border depth: 0.125 in (0.3 cm) on each side, 1 round
Materials
Choose a smooth, mercerized or combed sport-weight cotton. Cotton holds the fan texture clearly and keeps a keychain firm. A typical yardage is about 170 m per 50 g (about 3.4 m per gram).
- Coral (main color, letter body and border): 10 g, about 34 m
- Cream (shells): 3 g, about 10 m
- Deep coral-red (hibiscus): 3 g, about 10 m
- Golden yellow (stamen): 1 g, about 3 m
- Leaf green (leaves): 2 g, about 7 m
Tools:
– 2.75 mm (US C-2) crochet hook
– Tapestry needle
– Scissors
– Stitch markers
– Gold split keyring, 1 in (2.5 cm), with a short chain and jump ring
– Small pliers for opening the jump ring
– Blocking mat, rustproof pins, and a spray bottle
– Optional: fabric stiffener
All quantities include a margin for a gauge test and for weaving in ends.
Abbreviations (US Terms)
- ch – chain
- sl st – slip stitch
- sc – single crochet
- hdc – half double crochet
- dc – double crochet
- tr – treble crochet
- fpdc – front post double crochet
- sk – skip
- sp – space
- st(s) – stitch(es)
- RS / WS – right side / wrong side
Special stitch: Shell. Work 5 dc in the same stitch.
Stitch counting rule: The ch-3 at the start of a fan row counts as 1 dc. In the single-crochet rows, each ch-2 space counts as 2 sts, so every row keeps a steady stitch count.
Gauge and Checkpoints
Gauge matters on a small piece because the H shape is built from exact stitch counts.
Gauge: 19 sts in pattern = 2.5 in (6.4 cm) wide. The first 7 rows = 1.1 in (2.8 cm) tall.
Test first: Your first bottom leg doubles as the gauge test. Work Rows 1–7, then measure before you start the second leg.
Checkpoints:
– After Rows 1–7 (each bottom leg): 0.9 in (2.3 cm) wide x 1.1 in (2.8 cm) tall
– After Row 13 (crossbar complete): 2.5 in (6.4 cm) wide x 2.1 in (5.3 cm) tall; the crossbar alone is 1.0 in (2.5 cm) tall
– After Row 21 (both uprights): 3.5 in (8.9 cm) tall; the uprights add 1.4 in (3.6 cm)
– After the border: 2.75 in (7.0 cm) x 3.75 in (9.5 cm)
If your leg is too big: Go down to a 2.5 mm hook. If it’s too small: Go up to a 3.0 mm hook. Don’t change the stitch counts, because the fan pattern depends on them.
Letter Body
The fan pattern has two alternating rows:
- Fan row: a dc at each edge, with a shell in each center stitch.
- Sc row: sc, ch 2, sc, ch 2, sc, which anchors each shell at its center and creates the small openings.
Bottom Leg (make 2)
Row 1 (RS): With coral, ch 8. Sc in 2nd ch from hook and in each ch across. Turn. (7 sc)
Row 2 (fan row): Ch 3 (counts as dc), sk 2 sts, shell in next st, sk 2 sts, dc in last st. Turn. (7 sts: 1 + 5 + 1)
Row 3 (sc row): Ch 1, sc in first dc, ch 2, sk 2 dc, sc in 3rd dc of shell, ch 2, sk 2 dc, sc in top of turning ch. Turn. (3 sc + 2 ch-2 sps = 7 sts)
Row 4: Ch 3, sk ch-2 sp, shell in center sc, sk ch-2 sp, dc in last sc. Turn. (7 sts)
Rows 5–7: Repeat Row 3, Row 4, then Row 3. (7 sts each)
On the first leg, fasten off. On the second leg, don’t fasten off. Check that both legs are 0.9 in (2.3 cm) x 1.1 in (2.8 cm).
Crossbar
Lay both legs side by side with the same side facing you and Row 7 at the top. Place the leg with the working loop on the right. The loop should be at its outer right edge.
Row 8 (fan row joining row): Ch 3, sk ch-2 sp, shell in center sc, sk ch-2 sp, dc in last sc. (7 sts) Ch 5. On the left leg, start at its inner (right) edge: dc in first sc, sk ch-2 sp, shell in center sc, sk ch-2 sp, dc in last sc. Turn. (7 + 5 ch + 7 = 19 sts)
Row 9 (sc row): Ch 1, sc in first dc, [ch 2, sk 2 sts, sc in next st] 6 times. Turn.
The sc stitches land on the 1st, 4th, 7th, 10th, 13th, 16th, and 19th sts. Over the gap, this puts one sc on the leg edge dc, one on the center (3rd) ch, and one on the other leg’s edge dc. (7 sc + 6 ch-2 sps = 19 sts)
Row 10: Ch 3, [sk ch-2 sp, shell in next sc, sk ch-2 sp, dc in next sc] 3 times. Turn. (1 + 3 × 6 = 19 sts)
The three shells sit centered over the left leg, the gap, and the right leg.
Row 11: Ch 1, sc in first dc, [ch 2, sk 2 dc, sc in next st] 6 times, working the last sc in the top of the turning ch. Turn. (19 sts)
Rows 12–13: Repeat Rows 10 and 11. (19 sts each) Don’t fasten off.
Checkpoint: 2.5 in (6.4 cm) wide x 2.1 in (5.3 cm) tall.
First Upright
Row 14: Ch 3, sk ch-2 sp, shell in next sc, sk ch-2 sp, dc in next sc. Turn, leaving the remaining 12 sts unworked. (7 sts)
Row 15: Work as Row 3. (7 sts)
Rows 16–21: Alternate Row 4 and Row 3, ending with a sc row on Row 21. (7 sts each) Fasten off.
Second Upright
With the same side facing as for Row 14, find the first upright’s last stitch on Row 13. Skip the next 5 sts (ch-2 sp, sc, ch-2 sp). These 5 sts form the top of the center gap.
Row 14: Join coral with a sl st in the next sc (the 13th st of Row 13). Ch 3, sk ch-2 sp, shell in next sc, sk ch-2 sp, dc in last sc. Turn. (7 sts)
Rows 15–21: Work as for the First Upright. (7 sts each) Don’t fasten off.
Checkpoint: 3.5 in (8.9 cm) tall overall, with both uprights level.
Border
Border gauge:
– Along tops and bottoms, work 1 sc per stitch. This matches the body’s 7.6 sts per inch (about 3 per cm).
– Along the sides, work 1 sc per sc-row end and 2 sc per fan-row end. A fan row is about twice as tall as a sc row, so this keeps the edge flat.
Corners:
– Outer (convex) corners, 8 total: Work 3 sc in the corner stitch.
– Inner (concave) corners, 4 total: Add nothing. Work the sc on each side of the inner corner snugly.
Round 1: Continue with the loop from the Second Upright. Work around the H in this order. Each count below includes the corner groups on that side.
| Edge | How to work it | Count |
|---|---|---|
| Upright top | 3 sc in corner sc, 2 sc in ch-2 sp, sc in center sc, 2 sc in ch-2 sp, 3 sc in corner sc | 11 sc |
| Outer side, Rows 20 down to 2 | 2 sc per fan row (10 rows), 1 sc per sc row (9 rows) | 29 sc |
| Leg bottom (in foundation ch loops) | 3 sc, 5 sc, 3 sc | 11 sc |
| Inner side, Rows 2–7 | 3 fan rows × 2 + 3 sc rows × 1 | 9 sc |
| Gap underside (Row 8 ch-5 loops) | 1 sc in each ch | 5 sc |
| Other leg inner side, Rows 7–2 | as above | 9 sc |
| Leg bottom | 3 sc, 5 sc, 3 sc | 11 sc |
| Outer side, Rows 2–20 | as above | 29 sc |
| Upright top | as above | 11 sc |
| Inner side, Rows 20–14 | 4 fan rows × 2 + 3 sc rows × 1 | 11 sc |
| Gap top (5 unworked sts of Row 13) | 2 sc in ch-2 sp, 1 sc in sc, 2 sc in ch-2 sp | 5 sc |
| Inner side, Rows 14–20 | as above | 11 sc |
Join with a sl st to the first sc. Fasten off. (152 sc total)
Why the math works: Each 7-st top or bottom becomes 5 sc plus two 3-sc corners, for 11 sc. No stitch is counted twice. Row 1 and Row 21 are covered by their corner groups, so the side counts include only Rows 2–20 (outer sides) or the rows between the corner and the crossbar (inner sides).
The gap edges are 5 sts wide above and below the crossbar, matching the 5 chains of Row 8. Adding all twelve edges gives 11 + 29 + 11 + 9 + 5 + 9 + 11 + 29 + 11 + 11 + 5 + 11 = 152.
One sc round adds 0.125 in (0.3 cm) on each side. That turns 2.5 in x 3.5 in (6.4 cm x 8.9 cm) into 2.75 in x 3.75 in (7.0 cm x 9.5 cm).
Appliqués
Leave a 6 in (15.2 cm) tail on every appliqué for sewing.
Large Shell (make 2, cream)
Row 1: Ch 4. Work 6 dc in 4th ch from hook. Turn. (7 dc, with the skipped ch-3 counting as 1)
Row 2: Ch 2 (doesn’t count). Work (fpdc, dc) in each st across. (14 sts) Fasten off.
The fpdc stitches form raised ribs that fan out from the base. The shell measures about 0.85 in (2.2 cm) wide x 0.55 in (1.4 cm) tall.
Small Shell (make 2, cream)
Row 1: Ch 4. Work 7 dc in 4th ch from hook. (8 dc, with the skipped ch-3 counting as 1) Fasten off.
The shell measures about 0.5 in (1.3 cm) wide x 0.35 in (0.9 cm) tall.
Hibiscus (deep coral-red)
Rnd 1: Magic ring, ch 1, 5 sc in ring. Join with sl st to first sc. (5 sc)
Rnd 2: Ch 1, 2 sc in each sc. Join. (10 sc)
Rnd 3: [(hdc, dc, 2 tr, dc, hdc) in next sc, sl st in next sc] 5 times. Fasten off. (5 petals, 35 sts)
The flower measures about 1.25 in (3.2 cm) across.
Stamen (golden yellow): Ch 8. Sl st in 2nd ch from hook and in each of the next 6 ch. (7 sl st) Fasten off.
Sew the stamen from the flower’s center toward one petal so it extends about 0.6 in (1.5 cm). Add 3 small French knots at its tip.
Leaf (make 2, green)
Ch 7. Working into the chain:
1. Sc in 2nd ch from hook, then hdc, dc, dc, hdc in the next 4 ch.
2. Work 3 sc in the last ch.
3. Working back along the other side of the chain: hdc, dc, dc, hdc, sc.
4. Sl st to the first sc. Fasten off. (13 sts)
Each leaf is about 0.75 in (1.9 cm) long.
Placement
- Large shells: Sew one at the bottom of each leg, base on the border, rounded edge up.
- Small shells: On the left leg, sew one level with the crossbar and one in the upper leg, both rounded edge up.
- Leaves: Tuck them under the hibiscus, one pointing up-left and one pointing down-right.
- Hibiscus: Sew it on the upper right upright so a petal overlaps the outer edge.
- Keyring: Open the jump ring, pass it through the top border of the left upright, and close it.
Final Blocking
- Lightly mist the letter body (before sewing on appliqués, if possible) until it is damp but not wet.
- Pin it to a mat at 2.75 in x 3.75 in (7.0 cm x 9.5 cm). Pin each outer corner square.
- Pin both inner gaps open so the legs stay parallel and the crossbar stays level.
- Open each fan gently with your fingertips.
- Optional: brush on diluted fabric stiffener for a firmer charm.
- Let it dry completely, then sew on the appliqués and attach the ring.
Final Quality-Control Checklist
- Both legs are 7 sts wide, with 21 rows on each side
- The crossbar has 3 centered shells in each fan row
- The border totals 152 sc, with 3 sc at all 8 outer corners
- The inner corners are crisp, not puckered
- Final size is 2.75 in x 3.75 in (7.0 cm x 9.5 cm)
- The shells point up and the flower overlaps the right edge
- All tails are woven in securely and the jump ring is fully closed
Troubleshooting
- The fans lean to one side: You placed the shell off-center. Always work it into the center sc of the previous row.
- The crossbar puckers: Your ch-5 is too tight. Chain loosely or use a larger hook for the chain only.
- The uprights are uneven: Count the rows on each side. Both uprights should end on Row 21.
- The border ruffles: Use 1 sc (not 2) on each sc-row end.
- The border cups: Make sure you work 2 sc on every fan-row end.
- The inner corners bulge: Pull the sc on each side of the corner snug and don’t add stitches.
- The ring tears the edge: Pass it under both loops of 2 border sc.
Care
Hand wash in cool water and lay flat to dry. If you used stiffener, reshape and re-stiffen after washing.
Final Notes
Here is the measurement chain to check as you go:
- Each bottom leg: 0.9 in x 1.1 in (2.3 cm x 2.8 cm)
- After the crossbar: 2.5 in x 2.1 in (6.4 cm x 5.3 cm)
- After the uprights: 2.5 in x 3.5 in (6.4 cm x 8.9 cm)
- After 152 border sc: 2.75 in x 3.75 in (7.0 cm x 9.5 cm)
If each checkpoint matches, your shells, hibiscus, and leaves will sit exactly where they belong. Happy crocheting!