

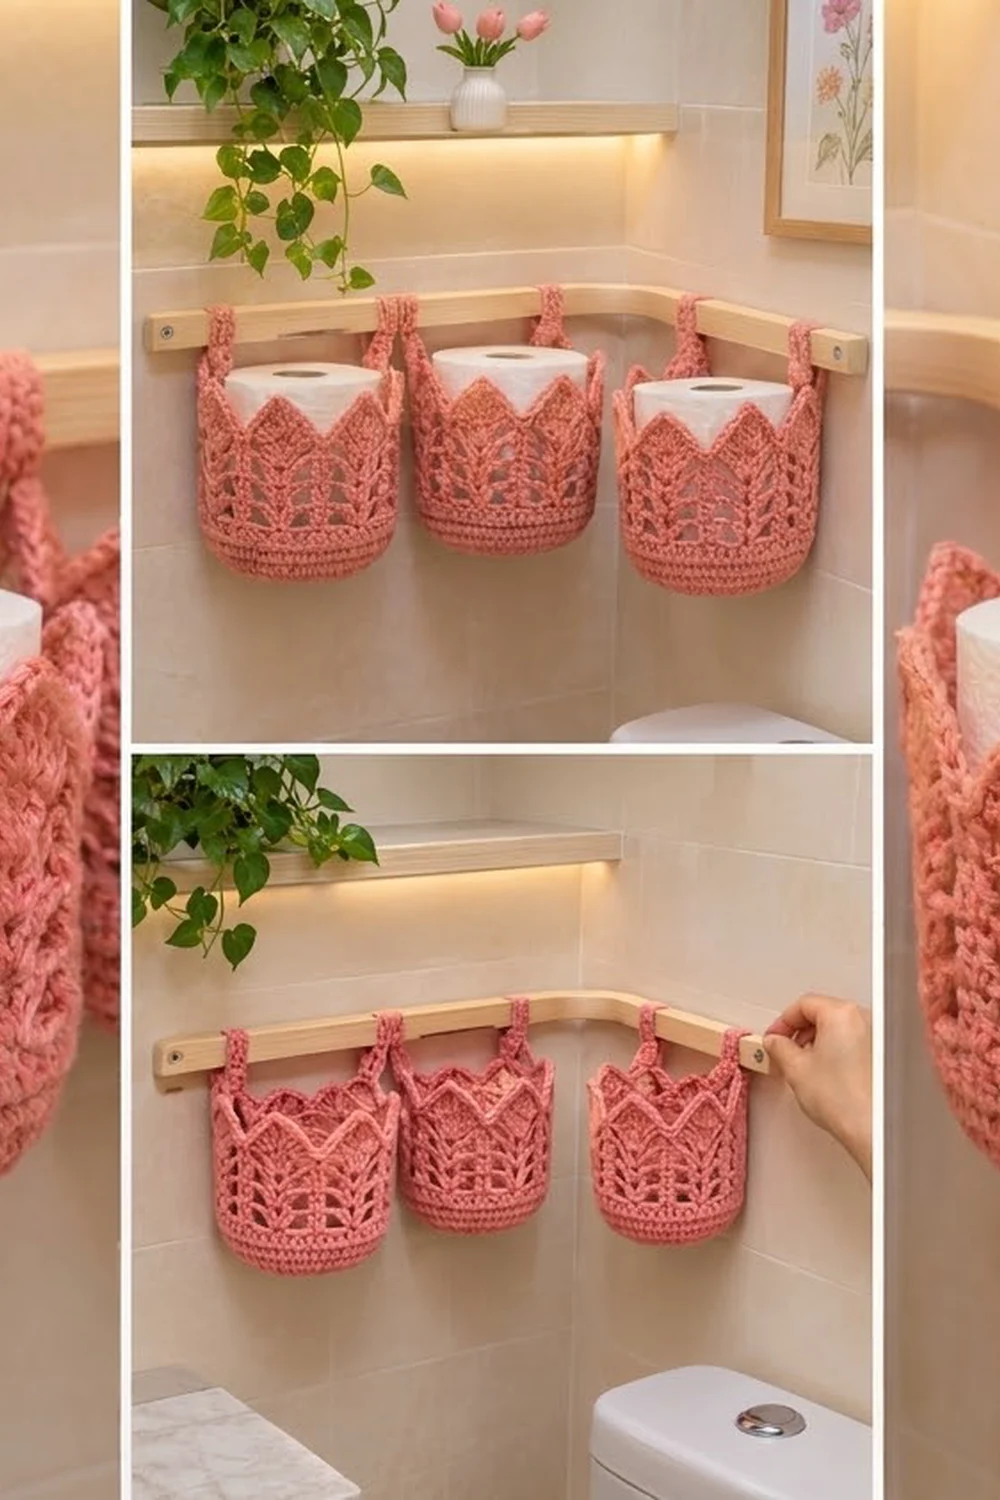
This pattern makes a set of three hanging toilet paper baskets. Each one is a round cotton cup with a lace band and a rim of six pointed peaks. Hang them side by side on a wall rail or towel bar to keep spare rolls tidy and in reach.
The sample is worked in a warm coral pink cotton. The lower part of each basket is solid single crochet, so it is sturdy and holds its shape under the weight of a roll. Above that, double crochet posts frame panels of stacked shells that look like small fern leaves. The rim ends in crisp crown points with tiny picot tips.
The pattern uses US crochet terms. Each finished basket measures 4.75 in (12.1 cm) across and 4.5 in (11.4 cm) tall at the points. A standard roll about 4.25 in (10.8 cm) wide fits inside with a little ease.
Construction is simple. You work a flat single crochet circle, turn up the wall with a back-loop round, and add the lace band and crown edge in joined rounds. Then you make a short strap and sew it inside the back. Repeat three times.
Finished Size and Construction
- Finished size (each basket): 4.75 in (12.1 cm) diameter × 4.5 in (11.4 cm) tall at the points; 3.75 in (9.5 cm) tall at the valleys
- Circumference: 15 in (38.1 cm)
- Skill level: Intermediate
- Terminology: US
- Yarn weight: Worsted (#4) cotton
- Hook: 5.0 mm (H-8)
- Number of pieces: 3 baskets + 3 straps (6 pieces in total)
- Layout: 3 separate baskets hung side by side on one rail; they are not joined to each other
- Piece size: 4.75 in (12.1 cm) diameter base
- Size before border: 3.3 in (8.4 cm) wall height after Round 20
- Border depth: the crown edge adds 1.2 in (3.0 cm) at the points and 0.45 in (1.1 cm) at the valleys
Materials
Use a smooth, firm, worsted-weight 100% cotton or cotton blend. Cotton holds the basket shape, survives a damp bathroom, and shows lace stitches clearly. Avoid fuzzy or very soft acrylic, because the walls will slump.
- Coral pink (one color): 160 g, about 304 m (332 yd), in a cotton of about 190 m per 100 g
- Per basket, including strap: about 45 g, 86 m (94 yd)
These quantities include a margin of about 15–20% for gauge swatching and differences in tension.
Tools:
- 5.0 mm (H-8) crochet hook
- Tapestry needle
- 2 stitch markers
- Scissors
- Measuring tape
- Pins and a spray bottle for blocking
- A wall rail or towel bar up to 1 in (2.5 cm) deep (hardware, not crocheted)
Abbreviations (US Terms)
- ch: chain
- sl st: slip stitch
- sc: single crochet
- hdc: half double crochet
- dc: double crochet
- tr: treble crochet
- BLO: back loop only
- sk: skip
- sp: space
- st(s): stitch(es)
- rep: repeat
Special stitches:
- Shell: (2 dc, ch 2, 2 dc) in the same space.
- V-st: (dc, ch 2, dc) in the same stitch.
- Post dc: in this pattern, “post” means the single vertical dc column between panels. It is worked into the top of the previous post dc. It is not a front- or back-post stitch.
Gauge and Checkpoints
- Single crochet: 16 sc and 18 rounds = 4 in (10.2 cm)
- Double crochet: 16 dc and 8 rounds = 4 in (10.2 cm)
Make one complete basket before starting the other two. Use these checkpoints as you go:
- After Round 10: the base measures 4.75 in (12.1 cm) across and lies flat.
- After Round 16: the wall stands 1.3 in (3.3 cm) tall above the BLO ridge.
- After Round 20: the wall stands 3.3 in (8.4 cm) tall.
- Finished: 4.5 in (11.4 cm) at the points and 3.75 in (9.5 cm) at the valleys.
If the base is too big (over 5 in / 12.7 cm), go down to a 4.5 mm hook. If it is too small (under 4.5 in / 11.4 cm), the roll will not fit; go up to a 5.5 mm hook. Do not change the stitch counts. The six lace repeats need exactly 60 stitches.

Basket Base
Work in joined rounds. Do not turn. Ch 1 at the start of each sc round does not count as a stitch.
- Rnd 1: Magic ring, ch 1, 6 sc in ring, sl st to first sc. (6 sts)
- Rnd 2: Ch 1, 2 sc in each st around, sl st to first sc. (12 sts)
- Rnd 3: Ch 1, sc in next st, 2 sc in next st; rep 6 times total, join. (18 sts)
- Rnd 4: Ch 1, sc in next 2 sts, 2 sc in next st; rep around, join. (24 sts)
- Rnd 5: Ch 1, sc in next 3 sts, 2 sc in next st; rep around, join. (30 sts)
- Rnd 6: Ch 1, sc in next 4 sts, 2 sc in next st; rep around, join. (36 sts)
- Rnd 7: Ch 1, sc in next 5 sts, 2 sc in next st; rep around, join. (42 sts)
- Rnd 8: Ch 1, sc in next 6 sts, 2 sc in next st; rep around, join. (48 sts)
- Rnd 9: Ch 1, sc in next 7 sts, 2 sc in next st; rep around, join. (54 sts)
- Rnd 10: Ch 1, sc in next 8 sts, 2 sc in next st; rep around, join. (60 sts)
Checkpoint: 4.75 in (12.1 cm) across, flat with no ruffling. If the edge cups, stagger the increases in Rounds 8–10 by starting each round with half the stitches before the first increase.
Lower Wall
- Rnd 11: Ch 1, sc in BLO of each st around, join. (60 sts) The unused front loops form a ridge, and the wall turns upward here.
- Rnds 12–16: Ch 1, sc in each st around, join. (60 sts)
Checkpoint: the wall is 1.3 in (3.3 cm) tall. Place a marker in any stitch at the back of the basket. This is where the strap will go later.
Lace Band
Each lace round has 6 repeats. Each repeat uses exactly 10 stitches of Round 16.
Rnd 17 (setup): Ch 3 (counts as the first post dc). Ch 2, sk next 2 sts, dc in next st, sk next st, V-st in next st, sk next st, dc in next st, ch 2, sk next 2 sts, dc in next st (post). Rep from * 4 more times, then from * to ** once. Sl st to top of beg ch-3.
- Stitches used per repeat: 1 + 2 + 1 + 1 + 1 + 1 + 1 + 2 = 10. Six repeats = 60.
- Count: 30 dc (5 per repeat) and 18 ch-2 sps (3 per repeat).
The V-stitch sits centered between two posts, with a mesh window on each side.
Rnd 18: Ch 3 (post). Ch 2, dc in next dc, shell in V-st ch-2 sp, dc in next dc, ch 2, dc in next post dc. Rep from * 4 more times, then from * to ** once, join.
- Count: 42 dc (7 per repeat) and 18 ch-2 sps (2 mesh + 1 shell per repeat).
Rnds 19–20: Ch 3 (post). Ch 2, dc in next dc, sk 2 dc, shell in shell ch-2 sp, sk 2 dc, dc in next dc, ch 2, dc in next post dc. Rep from * 4 more times, then from * to ** once, join.
- Count: 42 dc and 18 ch-2 sps in each round.
Stacking the shells makes the fern leaf, and the posts and edge dc make the straight columns.
Checkpoint: the wall is 3.3 in (8.4 cm) tall. This is the size before the border.
Make All Pieces
Make 3 baskets (Rounds 1–22, coral) and 3 straps (coral). Each basket takes about 45 g, so the set takes about 135 g plus margin.
The layout on the rail, viewed from the front:
|=========== RAIL ===========|
   [S]       [S]       [S]
  /\/\/\    /\/\/\    /\/\/\
 | B1  |   | B2  |   | B3  |
  \___/     \___/     \___/
   gap 0.75 in (1.9 cm) between baskets
S = strap, B = basket.
Strap and Attaching (Joining)
The baskets are never joined to each other. The only joining step is sewing each strap to its own basket.
Strap:
- Ch 4.
- Row 1: Sc in 2nd ch from hook and in next 2 ch. (3 sts)
- Rows 2–36: Ch 1, turn, sc in each st across. (3 sts)
- Fasten off and leave a 12 in (30.5 cm) tail.
Strap checkpoint: 0.75 in (1.9 cm) wide × 8 in (20.3 cm) long.
Attaching:
- Find the marked stitch from Round 16. Follow the post dc column above it, or the closest post, which runs up to a valley.
- Lay one strap end against the inside of the back wall, centered on that post. It should cover Rounds 19–20, an overlap of 1 in (2.5 cm).
- Whipstitch all four edges of the overlap. Work stitch to stitch: each strap edge stitch goes into the matching dc or ch-2 space behind it, so the seam is invisible from the front.
- Loop the strap over the rail, or over a pencil of the same thickness, and bring the other end down onto the first. Stack it directly on top and sew through all layers.
Tension: sew firmly but do not pull the wall inward. The lace should stay flat behind the strap.
Checkpoint: the free loop measures about 6 in (15.2 cm) of strap, and the valley at the back sits just below the rail.
Border (Crown Edge)
The border is worked directly onto Round 20. It is a shaping round plus an edging round, not a separate piece.
Border gauge: the tr peak is about 0.75 in (1.9 cm) tall, and each sc edge round adds about 0.22 in (0.6 cm).
Rnd 21 (crown shaping): Ch 1. Sc in post dc (valley), 2 sc in ch-2 sp, hdc in next dc, dc in next 2 dc, (2 tr, ch 2, 2 tr) in shell ch-2 sp, dc in next 2 dc, hdc in next dc, 2 sc in ch-2 sp. Rep 6 times total, sl st to first sc.
- Count: (7 sts worked 1-per-existing-dc) + (8 sts worked into spaces) = 15 per repeat.
- Round total: 42 + 48 = 90 sts and 6 ch-2 tips.
- Per side of each point: 7 sts (2 sc, hdc, 2 dc, 2 tr), plus the valley sc between points.
Rnd 22 (edging): Ch 1. Sk valley sc, sc in next 7 sts, (sc, ch 3, sc) in tip ch-2 sp, sc in next 7 sts. Rep 6 times total, sl st to first sc. Fasten off and weave in the ends.
- Count: (84 sc worked 1-per-stitch; 6 valley sts skipped) + (12 sc in tips) = 96 sc and 6 ch-3 picots.
- Per side of each point: 8 sc (7 + 1 tip sc).
Why the math works: 60 base stitches ÷ 6 = 10 per repeat. That gives each fern panel its own post, and each point sits exactly above a shell. The rising stitch heights (sc–hdc–dc–tr) build the slope of each point. Skipping the valley sc in Round 22 sharpens the notch between points. Because both sides of every point have the same count (7, then 8), the crown stays symmetrical.
Final Blocking
- Wet the basket and squeeze out the water in a towel. Do not wring it.
- Slide it over a can or jar about 4.75 in (12.1 cm) wide. A roll wrapped in plastic also works.
- Pull each point straight up and pinch the picot into a crisp tip.
- Open the shells and mesh windows with your fingers.
- Pin the points to the form if needed, and let the basket dry completely.
- Remove the form and check the measurements.
Final Quality-Control Checklist
- Base: 60 sts, flat, 4.75 in (12.1 cm) across
- BLO ridge is visible all the way around
- 6 posts, 6 fern panels, and 6 points, evenly spaced
- Round 21: 90 sts; Round 22: 96 sc + 6 picots
- Height: 4.5 in (11.4 cm) at the points and 3.75 in (9.5 cm) at the valleys
- Strap is centered on a back post, sewn on all edges, and invisible from the front
- All three baskets match within 0.25 in (0.6 cm)
Troubleshooting
- The base ruffles: your tension is loose or the yarn is thin. Go down a hook size or stagger the increases.
- The walls flare outward: your dc rounds are too loose. Use a smaller hook for Rounds 17–22 only.
- Fewer than 6 points: you made a counting error in Round 17. Each repeat must use exactly 10 stitches.
- Floppy, rounded points: use tr, not dc, at the tips, and block them pinned straight up.
- The basket tilts forward: the strap is off-center. Re-sew it on the middle back post.
- The roll is tight: go up a hook size for the whole basket.
Care
Hand wash in cool water with mild soap, reshape, and dry flat or over a form. Cotton may shrink slightly in a hot dryer, so avoid high heat.
Final Notes
The measurement chain works like this:
- The base reaches 4.75 in (12.1 cm) at 60 stitches.
- The lower wall adds 1.3 in (3.3 cm).
- The lace band brings the wall to 3.3 in (8.4 cm).
- The crown edge finishes at 4.5 in (11.4 cm) at the points.
If each checkpoint matches, all three baskets will match too, and they will hang evenly on the rail. Make one basket first, confirm its size, and then make the other two.
Happy crocheting!