

This little star ornament is all lines and dots. Six small solid circles mark the five points and the center. Slim chain cords connect them: spokes run out from the middle, and an outline dips gently inward between the points to shape the star.
The sample uses one color, a deep cranberry red mercerized cotton. The smooth yarn shows each stitch clearly and has a soft sheen that catches the tree lights. The look is simple and graphic, a little like a Scandinavian straw star made in yarn. It suits a traditional red-and-gold tree, and it also works as a gift topper or a window hanging.
The pattern uses US crochet terms. The finished star is about 4.8 in (12.2 cm) wide and 4.6 in (11.7 cm) tall, not counting the hanging loop. With the loop it is about 6.2 in (15.7 cm) tall.
The construction is easy to follow. You make six identical circles and join the center circle to the five point circles with chain spokes. Then you work one continuous chain outline around the five points and finish with the hanging loop. Light stiffening and pinned blocking set the star shape.
Finished Size and Construction
- Finished size: 4.8 in (12.2 cm) wide x 4.6 in (11.7 cm) tall; 6.2 in (15.7 cm) tall with the loop
- Skill level: Easy
- Terminology: US crochet terms
- Yarn weight: DK / light worsted (#3), cotton
- Hook: 3.5 mm (E-4)
- Number of pieces: 1 finished ornament, made from 6 identical circles joined with chains
- Layout: 1 center circle + 5 point circles in a five-pointed star
- Circle size: 1 in (2.5 cm) across
- Circle size before the edging round: 0.6 in (1.5 cm) across after Round 1
- Spoke length: 1 in (2.5 cm), 5 chains
- Outline side length: 1.6 in (4.1 cm), 8 chains
Materials
Choose a smooth mercerized cotton or cotton blend in DK weight. It holds its shape after stiffening and shows the chains cleanly. Avoid fuzzy or very stretchy yarns, because the chain cords will sag and the star will lose its sharp lines. A sport-weight cotton also works if you go down one hook size, but the star will come out slightly smaller.
- Cranberry red: 8 g, about 18 m (19.7 yd), for one ornament
This amount includes a comfortable margin for joining tails and a test circle. One ornament actually uses about 12 m (13.1 yd).
Tools:
– 3.5 mm (E-4) crochet hook
– Tapestry needle
– 6 locking stitch markers (or scrap yarn)
– Scissors
– Fabric stiffener or spray starch
– Blocking mat or corkboard, rustproof pins, and a paper template
Abbreviations (US Terms)
- ch – chain
- sl st – slip stitch
- sc – single crochet
- dc – double crochet
- st(s) – stitch(es)
- rnd – round
- MR – magic ring
Special technique – back-bump slip stitch: Turn the chain so the bumpy side faces you. Insert the hook under the single back bump of the next chain, yarn over, and pull through both the bump and the loop on the hook. Working back along a chain this way makes a firm, neat cord that won’t stretch.
Gauge and Checkpoints
Exact gauge isn’t critical for an ornament, but the proportions are. Make one test circle and one test chain before you start the full star. If the test circle passes, you can use it as one of your six.
- Chain gauge: 10 ch = 2 in (5.1 cm), or 5 ch = 1 in (2.5 cm), measured relaxed
- Checkpoint 1: After Round 1, the circle is 0.6 in (1.5 cm) across.
- Checkpoint 2: After Round 2, the circle is 1 in (2.5 cm) across and lies flat.
- Checkpoint 3: After the spokes, each point-circle center is 2 in (5.1 cm) from the center-circle center.
- Checkpoint 4: After the outline, the star is 4.8 in (12.2 cm) wide.
If your circle is too big or your chains are too long, go down to a 3.25 mm (D-3) hook. If it’s too small, go up to a 3.75 mm (F-5) hook. If only the chains are off, chain a little looser or tighter rather than changing the chain counts, so the proportions stay the same.
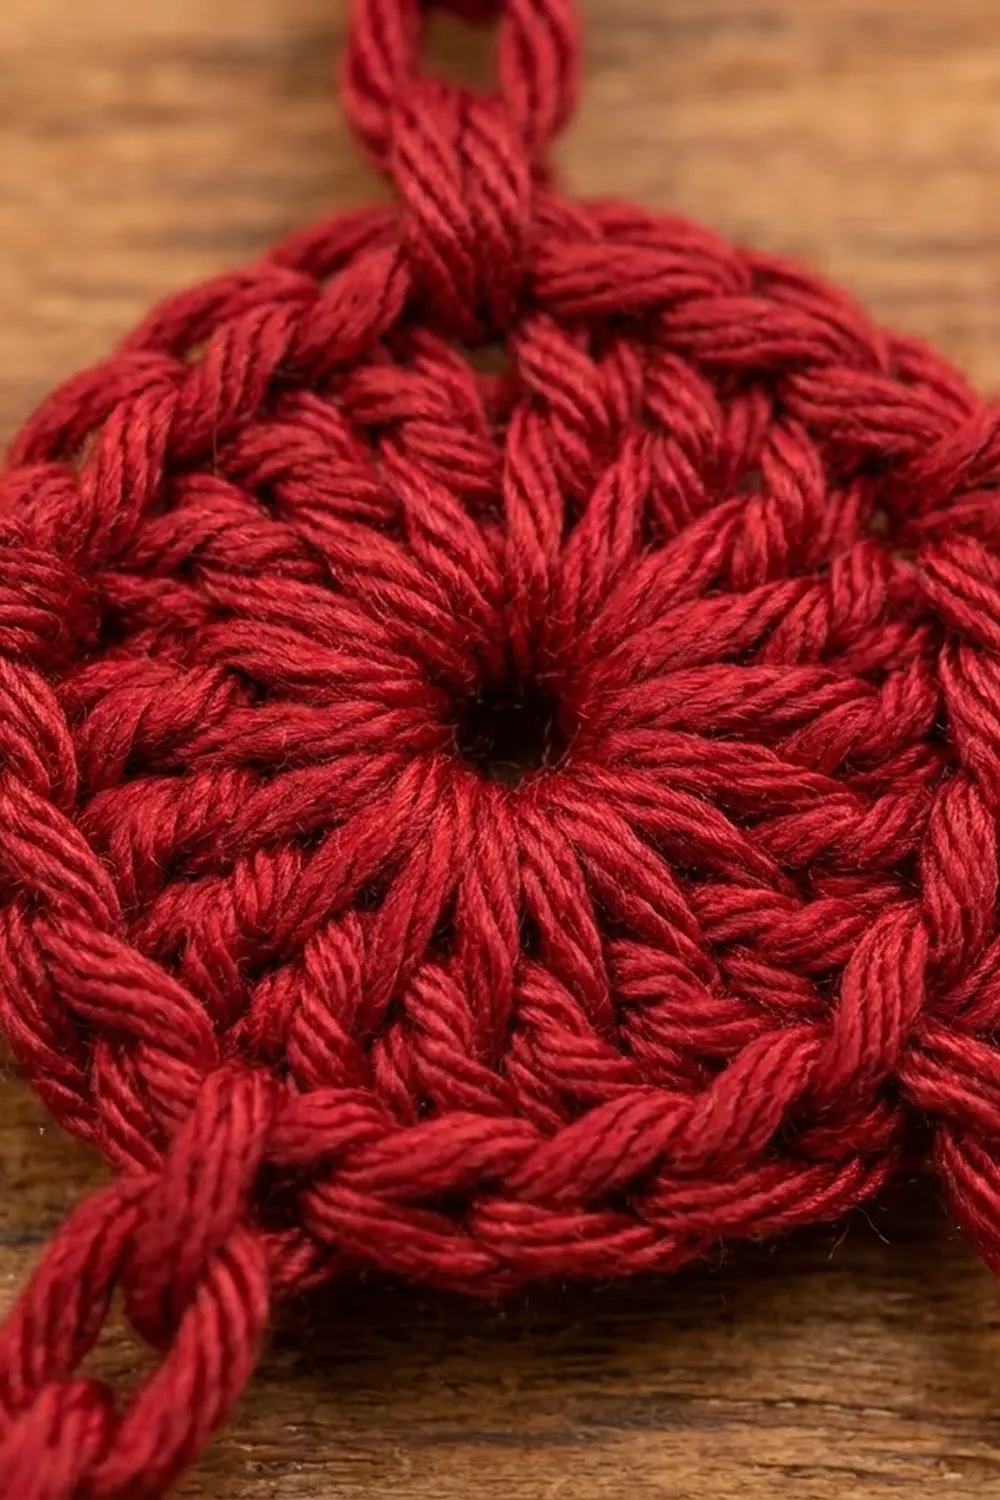
Circle Motif (Make 6)
All six circles are the same.
Round 1: Make a MR. Ch 3 (counts as the first dc), then work 9 dc into the ring. Pull the ring closed, leaving a small center hole. Sl st to the top of the beginning ch-3. (10 dc)
Checkpoint: 0.6 in (1.5 cm) across.
Round 2: Ch 1 (does not count as a st). Work 2 sc in the same st as the join, then 2 sc in each remaining st around. Sl st to the first sc. (20 sc)
This is a growth round: each of the 10 stitches gets 2 sc, so the round has 20 sc.
Checkpoint: 1 in (2.5 cm) across, flat, with no ruffling.
Fasten off, leaving a 4 in (10.2 cm) tail. Weave both tails in on the back, keeping the center hole open.
Make All Six Circles and Lay Out the Star
Make 6 cranberry red circles: 1 center circle and 5 point circles.
Draw a template on paper first. Mark a center dot. Then mark five point dots, each 2 in (5.1 cm) from the center and spaced evenly (72 degrees apart), with one dot straight up. The upper left and upper right dots will be 3.8 in (9.7 cm) apart, and the two lower dots will be 2.35 in (6.0 cm) apart.
Lay the circles right side up on the template:
             [T]

   [UL]      [C]      [UR]

        [LL]      [LR]
- C = center circle
- T = top point
- UR = upper right point
- LR = lower right point
- LL = lower left point
- UL = upper left point
Marking the circles (number the stitches counterclockwise, in the direction you worked Round 2):
– Center circle: Call the sc that faces T st 1. The anchor stitches are sts 1, 5, 9, 13, and 17: every 4th stitch, giving five evenly spaced spots.
– Each point circle: Call the sc that faces the center st 1. St 4 (3 sts after st 1) is where the outline leaves, and st 18 (3 sts before st 1) is where the outline arrives.
– Top circle only: St 11, directly opposite st 1, is the anchor for the loop.
Joining: The Spokes
The spokes join the center circle to each point. Each spoke is 5 ch, backed with 5 back-bump sl sts so it stays firm.
Join the yarn with a sl st in center-circle st 1, facing T.
Spoke 1: Ch 5, then sl st into st 1 of T. Turn and work 1 back-bump sl st in each of the 5 ch, then sl st into the same center st 1. (5 ch, 5 sl st)
Sl st in the next 4 sts of the center circle to reach st 5.
Spokes 2–5: Repeat the spoke from st 5 (to UL), st 9 (to LL), st 13 (to LR), and st 17 (to UR). Work a sl st in each of the next 4 center sts between spokes.
After Spoke 5, sl st in sts 18, 19, 20, and 1. Fasten off and weave in the tail.
Spoke totals: 5 spokes x 5 ch = 25 ch. The traveling sl sts on the center circle are 4 per section x 5 sections = 20, which takes you all the way around its 20-sc edge.
Tension advice: Keep each spoke snug but relaxed. If you pull the back-bump sl sts tight, the spoke gets shorter and the star shrinks.
Size checkpoint: Each point-circle center should be 2 in (5.1 cm) from the center-circle center. That is a 0.5 in (1.3 cm) radius + a 1 in (2.5 cm) spoke + another 0.5 in (1.3 cm) radius.
Border: Star Outline and Hanging Loop
The outline acts as this ornament’s border. It is one continuous round of chains linking the five points, worked at the same chain gauge: 5 ch = 1 in (2.5 cm). You work it clockwise around the star.
Join the yarn with a sl st in st 4 of T.
Outline round:
1. Ch 8, then sl st into st 18 of UR. (8 ch)
2. Sl st in sts 19, 20, 1, 2, 3, and 4 of UR, moving along the inner edge past the spoke. (6 sl st)
3. Repeat steps 1–2 for LR, then LL, then UL.
4. Ch 8, then sl st into st 18 of T. Sl st in sts 19, 20, 1, 2, and 3 of T, then sl st in st 4 to close the round. (8 ch, 6 sl st)
Per-side counts: Each of the 5 sides is 8 ch. Each of the 5 points has 6 traveling sl sts.
Round totals: 5 sides x 8 ch = 40 ch, plus 5 points x 6 sl st = 30 sl st.
Hanging loop: From st 4 of T, sl st in sts 5, 6, 7, 8, 9, 10, and 11 along the outer edge of T (7 sl st). Ch 16, then sl st back into st 11 (16 ch). Fasten off, leaving a 4 in (10.2 cm) tail, and weave it into the top circle. The 16-ch loop folds in half to stand 1.6 in (4.1 cm) tall.
Why the math works: Each outline side is 8 ch ÷ 5 ch per inch = 1.6 in (4.1 cm). Add the two circle radii of 0.5 in (1.3 cm) each, and the path from one point center to the next is 2.6 in (6.6 cm). The straight-line distance between neighboring point centers is only 2.35 in (6.0 cm). That extra length is what lets you pin each side about 0.5 in (1.3 cm) inward to form the concave star sides. With 7 ch, each side would lie almost straight and the star would look like a pentagon.
The outline doesn’t change the overall size. The outer points still set the star at 4.8 in (12.2 cm) wide and 4.6 in (11.7 cm) tall.
Final Blocking
- Weave in any remaining tails and trim them close.
- Soak the star in fabric stiffener (diluted as the label says), or wet it and spray it with starch.
- Gently squeeze out the extra liquid. Don’t wring it.
- Lay the star right side up over your template on a blocking mat.
- Pin the center circle over its dot. Then pin each point circle over its dot, 2 in (5.1 cm) from the center.
- Push the middle of each outline side inward and pin it so the bend sits about 1.1 in (2.8 cm) from the center of the star.
- If a spoke isn’t straight, put a pin at its midpoint.
- Shape all six circles flat and round, with their center holes open.
- Pin the hanging loop straight up.
- Let the star dry completely, usually 12–24 hours, before you remove the pins.
Final Quality-Control Checklist
- Six circles, each 1 in (2.5 cm) across with 20 sc
- Five spokes of 5 ch, each 1 in (2.5 cm) long
- Five outline sides of 8 ch, each bending evenly inward
- Star is 4.8 in (12.2 cm) wide and 4.6 in (11.7 cm) tall
- Loop is 1.6 in (4.1 cm) tall and centered on the top point
- All tails are woven in on the back
- Star lies flat and holds its shape when hung
Troubleshooting
Circles ruffle: Round 2 is too loose. Go down a hook size or tighten your sc.
Circles cup: Round 1 is too tight or has fewer than 10 dc. Recount and loosen the dc slightly.
Center hole closes up: You pulled the magic ring too tight. Leave it just open enough for the tip of a pencil.
Star is lopsided: One spoke is tighter than the others. Measure each spoke against 1 in (2.5 cm), and redo any spoke that is clearly short before blocking again.
Outline sides lie straight: The chains were worked too tight. Re-block with a firmer inward pin, or rework the outline more loosely.
Outline sides sag after drying: There wasn’t enough stiffener. Re-wet the star, use a stronger mix, and pin it again.
Ornament tilts on the tree: The loop is off-center. Check that it is anchored in st 11, directly opposite the spoke.
Care
Dust gently or spot clean with a damp cloth, then pin back into shape if needed. Store the star flat in a box between layers of tissue so the points stay crisp.

Final Notes
Every measurement in this star builds on the one before it. Each circle is 1 in (2.5 cm) across, and each 5-ch spoke adds 1 in (2.5 cm), so every point sits 2 in (5.1 cm) from the center. That spacing makes a star 4.8 in (12.2 cm) wide and 4.6 in (11.7 cm) tall. The 8-ch outline sides add just enough slack to shape the inward curves, and the 16-ch loop brings the total height to 6.2 in (15.7 cm).
Check your test circle, keep your chains even, and block over a template, and your star will come out right.
Happy crocheting!