

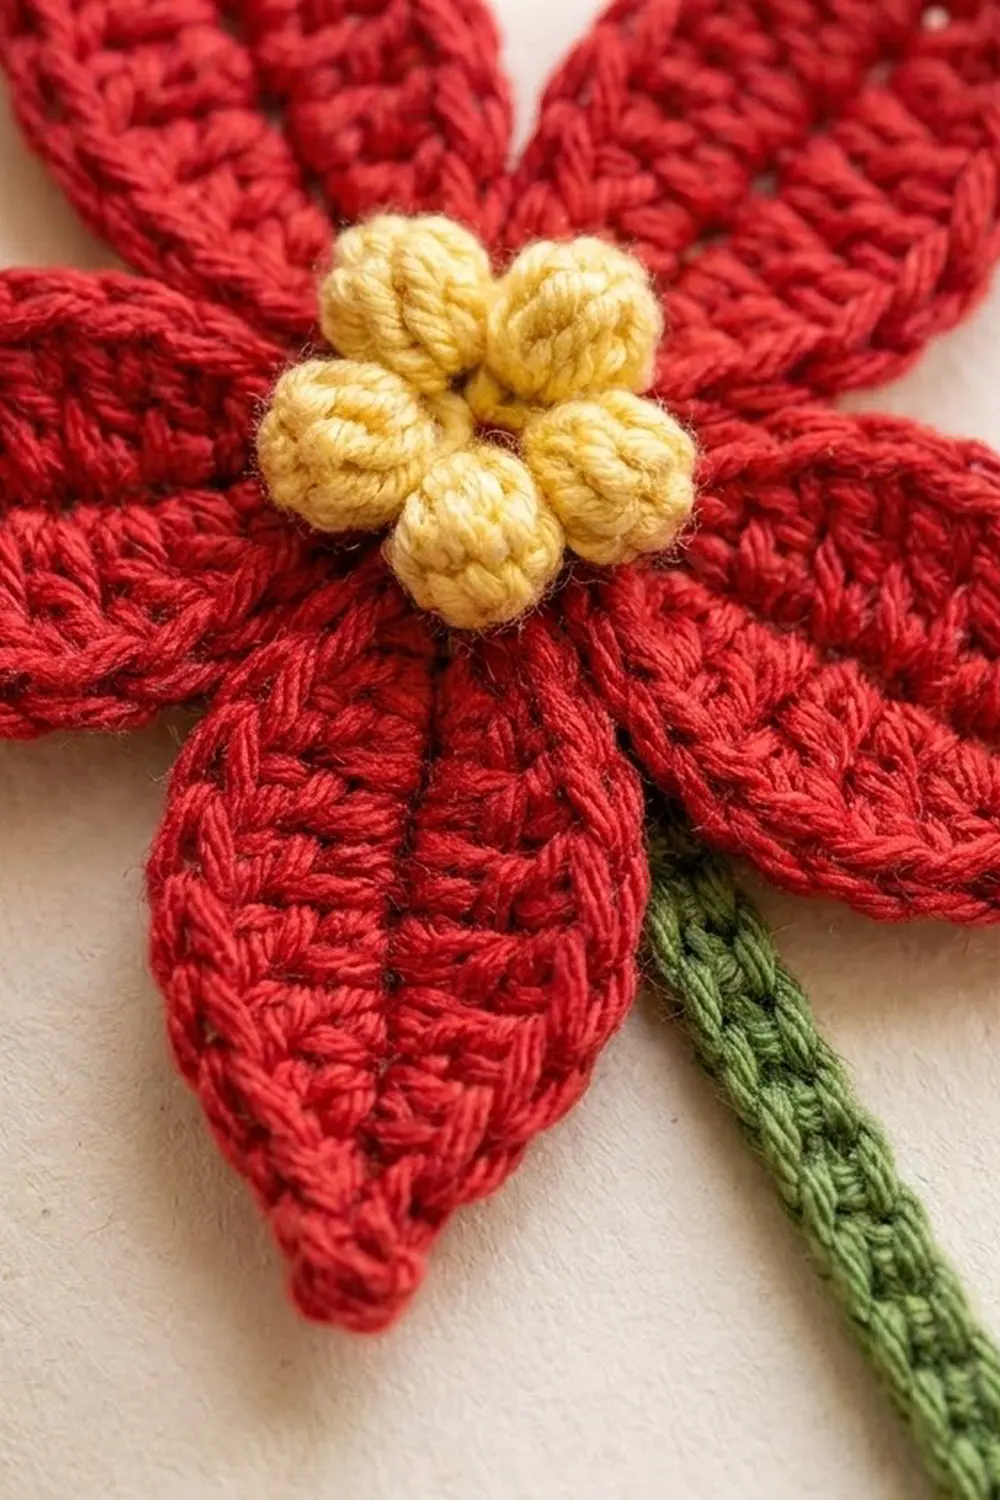
This little poinsettia bookmark brings some holiday color to any book. Five pointed red petals form a star, a ring of yellow bobbles sits in the center, and a slim green stem runs down the page to mark your place.
The palette is classic Christmas: deep red, butter yellow and moss green. A crisp single crochet outline with a small picot at every tip gives the flower a clean, finished look, so it lies flat between pages without curling.
The pattern uses US crochet terms throughout. The finished bookmark is about 8 in (20.3 cm) long, and the flower is about 3.5 in (8.9 cm) across from tip to tip.
You make five petals worked around a foundation chain, one bobble center and one stem cord. You then sew the petals into a star, work one continuous outline round around all five petals, and sew on the center and stem.
Finished Size and Construction
- Finished size: about 8 in (20.3 cm) long; flower about 3.5 in (8.9 cm) across
- Skill level: Easy
- Terminology: US crochet terms
- Yarn weight: DK / light (3), cotton or cotton blend
- Hook: 3.0 mm (US C/2 or D/3)
- Number of pieces: 7 (5 petals, 1 center, 1 stem)
- Layout: 5 petals in a star, center on top, stem behind
- Petal size: 1.5 in (3.8 cm) long × 0.75 in (1.9 cm) wide before the outline
- Flower size before border: about 3 in (7.6 cm) across
- Border depth: about 0.13 in (0.3 cm) along the sides, about 0.25 in (0.6 cm) at each tip including the picot
Materials
Use a smooth, mercerized DK cotton. It shows stitch detail clearly, holds the pointed petal shape and does not shed onto book pages. Avoid fuzzy or very stretchy yarns, because the bookmark needs to stay flat and thin.
The amounts below assume about 120 m per 50 g:
- Red (petals and outline): 8 g, about 19 m
- Yellow (center): 2 g, about 5 m
- Green (stem): 4 g, about 10 m
Tools:
– 3.0 mm crochet hook
– Tapestry needle
– Scissors
– 5 locking stitch markers
– Ruler or tape measure
– Pins and a blocking mat or folded towel
– Spray bottle with water
All yarn amounts include a margin for gauge swatches and long sewing tails.
Abbreviations (US Terms)
- ch – chain
- sl st – slip stitch
- sc – single crochet
- hdc – half double crochet
- dc – double crochet
- st(s) – stitch(es)
- RS – right side
Special stitches:
- Bobble: Yarn over, insert the hook in the stitch, yarn over and pull up a loop, yarn over and pull through 2 loops. Repeat 3 more times in the same stitch (5 loops on hook). Yarn over and pull through all 5 loops.
- Picot: Ch 3, then sl st in the 3rd ch from the hook.
- Back bump: The small horizontal bar on the back of a foundation chain.
Gauge and Checkpoints
Gauge: 16 sc = 3 in (7.6 cm) worked in back bumps of a chain, using a 3.0 mm hook.
Make one petal before you make the rest. It takes only a few minutes and tells you whether your tension will give the right final size.
Checkpoints:
- Stem gauge: 16 sc measure 3 in (7.6 cm).
- Petal after Round 1: 1.5 in (3.8 cm) from tip to base and 0.75 in (1.9 cm) at the widest point.
- Center after Round 2: about 0.75 in (1.9 cm) across.
- Flower after joining: about 3 in (7.6 cm) tip to tip.
- Flower after the outline: about 3.5 in (8.9 cm) tip to tip.
- Finished bookmark: about 8 in (20.3 cm) long.
If your test petal is too big, go down to a 2.75 mm hook. If it is too small, go up to a 3.25 mm hook. Do not change the stitch counts, because the outline math depends on them.
Petals (Make 5)
Use red. Each petal is worked in one round around both sides of a foundation chain. Short stitches at each end and taller stitches in the middle create the almond shape.
Foundation: Leaving a 6 in (15.2 cm) tail, ch 9.
Round 1 (RS):
– Side A: Sc in 2nd ch from hook, hdc in next ch, dc in next 4 ch, hdc in next ch. (7 sts, chains 1–7 counted from the tip end)
– Base: 3 sc in last ch. (3 sts)
– Side B: Rotate to work along the other side of the foundation chain. Hdc in next ch, dc in next 4 ch, hdc in next ch, sc in next ch (the same ch as the very first sc). (7 sts)
– Sl st to the first sc.
Stitch count: 17 sts (7 on Side A + 3 at the base + 7 on Side B).
Number the stitches in the order you worked them:
– Sts 1–7: Side A, from tip to base
– Sts 8–10: the three base stitches
– Sts 11–17: Side B, from base to tip
The tip sits between st 17 and st 1. Place a marker in st 9, the middle base stitch.
Fasten off, leaving an 8 in (20.3 cm) tail for sewing.
Checkpoint: The petal measures 1.5 in (3.8 cm) long and 0.75 in (1.9 cm) wide. It should come to a point at the tip and round off at the base.
Center (Make 1)
Use yellow.
Round 1: Make a magic ring. Ch 1, then work 5 sc in the ring. Pull the ring closed and sl st to the first sc. (5 sc)
Round 2: Ch 2 (does not count as a stitch). Bobble in next sc, ch 1. Repeat from * to * 4 more times. Sl st to the top of the first bobble. (10 sts: 5 bobbles + 5 ch-1 spaces)
Fasten off, leaving a 10 in (25.4 cm) tail. Push each bobble toward the RS so it sits round and plump.
Checkpoint: The center measures about 0.75 in (1.9 cm) across.
Stem (Make 1)
Use green.
Foundation: Leaving an 8 in (20.3 cm) tail, ch 33.
Row 1: Sc in the back bump of the 2nd ch from the hook and in each back bump across. (32 sc)
Fasten off and weave in the far tail only. Keep the starting tail for sewing.
Working into the back bumps leaves the front loops of the chain lying on top. This gives the stem its braided look.
Checkpoint: The stem measures 6 in (15.2 cm) long (32 sc ÷ 16 sc × 3 in = 6 in) and lies flat without twisting. If it spirals, steam it lightly while you pin it straight.
Make All Pieces
Before joining, check that you have:
- Red: 5 petals, 17 sts each, with the marker in st 9
- Yellow: 1 center, 5 bobbles
- Green: 1 stem, 32 sc
Layout (RS facing up):
              P1
     P5               P2
            [C]
       P4         P3
             |
             |
           stem
P1 points straight up, and the other petals follow clockwise at even spacing. C is the yellow center. The stem runs from behind C straight down, between P3 and P4.
Joining
Method: Whipstitch with the red tails, RS facing up.
Stitch-to-stitch logic: Set the petals in a ring with the bases touching. Going clockwise, sew st 8 of each petal to st 10 of the next petal: P1 st 8 to P2 st 10, P2 st 8 to P3 st 10, and so on, until P5 st 8 is sewn to P1 st 10. Make 2 small stitches through each pair. This closes all five base joins.
Next, run one tail through the five marked st 9 stitches, one on each petal. Pull gently to close the small hole in the middle, then knot the tail on the wrong side.
Tension: Sew snugly, but do not pull so hard that the petals tilt upward. The flower should lie flat. If the petal bases buckle, loosen the gathering thread in the middle slightly.
Remove the markers. Weave in all tails except one red tail, which you will use for the outline.
Checkpoint: The flower measures about 3 in (7.6 cm) from tip to tip. Each valley between two petals should form a clean V.
Border (Outline Round)
The outline is one continuous round of sc worked around all five joined petals. It firms up the edges and adds the picot points.
Border gauge: The same as the main gauge, 16 sc = 3 in (7.6 cm). Work 1 sc into each stitch of Round 1.
Starting count: Each petal’s outer edge has 14 stitches: Side B (sts 11–17) plus Side A (sts 1–7). The base stitches (sts 8–10) are hidden in the joins. With 5 petals, the round has 5 × 14 = 70 edge stitches. No stitches are added or skipped at the seams.
Round 1: With RS facing, join red with a sl st in st 11 of P1. Ch 1. For each petal, starting with P1 and moving clockwise:
- Sc in sts 11–17. (7 sc up Side B)
- Picot at the tip.
- Sc in sts 1–7. (7 sc down Side A)
- Move straight to st 11 of the next petal. This is the stitch sewn beside the one you just worked. Do not add a stitch in the valley.
Repeat for all 5 petals, then sl st to the first sc.
Stitch count: 70 sc + 5 picots (14 sc per petal: 7 per side).
Fasten off and weave in the tail.
Why the math works: Each petal side is only 1.5 in (3.8 cm) long and nearly straight, so working 1 sc per stitch keeps the edge flat. At the tip, the edge turns sharply, and the picot adds length exactly where it is needed without flaring the sides. In each valley, the two edges already meet at the sewn join. Adding a stitch there would make the edge ripple, and skipping one would make the petals cup. The outline adds about 0.13 in (0.3 cm) along each side and about 0.25 in (0.6 cm) at each tip including the picot. That takes the flower from 3 in (7.6 cm) to about 3.5 in (8.9 cm) across.
Attaching the Center and Stem
Center: Place the yellow center on the RS over the gathered middle. Using the yellow tail, sew through Round 1 of the center into the petal bases underneath. Stitch around the whole ring so the bobbles stay raised, then knot on the wrong side.
Stem: Turn the flower over. Lay the top 0.5 in (1.3 cm) of the stem behind the center, with the rest hanging straight down between P3 and P4. Sew it with the green tail. Your stitches should catch only the back loops of the petals and center, so nothing shows on the front.
Checkpoint: The bookmark measures about 8 in (20.3 cm) from the tip of P1 to the end of the stem.
Final Blocking
- Spritz the bookmark lightly with water until it is damp but not soaked.
- Lay it RS up on a blocking mat or folded towel.
- Pin the tip of P1 straight up. Pin the other four petal tips evenly around it, about 3.5 in (8.9 cm) across.
- Use the side of a pin to open each picot.
- Pin the stem in a straight line below the flower, checking that the total length is 8 in (20.3 cm).
- Gently shape each petal into an almond, widest at the middle.
- Leave it to dry completely, at least 4 hours.
- Unpin it and press the bookmark between the pages of a heavy book overnight for an extra-flat finish.
Final Quality-Control Checklist
- [ ] Each petal has 17 sts in Round 1.
- [ ] The outline has 70 sc + 5 picots.
- [ ] No extra stitches in the valleys.
- [ ] The center shows 5 evenly raised bobbles.
- [ ] The stem has 32 sc and measures 6 in (15.2 cm).
- [ ] The flower measures about 3.5 in (8.9 cm) tip to tip.
- [ ] The bookmark measures about 8 in (20.3 cm) long.
- [ ] No sewing stitches show on the front.
- [ ] All tails are woven in securely and trimmed.
- [ ] The bookmark lies flat with no curling.
Troubleshooting
Petals look round instead of pointed. Check that the tip uses sc, not hdc, and that the picot is pulled firmly.
Petals curl lengthwise. Your tension is too tight on the dc stitches. Go up a hook size, or block the petals more firmly.
The outline ripples. You probably added stitches in the valleys or at the base. Recount: there should be 14 sc per petal.
The outline pulls the petals into a cup. You skipped stitches, or your sc are too tight. Work the outline with a slightly looser hand.
The bobbles sink in. Push them through to the RS. When sewing, stitch only through Round 1 of the center.
The stem twists. This is common with chain-based cords. Steam it lightly and pin it straight while it dries.
There is a gap in the middle. Pull the st 9 gathering thread tighter. The center will cover any small opening.
Care
Hand wash in cool water with mild soap, press out the water in a towel, and dry flat, reshaping the petal points. Do not tumble dry.

Final Notes
The size of this bookmark depends on a short chain of measurements. A gauge of 16 sc = 3 in (7.6 cm) gives 1.5 in (3.8 cm) petals and a 6 in (15.2 cm) stem. Five joined petals make a 3 in (7.6 cm) flower. The 70-stitch outline brings it to 3.5 in (8.9 cm), and with the stem attached the bookmark finishes at about 8 in (20.3 cm). Check each measurement as you go, and the finished piece will come out right. Make a few for holiday gifts or for your own winter reading pile.
Happy crocheting!