

The Merry Sprig Holly Gift Topper is a small crochet embellishment for wrapped gifts. It has two pointed holly leaves in deep forest green and three round cherry-red berries. Tack it onto a cream ribbon bow on a kraft-paper box and you get a classic, cozy Christmas look in about an hour.
Each leaf has a ribbed texture that angles toward a raised center vein. The edge scallops into seven small picot points: three on each side and one at the tip. The berries are firm little stuffed balls. Each one has a tiny dimple where the magic ring closes, which makes it look like a real berry.
This pattern uses US crochet terms. The finished topper measures about 5.5 in (14.0 cm) wide and 3 in (7.6 cm) tall. Each leaf is 3.5 in (8.9 cm) long and 2 in (5.1 cm) wide, and each berry is 0.8 in (2.0 cm) across.
Construction is simple. You work each leaf in rounds around both sides of a foundation chain, add a pointed edging, then slip stitch a raised vein along the center. The berries are tiny stuffed spheres worked in the round. Finally, you sew the five pieces into one cluster.
Finished Size and Construction
- Finished size (assembled topper): 5.5 in (14.0 cm) wide x 3 in (7.6 cm) tall
- Skill level: Easy (advanced beginner)
- Terminology: US crochet terms
- Yarn weight: Worsted (#4), cotton or cotton blend
- Hook: 4.0 mm (G-6)
- Number of pieces: 5 (2 leaves, 3 berries)
- Layout: 2 leaves in a shallow V, with 3 berries in a point-up triangle at the center
- Piece size: each leaf 3.5 in (8.9 cm) x 2 in (5.1 cm); each berry 0.8 in (2.0 cm)
- Leaf size before border: 3 in (7.6 cm) x 1.6 in (4.1 cm)
- Border depth: about 0.2 in (0.5 cm) along the edge, with picot points reaching about 0.25 in (0.6 cm) further
Materials
Choose a smooth worsted-weight cotton or cotton blend. Cotton holds the pointed edges crisply and shows the ribbed texture clearly. Soft acrylic also works, but the points will be a little rounder.
Yarn (for one topper):
- Forest Green: 10 g, about 17 m (two leaves)
- Cherry Red: 5 g, about 9 m (three berries)
These quantities include a margin for your gauge swatch and weaving in ends. If you’re making a batch of toppers, multiply by the number you need. The margin then easily covers small differences in gauge.
Tools and extras:
- 4.0 mm (G-6) crochet hook
- Tapestry needle
- A small pinch of fiberfill (or yarn scraps) for the berries
- Stitch marker
- Scissors
- Pins and a blocking surface
- Optional: 24 in (61.0 cm) of 1 in (2.5 cm) cream ribbon for the bow, plus extra ribbon to wrap the box
Abbreviations (US Terms)
- ch – chain
- sl st – slip stitch
- sc – single crochet
- hdc – half double crochet
- dc – double crochet
- sc2tog – single crochet 2 together
- st(s) – stitch(es)
- Rnd – round
- MR – magic ring
Special stitches:
- Picot: ch 3, sl st in the 3rd ch from the hook. A picot isn’t counted as a stitch.
- Point: (hdc, picot, hdc) all in the same st. A point counts as 2 sts.
Gauge and Checkpoints
Gauge: 18 sc and 20 rows = 4 in (10.2 cm) with a 4.0 mm hook.
Gauge matters here because the leaves and berries have to fit together neatly. Make one leaf first and check it against these sizes:
- Foundation chain (13 ch): about 2.75 in (7.0 cm) long
- After Rnd 1: 2.75 in (7.0 cm) x 1.1 in (2.8 cm)
- After Rnd 2: 3 in (7.6 cm) x 1.6 in (4.1 cm)
- After Rnd 3 (border): 3.5 in (8.9 cm) x 2 in (5.1 cm), measured point to point
- Berry: 0.8 in (2.0 cm) across after stuffing
If your leaf is too big: go down to a 3.5 mm (E-4) hook. If it’s too small: go up to a 4.5 mm (7) hook. Keep the berries on the same hook as the leaves so the pieces stay in proportion.
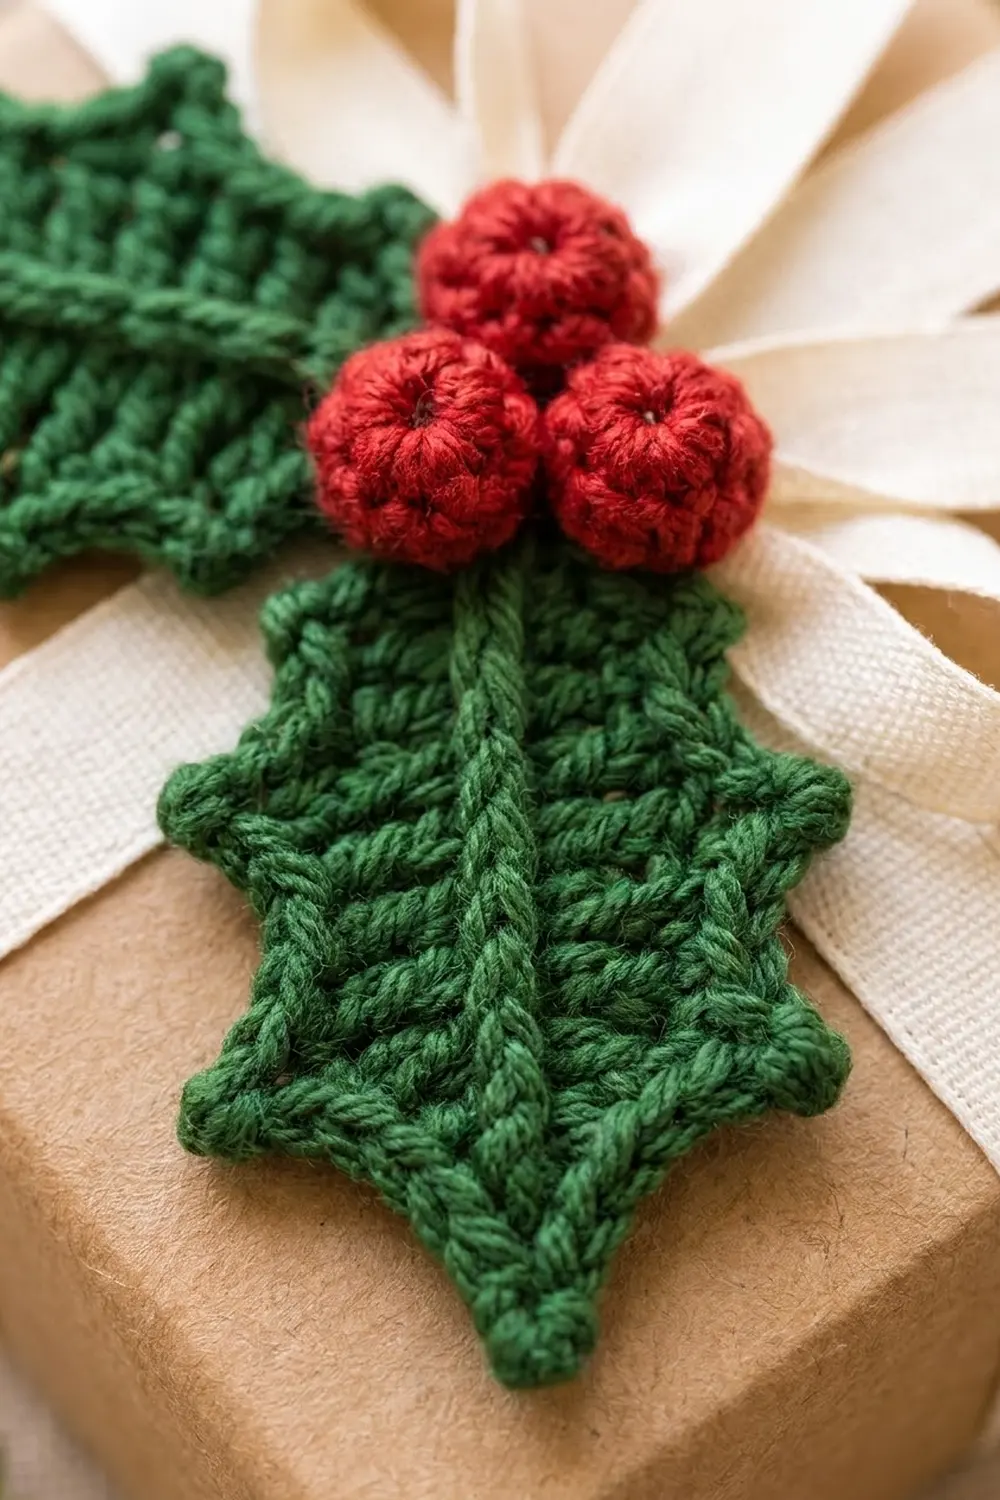
Leaf (Make 2)
Use Forest Green. You work around both sides of the foundation chain, so the chain becomes the center line of the leaf.
Foundation: Ch 13.
Rnd 1: Sc in the 2nd ch from the hook, hdc in the next ch, dc in each of the next 8 ch, hdc in the next ch, 3 sc in the last ch (this is the tip). Rotate and work along the other side of the chain: hdc in the next ch, dc in each of the next 8 ch, hdc in the next ch, sc in the last ch (the same ch as the first sc). Sl st to the first sc to join. (25 sts)
That’s 11 sts along side A, 3 sts around the tip, and 11 sts along side B. The tall dc in the middle and the shorter stitches at each end give you the classic tapered leaf shape.
Checkpoint: 2.75 in (7.0 cm) x 1.1 in (2.8 cm).
Rnd 2 (growth round): Ch 1 (doesn’t count as a st). Work the round like this:
- 2 sc in the first st
- sc in the next st
- hdc in each of the next 8 sts
- sc in each of the next 2 sts
- 3 sc in the next st (the center st of the tip)
- sc in each of the next 2 sts
- hdc in each of the next 8 sts
- sc in the next st
- 2 sc in the last st
Sl st to the first sc to join. (29 sts)
Count the Rnd 2 sts this way: 14 sts along side A, 1 center tip st (the middle sc of the 3-sc group), and 14 sts along side B. The hdc sections line up with the dc sections below them, which keeps the angled, ribbed texture.
Checkpoint: 3 in (7.6 cm) x 1.6 in (4.1 cm). Don’t fasten off. Go straight on to the Rnd 3 border below.
Berry (Make 3)
Use Cherry Red. Work in continuous rounds and place a marker in the first st of each round.
- Rnd 1: 6 sc in an MR. Pull the ring tight. (6 sts)
- Rnd 2: 2 sc in each st around. (12 sts)
- Rnd 3: Sc in each st around. (12 sts)
- Rnd 4: Sc in each st around. (12 sts)
Stuff firmly with a small pinch of fiberfill or yarn scraps.
- Rnd 5: Sc2tog 6 times. (6 sts)
Fasten off, leaving a 6 in (15.2 cm) tail. Thread the tail through the front loops of the last 6 sts and pull tight to close. Keep the tail for sewing. The tightened magic ring on top forms the small center dimple.
Checkpoint: 0.8 in (2.0 cm) across, firm and round.
Make All Pieces
For one topper you need:
- Forest Green: 2 leaves, both with Rnd 3 border and center vein finished
- Cherry Red: 3 berries, stuffed and closed
Layout grid (front view):
  [Leaf A tip]               [Leaf B tip]
        \                         /
         \                       /
          [Leaf A base][Leaf B base]
                [Berry 1]
           [Berry 2][Berry 3]
Leaf A points up and to the left and Leaf B points up and to the right. Each leaf sits about 30 degrees above horizontal. Berry 1 sits on top of the spot where the leaves overlap, and Berries 2 and 3 sit just below it, side by side.
Joining
Both leaves must have their Rnd 3 border and center vein finished before you join them.
Method: Whipstitch with a Forest Green tail, then tack the berries on with their own red tails.
Stitch-to-stitch logic:
- Lay Leaf B’s base over Leaf A’s base so the 2 base sl sts of each leaf line up. On each leaf, those are the sl sts worked into the 2 sc of the Rnd 2 base increase.
- Whipstitch the overlapped base sl sts together: 2 sts on top joined to 2 sts underneath.
- Open the leaves into a shallow V, tips up and outward. Add 2 or 3 tacking stitches about 0.4 in (1.0 cm) up from the base so the angle holds.
- Sew Berry 1 over the center of the overlap, going through the base of the berry and both leaf layers.
- Sew Berries 2 and 3 just below Berry 1, side by side, so the three berries touch.
Tension: Pull each stitch just snug. If you pull too hard, the leaves will cup and the berries will sink into them. If you leave the stitches too loose, the berries will wobble.
Size checkpoint: The assembled topper should measure about 5.5 in (14.0 cm) wide from tip to tip and 3 in (7.6 cm) tall. If it’s narrower, open the V a little. If it’s wider, close it.
Border (Leaf Edging, Rnd 3)
The border goes around each leaf separately. Work it straight after Rnd 2, before joining. A continuous border around the open V would distort the holly shape.
Border gauge: Same hook and gauge as the leaf. The border adds about 0.2 in (0.5 cm) along the edge, and the points reach about 0.25 in (0.6 cm) further.
Rnd 3:
- Base: Sl st in each of the next 2 sts. (2 sts used, 2 sl sts made)
- Side A: [Sc in the next st, hdc in the next st, Point in the next st, sl st in the next st] 3 times. (12 sts used)
- Tip: Point in the center tip st. (1 st used)
- Side B: [Sl st in the next st, Point in the next st, hdc in the next st, sc in the next st] 3 times. (12 sts used)
- Base: Sl st in each of the last 2 sts. (2 sts used)
Join with a sl st to the first sl st. Don’t fasten off yet; first work the vein (below).
Counts per side:
- Side A, including its 2 base sl sts: 14 sts worked into, which gives 17 sts and 3 picots.
- Tip: 1 st worked into, which gives 2 sts and 1 picot.
- Side B, including its 2 base sl sts: 14 sts worked into, which gives 17 sts and 3 picots.
- Round total: 29 sts worked 1 per existing st, plus 7 extra sts (the second hdc of each point) = 36 sts and 7 picots.
Why the math works: Each side of Rnd 2 has exactly 14 sts. That’s 2 base sts plus three 4-st repeats (2 + 12 = 14). The single center tip st takes the tip point. Side B mirrors side A in reverse order, so the points line up symmetrically. The sl st in each repeat pulls the edge inward between points, which makes the scalloped holly lobes.
Center vein: After you join Rnd 3, ch 1. Then, with the right side facing, work a surface sl st along the foundation chain, from the base to the start of the tip. That’s 12 surface sl sts, 1 per foundation chain. Fasten off, leaving a 10 in (25.4 cm) tail on one leaf for joining. This makes the raised center vein.
Checkpoint: 3.5 in (8.9 cm) x 2 in (5.1 cm), measured point to point.
Final Blocking
- Lightly mist both leaves with water.
- Pin each leaf flat to 3.5 in (8.9 cm) x 2 in (5.1 cm), with one pin in each of the 7 picot points.
- Straighten the center vein so it runs from base to tip.
- Let them dry completely.
- Don’t block the berries. Just roll each one gently between your palms to round it out.
- After joining, press the topper flat under a book for a few minutes so the leaves settle into the V.
Final Quality-Control Checklist
- Each leaf has 7 crisp picot points (3 per side plus the tip).
- Each leaf measures 3.5 in (8.9 cm) x 2 in (5.1 cm).
- The center vein is straight and raised on the right side.
- Both leaves are mirror images in size and shape.
- Each berry is 0.8 in (2.0 cm) across, firm, and fully closed.
- The berries form a point-up triangle that covers the leaf overlap.
- The assembled topper is 5.5 in (14.0 cm) x 3 in (7.6 cm).
- All ends are woven in, with no tails showing on the front.
Troubleshooting
- The leaf curls lengthwise: Your foundation chain is too tight. Chain with a hook one size larger, then switch back.
- The leaf ruffles: Check the Rnd 2 count (29 sts). An extra st at the tip or base is the usual cause.
- The points are blunt: Pull each picot sl st snug, and pin each point while blocking.
- The points don’t line up: Count 14 sts per side in Rnd 2 before you start Rnd 3.
- The berries are lumpy: Use less stuffing and spread it evenly before Rnd 5.
- Stuffing shows through: Go down a hook size for the berries only, and make sure the stuffing color is close to red.
Care
Spot clean with cool water and mild soap, then lay flat to dry. Reshape the points while the leaves are damp.

Final Notes
Here’s the measurement chain at a glance:
- The 13-ch foundation measures 2.75 in (7.0 cm).
- Rnd 1 has 25 sts and measures 2.75 in (7.0 cm) x 1.1 in (2.8 cm).
- Rnd 2 has 29 sts and measures 3 in (7.6 cm) x 1.6 in (4.1 cm).
- The Rnd 3 border has 36 sts and 7 picots, bringing each leaf to 3.5 in (8.9 cm) x 2 in (5.1 cm).
- The 12-st berries finish at 0.8 in (2.0 cm).
- Sewn together, the five pieces make a 5.5 in (14.0 cm) x 3 in (7.6 cm) topper.
If you check each stage along the way, every topper in your batch will match. Then tie on a cream ribbon bow and your gifts are ready.
Happy crocheting!