

The Peach Pinwheel Lace Curtain Panel is a light, airy panel made from round lace motifs. Each motif has eight curved blades that swirl out from a small open center, with a ring of chain loops around them. Once the motifs are joined into a grid, the spaces between the circles become a lacy net that lets window light through the whole panel.
The sample uses one soft peach shade in mercerized DK cotton. A single color keeps the look calm and lets the pinwheel texture stand out. The style is romantic and a little vintage. It suits a bedroom, a reading nook, or any window where you want privacy without blocking the light.
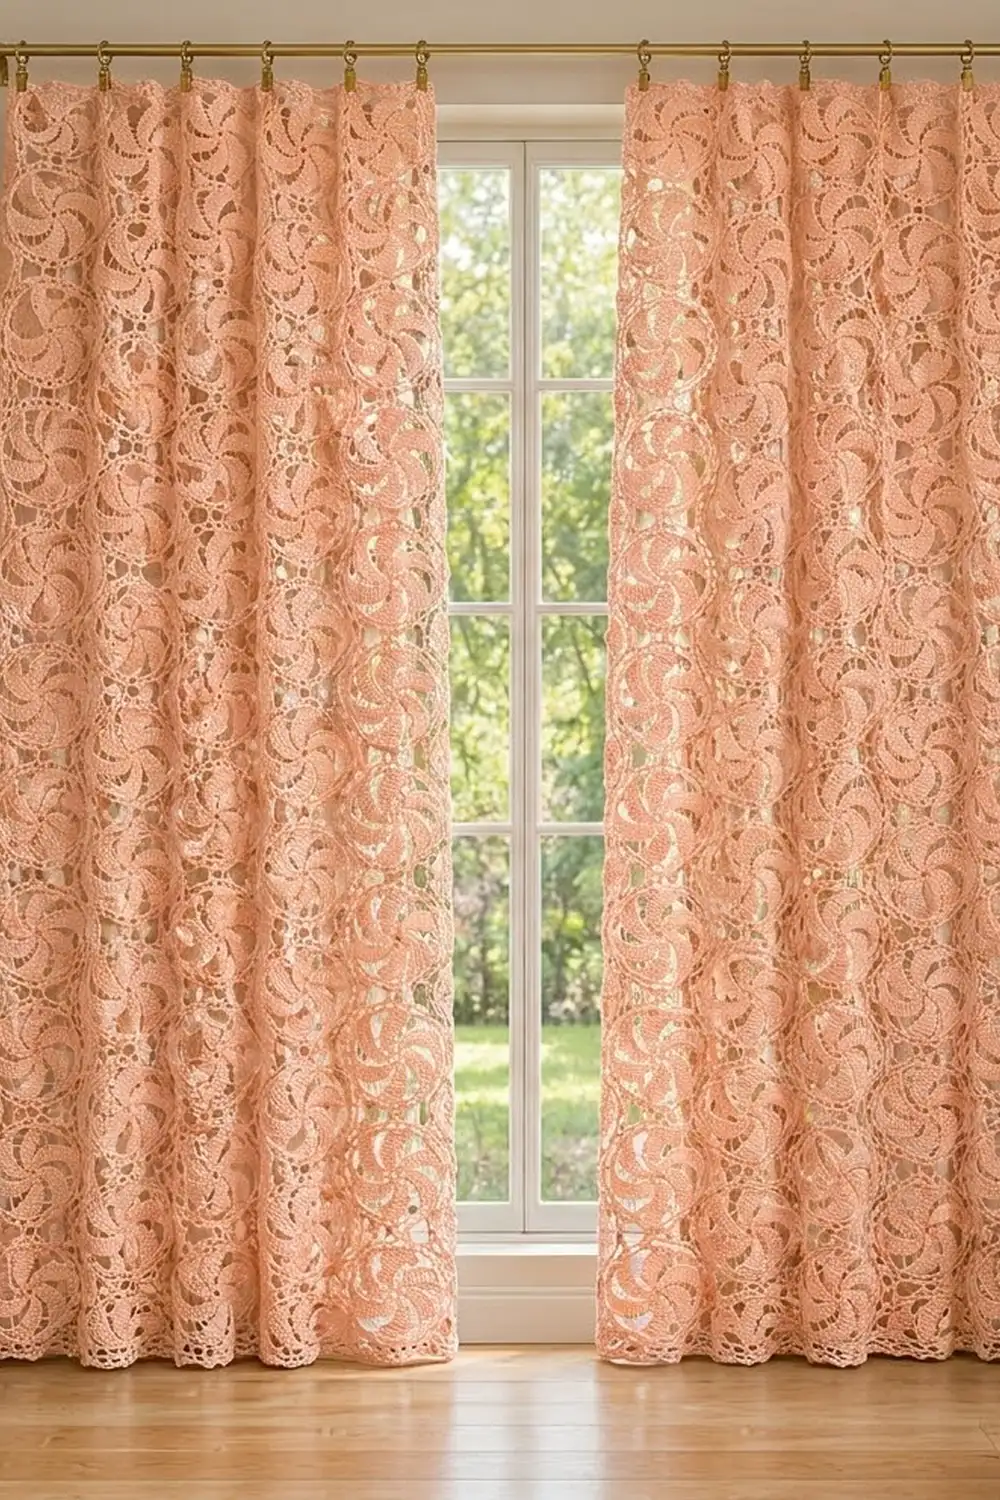
This pattern uses US crochet terms. One finished panel measures 42 x 82 inches (106.7 x 208.3 cm) after blocking. The photo shows a matching pair, so make two panels for a standard window.
The construction is easy to follow. You crochet a 5-inch (12.7 cm) pinwheel motif and join each new motif to its neighbors on the last round (join-as-you-go). When all 128 motifs are joined, you work a three-round border that straightens the edges and finishes them with shell scallops. The panel hangs from clip rings, so you don’t need to sew a rod pocket.
Finished Size and Construction
- Finished size (one panel): 42 x 82 in (106.7 x 208.3 cm)
- Skill level: Intermediate
- Terminology: US
- Yarn weight: DK (light, #3) mercerized cotton
- Hook: US G-6 (4.0 mm)
- Number of pieces: 128 motifs per panel (256 for a pair)
- Layout: 8 motifs wide x 16 motifs tall
- Motif size: 5 in (12.7 cm) diameter, blocked
- Size before border: 40 x 80 in (101.6 x 203.2 cm)
- Border depth: 1 in (2.5 cm) on every side
Materials
Choose a smooth mercerized cotton or cotton blend in DK weight, about 110-120 m per 50 g. Cotton holds the blade shapes crisply and hangs straight. Avoid fuzzy yarns, because they hide the swirl.
- Peach (single color): 900 g / 2,030 m per panel; 1,800 g / 4,060 m for a pair
These amounts include a margin of about 15% to cover gauge differences and test motifs.
Tools:
- US G-6 (4.0 mm) crochet hook
- Tapestry needle
- Scissors
- Stitch markers (at least 4)
- Rust-proof pins and a large blocking surface (foam mats or a bed with a towel)
- Spray bottle
- Measuring tape
- Clip rings for hanging (8 per panel)
Abbreviations (US Terms)
- ch – chain
- sl st – slip stitch
- sc – single crochet
- hdc – half double crochet
- dc – double crochet
- sk – skip
- sp – space
- st(s) – stitch(es)
- rep – repeat
- RS – right side
Special stitch – Joining loop (JL): Ch 2, sl st into the matching ch-5 loop of the neighboring motif, ch 2. A JL replaces a ch 5 on Round 6 and makes one join point.
Shell: 5 dc in the same stitch.
Gauge and Checkpoints
Make one complete motif and block it before you start the panel. Gauge matters here: a small difference in one motif multiplies across 8 motifs of width and 16 of length.
Motif diameter checkpoints (lightly pressed flat):
- After Round 1: 1.25 in (3.2 cm)
- After Round 2: 2 in (5.1 cm)
- After Round 3: 2.75 in (7.0 cm)
- After Round 4: 3.5 in (8.9 cm)
- After Round 5: 4.25 in (10.8 cm)
- After Round 6, blocked: 5 in (12.7 cm)
Border gauge: 18 sc = 4 in (10.2 cm).
If your blocked motif is larger than 5 in (12.7 cm), go down one hook size to 3.75 mm. If it is smaller, go up to 4.5 mm. A difference of 0.25 in (0.6 cm) per motif changes the panel width by 2 in (5.1 cm), so correct it before you go on.
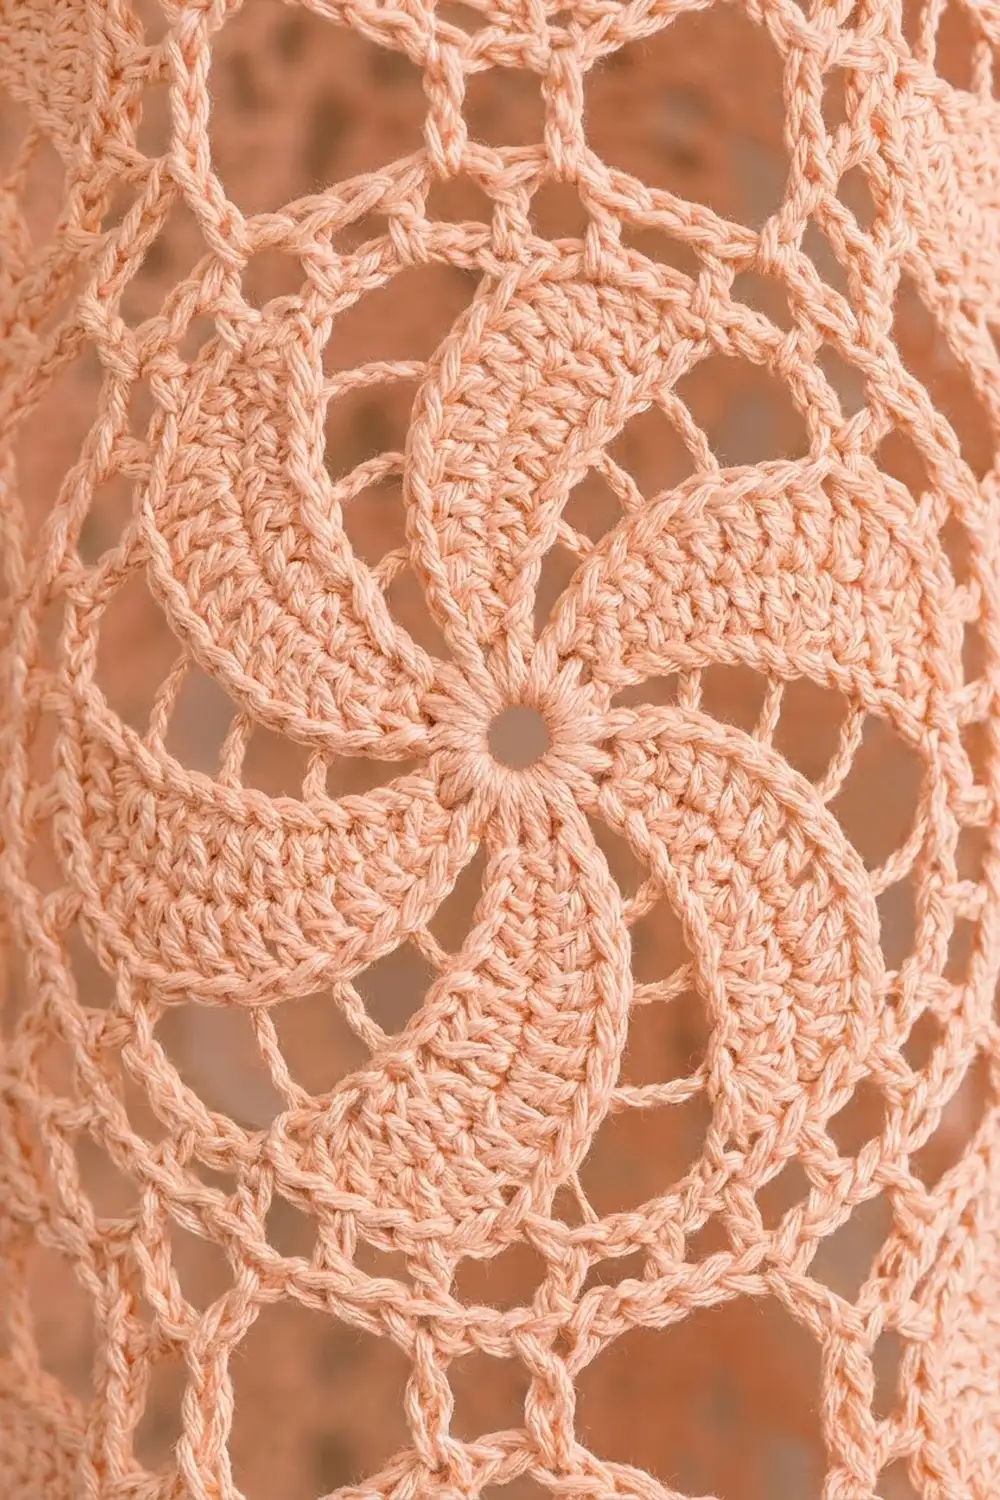
Pinwheel Motif
Ch 5, sl st in first ch to form a ring.
Round 1: Ch 3 (counts as dc throughout), 15 dc in ring, sl st to top of ch-3. (16 dc)
Round 2: Ch 3, dc in same st, dc in next st, ch 2, 2 dc in next st, dc in next st, ch 2; rep from * 6 more times, sl st to top of ch-3. (24 dc in 8 blades of 3 dc; 8 ch-2 sps)*
Round 3: Sl st in next 2 dc and into next ch-2 sp. Ch 3, dc in same sp, dc in next 2 dc, sk last dc of blade, ch 2, 2 dc in next ch-2 sp, dc in next 2 dc, sk 1 dc, ch 2; rep from * 6 more times, sl st to top of ch-3. (32 dc in 8 blades of 4 dc; 8 ch-2 sps)*
Each blade now starts one space earlier and drops its last stitch. That shift turns the wedges into a swirl.
Round 4: Sl st in next 3 dc and into next ch-2 sp. Ch 3, dc in same sp, dc in next 2 dc, hdc in next dc, sk last dc, ch 3, 2 dc in next ch-2 sp, dc in next 2 dc, hdc in next dc, sk 1 dc, ch 3; rep from * 6 more times, sl st to top of ch-3. (40 sts in 8 blades of 4 dc + 1 hdc; 8 ch-3 sps)*
The hdc at the end of each blade makes the pointed, tapered tip.
Round 5: Sl st in next 2 sts (you are now in the center dc of the blade). Ch 1, sc in same st, ch 4, sc in next ch-3 sp, ch 4, sk next 2 sts, sc in next st, ch 4, sc in next ch-3 sp, ch 4; rep from * 6 more times, sl st to first sc. (16 sc; 16 ch-4 loops)*
Round 6 (first motif only): Sl st into first ch-4 loop, ch 1, sc in same loop, ch 5, sc in next ch-4 loop, ch 5; rep from * 14 more times, sl st to first sc. Fasten off. (16 sc; 16 ch-5 loops)*
Loop numbering: The ch-5 loop made right after the first sc is Loop 1; number the rest in order up to Loop 16. With RS facing, turn the motif so Loops 16 and 1 are centered at the top. Then:
- Top pair: Loops 16 and 1
- Left pair: Loops 4 and 5
- Bottom pair: Loops 8 and 9
- Right pair: Loops 12 and 13
- Diagonal loops (2-3, 6-7, 10-11, 14-15) stay free and frame the open spaces between motifs.
(Left-handed crocheters: your motif is a mirror image, so swap “left” and “right.”)
Make All Pieces
Make 128 motifs per panel in Peach, or 256 for the pair. Complete the first motif in full. Work every other motif through Round 5, then join it on Round 6.
Layout for one panel (motifs numbered in joining order):
Row 1:   [1][2][3][4][5][6][7][8]
Row 2:   [9][10][11][12][13][14][15][16]
Row 3:   [17]..........................[24]
...
Row 16:  [121].........................[128]
That is 8 motifs per row and 16 rows.
Joining
Join as you go on Round 6. Work Round 6 in the normal loop order, but wherever a loop joins a neighbor, replace its ch 5 with a JL (ch 2, sl st into the neighbor, ch 2).
Stitch-to-stitch logic: Each pair of matching loops are mirror images of each other.
- Joining to a motif on the left: new Loop 4 joins neighbor Loop 13; new Loop 5 joins neighbor Loop 12.
- Joining to a motif above: new Loop 16 joins upper Loop 9; new Loop 1 joins upper Loop 8.
In Row 1, every motif except Motif 1 joins only on the left. In later rows, the first motif joins only above. All other motifs join above and on the left, using four JLs each. By the end, every interior motif is joined on all four sides, so it is held at 8 points.
Tension: Keep the sl st of each JL relaxed, no tighter than your chains. A tight join pulls the circles together, puckers the lace, and shortens the panel. Don’t twist the neighbor’s loop. Insert the hook from the RS so all joins face the same way.
Size checkpoint: After Row 4, lay the piece flat and measure it. It should be 40 in (101.6 cm) wide and 20 in (50.8 cm) tall. The finished grid should measure 40 x 80 in (101.6 x 203.2 cm).
Border
Border gauge: 18 sc = 4 in (10.2 cm).
Each edge motif gives exactly 4 loops to the side it sits on, one quarter of its circle:
- Top side: Loops 15, 16, 1, 2
- Left side: Loops 3, 4, 5, 6
- Bottom side: Loops 7, 8, 9, 10
- Right side: Loops 11, 12, 13, 14
At each dip between two edge motifs, each motif has one loop outside that side’s quarter. These two loops stay unworked and hang as lace under the bridge chain. Each panel corner falls between two quarters of the corner motif, so no loop is counted twice.
Round 1: With RS facing, join yarn in Loop 15 of the top-right corner motif and work along the top toward the left. For each motif: 3 hdc in its first edge loop, 3 sc in each of the next 2 loops, 3 hdc in its last edge loop (12 sts). Between motifs, ch 11 across the dip to the next motif. After the last motif on a side, ch 2 for the corner, then work the next side the same way. Sl st to first hdc.
- Top and bottom: (8 x 12) + (7 x 11) = 96 + 77 = 173 sts each
- Left and right: (16 x 12) + (15 x 11) = 192 + 165 = 357 sts each
- Plus 4 corner ch-2 sps (not counted in the side totals)
Round 2: Ch 1, sc in each st and each ch along every side, 3 sc in each corner ch-2 sp, sl st to first sc.
- Top and bottom: 173 sts each
- Left and right: 357 sts each
- Corners: 3 sc each
- Total: (2 x 173) + (2 x 357) + 12 = 1,072 sts
Round 3 (shell scallops): Ch 1. Along each side: sc in first st, *sk 1, shell in next st, sk 1, sc in next st; rep from * across the side. At each corner: sk first corner sc, 7 dc in center corner sc, sk third corner sc. Sl st to first sc. Fasten off.
- Top and bottom: 43 shells and 44 sc each
- Left and right: 89 shells and 90 sc each
- Corners: one 7-dc fan each
Why the math works: The motifs are spaced 5 in (12.7 cm) apart, center to center. Each motif’s 12 edge stitches plus one 11-ch bridge make 23 sts. At 4.5 sts per inch, that is 5.1 in (13.0 cm), which is a close match. Each side has one bridge fewer than it has motifs, so the top has 8 x 23 – 11 = 173 sts. The corner stitches cover the curve of the corner motifs. For the shells, 173 = (4 x 43) + 1 and 357 = (4 x 89) + 1. So every side starts and ends with a sc, and the corners fit without any adjustment.
Rounds 1 and 2 add about 0.5 in (1.3 cm) and the shells add about 0.5 in (1.3 cm), for a 1 in (2.5 cm) border.
Final Blocking
- Weave in all ends along the back of the blades, not through the open chain loops.
- Soak the panel in cool water for 15 minutes. Squeeze gently; do not wring.
- Roll it in towels to remove excess water.
- Lay it flat on your blocking surface, RS up. Work in sections if needed.
- Pin the four corners first, to 42 x 82 in (106.7 x 208.3 cm).
- Pin the straight edges every 2-3 in (5.1-7.6 cm), then pin each shell point.
- Open up the motif centers and use your fingers to ease each blade into its curve.
- Let it dry completely before unpinning, usually 24-48 hours.
Final Quality-Control Checklist
- Every motif has 8 blades, all swirling the same direction.
- Every interior motif is joined at 8 points, with no missed JLs.
- The panel measures 42 x 82 in (106.7 x 208.3 cm).
- The top and bottom each have 43 shells; each side has 89.
- Each of the four corners has one 7-dc fan.
- Ends are hidden and trimmed, and no tails show against the light.
- The top edge is straight enough to clip evenly.
Troubleshooting
Motif cups: Your chains are too tight. Loosen the ch-3 and ch-4 spaces or go up a hook size.
Motif ruffles: Make sure you skip the last dc of each blade on Rounds 3 and 4.
Blades look like wedges, not swirls: You started the blades in the blade stitches instead of the ch-sp. Each blade must begin in the space before it.
Joins pucker: Your sl sts are too tight. Keep them as loose as a chain.
Border ripples: Your sc are looser than gauge. Go down a hook size for the border only.
Border pulls in: Loosen the 11-ch bridges or go up a hook size for Round 1.
Shell count is off: Recount Round 2. Each side must have 173 or 357 sts before you start the shells.
Care
Hand wash in cool water with mild detergent and dry flat, reshaping the motifs while damp. Don’t hang the panel while it’s wet, because the weight stretches the lace.
Final Notes
The measurement chain is short. A 5 in (12.7 cm) motif builds a 40 x 80 in (101.6 x 203.2 cm) grid, and the 1 in (2.5 cm) border brings the panel to 42 x 82 in (106.7 x 208.3 cm). Check your first motif and measure again after Row 4; if both are right, the rest will be too. Space the 8 clip rings about 5 in (12.7 cm) apart along the top, one over each motif, so the pinwheels hang evenly.
Happy crocheting!