

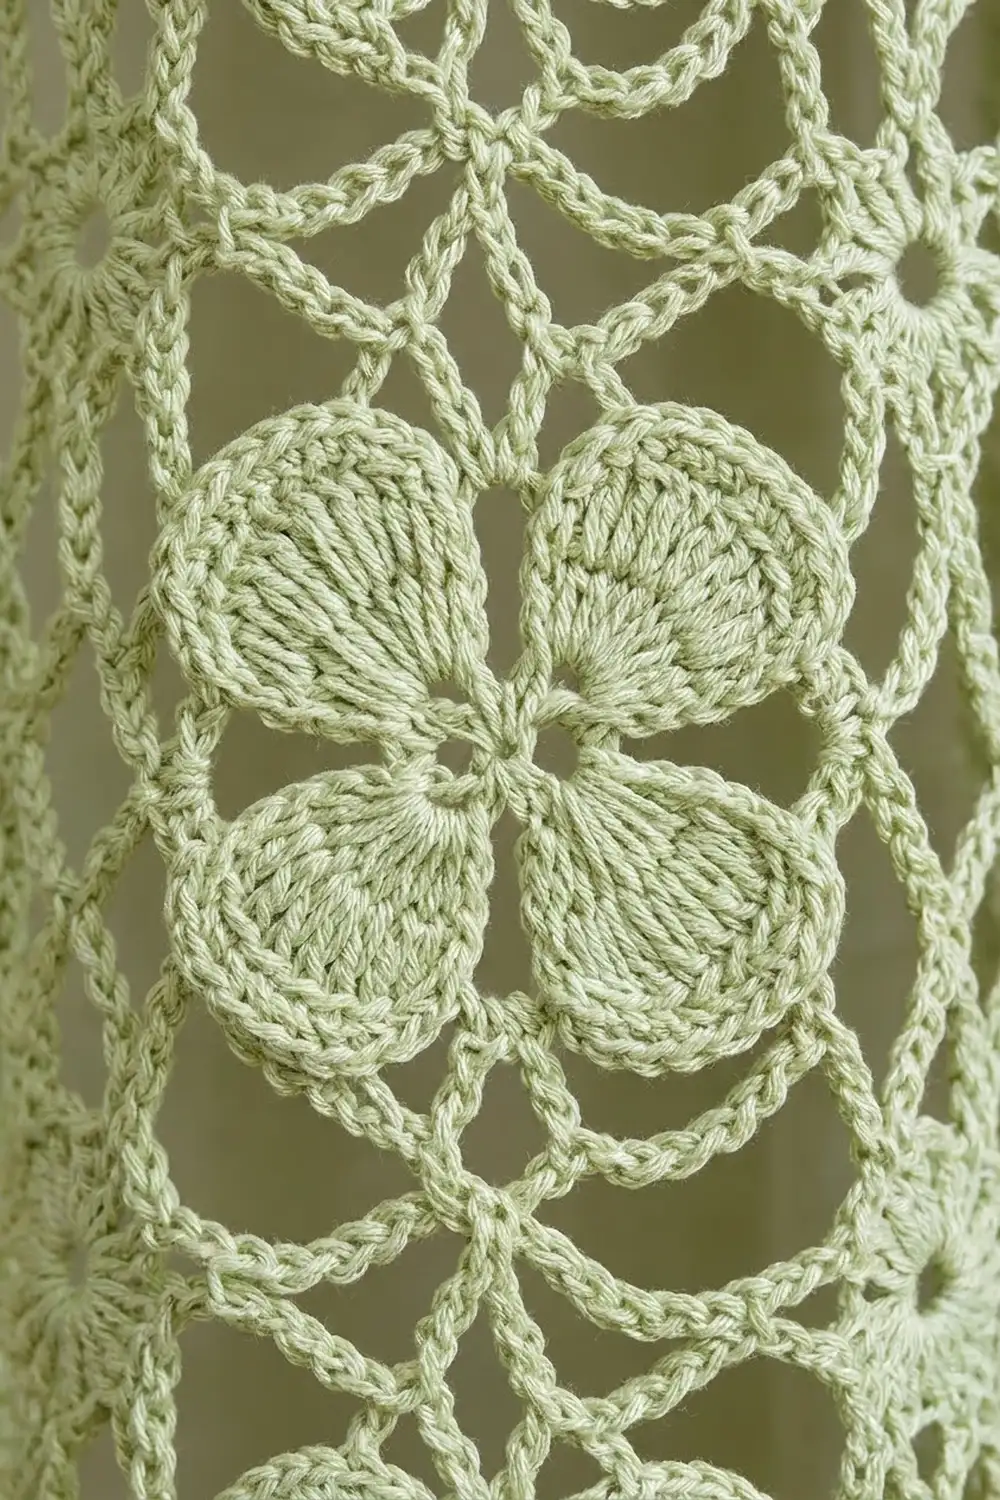
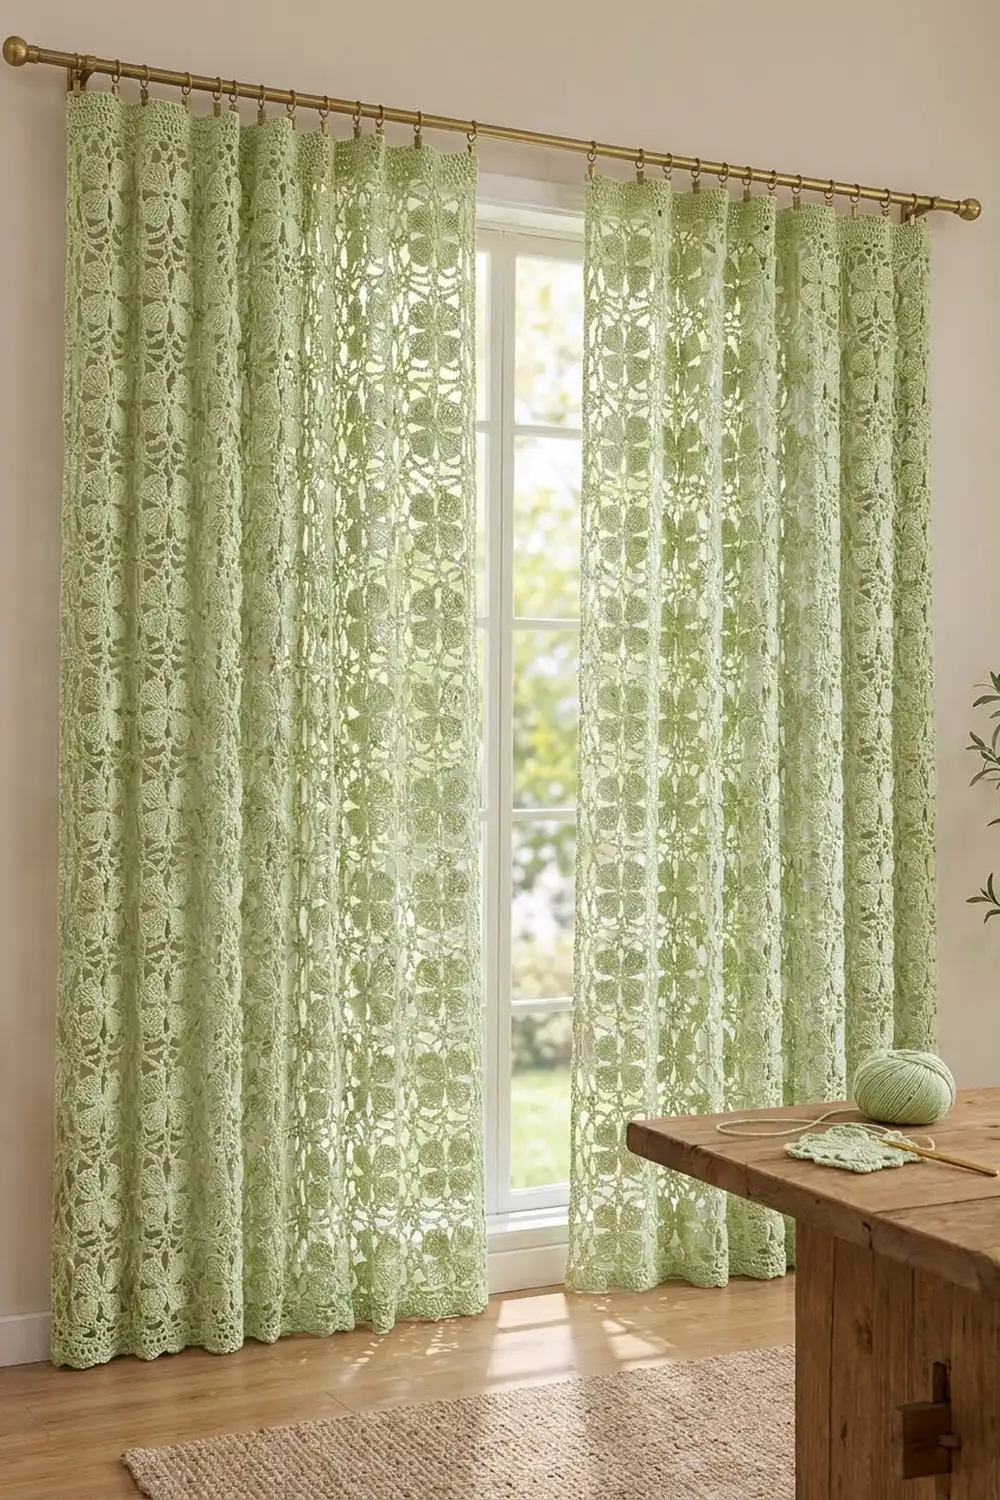
The Sage Clover Lace Curtain is a light, airy window panel made from small square lace motifs. Each motif has a solid four-petal flower in the center, framed by open chain loops. The panel looks like rows of soft flowers floating in a net. Light comes through the loops, and the petals give the fabric enough body to hang straight.
The design uses one color: a soft sage green cotton DK yarn. The look is calm, botanical and slightly vintage. It suits a bedroom, a kitchen or a sunny living-room window.
This pattern uses US crochet terms. One finished panel measures 41.5 in wide x 83 in long (105.4 cm x 210.8 cm) after blocking. Make two panels for a pair, as shown.
The construction is simple. You work one 5 in (12.7 cm) motif in the round. Each motif after that joins to its neighbors on its last round (join-as-you-go). A 3-round single crochet border frames the panel. A 4-row half double crochet band across the top gives the curtain clips something firm to grip.
Finished Size and Construction
- Finished size (one panel): 41.5 in x 83 in (105.4 cm x 210.8 cm)
- Skill level: Intermediate
- Terminology: US crochet terms
- Yarn weight: DK (light, #3) cotton
- Hook: 3.5 mm (US E-4)
- Number of pieces: 128 motifs per panel (256 for a pair)
- Layout: 8 motifs wide x 16 motifs tall
- Motif size: 5 in x 5 in (12.7 cm x 12.7 cm)
- Size before border: 40 in x 80 in (101.6 cm x 203.2 cm)
- Border depth: 0.75 in (1.9 cm) on all sides, plus a 1.5 in (3.8 cm) top band
Materials
Choose a smooth mercerized or combed cotton DK. Cotton holds the petal shape and blocks crisply. It also stretches less than acrylic under its own weight. Avoid fuzzy or very soft yarns, because they blur the chain loops.
- Sage green, cotton DK (about 115 m per 50 g): 900 g / 2,070 m per panel; 1,800 g / 4,140 m for a pair
Tools:
- 3.5 mm (US E-4) crochet hook
- Tapestry needle
- Stitch markers
- Scissors
- Blocking mats and rust-proof pins
- Spray bottle
- Measuring tape
- Curtain rod with clip rings (about 12 per panel)
The quantities include a margin of about 8% over the calculated amount. Buy all your yarn from one dye lot. A color shift is very easy to see in a large single-color panel.
Abbreviations (US Terms)
- ch – chain
- sl st – slip stitch
- sc – single crochet
- hdc – half double crochet
- dc – double crochet
- tr – treble crochet
- sp – space
- st(s) – stitch(es)
- rep – repeat
- RS – right side
Special stitch – Petal: In the indicated ch-3 sp, work (2 dc, 7 tr, 2 dc). One Petal = 11 sts. The center tr is the 6th stitch of the Petal.
Joining loop: Ch 2, sl st into the matching ch-5 loop of the finished neighbor motif, ch 2. This replaces one ch-5 loop on the motif you are working.
Gauge and Checkpoints
Make one complete motif first. Block it and measure it before you commit to 128.
- Rnd 1: about 0.75 in (1.9 cm) across
- Rnd 3 (flower): about 3 in (7.6 cm) across the petals
- Rnd 4: about 4 in (10.2 cm) square
- Rnd 5 (finished motif): 5 in x 5 in (12.7 cm x 12.7 cm) from outer edge to outer edge, after blocking
Border gauge: 24 sc = 5 in (12.7 cm), or 4.8 sc per inch (2.54 cm).
If your motif is larger than 5 in (12.7 cm), use a hook 0.25 mm smaller. If it is smaller, use a hook 0.25 mm larger. Being off by only 0.25 in (0.6 cm) per motif adds up to 2 in (5.1 cm) across the width and 4 in (10.2 cm) down the length, so this step matters.
Motif Pattern
Rnd 1
Ch 4, then sl st in the first ch to form a ring. Ch 1, work 8 sc in the ring, and sl st in the first sc to join. (8 sc)
Rnd 2
Ch 1, sc in the same st, ch 3, skip the next st. Sc in the next st, ch 3, skip the next st; rep from * 2 more times. Sl st in the first sc to join. (4 sc, 4 ch-3 sps)*
Rnd 3 – Petals
Sl st in the next ch-3 sp. Ch 3 (counts as dc), then work dc, 7 tr and 2 dc in the same sp, and sc in the next sc. Work a Petal in the next ch-3 sp, then sc in the next sc; rep from * 2 more times. Sl st in the top of the beginning ch-3 to join. (4 Petals of 11 sts + 4 sc = 48 sts)*
The 4 sc anchor the space between the petals, so each Petal stands as its own rounded fan. Together, the four fans form the clover-like flower.
Rnd 4 – Inner Frame
Sl st in the next 5 sts to reach the center tr of the first Petal. Ch 1, then work (sc, ch 5, sc) in the center tr. Ch 7, sc in the next sc between Petals, ch 7, then work (sc, ch 5, sc) in the center tr of the next Petal; rep from * 2 more times, ending the last rep at . Sl st in the first sc to join. (12 sc, 4 corner ch-5 sps, 8 ch-7 sps)*
Each Petal tip now becomes a corner, so the petals point diagonally into the four corners of the square.
Rnd 5 – Outer Loops (first motif only)
Sl st in the next corner ch-5 sp. Ch 1, then work (sc, ch 5, sc) in the same sp. [Ch 5, sc in the next ch-7 sp] twice, ch 5, then work (sc, ch 5, sc) in the next corner sp; rep from * 2 more times, ending the last rep at . Sl st in the first sc to join, then fasten off. (16 sc and 16 ch-5 loops: 4 corner loops + 12 side loops, 3 per side)*
Each side now has a corner loop at each end and 3 side loops between them.
Make All Pieces
You need 128 motifs per panel, all in sage green. Work Rnds 1–4 the same way for every motif. Only Rnd 5 changes when you join.
Layout for one panel (8 wide x 16 tall; M = one motif):
Row 1:  M M M M M M M M   (top)
Row 2:  M M M M M M M M
...     (Rows 3-15 the same)
Row 16: M M M M M M M M   (bottom)
Work across Row 1 from left to right, then start Row 2 at the left again. Each new motif joins to the motif on its left and the motif above it.
Joining
Use the join-as-you-go method on Rnd 5.
Joining one side: Work Rnd 5 as usual until you reach the side that touches a finished motif. At the shared corner, work sc, then a Joining loop into the neighbor’s corner loop, then sc. Along the side, replace each of the 3 side ch-5 loops with a Joining loop, slip stitching into the matching side loop of the neighbor. Join the next shared corner the same way.
Joining two sides: Join the top side to the motif above and the left side to the motif on the left, using the same method.
Four-way corners: Where four motifs meet, sl st into the existing join point in the center instead of making a new loop. This locks all four corners together at one spot.
Stitch-to-stitch logic: Always join loop to loop: 3 side loops to 3 side loops and corner loop to corner loop. Never skip or double a loop, or the rows will drift out of line.
Tension: Work the ch 2 on each side of the joining sl st at your normal chain tension. Tight joins make the panel pucker, and loose joins leave a visible gap line between motifs.
Size checkpoint: Row 1 should measure 40 in (101.6 cm) wide when laid flat without stretching. After 4 rows, the panel should measure 20 in (50.8 cm) tall.
Border
Border gauge: 4.8 sc per inch (2.54 cm), or 24 sc per motif side.
On each motif side, Rnd 1 puts 3 sc in each corner loop and 6 sc in each of the 3 side loops: 3 + 18 + 3 = 24 sc. These 24 sc include that side’s corner-loop stitches at both ends. Where two motifs meet on the edge, each motif’s corner loop gets its own 3 sc. No extra stitches are added at the seams.
- Top and bottom edges: 8 motifs x 24 sc = 192 sc
- Left and right edges: 16 motifs x 24 sc = 384 sc
Rnd 1
With the RS facing, join the yarn in the top right corner loop of the panel. Ch 1, then work (3 sc, ch 2, 3 sc) in that loop. Work along each side with 3 sc in each corner loop and 6 sc in each side loop. At each panel corner, work (3 sc, ch 2, 3 sc) in the corner loop. Sl st in the first sc to join. (192 sc on the top and bottom, 384 sc on each long side, 4 corner ch-2 sps; 1,152 sc total)
Rnd 2
Ch 1, sc in each sc around, working (sc, ch 2, sc) in each corner ch-2 sp. Sl st in the first sc to join. (194 sc on the top and bottom, 386 sc on each long side; 1,160 sc total)
Rnd 3
Repeat Rnd 2. (196 sc on the top and bottom, 388 sc on each long side; 1,168 sc total) Do not fasten off.
Why the math works: At 4.8 sc per inch (2.54 cm), 192 sc fit exactly across 40 in (101.6 cm), and 384 sc fit exactly along 80 in (203.2 cm). The edge lies flat without ruffling or pulling in. Each later round adds 1 sc at each end of every side, which is what the corner turn needs.
Top Band
Sl st into the top right corner ch-2 sp, so you are ready to work across the top edge.
Row 1: Ch 2 (does not count as a st), then hdc in each of the 196 sc across the top edge. Turn. (196 hdc)
Rows 2–4: Ch 2, hdc in each hdc across. Turn. (196 hdc)
Fasten off. The band is about 1.5 in (3.8 cm) deep. It stays the same width as the panel because the stitch count does not change.
Finished size:
– Width: 40 in + 0.75 in + 0.75 in = 41.5 in (105.4 cm)
– Length: 80 in + 0.75 in + 0.75 in + 1.5 in = 83 in (210.8 cm)
Final Blocking
- Weave in all ends along chain loops or inside the sc border, so they don’t show against the light.
- Lay the panel on blocking mats, working in sections if needed.
- Pin the four corners first, to 41.5 in x 83 in (105.4 cm x 210.8 cm).
- Pin along the border every 4 in (10.2 cm), and check that the edges are straight.
- Gently open each motif so the petals lie flat and the side loops form clean arches.
- Mist evenly until damp, not soaking.
- Let the panel dry completely, ideally for 24 hours, before unpinning.
- Hang the panel from clip rings spaced evenly along the top band, about every 3.5 in (8.9 cm).
Final Quality-Control Checklist
- Every motif has 4 Petals of 11 sts and 16 outer loops.
- All petals point diagonally into the motif corners.
- No joins between motifs are skipped or doubled.
- All four-way corners meet at one center point.
- Border Rnd 3 has 196 sc on the top and bottom and 388 sc on each long side.
- The top band has 4 rows of 196 hdc.
- The panel measures 41.5 in x 83 in (105.4 cm x 210.8 cm) after blocking.
- All ends are secure and hidden.
Troubleshooting
Petals cup instead of lying flat: Your tr are too tight. Relax your tension, or use a hook 0.25 mm larger for Rnd 3 only.
Motif is not square: Check that each corner is worked in the center tr of a Petal, which is the 6th of its 11 sts.
Panel is wider at the bottom than the top: Your joining tension changed as you worked. Measure each row against the 40 in (101.6 cm) checkpoint.
Border ruffles: You are working more than 6 sc in some side loops. Recount one motif side to 24 sc.
Border pulls in: Your sc are too tight. Use a hook 0.5 mm larger for the border only.
Curtain sags between clips: Add more clip rings or move them closer together.
Care
Hand wash in cool water with a mild detergent, then dry flat and reshape to size. Don’t hang the panel to dry while it’s wet, because cotton lace stretches under its own weight.
Final Notes
The whole curtain follows one chain of measurements. One motif blocks to 5 in (12.7 cm). Eight motifs make 40 in (101.6 cm) across, and sixteen make 80 in (203.2 cm) down. At 24 sc per motif side, the border starts with 192 sc and 384 sc. Three border rounds and a 4-row top band bring the panel to 41.5 in x 83 in (105.4 cm x 210.8 cm). If your first motif is the right size, the rest of the panel will be too.
Happy crocheting!