

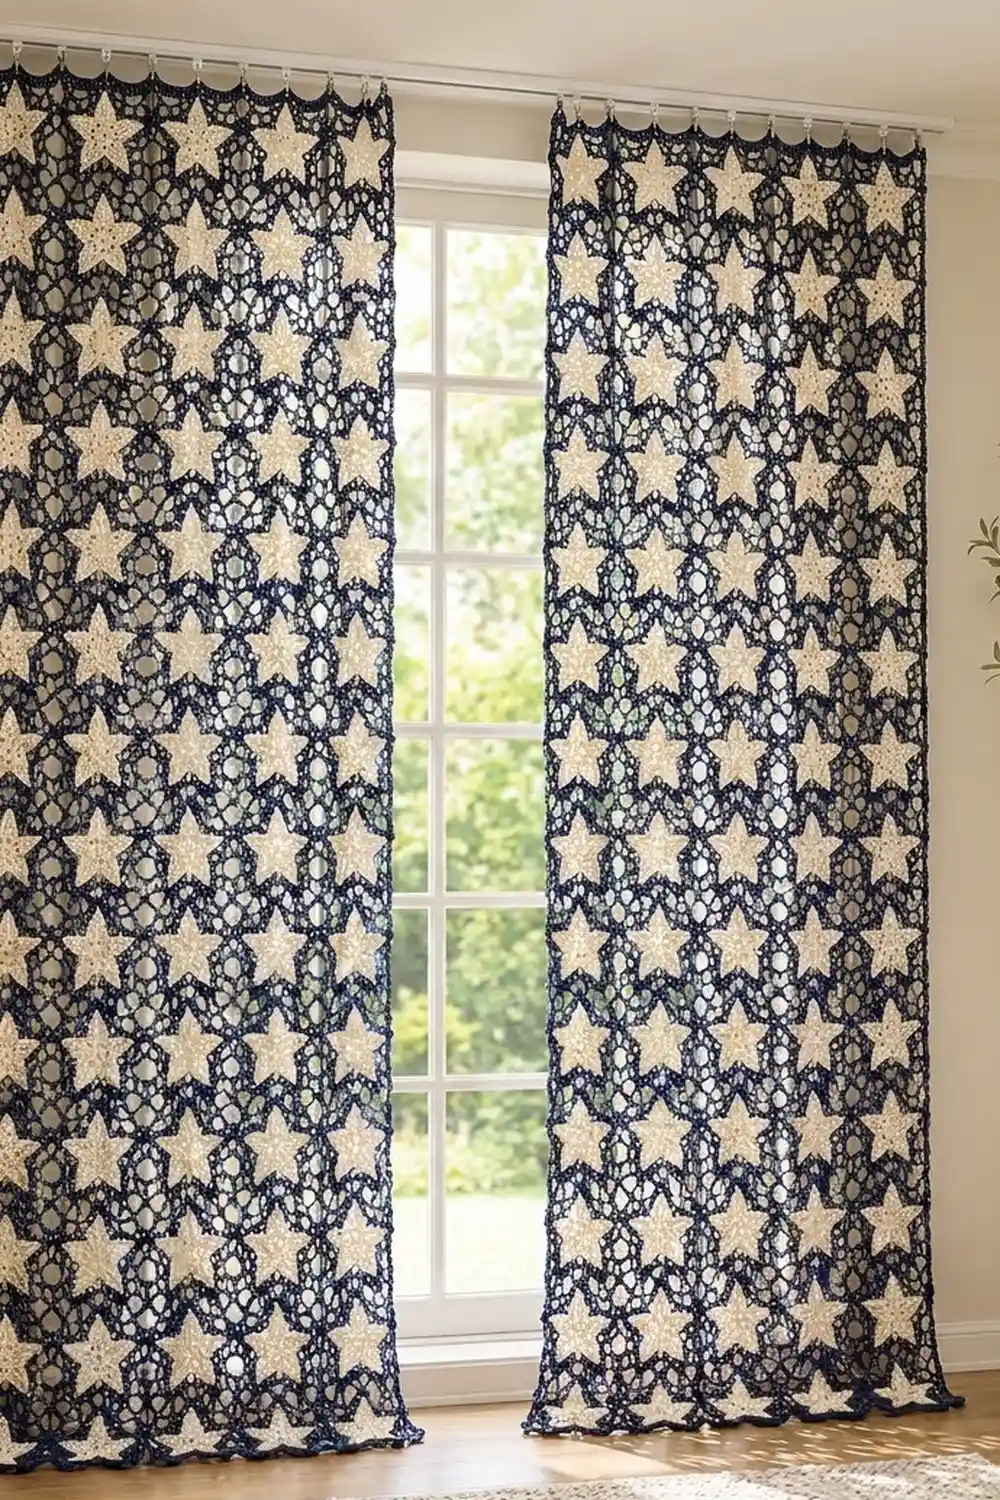
These curtain panels pair cream five-pointed stars with an airy navy mesh. Each star sits inside its own mesh square, and once the squares are joined the navy loops form one continuous lattice. Light comes through the open loops while the solid stars keep a strong graphic shape.
The palette is two colors: deep navy for the mesh, seams, and border, and soft cream for the stars. The style is somewhere between farmhouse lace and modern geometric. It works in a living room, a bedroom, or a nursery with a celestial theme.
This pattern uses US crochet terms. Each finished panel measures 30 in (76.2 cm) wide by 80.75 in (205.1 cm) long, not counting the hanging loops. The pattern makes two matching panels.
Here is how it comes together. You crochet each motif in the round: first the cream star, then three navy rounds that turn it into a square with a solid single crochet edge. You join the motifs with slip stitches into a grid 4 motifs wide by 11 tall, then add a two-round navy border and a row of hook loops along the top.
Finished Size and Construction
- Finished panel size: 30 in (76.2 cm) wide × 80.75 in (205.1 cm) long
- Skill level: Intermediate
- Terminology: US
- Yarn weight: Worsted weight (#4) cotton
- Hook: 5.0 mm (H-8)
- Number of pieces: 88 motifs (44 per panel), 2 panels
- Layout: 4 motifs across × 11 motifs down, per panel
- Motif size: 7.25 in (18.4 cm) square
- Panel size before border: 29 in (73.7 cm) × 79.75 in (202.6 cm)
- Border depth: 0.5 in (1.3 cm) per side, plus 1 in (2.5 cm) hook loops on the top edge
Materials
Choose a smooth, firm worsted weight cotton or cotton blend. Cotton holds the star points crisp, resists stretching under its own weight, and launders well. Avoid very drapey yarns such as bamboo or superwash merino, because a long panel will sag. These estimates assume about 170 m per 100 g.
- Navy: 850 g (approx. 1,445 m) for the mesh, seams, and borders on both panels
- Cream: 500 g (approx. 850 m) for 88 stars
Both quantities include a margin of roughly 10–15% for gauge differences and swatching.
Tools:
– 5.0 mm (H-8) crochet hook
– Tapestry needle
– Stitch markers
– Scissors
– Tape measure
– Blocking mats and rust-proof pins
– Spray bottle
– 16 curtain hooks or clips (8 per panel)
Abbreviations (US Terms)
- ch – chain
- sl st – slip stitch
- sc – single crochet
- dc – double crochet
- sc2tog – single crochet 2 together
- dc2tog – double crochet 2 together
- sp(s) – space(s)
- st(s) – stitch(es)
- RS – right side
Special stitch – dc2tog: Yarn over, insert the hook in the next st, pull up a loop, yarn over and draw through 2 loops. Yarn over, insert the hook in the following st, pull up a loop, yarn over and draw through 2 loops. Yarn over and draw through all 3 loops on the hook.
Gauge and Checkpoints
Make one complete motif before you start production. Block it lightly and measure it.
- Base gauge: 16 sc = 4 in (10.2 cm) in the navy edge round
- After Star Round 2: center circle about 2.25 in (5.7 cm) across
- After Star Edging: star about 4.75 in (12.1 cm) from tip to tip
- After Mesh Round 1: about 5.5 in (14.0 cm) across
- After Mesh Round 2: about 6.75 in (17.1 cm) square
- After Mesh Round 3: 7.25 in (18.4 cm) square, with 29 sc per side
If your motif is larger than 7.25 in (18.4 cm), go down to a 4.5 mm hook. If it is smaller, go up to a 5.5 mm hook. Being off by 0.25 in (0.6 cm) on one motif becomes 2.75 in (7.0 cm) over the panel length, so check gauge before you make all 88.
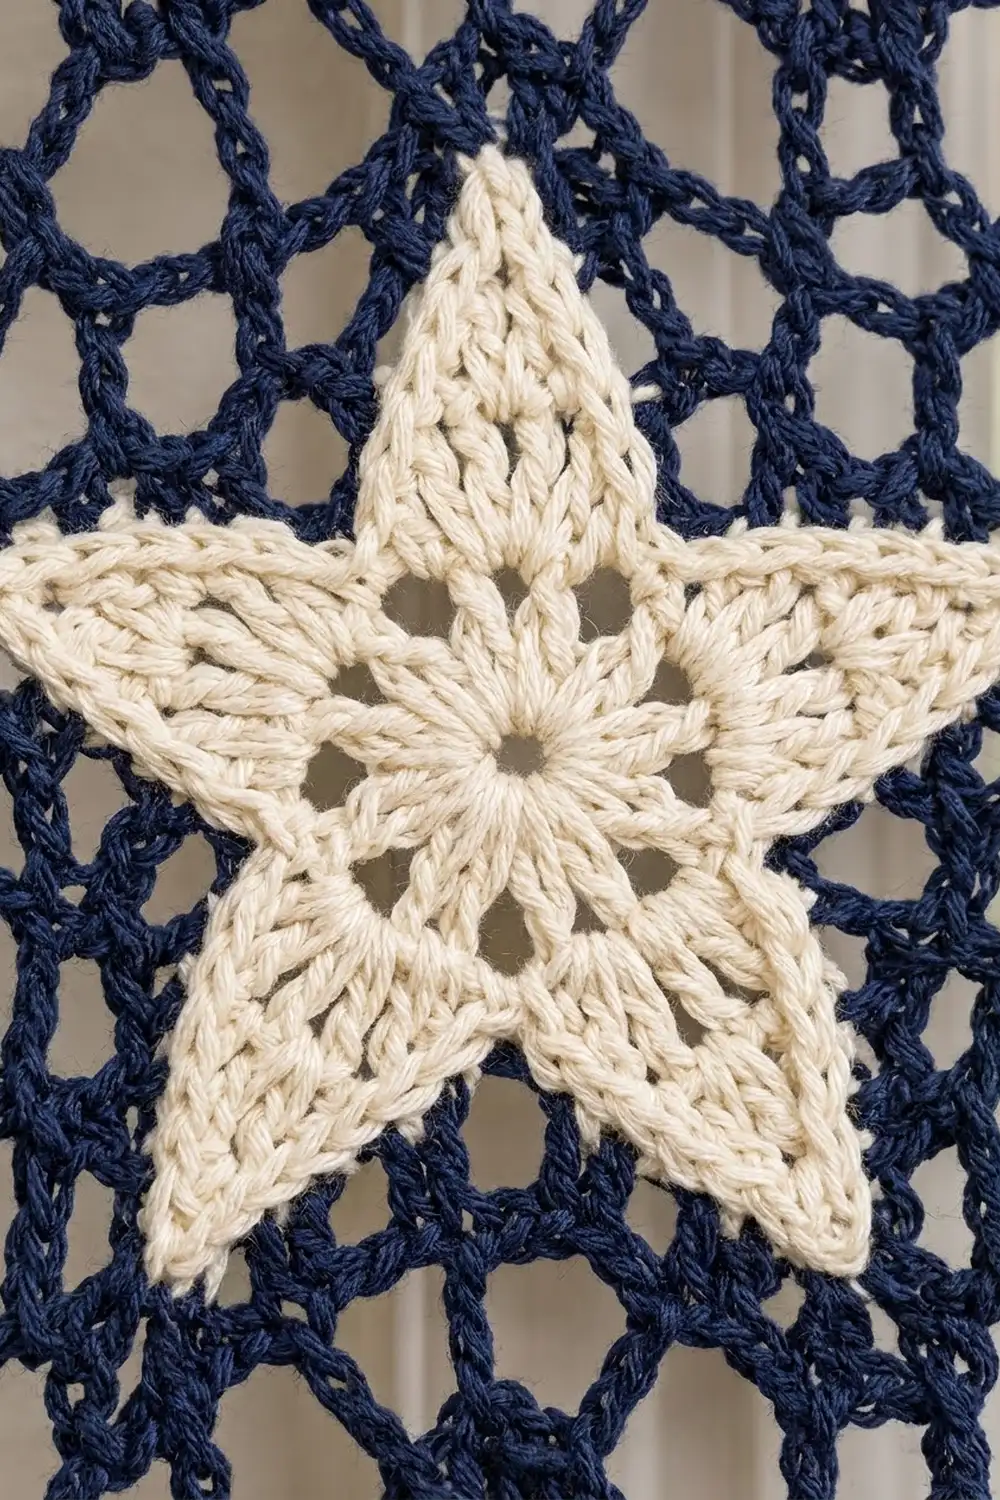
Star Motif (Make 88)
Cream Star Center
With cream, make a magic ring.
Round 1: Ch 3 (counts as dc), 14 dc in ring, sl st in top of the beginning ch-3. Pull the ring snug but leave a small open center. (15 dc)
Round 2: Ch 3 (counts as dc), dc in the same st, 2 dc in each st around, sl st in top of the beginning ch-3. (30 dc)
Think of Round 2 as 5 groups of 6 sts. Each point is worked in short rows over one group.
Star Points
Point 1, Row 1: Ch 2 (does not count as a st), dc in the same st as the join and in each of the next 5 sts, turn. (6 dc)
Row 2: Ch 2, dc2tog, dc in next 2 sts, dc2tog, turn. (4 sts)
Row 3: Ch 2, dc2tog twice, turn. (2 sts)
Row 4: Ch 2, dc2tog. (1 st – this is the tip)
Travel to the next point: Do not turn. Work 1 sl st in each of the 3 row-ends down the left side of the point (Rows 3, 2, and 1), then sl st in the next unworked st of Round 2. This is the first st of the next group.
Points 2–5: Repeat Rows 1–4 and the travel step for Points 2, 3, and 4. Work Point 5 through Row 4 only, then do not travel. You are now at the tip of Point 5.
Star Edging
Edging round: Ch 1, (sc, ch 3, sc) in the tip of Point 5. Work 5 sc evenly down the side of the point, then 5 sc evenly up the side of the next point, working over the travel sl sts where needed. Work (sc, ch 3, sc) in the tip. Repeat from * 3 more times. Work 5 sc down the last side and 5 sc up the side of Point 5, then sl st in the first sc. (60 sc and 5 ch-3 tips; 12 sc per point)
Fasten off cream and weave in the ends. The star should lie flat with five distinct, slightly pointed tips.
Navy Mesh
From any ch-3 tip, the 12 sc that follow up to the next tip are numbered #1–#12. Sc #1 is the second sc of the current tip, #2–#6 run down the point, #7–#11 run up the next point, and #12 is the first sc of the next tip.
Mesh Round 1: Join navy in any ch-3 tip sp with ch 1, then sc in the same sp. Ch 5, skip sc #1–#3, sc in #4. Ch 5, skip #5, sc2tog over #6 and #7 (this is the valley). Ch 5, skip #8, sc in #9. Ch 5, skip #10–#12, sc in the next ch-3 tip sp. Repeat from * around, ending the last repeat with a sl st in the first sc instead of the final sc. (20 ch-5 loops; 4 per point)
Mesh Round 2: Sl st in the first 3 ch to reach the center of the first loop. Ch 1, (sc, ch 7, sc) in the same loop for the corner. [Ch 5, sc in next loop] 4 times, ch 5, (sc, ch 7, sc) in the next loop. Repeat from * 2 more times. Then work [ch 5, sc in next loop] 4 times, ch 5, and sl st in the first sc. (4 ch-7 corners and 20 ch-5 loops; 5 ch-5 loops per side)
Mesh Round 3: Sl st in the next ch-7 sp. Ch 1, (2 sc, ch 2, 2 sc) in the same sp. 5 sc in each of the next 5 ch-5 sps, then (2 sc, ch 2, 2 sc) in the next ch-7 corner sp. Repeat from * 2 more times. Work 5 sc in each of the last 5 ch-5 sps and sl st in the first sc. (116 sc total)
Per-side count: 2 + 25 + 2 = 29 sc per side, counted between the corner ch-2 sps. These 29 already include the 2 sc at each end of the side. The ch-2 corner spaces are spaces, not stitches.
Fasten off and leave a 6 in (15.2 cm) tail. Check that the motif measures 7.25 in (18.4 cm) square.
Make All Pieces
- Total motifs: 88 (44 per panel)
- Cream per motif: about 5 g; 440 g used across all stars
- Navy per motif: about 8 g; 704 g used across all motifs, with the rest going to seams and borders
Layout for one panel (4 across × 11 down):
Row 1:  [S] [S] [S] [S]
Row 2:  [S] [S] [S] [S]
Row 3:  [S] [S] [S] [S]
Row 4:  [S] [S] [S] [S]
Row 5:  [S] [S] [S] [S]
Row 6:  [S] [S] [S] [S]
Row 7:  [S] [S] [S] [S]
Row 8:  [S] [S] [S] [S]
Row 9:  [S] [S] [S] [S]
Row 10: [S] [S] [S] [S]
Row 11: [S] [S] [S] [S]
Turn every star so that one point faces up. This keeps the lattice looking the same from top to bottom.
Joining
Method: Flat slip-stitch join through back loops, using navy.
Lay two motifs side by side with the RS facing up and the edges touching. Join navy in the matching corner ch-2 sps, working through both at once. Sl st through the back loop of each pair of matching sc, which is 29 sl sts. Finish with a sl st through the next pair of corner ch-2 sps. That makes 31 sl sts per seam.
Stitch-to-stitch logic: Each side has exactly 29 sc, so stitch 1 meets stitch 1 and stitch 29 meets stitch 29. If you have a stitch left over, recount Mesh Round 3 on that motif. Do not skip a stitch to make it fit.
Order:
1. Join all the horizontal seams first, which builds 4 vertical columns of 11 motifs.
2. Join the vertical seams, running one long line of sl sts from top to bottom. At each 4-way corner, sl st through the corner sps of all the motifs that meet there.
Tension: Keep the sl sts as loose as the sc beneath them. Tight seams make the panel pucker and shorten its length. If you tend to work tightly, use a 5.5 mm hook for joining.
Checkpoint: A strip of 2 motifs should measure 14.5 in (36.8 cm). A full row of 4 should measure 29 in (73.7 cm). The joined panel should measure 29 in (73.7 cm) × 79.75 in (202.6 cm).
Border
Border gauge: 4 sc = 1 in (2.5 cm), the same as the motif edge.
Border Round 1: With the RS facing, join navy in the top-right corner ch-2 sp of the panel. Ch 1, (sc, ch 2, sc) in the same sp. Work along the top: sc in each sc of each motif. Skip the joined ch-2 corner sps at the seams. Work no stitches into them.
- Top and bottom: 4 motifs × 29 sc = 116 sc, plus 1 corner sc at each end = 118 sc between the corner ch-2 sps
- Long sides: 11 motifs × 29 sc = 319 sc, plus 2 corner sc = 321 sc
- Work (sc, ch 2, sc) in each panel corner sp and sl st in the first sc to close.
- Round total: 2 × 118 + 2 × 321 = 878 sc
Border Round 2: Sl st in the corner ch-2 sp. Ch 1, (sc, ch 2, sc) in the same sp. Sc in each sc around, working (sc, ch 2, sc) in each corner sp, then sl st in the first sc.
- Top and bottom: 118 + 2 = 120 sc
- Long sides: 321 + 2 = 323 sc
- Round total: 2 × 120 + 2 × 323 = 886 sc
Fasten off.
Hook Loop Row (top edge only): With the RS facing, join navy in the first sc of the top edge, just after the corner ch-2 sp. Ch 1, (sc, ch 8, sc) in the same st. Sc in next 16 sts, (sc, ch 8, sc) in the next st. Repeat from * 6 more times. (8 hook loops; 1 + 7 × 17 = 120 sts)
Fasten off. The loops sit at the two panel corners and at evenly spaced points between them.
Why the math works: Each motif side gives exactly 29 sc. The seam corner spaces are skipped, so no hidden stitches get added at the seams. Each border round adds exactly 2 sc per side, 1 at each corner. At 4 sc per inch, 116 sc = 29 in (73.7 cm), which matches the joined width.
Final Blocking
- Weave in all ends along the navy seams, where they hide easily.
- Lay the panel flat on blocking mats. A clean floor covered with towels works too.
- Spray it evenly until damp but not soaked.
- Pin the outer edge to 30 in (76.2 cm) × 80.75 in (205.1 cm).
- Pin every star tip outward so the points are crisp.
- Smooth the mesh loops so they open evenly.
- Let it dry completely, which takes 24–48 hours.
- Unpin it, then block the second panel to exactly the same measurements.
Final Quality-Control Checklist
- [ ] Every motif measures 7.25 in (18.4 cm) square
- [ ] Every motif side has 29 sc
- [ ] All stars face the same way, with one point up
- [ ] Seams are flat with no puckers
- [ ] Border Round 2 counts are 120 / 323 / 120 / 323
- [ ] 8 hook loops are evenly spaced on each panel
- [ ] Both panels measure 30 in (76.2 cm) × 80.75 in (205.1 cm)
- [ ] All ends are woven in securely
Troubleshooting
Star cups or ruffles: Your Round 2 tension is off. Tighten it if the star cups, or loosen it if it ruffles. Blocking will correct small differences.
Points look blunt: Make sure Row 4 is a single dc2tog. Pin the tips firmly when blocking.
Mesh Round 1 won’t line up: Recount the 12 sc between tips in the Star Edging. Every point needs exactly 12.
Motif isn’t square: Check that the corner ch-7 loops of Mesh Round 2 land on loops 1, 6, 11, and 16.
Panel is shorter than expected: Your joining sl sts are too tight. Rework them with a larger hook.
Border ripples: Check that you skipped the seam corner sps and did not work sc into them.
Border pulls in: Your border tension is tighter than the motif edges. Go up a hook size for the border.
Care
Hand wash or machine wash on a gentle cold cycle inside a mesh laundry bag. Dry flat, reshaping and pinning the star tips if needed. Never hang the panels while they are wet.
Final Notes
The measurement chain is simple, and each step depends on the one before it. A 15-st ring grows to 30 sts, which gives 5 points with 12 edging sc each. That gives 20 mesh loops, then 5 loops per side, then 29 sc per side and a 7.25 in (18.4 cm) motif. Four motifs across make 29 in (73.7 cm), and eleven down make 79.75 in (202.6 cm). The border brings the panel to 30 in (76.2 cm) × 80.75 in (205.1 cm). Check each link as you go and both panels will hang straight and match.
Happy crocheting!