

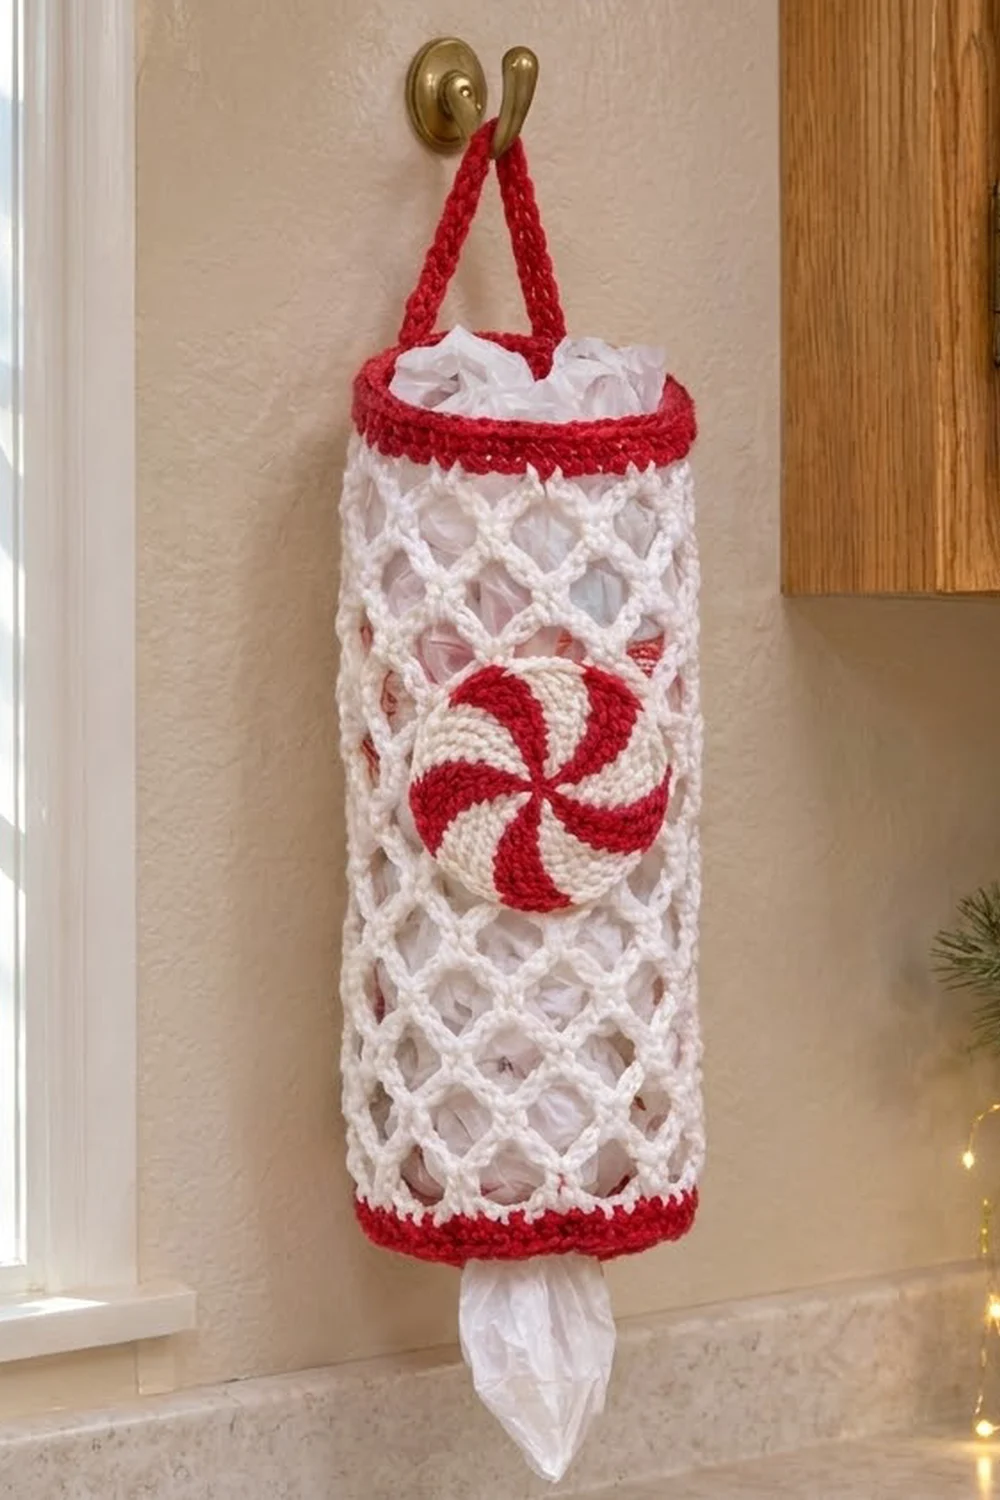
This peppermint bag holder keeps a winter kitchen tidy. It is a white mesh tube with bright red bands at both ends, a red hanging strap, and a round peppermint-candy appliqué on the front. You push bags in at the top and pull them out at the bottom.
The colors are classic candy cane: bright white for the open diamond mesh, cherry red for the bands and strap, and a red and cream swirl on the candy. The mesh lets you see how many bags are left, and the solid bands keep both openings firm.
This pattern uses US crochet terms. The finished holder is 15 in (38.1 cm) tall and 15 in (38.1 cm) around, which is about 4.8 in (12.2 cm) across. The strap adds a loop that rises about 4 in (10.2 cm) above the rim.
You work the tube from the bottom up in one piece: a red band, then white mesh, then a red top band. The strap is crocheted onto the top rim. The peppermint is made separately as a flat swirl circle and sewn on last.
Finished Size and Construction
- Finished size: 15 in (38.1 cm) tall, 15 in (38.1 cm) around, about 4.8 in (12.2 cm) across
- Skill level: Easy / Advanced Beginner
- Terminology: US crochet terms
- Yarn weight: Worsted weight (#4) cotton
- Hook: US H-8 (5.0 mm)
- Number of pieces: 2 (one tube with built-in strap, one appliqué)
- Layout: Single cylinder, appliqué centered on the front
- Piece size: Tube 15 in (38.1 cm) tall; appliqué 3 in (7.6 cm) across
- Size before border: Bottom band plus mesh is 13.5 in (34.3 cm) tall
- Border depth: Top band 1.5 in (3.8 cm), plus a strap 10 in (25.4 cm) long
Materials
Cotton or a cotton blend works best. It holds its shape, does not stretch much under the weight of the bags, and can go in the wash. These amounts assume a worsted cotton of about 85 m per 50 g.
- Color A – Bright White (mesh): 65 g, about 111 m
- Color B – Cherry Red (bands, strap, candy wedges): 55 g, about 94 m
- Color C – Cream (candy wedges): 10 g, about 17 m
Tools:
– US H-8 (5.0 mm) crochet hook
– Tapestry needle
– 1 stitch marker
– Scissors
– Measuring tape
– Rust-proof pins and a blocking mat or towel
All yarn amounts include a margin of about 20 percent for your gauge swatch and weaving in ends.
Abbreviations (US Terms)
- ch – chain
- sc – single crochet
- sl st – slip stitch
- st(s) – stitch(es)
- rnd – round
- inc – increase (2 sc in the same stitch)
- ch-5 loop – the open space under a chain of 5
- R / C – work with Color B (red) / Color C (cream)
Special technique: color change. Work the last sc before the change until 2 loops are on the hook. Yarn over with the new color and pull through. Carry the unused color along the top of the round and work over it, so there are no floats on the back.
Gauge and Checkpoints
Gauge: 16 sc and 16 rnds = 4 in (10.2 cm). In the mesh, 15 ch-5 loops = 15 in (38.1 cm) around and 5 mesh rnds = 4 in (10.2 cm) tall.
Test one piece first. Make the peppermint appliqué before you start the tube. It is small and uses only sc. When it is done it should measure 3 in (7.6 cm) across. If it does, your sc gauge is right for the bands.
Checkpoints:
1. After Rnd 1 of the bottom band, lay the ring flat. It should measure 7.5 in (19.1 cm) folded, which is 15 in (38.1 cm) around.
2. After Rnd 6, the bottom band should be 1.5 in (3.8 cm) deep.
3. After Rnd 11, the piece should be 5.5 in (14.0 cm) tall.
4. After Rnd 21, the piece should be 13.5 in (34.3 cm) tall.
5. After Rnd 27, the piece should be 15 in (38.1 cm) tall.
If your piece is too big, go down to a US G-6 (4.0 mm) hook. If it is too small, go up to a US I-9 (5.5 mm) hook. If only the mesh is off, change the chain length: use ch 4 for loops that are too long or ch 6 for loops that are too short, and keep 15 loops per round.
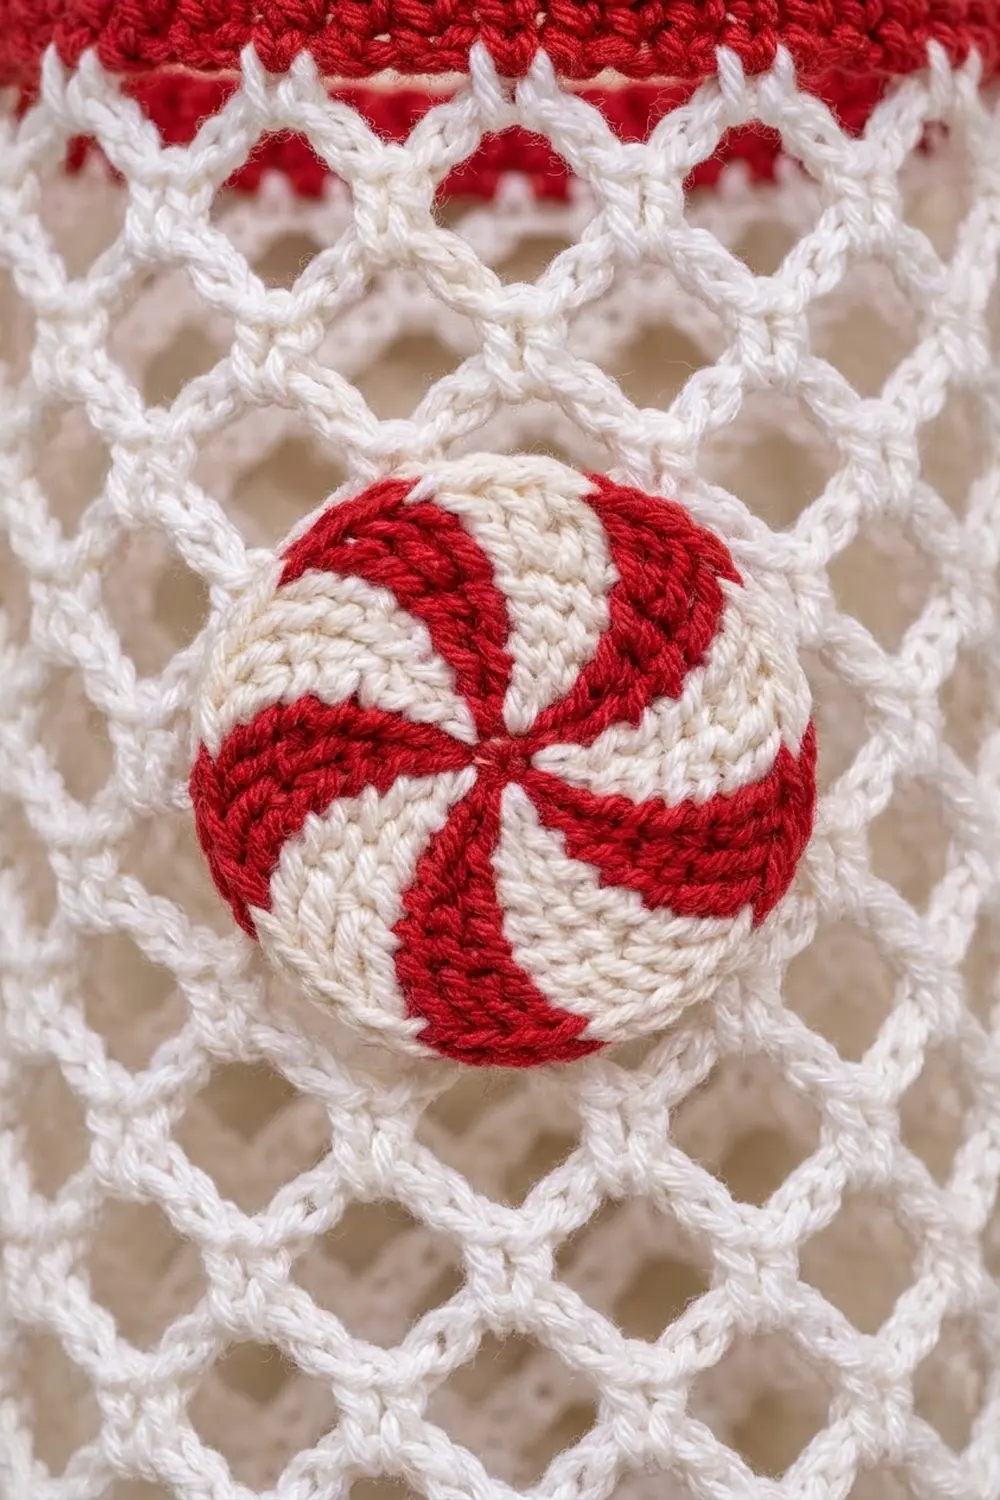
Peppermint Appliqué
You work this in a continuous spiral with a marker in the first stitch of each round. Each round, the red wedges start one stitch later than they did before. That steady drift is what makes the pinwheel swirl. The repeats below are written over the stitches of the previous round.
Rnd 1 (C): Make a magic ring and work 6 sc into it. (6 sts)
Rnd 2: Work 2 sc in the next st: the first with R, the second with C. Repeat 5 more times. (12 sts: 6 red wedges and 6 cream wedges, 1 st each)
Rnd 3: With R, work 2 sc in the next (red) st. With C, sc in the next st. Repeat 5 more times. (18 sts: 6 red wedges of 2 and 6 cream wedges of 1)
Rnd 4: With C, sc in the next st. With R, sc in the next st. In the next st, work 1 sc with R, then 1 sc with C. Repeat 5 more times. (24 sts: 6 red wedges of 2 and 6 cream wedges of 2)
Rnd 5: With C, sc in each of the next 2 sts. With R, work 2 sc in the next st, then sc in the next st. Repeat 5 more times. (30 sts: 6 red wedges of 3 and 6 cream wedges of 2)
Rnd 6: With C, sc in each of the next 3 sts. With R, sc in the next st, then 2 sc in the next st. Repeat 5 more times. (36 sts: 6 red wedges of 3 and 6 cream wedges of 3)
Rnd 7 (trim, C): Sl st loosely in each st around. (36 sl sts = 36 worked 1 per st + 0 added)
Fasten off and leave a 12 in (30.5 cm) cream tail for sewing. Weave in the red end. Checkpoint: the appliqué should be 3 in (7.6 cm) across and lie flat.
Bottom Band
Foundation (B): Ch 60. Without twisting the chain, sl st to the first ch to form a ring.
Rnd 1: Ch 1. Sc in each ch around, then sl st to the first sc. (60 sts)
Rnds 2–6: Ch 1. Sc in each st around, then sl st to the first sc. (60 sts each rnd)
Fasten off B. Checkpoint: the band is 1.5 in (3.8 cm) deep and 15 in (38.1 cm) around. This finished edge is the bottom opening that bags are pulled through.
Diamond Mesh Body
Rnd 7 (setup, A): Join A with a sl st in any st. Ch 1, sc in the same st. Ch 5, skip 3 sts, sc in the next st. Repeat around, ending with ch 5, skip the last 3 sts, sl st to the first sc. (15 ch-5 loops)
The math: each repeat uses 4 sts (1 sc plus 3 skipped), and 60 ÷ 4 = 15 loops.
Rnd 8: Sl st in each of the next 3 ch to move to the center of the first loop. Ch 1, sc in the same loop. Ch 5, sc in the next ch-5 loop. Repeat around, ending with ch 5, sl st to the first sc. (15 ch-5 loops)
Each sc anchors the middle of a loop from the round below. This is what turns the loops into the diamond lattice.
Rnds 9–21: Repeat Rnd 8. (15 ch-5 loops each rnd; 15 mesh rnds in total)
Checkpoint: after Rnd 11, the piece is 5.5 in (14.0 cm) tall. After Rnd 21, it is 13.5 in (34.3 cm) tall, made up of the 1.5 in (3.8 cm) band and 12 in (30.5 cm) of mesh. Fasten off A.
Top Band and Hanging Strap (Border)
Border gauge: 16 sc = 4 in (10.2 cm), the same as the bottom band.
Rnd 22 (conversion, B): Join B in any ch-5 loop. Ch 1. Work 4 sc in each ch-5 loop around, then sl st to the first sc. (15 loops × 4 sc = 60 sts, + 0 added)
Rnds 23–27: Ch 1. Sc in each st around, then sl st to the first sc. (60 sts each rnd)
Why the math works: the bottom band has 60 sts. Every 4 of them became 1 mesh loop, giving 15 loops. Working 4 sc back into each loop restores exactly 60 sts. Both bands therefore have the same circumference, 15 in (38.1 cm), and the tube hangs straight with no flare or pucker at either end.
Mark the strap points. Flatten the tube with the seam joins at one side. Count the 60 sts of Rnd 27 starting from the join: sts 1–3 are one strap end and sts 31–33 are the opposite end. The front center is around st 17.
Strap Row 1: With B still attached, ch 1, turn. Sc in sts 1–3 of Rnd 27. (3 sts)
Rows 2–40: Ch 1, turn. Sc in each st across. (3 sts each row)
Checkpoint: the strap is 10 in (25.4 cm) long and 0.75 in (1.9 cm) wide. Bring the end across to sts 31–33 without twisting it. Holding the strap and rim together, sl st through both layers in each of the 3 sts. Fasten off. When it hangs, the strap rises about 4 in (10.2 cm) above the rim.
Attaching the Peppermint Appliqué
- Flatten the tube with the strap ends at the sides.
- Center the peppermint on the front, over st 17. Its center should be 5.5 in (14.0 cm) below the top edge of the top band.
- Pin it to the mesh in at least 6 places around the edge.
- With the cream tail, whipstitch through the outer sl st round and around the mesh strands below, about every 0.25 in (0.6 cm).
- Work only through the front layer of the tube. Slide a hand inside as you sew to make sure the back is not caught.
- Knot inside and weave in the end.
Final Blocking
- Weave in all remaining ends along the solid bands, where they will not show through the mesh.
- Mist the whole piece lightly with water.
- Roll a towel into a 4.8 in (12.2 cm) wide cylinder and slide the holder over it.
- Even out the diamonds with your fingers so all 15 loops in each round are the same size.
- Measure: 15 in (38.1 cm) tall and 15 in (38.1 cm) around.
- Pin the peppermint flat, and if the edges ruffle, steam it gently.
- Let the holder dry completely on the form before you remove it.
Final Quality-Control Checklist
- Both bands have 60 sts and are 1.5 in (3.8 cm) deep.
- Every mesh round has 15 even loops, and there are no skipped anchors.
- The tube is 15 in (38.1 cm) tall and 15 in (38.1 cm) around.
- The strap has 3 sts and 40 rows, is untwisted, and is attached at sts 1–3 and 31–33.
- The peppermint is 3 in (7.6 cm) across, has 6 red and 6 cream wedges, and swirls in one direction.
- The appliqué is sewn only to the front layer.
- All ends are secured inside the bands.
Troubleshooting
The tube is twisted. The foundation chain twisted when you joined it. Check before you sl st the ring closed; the only fix afterward is to restart.
The mesh looks slanted. You started each round past the center of the loop. Always work exactly 3 sl sts to reach the loop’s center.
The top band ruffles. Work 4 sc per loop, not 5. Use a smaller hook for the band if needed.
The peppermint cups. Your stitches are too tight. Go up one hook size, or move the increases so they do not stack.
The peppermint ruffles. Your stitches are too loose. Go down one hook size.
The swirl does not show. Check that the red sections drift one stitch forward each round, as written.
Bags slip out of the bottom. Thread a length of red yarn through Rnd 1 and cinch it slightly.
Care
Hand wash or machine wash cold on a gentle cycle and lay flat to dry, reshaping the tube over a rolled towel. Do not wring, and do not put it in the dryer if your cotton is not preshrunk.
Final Notes
Every measurement in this holder follows from the 60-stitch ring. 60 sc gives 15 in (38.1 cm) around. Those 60 sts become 15 mesh loops at 4 sts each. The 15 loops convert back to 60 sc for the top band. The height adds up the same way: a 1.5 in (3.8 cm) bottom band, 12 in (30.5 cm) of mesh, and a 1.5 in (3.8 cm) top band make 15 in (38.1 cm). The 10 in (25.4 cm) strap and the 3 in (7.6 cm) peppermint finish the piece.
Happy crocheting!