

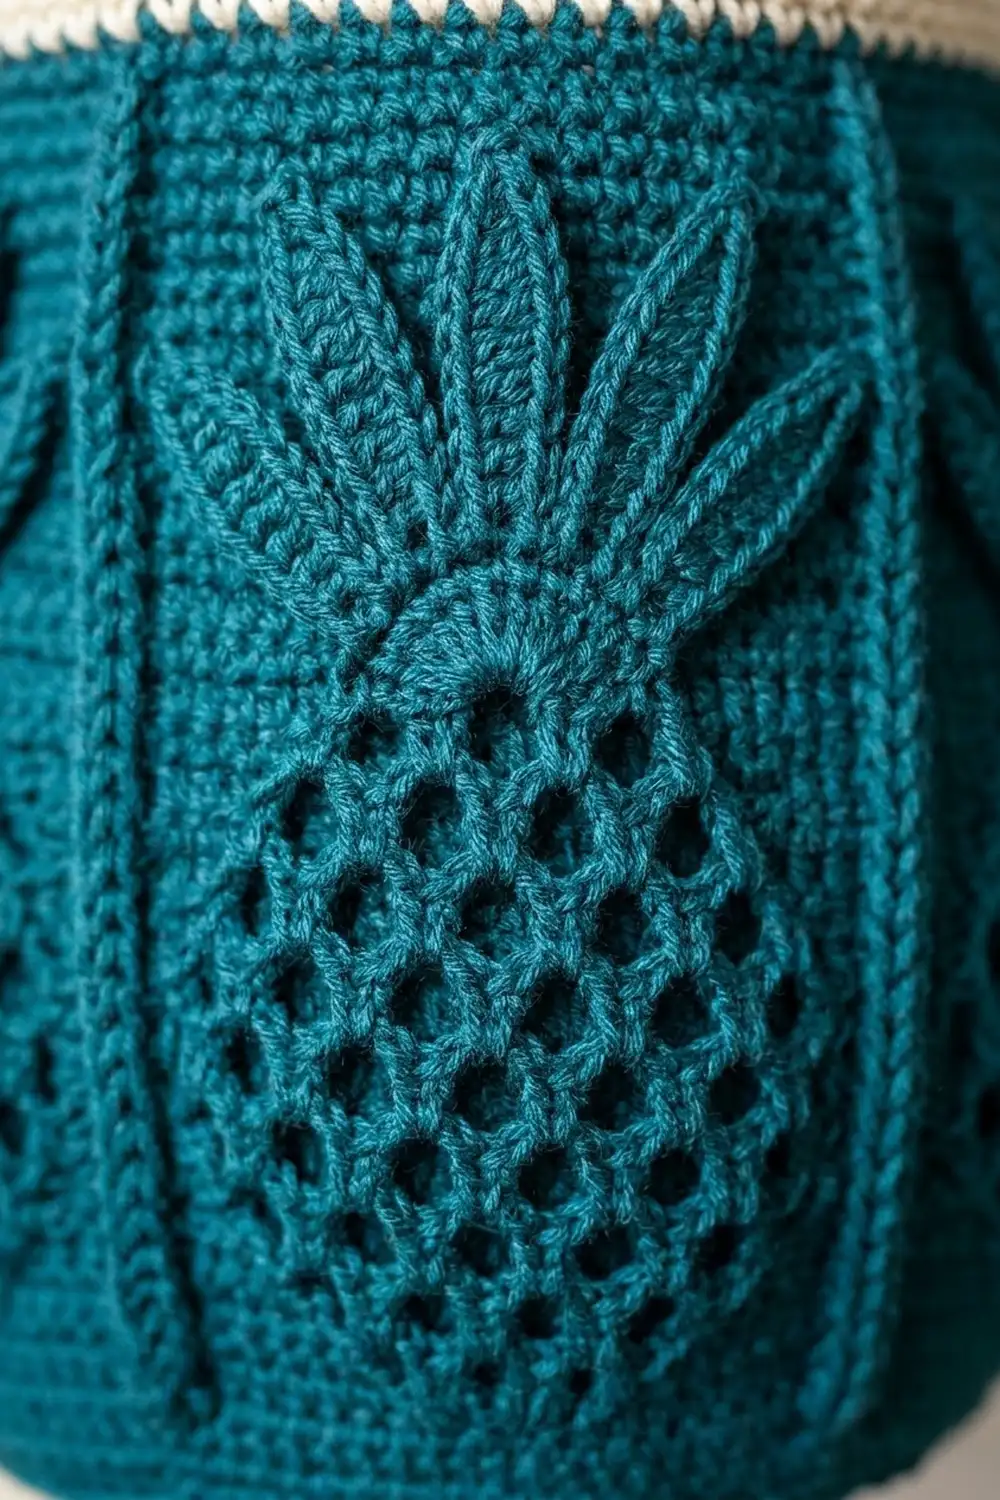
The Pineapple Pantry Bag Holder is a hanging holder that stores plastic grocery bags. You stuff bags in through the top and pull them out one at a time through a small opening in the base. The body is deep teal lace with six pineapple panels around it. Each pineapple has an open diamond mesh fruit topped by a fan of five long leaf clusters.
Cream trim frames the top rim and the bottom opening, and a narrow cream strap hangs the holder from a hook. The shape tapers gently from a wide base to a narrower rim, like a small lampshade.
This pattern uses US crochet terms. Flattened, the finished holder measures 12 in (30.5 cm) across the bottom, 9 in (22.9 cm) across the rim, and 7 in (17.8 cm) tall, not counting the strap.
You work the body in one piece from the bottom up. You start with a chain ring that becomes the dispensing hole, work a flat base outward, turn up the walls, and work the pineapple lace. Then you pull the top in and add the cream rim. Last, you crochet the cream collar around the opening and sew on the strap.
Finished Size and Construction
- Finished size (flattened): 12 in (30.5 cm) wide at the bottom, 9 in (22.9 cm) wide at the rim, 7 in (17.8 cm) tall
- Skill level: Intermediate
- Terminology: US crochet terms
- Yarn weight: Worsted (#4), cotton or cotton blend
- Hook: 5.0 mm (H-8)
- Number of pieces: 1 body + 1 strap, sewn together into one holder
- Layout: Single item worked in joined rounds, no assembly grid
- Base: flat round, about 7.5 in (19.1 cm) across, with a 9 in (22.9 cm) circumference opening in the center
- Size before trim: 72-stitch top edge, 18 in (45.7 cm) around
- Trim depth: rim 0.9 in (2.3 cm); opening collar 0.5 in (1.3 cm)
- Strap: 14 in (35.6 cm) long, 0.7 in (1.8 cm) wide
Materials
Use a smooth worsted cotton or cotton blend. Cotton holds the lace shape, stays firm when stuffed with bags, and washes well. Avoid fuzzy or very stretchy acrylic, which blurs the mesh and lets the holder sag.
- Teal (main color): 120 g / 204 m
- Cream (contrast): 40 g / 68 m
These quantities include a margin of about 15%, so you can swatch and rip back without running short.
Tools:
– 5.0 mm (H-8) crochet hook
– 6 stitch markers
– Tapestry needle
– Scissors
– Measuring tape
– Rustproof pins and a spray bottle for blocking
– A bowl, or a rolled towel, about 7.5 in (19.1 cm) across, to use as a blocking form
Abbreviations (US Terms)
- ch – chain
- sl st – slip stitch
- sc – single crochet
- dc – double crochet
- tr – treble crochet
- FPdc – front post double crochet: yarn over, insert the hook from front to back to front around the post of the stitch, then complete a dc
- blo – back loop only
- sp – space
- st(s) – stitch(es)
- rnd – round
- rep – repeat
Special stitch: Leaf (tr3cl). Work 3 tr into the same stitch. On each one, stop with 2 loops left on the hook, so you have 4 loops on the hook. Yarn over and pull through all 4 loops. The result is a long, pointed cluster that reads as one pineapple leaf.
Gauge and Checkpoints
Gauge: 16 sc × 18 rnds = 4 in (10.2 cm) in teal.
Test the base first. Base Rnds 1–11 take little yarn and tell you whether your tension will give the right size.
- After Rnd 1: the ring has 36 sts and should measure 9 in (22.9 cm) around.
- After Rnd 11: the base should lie flat, measure 7.5 in (19.1 cm) across, and have 96 sts, or 24 in (61.0 cm) around.
- After Rnd 17: the solid wall band should be 1.3 in (3.3 cm) tall.
- After Rnd 24: the work from Rnd 18 up should be about 3.2 in (8.1 cm) tall.
- After Rnd 27: the top edge should have 72 sts and measure 18 in (45.7 cm) around.
If your base is too big or ruffles, go down to a 4.5 mm hook. If it is too small or cups upward, go up to a 5.5 mm hook. If the base cups only slightly, that’s fine, because the walls turn up anyway. Ruffling is the problem to fix.
Pattern
Join every round with a sl st to the first stitch. Don’t turn. Keep the right side facing you throughout.
Base (Teal)
Rnd 1: Ch 36 and sl st to the first ch to form a ring, taking care not to twist it. Ch 1, then sc in the back bump of each ch. (36 sts) This leaves the front loops of the chain free for the cream collar later.
Rnd 2: Ch 1, sc in next 5 sts, 2 sc in next st; rep from * 6 times. (42 sts)*
Rnd 3: Ch 1, sc in next 6 sts, 2 sc in next st; rep from * 6 times. (48 sts)*
Rnds 4–11: In each round, stitch 1 more sc between increases than in the round before, which adds 6 sts per round.
- Rnd 4: sc 7, inc (54 sts)
- Rnd 5: sc 8, inc (60 sts)
- Rnd 6: sc 9, inc (66 sts)
- Rnd 7: sc 10, inc (72 sts)
- Rnd 8: sc 11, inc (78 sts)
- Rnd 9: sc 12, inc (84 sts)
- Rnd 10: sc 13, inc (90 sts)
- Rnd 11: sc 14, inc (96 sts)
Check the base against the checkpoint: 7.5 in (19.1 cm) across and lying flat.
Wall Band (Teal)
Rnd 12: Ch 1, sc blo in each st around. (96 sts) The unused front loops make a crisp fold where the base turns up into the wall.
Rnds 13–17: Ch 1, sc in each st around. (96 sts each round)
Place 6 markers, one every 16 sts, starting with the first stitch. Each marker sits at the start of one pineapple repeat.
Pineapple Lace (Teal)
Each 16-st repeat makes 1 raised column (2 FPdc) and 1 pineapple panel (14 sts). Move the markers up as you go.
Rnd 18 (lace foundation): Ch 2 (does not count as a st), dc in each st around. (96 dc)
Rnd 19 (Mesh A): Ch 2 (does not count), *FPdc around each of next 2 sts, ch 3, sk 2 sts, [sc in next st, ch 3, sk 2 sts] 4 times; rep from * 6 times.
Each repeat uses all 16 dc: 2 for the column + 2 skipped + (4 × 3). Each repeat has 2 FPdc, 4 sc, and 5 ch-3 sps. (Round: 12 FPdc, 24 sc, 30 ch-3 sps)
Rnd 20 (Mesh B): Ch 2, *FPdc around each of next 2 FPdc, ch 2, [sc in next ch-3 sp, ch 3] 4 times, sc in next ch-3 sp, ch 2; rep from * 6 times.
Each repeat has 2 FPdc, 5 sc, 4 ch-3 sps, and 2 ch-2 sps. The ch-3 loops now sit offset from the round below, which forms the diamonds. (Round: 12 FPdc, 30 sc, 24 ch-3 sps, 12 ch-2 sps)
Rnd 21 (Mesh A): Ch 2, *FPdc around each of next 2 FPdc, ch 3, sk ch-2 sp, [sc in next ch-3 sp, ch 3] 4 times, sk ch-2 sp; rep from * 6 times.
Each repeat has 2 FPdc, 4 sc, and 5 ch-3 sps, the same as Rnd 19. (Round: 12 FPdc, 24 sc, 30 ch-3 sps)
Rnd 22: Rep Rnd 20.
Rnd 23: Rep Rnd 21.
Rnd 24 (Mesh B, tightened): Ch 2, *FPdc around each of next 2 FPdc, ch 1, [sc in next ch-3 sp, ch 2] 4 times, sc in next ch-3 sp, ch 1; rep from * 6 times.
Each repeat has 2 FPdc, 5 sc, 4 ch-2 sps, and 2 ch-1 sps. The shorter chains start the taper toward the rim. (Round: 12 FPdc, 30 sc, 24 ch-2 sps, 12 ch-1 sps)
Rnd 25 (pineapple point): Ch 2, *FPdc around each of next 2 FPdc, ch 4, sc in the center (3rd) sc of the panel, ch 4; rep from * 6 times.
The two ch-4 chains pull each mesh fruit into a point. Each repeat has 2 FPdc, 1 sc, and 2 ch-4 sps. (Round: 12 FPdc, 6 sc, 12 ch-4 sps)
Rnd 26 (leaf crown): Ch 2, *FPdc around each of next 2 FPdc, sk ch-4 sp, in the center sc work [Leaf, ch 2] 4 times, then 1 more Leaf; sk ch-4 sp; rep from * 6 times.
All 5 leaves come out of 1 stitch, so they fan upward over the fruit. Each repeat has 2 FPdc, 5 Leaves, and 4 ch-2 sps. (Round: 12 FPdc, 30 Leaves, 24 ch-2 sps)
Rnd 27 (closing round, conversion): Ch 1, *sc in each of next 2 FPdc, [sc in next Leaf, sc in next ch-2 sp] 4 times, 2 sc in last Leaf; rep from * 6 times.
Each repeat works 11 sts one-for-one (2 FPdc + 5 Leaves + 4 sps), plus 1 extra sc in the last Leaf, for 11 + 1 = 12 sts. The round is (66 worked 1-per-existing-stitch) + (6 extra) = 72 sts.
Fasten off teal. The top edge should now measure 18 in (45.7 cm) around.
Border
On this holder, the “border” is the cream trim. There are two parts: the rim at the top and the collar around the dispensing opening.
Border gauge: 16 sc = 4 in (10.2 cm), the same as the body. Cream rounds should match the teal gauge exactly, so the rim doesn’t flare or pull in.
Top Rim (Cream)
Join cream at any column (marker position).
Rnds 28–31: Ch 1, sc in each st around. (72 sts each round)
When flattened, each side (front and back) has 36 sts, which is 3 repeats of 12. 36 sts ÷ 4 sts per in = 9 in (22.9 cm), which matches the finished rim width.
Four rounds at 18 rnds per 4 in give a rim about 0.9 in (2.3 cm) deep. Fasten off and weave in the ends.
Opening Collar (Cream)
Turn the holder so the base faces you. Join cream in any free front loop of the foundation chain from Rnd 1.
Rnd 1: Ch 1, sc in each free loop around. (36 sts)
Rnd 2: Ch 1, sc in each st around. (36 sts)
When flattened, each side of the opening has 18 sts. You don’t increase or decrease in the collar. Matching the 36-st chain exactly makes the collar stand up as a short, firm tube about 0.5 in (1.3 cm) tall. A flat frame would tend to flip. Fasten off and weave in the ends.
Why the math works: The base grows from 36 to 96 sts, which gives a 24 in (61.0 cm) circumference, or 12 in (30.5 cm) flattened. The lace keeps 96 stitch positions (6 × 16) until Rnd 27 converts each repeat to 12 sts (6 × 12 = 72), which is 18 in (45.7 cm) around, or 9 in (22.9 cm) flattened. The rim keeps exactly 72 sts, so the taper is set by the lace and held by the rim.
Strap (Cream)
Row 1: Ch 57, sc in 2nd ch from hook and in each ch across. (56 sts)
Rows 2–3: Ch 1, turn, sc in each st across. (56 sts)
The strap measures 14 in (35.6 cm) long by 0.7 in (1.8 cm) wide. Fasten off and leave a 10 in (25.4 cm) tail at each end.
Flatten the holder so one column is centered at each side fold. These sit at rim sts 1 and 37. Overlap each strap end 1 in (2.5 cm) inside the rim at one side fold, then whipstitch it securely through all 4 cream rounds.
Final Blocking
- Weave in all ends. Then wet the holder thoroughly in cool water and press out the excess in a towel. Don’t wring it.
- Pull the holder over a bowl or a rolled towel about 7.5 in (19.1 cm) across, base side down, so the base sits flat.
- Ease the walls into a smooth taper: 24 in (61.0 cm) around at the bottom and 18 in (45.7 cm) around at the rim.
- Open each diamond in the mesh with your fingertips. Straighten the 6 columns so they run vertically.
- Fan the 5 leaves in each crown evenly and pin the tips if needed.
- Shape the opening collar into a soft oval about 4 in × 1.5 in (10.2 × 3.8 cm).
- Let it dry completely, then hang it up and check that the strap is centered.
Final Quality-Control Checklist
- Base lies flat at 7.5 in (19.1 cm) across with 96 sts in Rnd 11
- Wall band is 1.3 in (3.3 cm) tall, with a clean fold line at Rnd 12
- 6 straight raised columns, 16 sts apart at Rnd 18
- Each panel has an even diamond mesh narrowing to one point
- Each crown has exactly 5 leaves fanning from one sc
- Rnd 27 has 72 sts; the rim is 18 in (45.7 cm) around
- Rim has 4 even cream rounds with no flare
- Collar has 36 sts in 2 rounds and stands up evenly
- Strap ends are sewn at opposite side folds, 1 in (2.5 cm) deep
- All ends woven in securely
Troubleshooting
The base ruffles. Your tension is loose. Go down a hook size and check that you have 6 increases per round, not more.
The base cups upward. Your tension is tight. Go up a hook size, or loosen your sc.
The columns slant. You may be working the FPdc around the wrong post. Always work around the FPdc directly below, and start each round at a marker.
The diamonds look like straight rows. Make sure Mesh A and Mesh B alternate. Mesh B begins and ends with the short chains, which shift the loops sideways.
Leaves are stubby or uneven. Keep all 3 tr in each Leaf the same height, and pull up the first loop fully before each yarn over.
The rim flares. Your cream may be thicker than your teal. Use a cream of the same weight, or go down half a hook size for Rnds 28–31.
Bags fall out of the bottom. The collar is too loose. Work it with a smaller hook so the opening grips the bags.
Care
Hand wash or machine wash on gentle in cool water, reshape while damp, and lay flat or hang to dry. Avoid high dryer heat, which can shrink cotton and distort the lace.

Final Notes
Every measurement follows from the one before:
- A 36-st ring gives a 9 in (22.9 cm) opening.
- Eleven base rounds build it to 96 sts, which is 24 in (61.0 cm) around, or 12 in (30.5 cm) flattened.
- Six 16-st pineapple repeats keep that width through the lace.
- The closing round turns each repeat into 12 sts, giving 72 sts and an 18 in (45.7 cm) top edge, or 9 in (22.9 cm) flattened.
- Four cream rounds hold that edge, and a 14 in (35.6 cm) strap hangs it.
Check your gauge at the base and at Rnd 27, and the rest falls into place. Happy crocheting!