

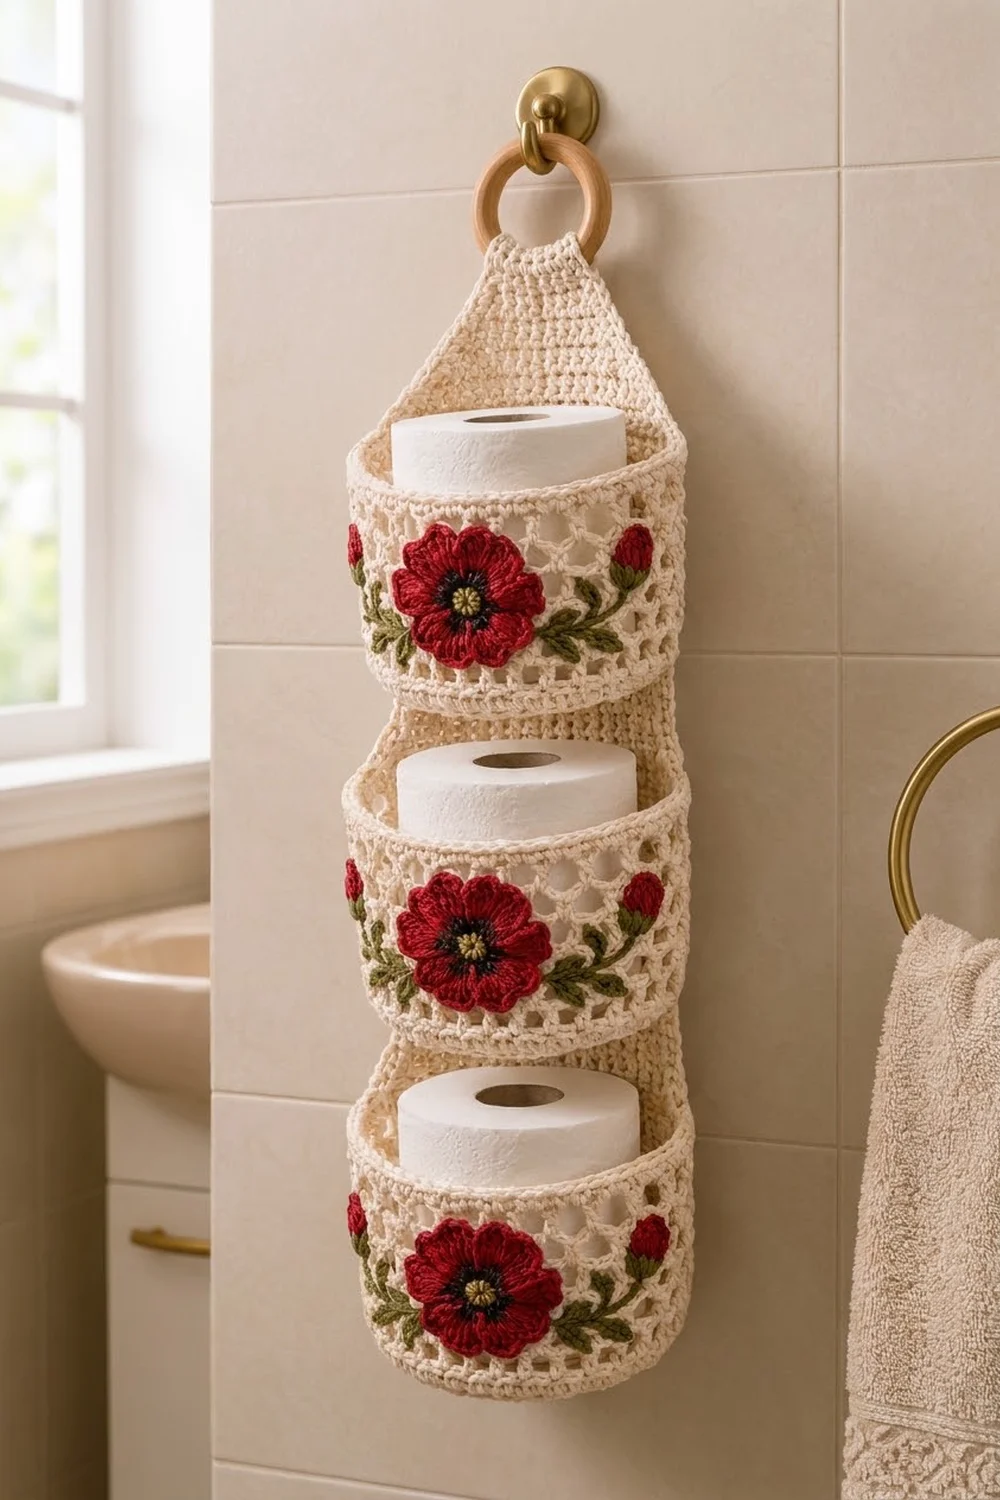
This hanging toilet paper holder adds some cottage-garden charm to a bathroom wall. A long cream back panel narrows at the top into a strap that wraps around a natural wooden ring. Three oval pockets are stacked one above another, and each one holds a standard roll.
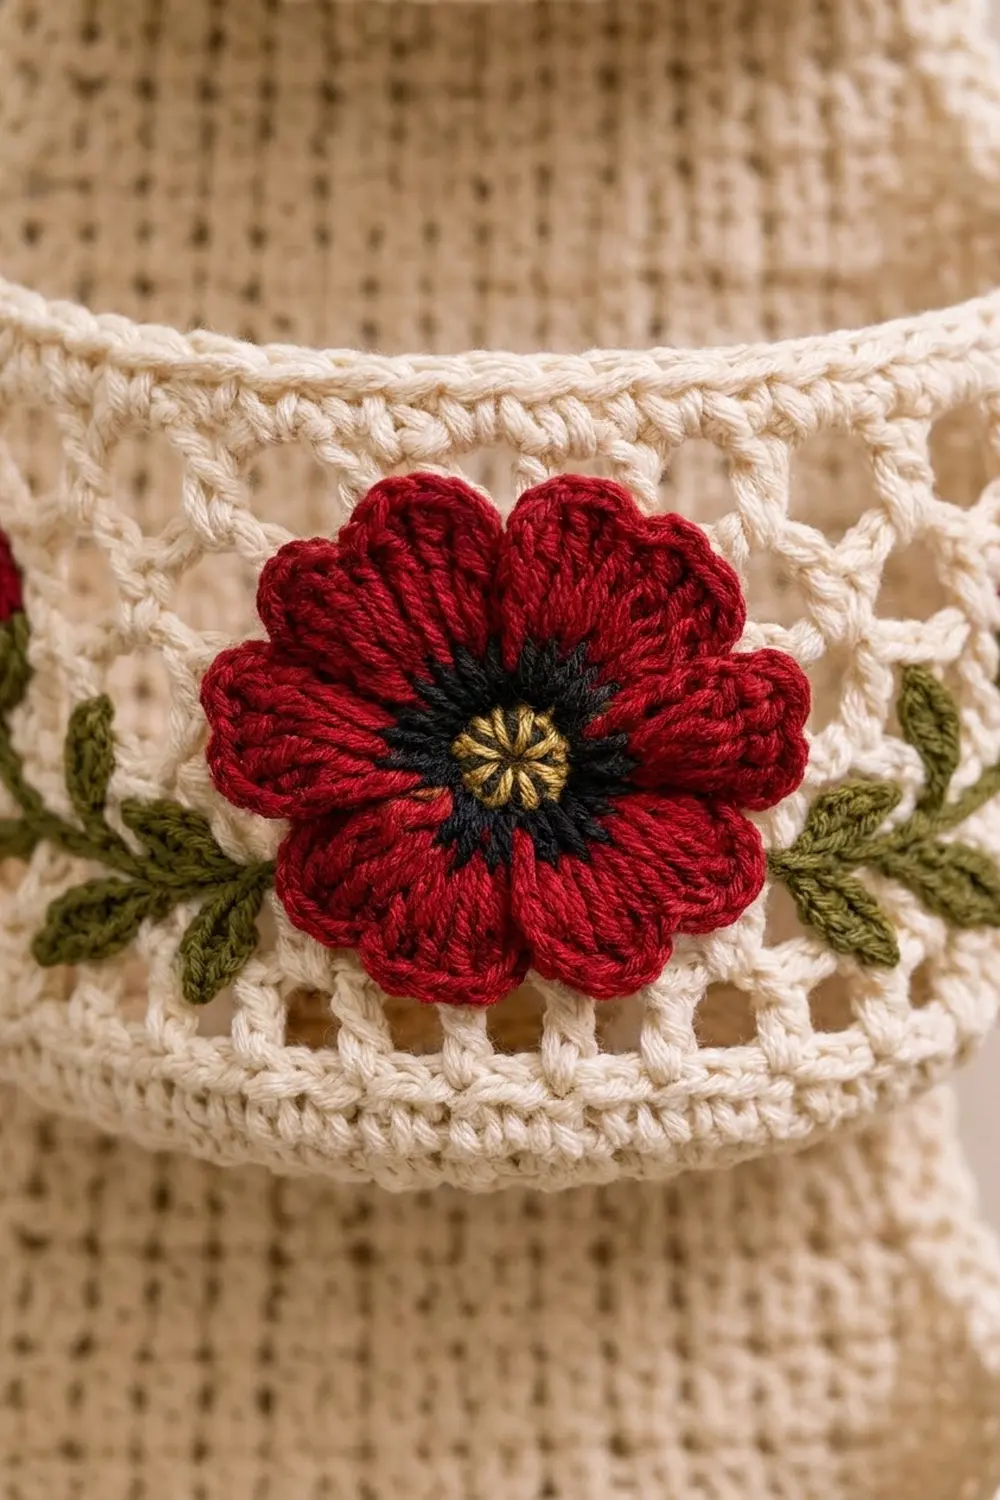
Every pocket has a solid base band, an open honeycomb mesh band, and a solid rim. A deep red poppy sits at the front center of each pocket, with a black ring and a gold center. Olive-green leaves on embroidered stems and a small red bud sit on each side of the poppy.
This pattern uses US crochet terms. The finished panel measures 7.5 x 21 in (19.1 x 53.3 cm). The holder hangs about 23 in (58.4 cm) long including the strap and ring.
Construction is simple. You crochet the back panel flat in rows and add a two-round border. You make three pockets in joined rounds, starting from an oval base. Then you crochet the poppies, buds and leaves, sew everything together, and attach the strap and ring.
Finished Size and Construction
- Finished size: panel 7.5 x 21 in (19.1 x 53.3 cm); about 23 in (58.4 cm) hanging length with ring
- Skill level: Intermediate
- Terminology: US
- Yarn weight: worsted (#4) cotton
- Hook: 4.5 mm (US 7)
- Number of pieces: 1 back panel, 3 pockets, 1 strap, 3 poppies, 6 buds, 18 leaves
- Layout: 3 pockets stacked vertically on one panel
- Pocket size: 6 in (15.2 cm) wide, 3.5 in (8.9 cm) deep, 3.25 in (8.3 cm) tall
- Panel size before border: 6.5 x 20 in (16.5 x 50.8 cm)
- Border depth: 0.5 in (1.3 cm), 2 rounds
Materials
Choose a smooth, firm worsted-weight cotton or cotton blend. Cotton holds its shape, washes easily, and copes well with bathroom humidity. The quantities below assume about 190 m per 100 g.
- Cream (MC): 450 g / 855 m
- Red (A): 30 g / 57 m
- Black (B): 10 g / 19 m
- Gold (C): 5 g / 10 m
- Olive green (D): 20 g / 38 m
Tools:
- 4.5 mm (US 7) crochet hook
- 3 in (7.6 cm) natural wooden ring
- Tapestry needle
- Stitch markers
- Rust-proof pins
- Measuring tape
- Blocking mat and spray bottle
All quantities include a margin of about 10 percent for swatching and weaving in ends.
Abbreviations (US Terms)
- ch – chain
- sl st – slip stitch
- sc – single crochet
- sc2tog – single crochet 2 together
- hdc – half double crochet
- dc – double crochet
- tr – treble crochet
- BLO – back loop only
- MR – magic ring
- st(s) – stitch(es)
- rsc – reverse single crochet
- pc – popcorn
Special stitch – Reverse single crochet (rsc): Work from left to right (if you crochet right-handed). Insert the hook into the next stitch to the right, yarn over and pull up a loop, then yarn over and pull through both loops. This makes a rounded, corded edge.
Special stitch – Popcorn (pc): Work 5 dc in the stitch given. Drop the loop from the hook and insert the hook from front to back into the first dc. Pick up the dropped loop and pull it through.
Gauge and Checkpoints
Gauge: 16 sc and 18 rows = 4 in (10.2 cm) in sc worked in rows.
Make one pocket first. It’s the best test piece because it includes the base, the mesh and the rim.
- Pocket base after Rnd 8: oval measuring 6 x 3.5 in (15.2 x 8.9 cm)
- Pocket circumference after Rnd 9: 16 in (40.6 cm)
- Pocket height after Rnd 21: 3.25 in (8.3 cm), including about 1.25 in (3.2 cm) of mesh
- Panel width after Row 1: 6.5 in (16.5 cm)
- Panel length after Row 81: 18 in (45.7 cm)
- Poppy diameter: 2.75 in (7.0 cm)
If your pieces are too big, go down 0.5 mm in hook size. If they’re too small, go up 0.5 mm. Check the base oval again before you continue, because every later measurement depends on it.
Back Panel
With MC, ch 27.
Row 1: Sc in 2nd ch from hook and in each ch across, turn. (26 sc)
Rows 2–81: Ch 1, sc in each st across, turn. (26 sc)
Checkpoint: 6.5 x 18 in (16.5 x 45.7 cm).
Shaped top
Rows 82–89: Ch 1, sc2tog, sc across to last 2 sts, sc2tog, turn. Stitch counts: Row 82 has 24 sts, Row 83 has 22, Row 84 has 20, Row 85 has 18, Row 86 has 16, Row 87 has 14, Row 88 has 12 and Row 89 has 10.
Row 90: Ch 1, sc in each st across. (10 sc) Don’t fasten off. Continue to the Border section.
Checkpoint: 6.5 x 20 in (16.5 x 50.8 cm), with a 2 in (5.1 cm) tapered top.
Pockets (make 3)
Use MC. Join each round with a sl st to the first st, then ch 1 (the ch 1 doesn’t count as a stitch). Each base round has 2 curved ends and 2 straight sides of 8 sts.
Rnd 1: Ch 11. Work 3 sc in 2nd ch from hook (end), sc in next 8 ch (side), 3 sc in last ch (end). Rotate and work along the underside of the chain: sc in next 8 ch (side). (22 sc)
Rnd 2: 2 sc in each of next 3 sts, sc in next 8 sts twice. (28 sc)
Rnd 3: (Sc in next st, 2 sc in next st) 3 times, sc in next 8 sts twice. (34 sc)
Rnd 4: (Sc in next 2 sts, 2 sc in next st) 3 times, sc in next 8 sts twice. (40 sc)
Rnd 5: (Sc in next 3 sts, 2 sc in next st) 3 times, sc in next 8 sts twice. (46 sc)
Rnd 6: (Sc in next 4 sts, 2 sc in next st) 3 times, sc in next 8 sts twice. (52 sc)
Rnd 7: (Sc in next 5 sts, 2 sc in next st) 3 times, sc in next 8 sts twice. (58 sc)
Rnd 8: (Sc in next 6 sts, 2 sc in next st) 3 times, sc in next 8 sts twice. (64 sc)
Checkpoint: oval base 6 x 3.5 in (15.2 x 8.9 cm).
Walls
Rnd 9: Sc in BLO of each st around. (64 sc) This creates the fold line between the base and the wall.
Rnds 10–13: Sc in each st around. (64 sc)
Rnd 14 (mesh set-up): Sc in next st, ch 3, skip next st 32 times. Join to first sc. (32 ch-3 loops)
Rnd 15: Sl st into first ch-3 loop, ch 1, sc in same loop, ch 3, sc in next loop around, ch 3, join to first sc. (32 ch-3 loops)
Rnds 16–17: Repeat Rnd 15. (32 ch-3 loops each)
Each round’s loops sit offset from the round below, which creates the honeycomb look.
Rnd 18 (conversion): Work 2 sc in each ch-3 loop around. Count: 32 sc (1 per loop) + 32 extra sc = 64 sc.
Rnds 19–20: Sc in each st around. (64 sc)
Rnd 21: Rsc in each st around. (64 rsc) Fasten off.
Checkpoint: each pocket is 3.25 in (8.3 cm) tall and 16 in (40.6 cm) around.
Poppy (make 3)
Rnd 1: With C, make a MR and work 6 sc in the ring. Join. (6 sc) Fasten off C.
Rnd 2: Join B. Work 2 sc in each st around. Join. (12 sc) Fasten off B.
Rnd 3: Join A in BLO. Working in BLO, sc in next st, 2 sc in next st 6 times. Join. (18 sc)
Rnd 4 (petals): (2 dc, 3 tr, 2 dc) in next st, skip next st, sl st in next st 6 times. (6 petals) Fasten off, leaving a 12 in (30.5 cm) tail.
The unused front loops of Rnd 2 stay visible as a raised black ring around the gold center. Checkpoint: 2.75 in (7.0 cm) across.
Bud (make 6)
With A, ch 4. Work 1 pc in 4th ch from hook. Ch 1 to close. Fasten off, leaving a tail.
With D, embroider 2 lazy-daisy stitches at the base of each bud to form the calyx.
Leaf (make 18)
With D, ch 6. Sc in 2nd ch from hook, hdc in next ch, dc in next ch, hdc in next ch, sl st in last ch. (5 sts) Fasten off, leaving a tail.
Checkpoint: 1.25 in (3.2 cm) long.
Strap
With MC, ch 11.
Row 1: Sc in 2nd ch from hook and in each ch across, turn. (10 sc)
Rows 2–18: Ch 1, sc in each st across, turn. (10 sc) Fasten off, leaving a 16 in (40.6 cm) tail.
Checkpoint: 2.5 x 4 in (6.4 x 10.2 cm).
Make All Pieces
| Piece | Qty | Colors |
|---|---|---|
| Back panel | 1 | MC |
| 3 | MC | |
| Strap | 1 | MC |
| Poppy | 3 | C, B, A |
| Bud | 6 | A, D |
| Leaf | 18 | D |
Layout (front view, top to bottom):
      [ ring ]
      [ strap ]
   /  tapered top  \
  |   Pocket 3      |   seams at Rows 59 / 74
  |                 |
  |   Pocket 2      |   seams at Rows 31 / 46
  |                 |
  |   Pocket 1      |   seams at Rows 3 / 18
  |_________________|
Joining
Finish the Border on the panel (next section) before you sew on the pockets.
Decorate each pocket first. Mark the front center of the pocket, opposite one straight side of the oval. Center a poppy over the mesh band so the lower petals overlap Rnds 11–13. Whipstitch around the outer edge of Rnd 3, then tack down each petal tip.
With D, backstitch a curved stem about 2 in (5.1 cm) long from under each side of the poppy toward the pocket ends. Sew 3 leaves along each stem, alternating sides, and sew a bud at the outer end of each stem.
Attach the pockets. Flatten each pocket so the other straight side faces the panel. On Rnd 9, mark the 26 back sts: the 8 straight-side sts plus 9 sts on each side of them.
Match those 26 sts one-to-one with the 26 sts of the panel row listed below, then whipstitch through both layers. Do the same with the matching 26 sts on Rnd 21, sewing them to the higher panel row.
- Pocket 1: base at Row 3, rim at Row 18
- Pocket 2: base at Row 31, rim at Row 46
- Pocket 3: base at Row 59, rim at Row 74
That leaves 15 rows (3.25 in / 8.3 cm) between each base seam and rim seam, which matches the pocket height. The pockets are 28 rows apart, about 6.25 in (15.9 cm), which leaves room for a roll 4 in (10.2 cm) tall.
Keep your tension relaxed. Pull each stitch snug but not tight so the panel doesn’t pucker. After sewing, lay the holder flat. The panel should still measure 7.5 x 21 in (19.1 x 53.3 cm).
Attach the strap and ring. Pass the strap through the wooden ring and fold it in half. On the back of the tapered top, overlap both strap ends by 1 in (2.5 cm), centered over Rows 86–90. Whipstitch along all 4 edges.
Border
Border gauge: 4 sc per in along every edge, the same as the panel’s stitch gauge.
Each count below includes every stitch worked along that edge. The bottom count includes both bottom corner groups.
Rnd 1: Continuing from Row 90, ch 1 and work down the edge:
- Right taper: 10 sc across 9 row-ends (2 sc in the center row-end)
- Right side: 72 sc across 81 row-ends (skip every 9th row-end)
- Bottom: 3 sc in first ch, sc in next 24 ch, 3 sc in last ch (30 sc)
- Left side: 72 sc
- Left taper: 10 sc
- Top: 2 sc in first st, sc in next 8 sts, 2 sc in last st (12 sc)
Join. Total: 10 + 72 + 30 + 72 + 10 + 12 = 206 sc.
Rnd 2: Ch 1, sc in each st around, working 3 sc in the center st of each bottom 3-sc corner group. Count: 206 sc (1 per stitch) + 4 extra sc = 210 sc. The bottom edge now has 34 sc and the other edges are unchanged. Join and fasten off.
Why the math works: 81 rows at 4.5 rows per in = 18 in (45.7 cm), and 72 sc at 4 sc per in = 18 in (45.7 cm), so the sides lie flat. The 26 bottom sts at 4 sc per in = 6.5 in (16.5 cm). The extra corner stitches let the corners turn without cupping. The two rounds add 0.5 in (1.3 cm) on each edge, so the panel finishes at 7.5 x 21 in (19.1 x 53.3 cm).
Final Blocking
- Spray the whole holder lightly with water until it’s damp but not soaked.
- Lay it face up on a blocking mat.
- Pin the panel to 7.5 x 21 in (19.1 x 53.3 cm), keeping the side edges straight.
- Fill each pocket with a toilet roll or a rolled towel to set the oval shape.
- Open the mesh loops evenly with your fingers.
- Fluff the poppy petals outward and press the leaves flat.
- Let it dry completely before hanging.
Final Quality-Control Checklist
- The panel measures 7.5 x 21 in (19.1 x 53.3 cm).
- Border Rnd 2 has 210 sc and lies flat.
- Each pocket has 64 sts, and each mesh round has 32 loops.
- The pocket seams are on the correct rows and sit level.
- The poppies are centered on the front of each pocket.
- The buds and leaves mirror each other on both sides.
- The strap is secure and the ring turns freely.
- All ends are woven in on the back.
Troubleshooting
- Base cups: Add 1 extra increase on each curved end, or go up a hook size.
- Base ruffles: Increase less often, or go down a hook size.
- Mesh pulls in: Chain a little more loosely, or use ch 4 instead of ch 3 in every mesh round.
- Panel sides wave: In Border Rnd 1, skip one more row-end on each side.
- Panel sides pull in: Skip one fewer row-end on each side.
- Pocket sags forward: Add a second line of whipstitching between the base and rim seams.
- Petals curl: Pin them flat while blocking.
Care
Hand wash in cool water with mild soap and lay flat to dry. Reshape the pockets while damp. If you can, remove the wooden ring before washing.
Final Notes
The measurements build on each other. Gauge sets the panel at 6.5 x 20 in (16.5 x 50.8 cm), and the two-round border brings it to 7.5 x 21 in (19.1 x 53.3 cm). Each 64-st pocket stands 3.25 in (8.3 cm) tall and is sewn on 28 rows above the one below it. If your pocket and panel match each checkpoint, everything will line up neatly on the wall.
Happy crocheting!