

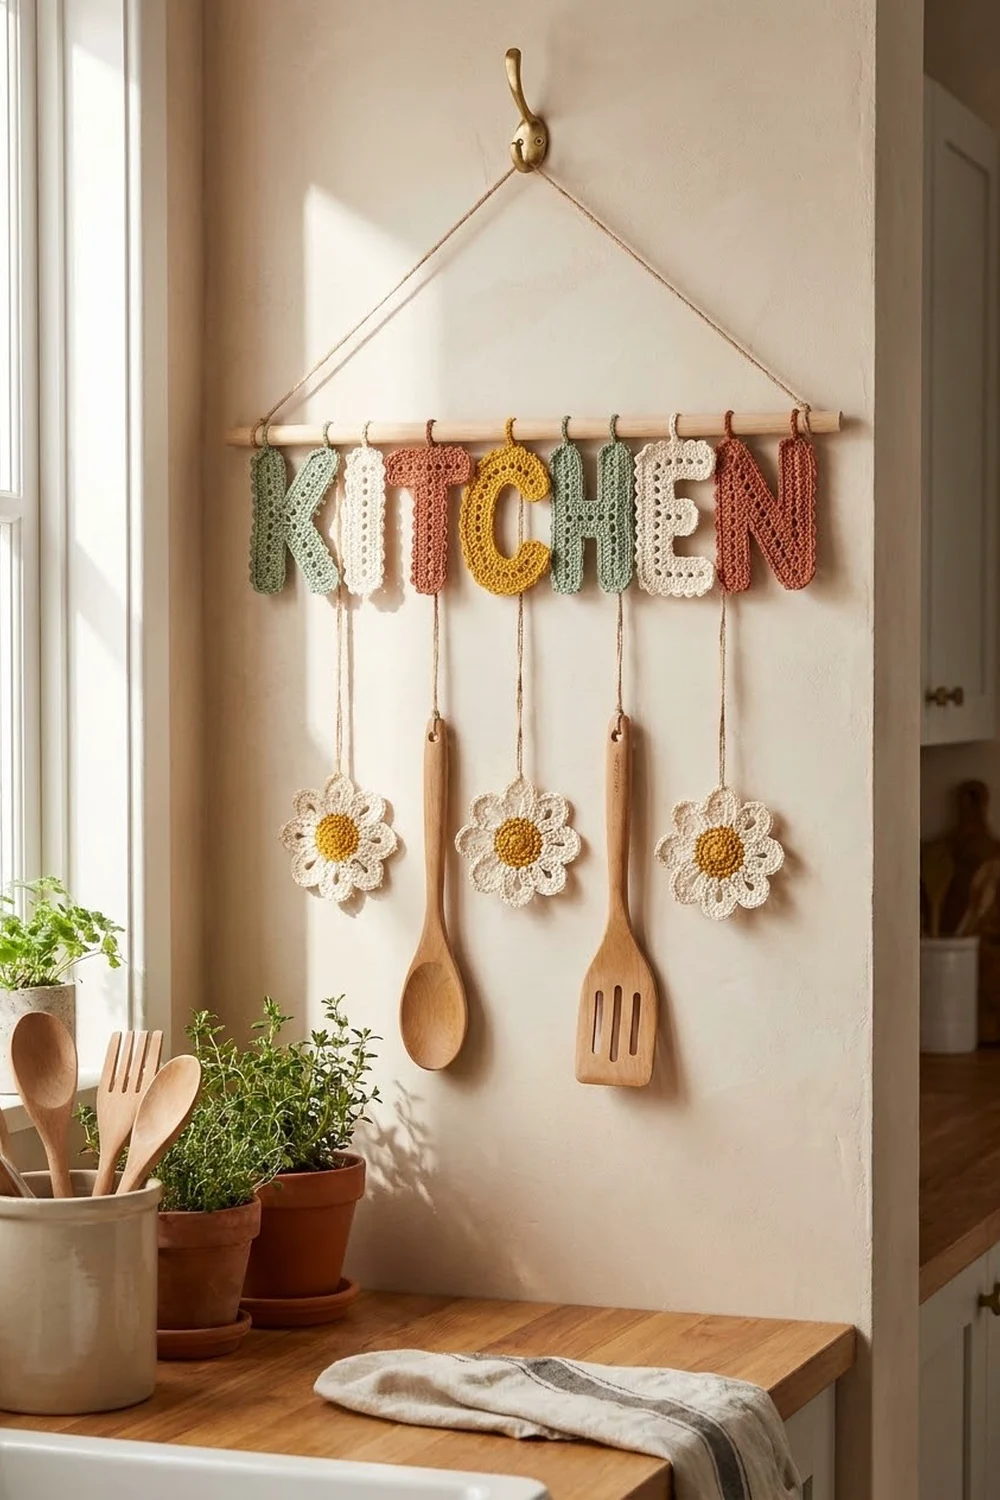
This cheerful wall hanging spells KITCHEN in chunky, lacy letters. Every stroke has a single line of eyelet holes down its center and a bumpy scalloped edge, so the letters look light and playful. Three cream daisies with mustard centers hang below the word, and a wooden spoon and spatula hang between them.
The palette is soft and warm: sage green, cream, terracotta, and mustard yellow. It suits a farmhouse or cottage kitchen, and it is a good way to use up leftover cotton.
This pattern uses US crochet terms. Each letter is 4 in (10.2 cm) tall. Each daisy is 3.5 in (8.9 cm) across. The row of letters is about 25.5 in (64.8 cm) wide, and it hangs from a 30 in (76.2 cm) dowel.
You will work every letter stroke as a short mesh strip with a two-round edging. Then you overlap and sew the strips into letter shapes. The C is one curved strip. The daisies are worked in the round. Each piece hangs on its own twine.
Finished Size and Construction
- Letter height: 4 in (10.2 cm)
- Daisy diameter: 3.5 in (8.9 cm)
- Letter row width: about 25.5 in (64.8 cm)
- Total drop, dowel to daisy bottom: about 11 in (27.9 cm)
- Skill level: Easy to Intermediate
- Terminology: US
- Yarn weight: Worsted (#4) cotton
- Hook: 4.0 mm (G-6)
- Number of pieces: 7 letters (made from 17 strips) and 3 daisies
- Layout: one row of 7 letters, with 3 daisies and 2 wooden utensils hanging below
- Piece size: a 7-mesh strip measures 4 in x 1.5 in (10.2 x 3.8 cm) after edging
- Size before border: a 7-mesh strip measures 3 in x 0.5 in (7.6 x 1.3 cm)
- Border depth: 0.5 in (1.3 cm) on every side
Materials
Use a smooth worsted-weight cotton or cotton blend. Cotton shows the eyelets and scallops clearly, and it holds its shape on a wall. Steer clear of fuzzy yarns, because they blur the holes.
- Sage green: 35 g, about 60 m
- Cream: 45 g, about 77 m
- Terracotta: 35 g, about 60 m
- Mustard yellow: 20 g, about 34 m
These amounts include a margin of roughly 30 percent for gauge swatches, sewing tails, and tension differences.
Tools
- 4.0 mm (G-6) crochet hook
- Tapestry needle
- Scissors
- Stitch markers
- Wooden dowel, 30 in (76.2 cm) long and 0.5 in (1.3 cm) thick
- Jute twine, about 6 yd (5.5 m)
- 1 small wooden spoon and 1 slotted wooden spatula, each about 6 in (15.2 cm) long
- Blocking mat and rust-proof pins
Abbreviations (US Terms)
- ch – chain
- sl st – slip stitch
- sc – single crochet
- hdc – half double crochet
- dc – double crochet
- sk – skip
- sp(s) – space(s)
- st(s) – stitch(es)
- rnd – round
Special stitch: Scallop loop. Ch 3, sk next sc, sl st in next sc. Each loop covers 2 sc and forms one bump on the edge.
Gauge and Checkpoints
- 5 ch = 1 in (2.5 cm)
- 1 dc row = 0.5 in (1.3 cm) tall
Make one 7-mesh strip, including its edging, before you make anything else. Check it at each stage:
- After Row 1: 3 in x 0.5 in (7.6 x 1.3 cm).
- After Edging Rnd 1: 3.4 in x 0.9 in (8.6 x 2.3 cm).
- After Edging Rnd 2: 4 in x 1.5 in (10.2 x 3.8 cm).
For the daisy, the mustard center should measure 1.25 in (3.2 cm) after Rnd 3.
If your strip is too long, go down to a 3.75 mm hook. If it is too short, go up to a 4.5 mm hook. If the length is right but the strip is too wide, your dc stitches are tall. Pull the first loop of each dc snug.
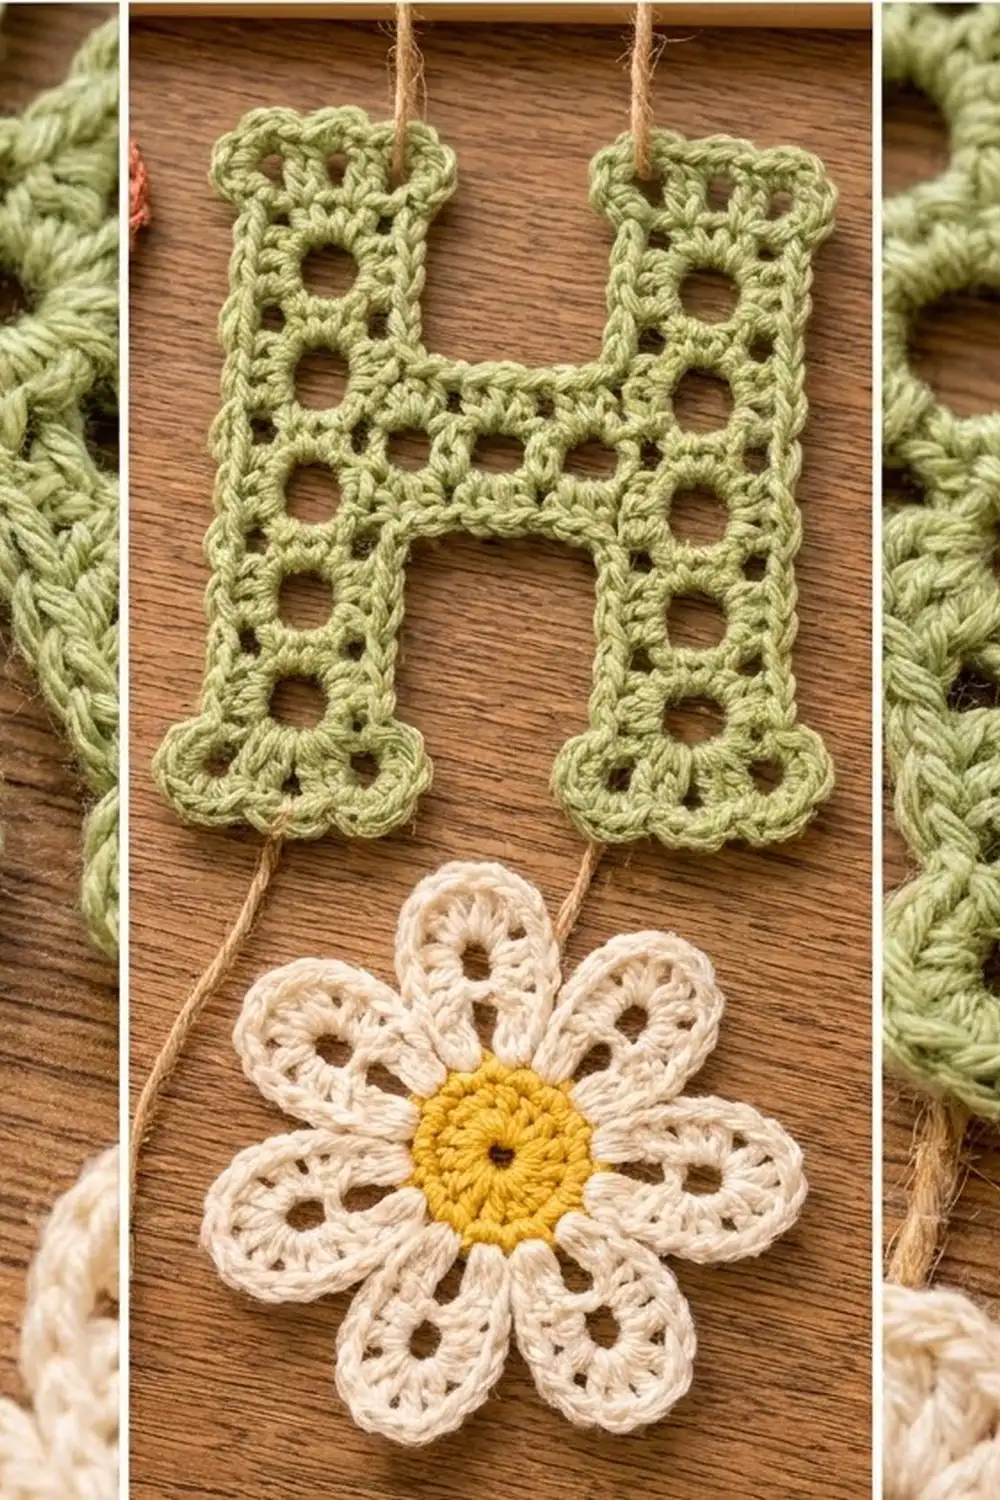
Mesh Strip (Letter Strokes)
Every straight stroke is a mesh strip. N is the number of eyelet holes in the strip.
Foundation: Ch 2N + 4.
Row 1: Dc in 6th ch from hook. The skipped chs count as the first dc, a ch-1 sp, and 1 skipped ch. Ch 1, sk next ch, dc in next ch. Repeat from * N – 1 more times. Do not turn.
Count: N + 1 dc (the beginning chs count as 1 dc) and N ch-1 sps.
| N | Foundation ch | Length before edging |
|---|---|---|
| 2 | 8 | 1 in (2.5 cm) |
| 3 | 10 | 1.4 in (3.6 cm) |
| 4 | 12 | 1.8 in (4.6 cm) |
| 5 | 14 | 2.2 in (5.6 cm) |
| 6 | 16 | 2.6 in (6.6 cm) |
| 7 | 18 | 3 in (7.6 cm) |
Every strip is 0.5 in (1.3 cm) wide before edging. Work the edging (see Border) on each strip before you assemble the letters.
Curved Strip (Letter C)
The C uses ch-2 spaces on its outer edge. Because the outer edge is longer than the inner edge, the strip curves on its own.
Foundation: With mustard, ch 29.
Row 1: Dc in 7th ch from hook. The skipped chs count as the first dc, a ch-2 sp, and 1 skipped ch. Ch 2, sk next ch, dc in next ch. Repeat from * 10 more times. Do not turn.
Count: 13 dc and 12 ch-2 sps.
The strip will curl into a crescent. You will shape it into a C when you block it.
Daisy (Make 3)
Rnd 1: With mustard, make a magic ring. Ch 1, 8 sc in ring. Join with a sl st to the first sc. (8 sts)
Rnd 2: Ch 1, 2 sc in each st around. Join. (16 sts)
Rnd 3: Ch 1, sc in next st, 2 sc in next st. Repeat from * around. Join. (24 sts) The center now measures 1.25 in (3.2 cm). Fasten off mustard.
Rnd 4: Join cream in any st. Ch 1, sc in the st where you joined, ch 9, sk 2 sts. Sc in next st, ch 9, sk 2 sts. Repeat from * 6 more times. Join to the first sc. (8 sc and 8 ch-9 loops)
Rnd 5: In the next ch-9 loop, work (sc, hdc, 3 dc, ch 3, 3 dc, hdc, sc). Sl st in the next sc. Repeat from * around. (8 petals, each with 10 sts and 1 ch-3 tip)
The ch-9 loop arches over just 2 skipped stitches. That leaves an open teardrop hole inside each petal, which gives the lacy look. Fasten off and weave in the ends.
Make All Pieces
| Color | Pieces |
|---|---|
| Sage | three 7-mesh strips (K stem, both H stems), two 4-mesh strips (K arms), one 2-mesh strip (H bar) |
| Cream | two 7-mesh strips (I, E stem), two 3-mesh strips (E top and bottom arms), one 2-mesh strip (E middle arm), petals for 3 daisies |
| Terracotta | three 7-mesh strips (both N stems, N diagonal), one 6-mesh strip (T stem), one 5-mesh strip (T bar) |
| Mustard | one curved C strip, centers for 3 daisies |
That makes 17 strips and 3 daisies in total.
Layout grid (front view):
=========================== DOWEL 30 in (76.2 cm) ===========================
     |        |        |        |        |        |        |
    [K]      [I]      [T]      [C]      [H]      [E]      [N]
   sage     cream   terra.  mustard    sage     cream   terra.
     |                 |        |                 |        |
  (daisy)          (spoon)  (daisy)          (spatula) (daisy)
Joining: Assembling the Letters and Hanging
Method. Lay the edged strips face up in letter shape. Wherever two strips meet, tuck one end behind the other strip. With a tapestry needle and a matching tail, whipstitch the 5 end sc of the tucked strip (from Edging Rnd 1) to the back loops of the sc they sit behind. Work 1 whipstitch for each sc, so the seam has 5 stitches. Stay on the back of the work, so the front scallops remain loose.
- I: one 7-mesh strip, used as it is.
- H: two 7-mesh stems set side by side, 1 in (2.5 cm) apart. Tuck each end of the 2-mesh bar 0.5 in (1.3 cm) behind a stem, centered on the 4th hole.
- E: a 7-mesh stem. Tuck the 3-mesh arms 0.9 in (2.3 cm) behind it at the top and bottom. Tuck the 2-mesh arm behind it at the 4th hole.
- T: lay the 5-mesh bar across the top. Tuck the top of the 6-mesh stem behind the center of the bar. The T should be 4 in (10.2 cm) tall overall.
- K: a 7-mesh stem. Tuck both 4-mesh arms behind it at the 4th hole, one angled up and the other angled down, each at about 45 degrees.
- N: two 7-mesh stems with a 7-mesh diagonal running from the top left to the bottom right. Tuck each end of the diagonal behind a stem.
Tension. Pull each whipstitch just snug enough that the strips lie flat together. If you pull too hard, the front puckers. If you leave the stitches loose, the strips will shift when the letter hangs.
Size checkpoint. Every letter should be 4 in (10.2 cm) tall. Widths are about: K 3.5 in (8.9 cm), I 1.5 in (3.8 cm), T 3.2 in (8.1 cm), C 3.5 in (8.9 cm), H 4 in (10.2 cm), E 3 in (7.6 cm), and N 3.75 in (9.5 cm).
Hanging. Thread a 12 in (30.5 cm) length of twine through the top scallop loops of each letter. Tie it to the dowel so the top of every letter sits 2 in (5.1 cm) below the dowel, with about 0.5 in (1.3 cm) between letters. Tie each daisy through one petal tip to the bottom scallops of K, C, or N, so it hangs 1.5 in (3.8 cm) below the letter. Tie the spoon below T and the spatula below E. Finally, tie a hanging cord from one end of the dowel to the other.
Border: Two-Round Scalloped Edging
Border gauge: Rnd 1 adds 0.2 in (0.5 cm) to every side. Rnd 2 adds 0.3 in (0.8 cm). Together they add 0.5 in (1.3 cm) per side.
Work this edging on every mesh strip in the strip’s own color.
Rnd 1 (sc frame): Do not turn. Ch 1, then work the sides in this order:
- End 1: Work 5 sc around the post of the last dc to round off the end.
- Side B (foundation): Work 1 sc in each foundation ch: the N dc bases, the N skipped chs, and the ch at the base of the beginning chain. That gives 2N + 1 sc. Mark the first sc of Side B.
- End 2: Work 5 sc around the beginning-ch post.
- Side A (top): Work 1 sc in each dc top and 1 sc in each ch-1 sp. That gives 2N + 1 sc.
Join to the first sc of End 1.
Total: (2N + 1) x 2 + 5 + 5 = 4N + 12 sc. A 7-mesh strip has 40 sc.
Rnd 2 (scallop loops): Sl st in each of the next 5 sc. The last of these sl sts goes into the marked sc. Work scallop loops around, joining the last loop into the marked sc.
- Side B: N loops
- Each end: 3 loops, including 1 loop that turns the corner
- Side A: N loops
Total: 2N + 6 loops. A 7-mesh strip has 20 loops. Fasten off, leaving an 8 in (20.3 cm) tail for sewing.
C edging: Work it the same way. The inner (foundation) edge is Side B, with 1 sc in each of its 25 foundation positions. Each end gets 5 sc. On the outer edge, work 1 sc in each dc and 2 sc in each ch-2 sp, for 37 sc. The total is 72 sc. In Rnd 2, the inner edge gets 12 loops, each end gets 3, and the outer edge gets 18, for 36 loops.
Why the math works. Each long side has an odd count, 2N + 1, so slip stitches land on sc 1, 3, 5, and so on through the last sc. That makes exactly N loops per side. Each end has 5 sc, which take 2 loops, and 1 more loop carries you around to the next side. The Rnd 1 total of 4N + 12 is always even, so every loop covers exactly 2 sc and the round closes cleanly.
Final Blocking
- Soak all pieces in cool water for 10 minutes. Press out the water in a towel without wringing.
- Pin each 7-mesh strip to 4 in x 1.5 in (10.2 x 3.8 cm), pinning each scallop loop outward.
- Pin the C strip into a C shape 4 in (10.2 cm) tall, with the opening facing right.
- Pin each daisy to 3.5 in (8.9 cm) across. Open each petal hole by pinning the ch-3 tip outward.
- Let everything dry completely, then assemble the letters.
- After assembly, lightly steam the seams from the back, but don’t let the iron touch the yarn.
Final Quality-Control Checklist
- Every strip has the correct number of holes, and each hole is open and centered.
- Rnd 1 counts match 4N + 12, and the C has 72 sc.
- The scallop loops are evenly spaced, with no gaps at the ends.
- Each letter is 4 in (10.2 cm) tall.
- No tucked ends show from the front.
- Daisy centers are flat, and all 8 petals are the same size.
- All twine knots are tight, and the letters hang level.
Troubleshooting
- Strip twists: You probably turned before Rnd 1. Rework the edging without turning, then block flat.
- Wavy edging: Rnd 1 has too many sc. Recount each side against 2N + 1.
- Gap at the end of Rnd 2: You have an odd number of sc. Check that each end has 5 sc.
- C won’t curve: Your ch-2 spaces are too tight. Chain more loosely, or pin the curve firmly while blocking.
- Daisy cups: Your Rnd 4 chains are too short. Chain loosely, or use 10 ch.
- Letters tilt: Move the twine so it sits at the letter’s center of balance.
Care
Dust the hanging gently, or shake it out. If a letter gets dirty, untie it, hand wash it in cool water, and lay it flat to dry.
Final Notes
The measurement chain is short. Each 7-mesh strip goes from 3 in (7.6 cm) after Row 1, to 3.4 in (8.6 cm) after the sc frame, to 4 in (10.2 cm) after the scallops. That 4 in (10.2 cm) sets the height of every letter. The seven letters, with small gaps between them, make a row about 25.5 in (64.8 cm) wide on a 30 in (76.2 cm) dowel. Check your first strip carefully, and everything after it falls into place.
Happy crocheting!