

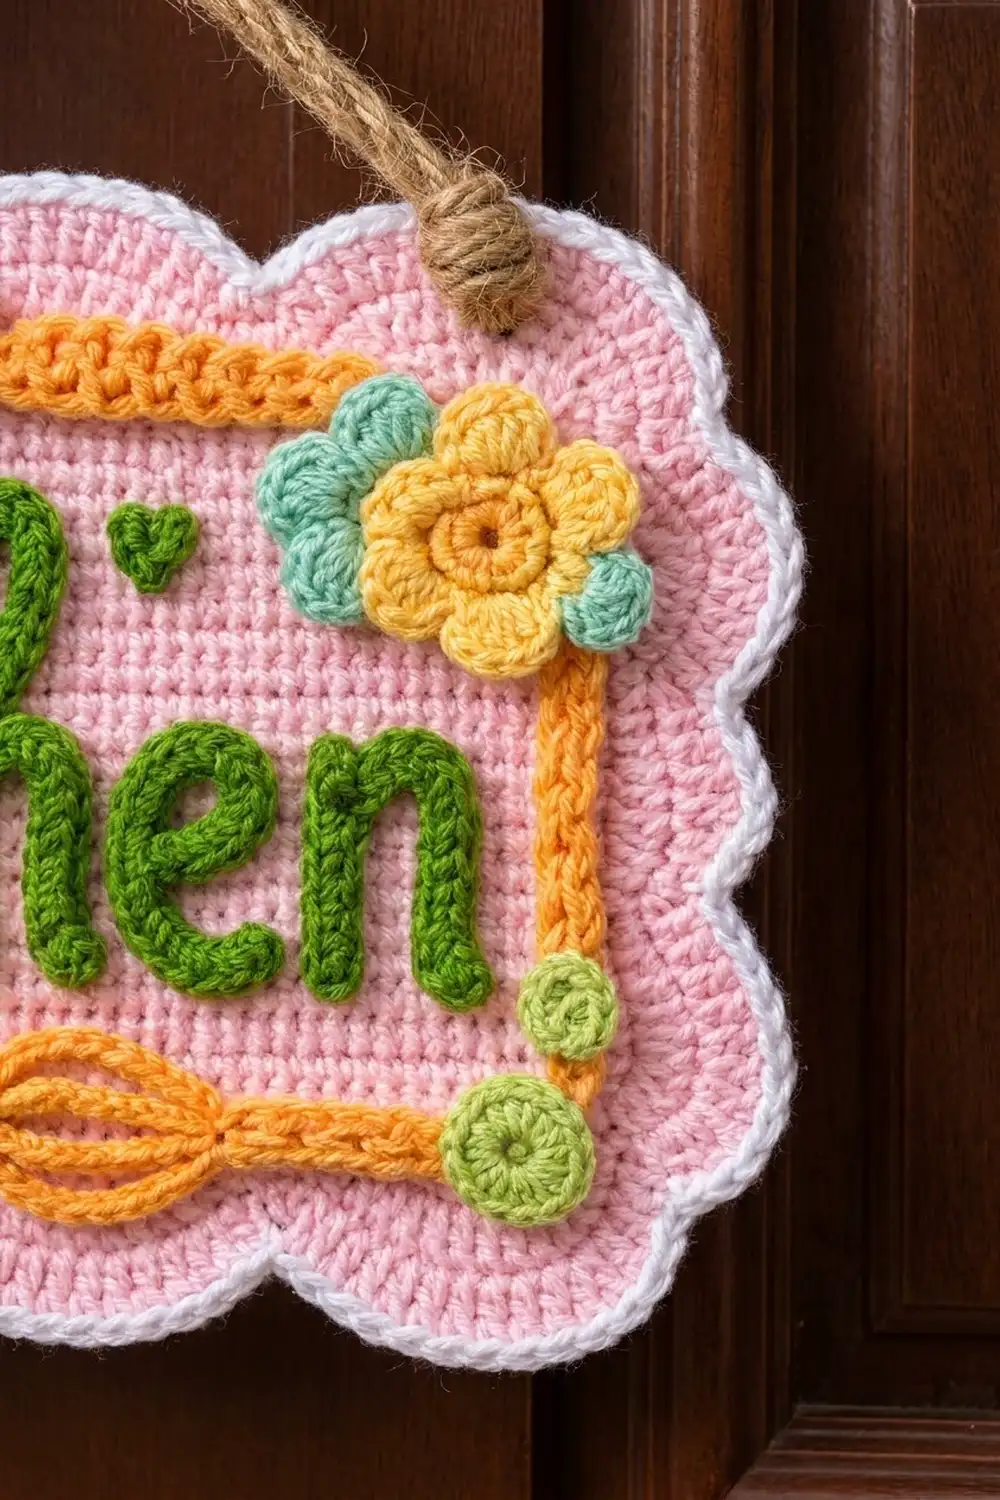
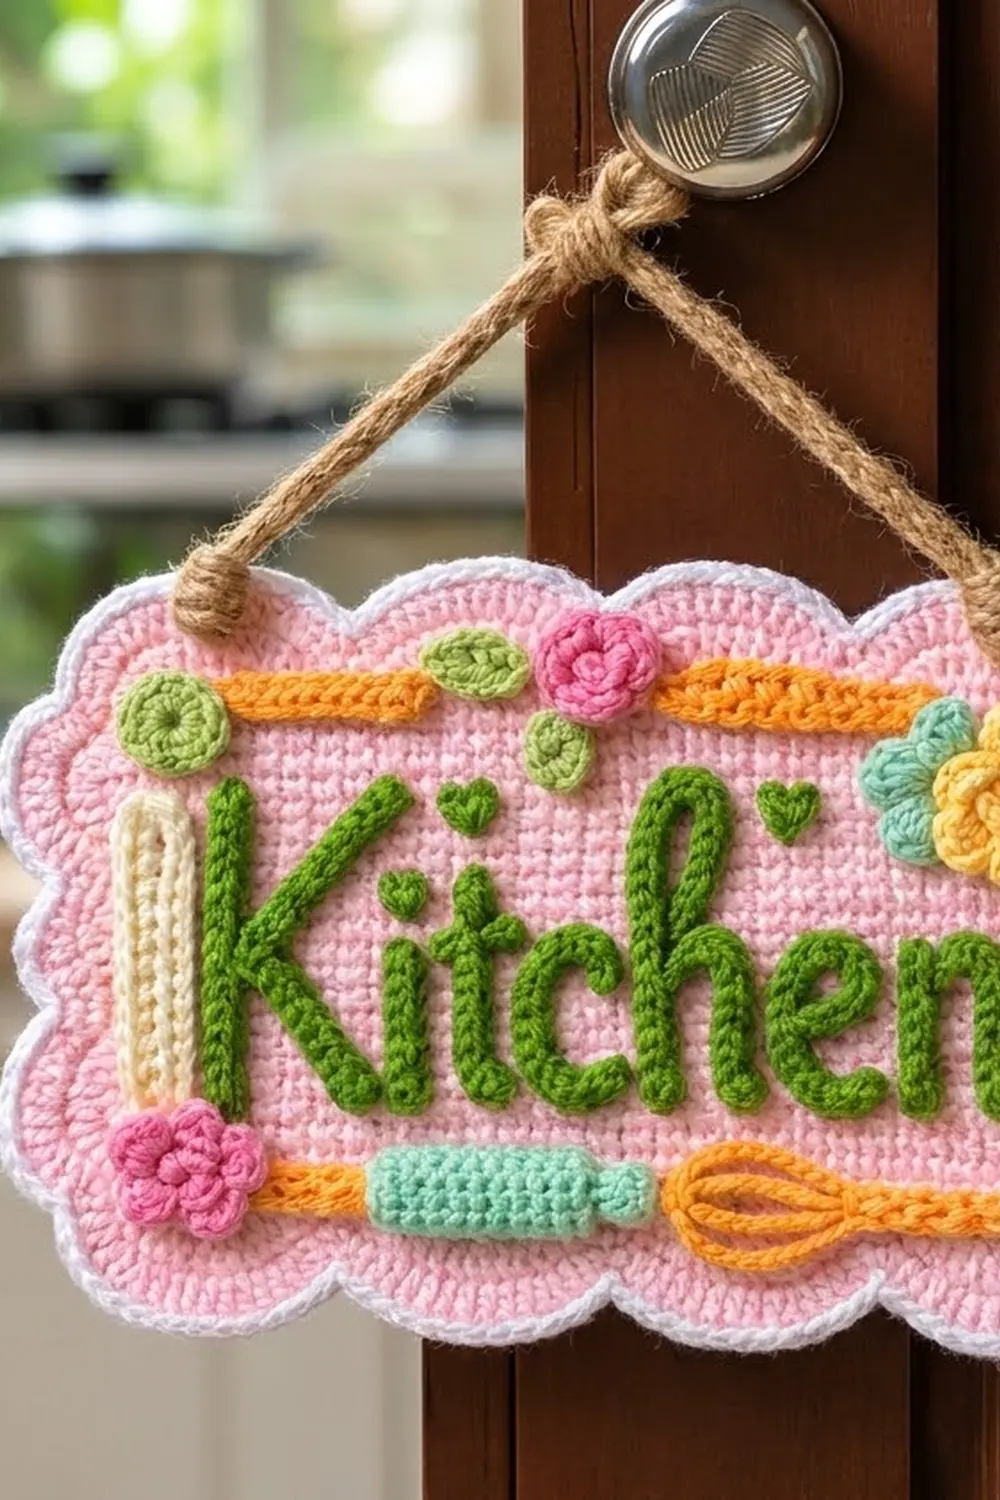
The Sweet Pantry Kitchen Sign is a cheerful door hanger. It has a soft pink panel, a scalloped pink-and-white edge, and the word “Kitchen” in chunky, raised green letters. A thin orange frame surrounds the word, along with a wooden spoon, a rolling pin, a whisk, flowers, leaves, and tiny hearts.
The colors are light pink, white, leaf green, orange, cream, mint, sunny yellow, rose pink, and lime green. The look is bright, playful cottage kitchen.
This pattern uses US crochet terms. The finished sign measures 11.75 in (29.8 cm) wide by 7.2 in (18.3 cm) tall at the scallop peaks.
You work a single crochet panel in rows and add four border rounds that form the scallops. Then you add the letters and frame with surface slip stitch, and sew on the small appliqués.
Finished Size and Construction
- Finished size: 11.75 in x 7.2 in (29.8 cm x 18.3 cm)
- Skill level: Intermediate
- Terminology: US crochet terms
- Yarn weight: Worsted (#4) cotton
- Hook: 4.0 mm (G-6)
- Number of pieces: 1 sign panel plus 14 small sewn-on appliqués
- Layout: single rectangular panel, landscape
- Panel size before border: 9.25 in x 4.7 in (23.5 cm x 11.9 cm), 37 sts x 21 rows
- Border depth: 1.25 in (3.2 cm) at the scallop peaks, 0.75 in (1.9 cm) at the valleys
Materials
Use a smooth worsted cotton. It holds its shape and shows surface stitches clearly.
- Light pink (panel, scallops): 35 g / 56 m
- White (edging): 5 g / 8 m
- Leaf green (letters, hearts): 10 g / 16 m
- Orange (frame, whisk): 6 g / 10 m
- Cream (spoon): 3 g / 5 m
- Mint (rolling pin, back flower): 4 g / 6 m
- Sunny yellow (front flower): 3 g / 5 m
- Rose pink (2 flowers): 3 g / 5 m
- Lime green (circles, leaves): 3 g / 5 m
Tools:
- 4.0 mm (G-6) crochet hook
- Tapestry needle
- Water-soluble fabric marker
- 4 locking stitch markers
- Rustproof pins and a blocking board
- Jute twine, 24 in (61.0 cm)
All quantities include a margin of about 15 percent.
Abbreviations (US Terms)
- ch – chain
- sl st – slip stitch
- sc – single crochet
- hdc – half double crochet
- dc – double crochet
- st(s) – stitch(es)
- RS – right side
- rnd – round
- MR – magic ring
Surface slip stitch: Hold the yarn behind the panel. Insert the hook from front to back between stitches and pull up a loop. Insert the hook one stitch-length farther along the drawn line, pull up a loop, and draw it through the loop on the hook. Repeat. The front shows a neat chain line.
Gauge and Checkpoints
Gauge: 16 sc and 18 rows = 4 in (10.2 cm).
Use the panel as your test piece. Measure after Row 8, before you go further.
- Checkpoint 1 (Row 8): width 9.25 in (23.5 cm)
- Checkpoint 2 (Row 21): 9.25 in x 4.7 in (23.5 cm x 11.9 cm)
- Checkpoint 3 (border Rnd 2): 10.25 in x 5.7 in (26.0 cm x 14.5 cm)
- Checkpoint 4 (Rnd 4): 11.75 in x 7.2 in (29.8 cm x 18.3 cm)
If the panel is too wide, go down half a hook size. If it is too narrow, go up half a size. Change the hook, never the stitch count. The border math depends on 37 sts and 21 rows.
Sign Panel
With light pink, ch 38.
Row 1 (RS): Sc in 2nd ch from hook and in each ch across, turn. (37 sc)
Rows 2–21: Ch 1 (does not count as a st), sc in each st across, turn. (37 sc)
After Row 21, do not fasten off and do not turn.
Border
Rnds 1–2 square the edges. Rnd 3 forms the scallops. Rnd 4 adds the white outline.
Border gauge: 1 sc per stitch along the top and bottom, and 1 sc per row end along the sides.
Rnd 1 (light pink): Ch 1. Work 3 sc in the last st of Row 21 (corner). Working down the side, sc in the ends of Rows 20 through 2 (19 sc). Work 3 sc in the beginning foundation ch (corner), sc in the next 35 chs, then 3 sc in the last foundation ch (corner). Sc in the ends of Rows 2 through 20 (19 sc). Work 3 sc in the first st of Row 21 (corner), then sc in the next 35 sts. Sl st to first sc.
Count: 12 corner sc + 35 + 35 + 19 + 19 = 120 sts. Counted from corner center to corner center, including both corner centers, each long side has 37 sts and each short side has 21 sts.
Rnd 2: Ch 1, sc in each st around, working 3 sc in the center sc of each corner. Sl st to first sc. Mark the center sc of each new corner.
Count: 120 + 8 = 128 sts. From corner center to corner center, the long sides have 39 sts each and the short sides have 23 sts each.
Side lobe (worked over 7 sts): Hdc in next st, dc in next st, 2 dc in next st, 3 dc in next st, 2 dc in next st, dc in next st, hdc in next st. (11 sts)
Corner lobe (worked over 7 sts, with the marked st in the middle): Hdc in next st, 2 dc in next st, 2 dc in next st, 5 dc in marked st, 2 dc in next st, 2 dc in next st, hdc in next st. (15 sts)
Rnd 3: Sl st in the next 6 sts. The hook is now in the 4th st past the first marked corner, on a short side. Ch 1, sc in the same st (valley). Then:
- Short side: (side lobe, sc in next st) twice, then a corner lobe.
- Long side: sc in next st, (side lobe, sc in next st) 4 times, then a corner lobe.
- Second short side and second long side: repeat the two sides above. The final corner lobe is worked into the Rnd 2 sts under your opening slip stitches.
Sl st to first sc. Fasten off.
Count: 12 side lobes x 11 (132) + 4 corner lobes x 15 (60) + 16 valley sc = 208 sts.
Rnd 4 (white): Join white in any valley sc. Ch 1, sc in each st around, working 2 sc in the center (3rd) dc of each corner 5-dc group. Sl st to first sc. Fasten off.
Count: 208 + 4 = 212 sts. That is 11 sc per side lobe, 16 sc per corner lobe, and 1 sc per valley.
Why the math works: Each scallop repeat uses 8 sts: 7 for the lobe and 1 for the valley. A long side works out as 3 + 1 + (4 x 8) + 3 = 39. A short side works out as 3 + 1 + (2 x 8) + 3 = 23. In each sum, the 3s are the corner-lobe stitches on either side of the corner centers. Because every corner lobe is centered on its corner, the outline is symmetrical.
Lettering and Frame Lines
First, lightly block the bordered panel (Final Blocking, steps 1–4). On the RS, draw these guide lines with the marker. Measure from the panel edge, not from the scallops.
- Top line: 0.5 in (1.3 cm) below the top edge. It runs from 1.25 in (3.2 cm) in from the left to 3 in (7.6 cm) in from the right.
- Right line: 0.6 in (1.5 cm) in from the right edge. It runs from 1.5 in (3.8 cm) below the top down to the bottom line.
- Bottom line: 0.5 in (1.3 cm) above the bottom edge. It runs from 1 in (2.5 cm) in from the left to 0.6 in (1.5 cm) in from the right.
- “Kitchen”: rounded letters with a capital K, centered on the panel, with the baseline 1.25 in (3.2 cm) above the bottom edge. The K, t, and h are 2.25 in (5.7 cm) tall. The other lowercase letters are 1.25 in (3.2 cm) tall. The whole word is 6.75 in (17.1 cm) long. Leave off the dot on the i.
Frame: With orange, work one pass of surface slip stitch along the top, right, and bottom lines.
Letters: With leaf green, surface slip stitch each letter stroke. Then work a second pass right beside the first so the two lines touch. This doubled line gives the chunky, raised look. Knot the tails on the wrong side.
Appliqués
Leave a 10 in (25.4 cm) tail on each piece for sewing.
Wooden Spoon (make 1, cream): Ch 16. Sc in 2nd ch from hook and next 9 chs, hdc in next 2 chs, dc in next 2 chs, 7 dc in last ch. Working along the other side of the chain: dc in next 2 chs, hdc in next 2 chs, sc in next 9 chs, 3 sc in last ch. Sl st to first sc. (37 sts) The spoon is 3.75 in (9.5 cm) long, with an oval bowl at one end.
Rolling Pin (make 1, mint): Ch 13.
Row 1: Sc in 2nd ch from hook and each ch across, turn. (12 sc)
Rows 2–5: Ch 1, sc in each st across, turn. (12 sc)
Handles: Sl st into the row end of Row 3 on one short side. Ch 4, sl st in 2nd ch from hook and next 2 chs, then sl st into the same row end. Fasten off. Repeat on the other short side. The body is 3 in x 1.1 in (7.6 cm x 2.8 cm).
Whisk (make 1, orange): Ch 9. Sl st in 2nd ch from hook and each ch across (8 sl st handle). At the end of the handle, work (ch 16, sl st in same st), then (ch 12, sl st in same st), then (ch 8, sl st in same st). This makes three nested loops. Fasten off. The whisk is 3.5 in (8.9 cm) long.
Rose Flower (make 2, rose pink):
Rnd 1: MR, 5 sc in ring. Pull closed and sl st to first sc. (5 sc)
Rnd 2: (Sc, hdc, dc, hdc, sc) in each sc. Sl st to first sc. (5 petals, 25 sts) The flower is 1.25 in (3.2 cm) across.
Back Flower (make 1, mint): Work as for the Rose Flower.
Front Flower (make 1, sunny yellow):
Rnd 1: MR, 6 sc in ring. Sl st to first sc. (6 sc)
Rnd 2: 2 sc in each st. Sl st to first sc. (12 sc)
Rnd 3: (Sl st in next st, 5 dc in next st) 6 times. Sl st to first sl st. (6 petals, 36 sts) The flower is 1.5 in (3.8 cm) across.
Circle (make 3, lime green):
Rnd 1: MR, 6 sc in ring. Leave a small hole in the center. Sl st to first sc. (6 sc)
Rnd 2: 2 sc in each st. Sl st to first sc. (12 sc) The circle is 0.9 in (2.3 cm) across.
Leaf (make 2, lime green): Ch 5. Sc in 2nd ch from hook, hdc in next ch, dc in next ch, (hdc, ch 2, hdc) in last ch. Working along the other side: dc in next ch, hdc in next ch, sc in next ch. Sl st to first sc. (8 sts plus a ch-2 tip) The leaf is 0.75 in (1.9 cm) long.
Heart (make 2, leaf green): MR. Into the ring work: ch 2, 2 dc, ch 1, dc (point), ch 1, 2 dc, ch 2, sl st in ring. Pull closed. The heart is 0.5 in (1.3 cm) across.
Placement and Sewing
Pin everything in place before you sew anything.
- Spoon: upright with the bowl at the top, 0.6 in (1.5 cm) in from the left panel edge, starting 0.5 in (1.3 cm) above the bottom edge.
- Circles: one at the left end of the top line, one halfway down the right line, and one at the right end of the bottom line.
- Rose Flowers: one on the top line, 3.25 in (8.3 cm) in from the left edge. The other goes at the left end of the bottom line, overlapping the foot of the spoon.
- Leaves: one to the left of the top Rose Flower, and one tucked below it.
- Layered flowers: sew the mint flower at the right end of the top line. Sew the yellow flower on top of it, shifted 0.5 in (1.3 cm) down and to the right, so mint petals show at the upper left.
- Rolling Pin: on the bottom line, starting 2 in (5.1 cm) in from the left edge.
- Whisk: to the right of the rolling pin, with the loops toward the pin and the handle toward the corner circle. Shape the loops into an oval and tack them down every 0.25 in (0.6 cm).
- Hearts: one dotting the i, and one above the space between the c and the h.
Whipstitch around each appliqué with matching yarn, catching only the front loops of the panel. Weave in all ends.
Hanger: Thread one end of the twine from back to front through the top-left corner lobe, 0.5 in (1.3 cm) in from the edge. Tie a large overhand knot on the front. Repeat at the top-right corner.
Final Blocking
- Mist the sign until it is evenly damp.
- Lay it face up on the blocking board.
- Pin the panel corners to 9.25 in x 4.7 in (23.5 cm x 11.9 cm).
- Pin each scallop peak outward to reach 11.75 in x 7.2 in (29.8 cm x 18.3 cm).
- Smooth the appliqués flat with your fingers. Never pin through the letters.
- Let it dry for at least 12 hours.
- Unpin, then remove any leftover marker with a damp swab.
Final Quality-Control Checklist
- Panel is 37 sts x 21 rows and measures 9.25 in x 4.7 in (23.5 cm x 11.9 cm).
- Rnd 2 has 128 sts: 39 per long side and 23 per short side.
- There are 16 lobes: 4 on each long side, 2 on each short side, and 4 corners.
- White Rnd 4 has 212 sts.
- Letters are doubled and the word is centered.
- Mint petals peek out from behind the yellow flower.
- The knots are secure and the sign hangs level.
Troubleshooting
- Short sides ripple: Work Rnd 1 with a hook half a size smaller.
- Scallops cup: Use a hook half a size larger for Rnd 3 only.
- Scallops ruffle: Use a hook half a size smaller for Rnd 3.
- Letters pucker: Pull up taller loops and keep the yarn slack behind the panel.
- Sign tilts: Retie one knot so both sides of the twine are the same length.
Care
Spot clean with mild soap and cool water, then reshape and dry flat. Don’t machine wash, because it can loosen the appliqués.
Final Notes
The measurements build on each other. At a gauge of 16 sc per 4 in (10.2 cm), the 37-st x 21-row panel measures 9.25 in x 4.7 in (23.5 cm x 11.9 cm). Two sc rounds bring it to 128 sts and 10.25 in x 5.7 in (26.0 cm x 14.5 cm). The 8-st scallop repeat fits every side exactly. The white edge finishes the sign at 11.75 in x 7.2 in (29.8 cm x 18.3 cm). If each checkpoint is right, the decorations will line up.
Happy crocheting!