

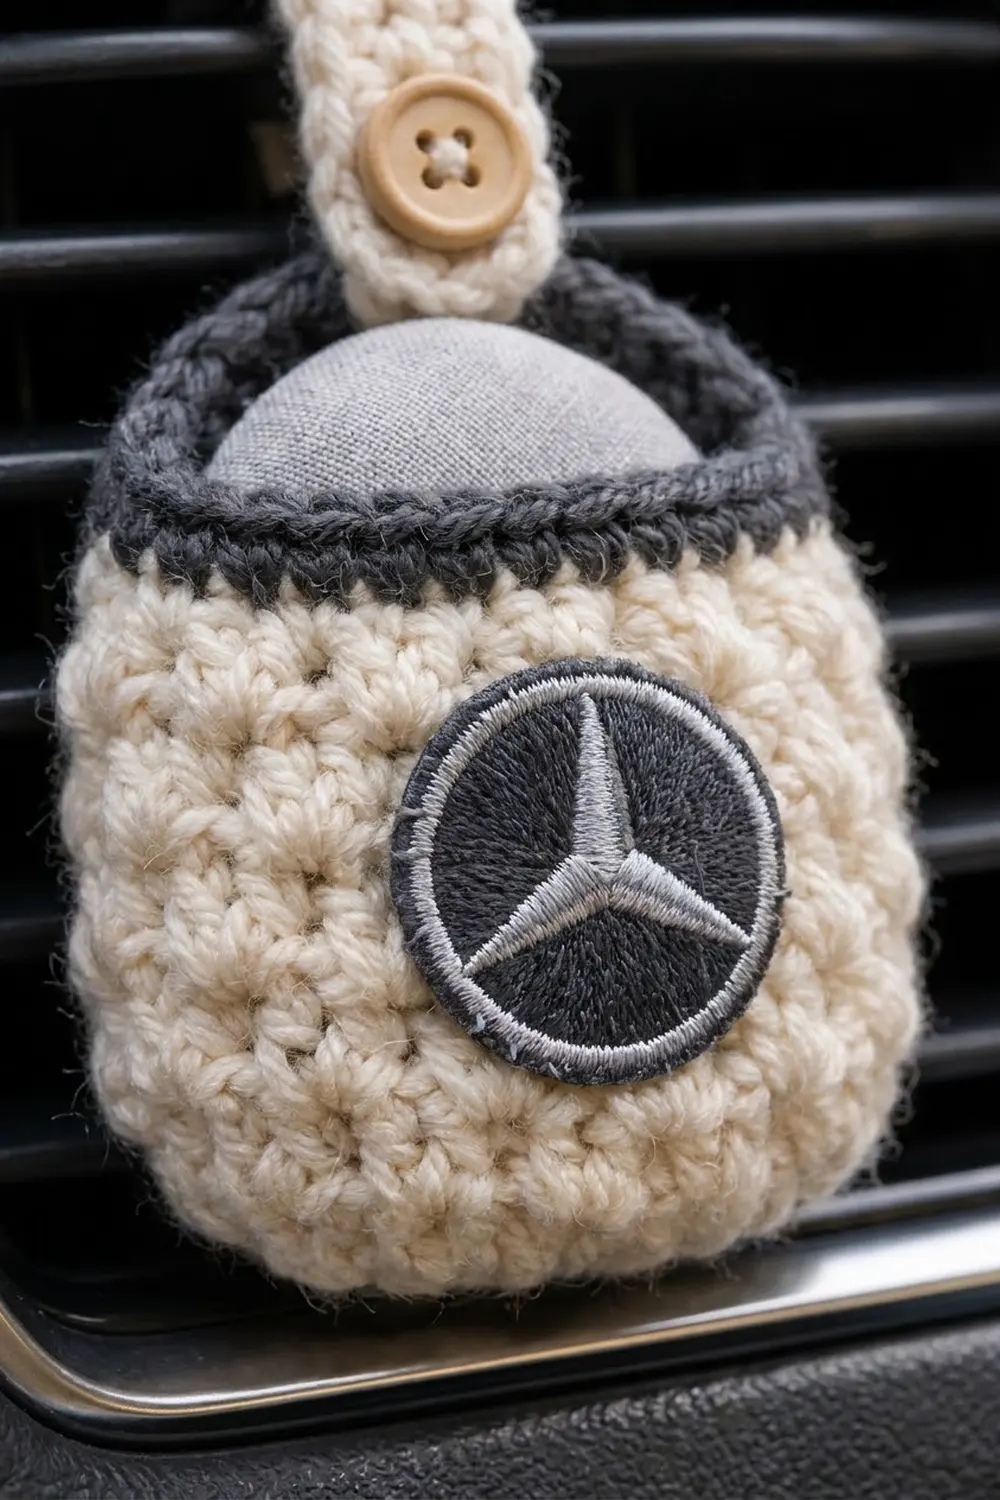
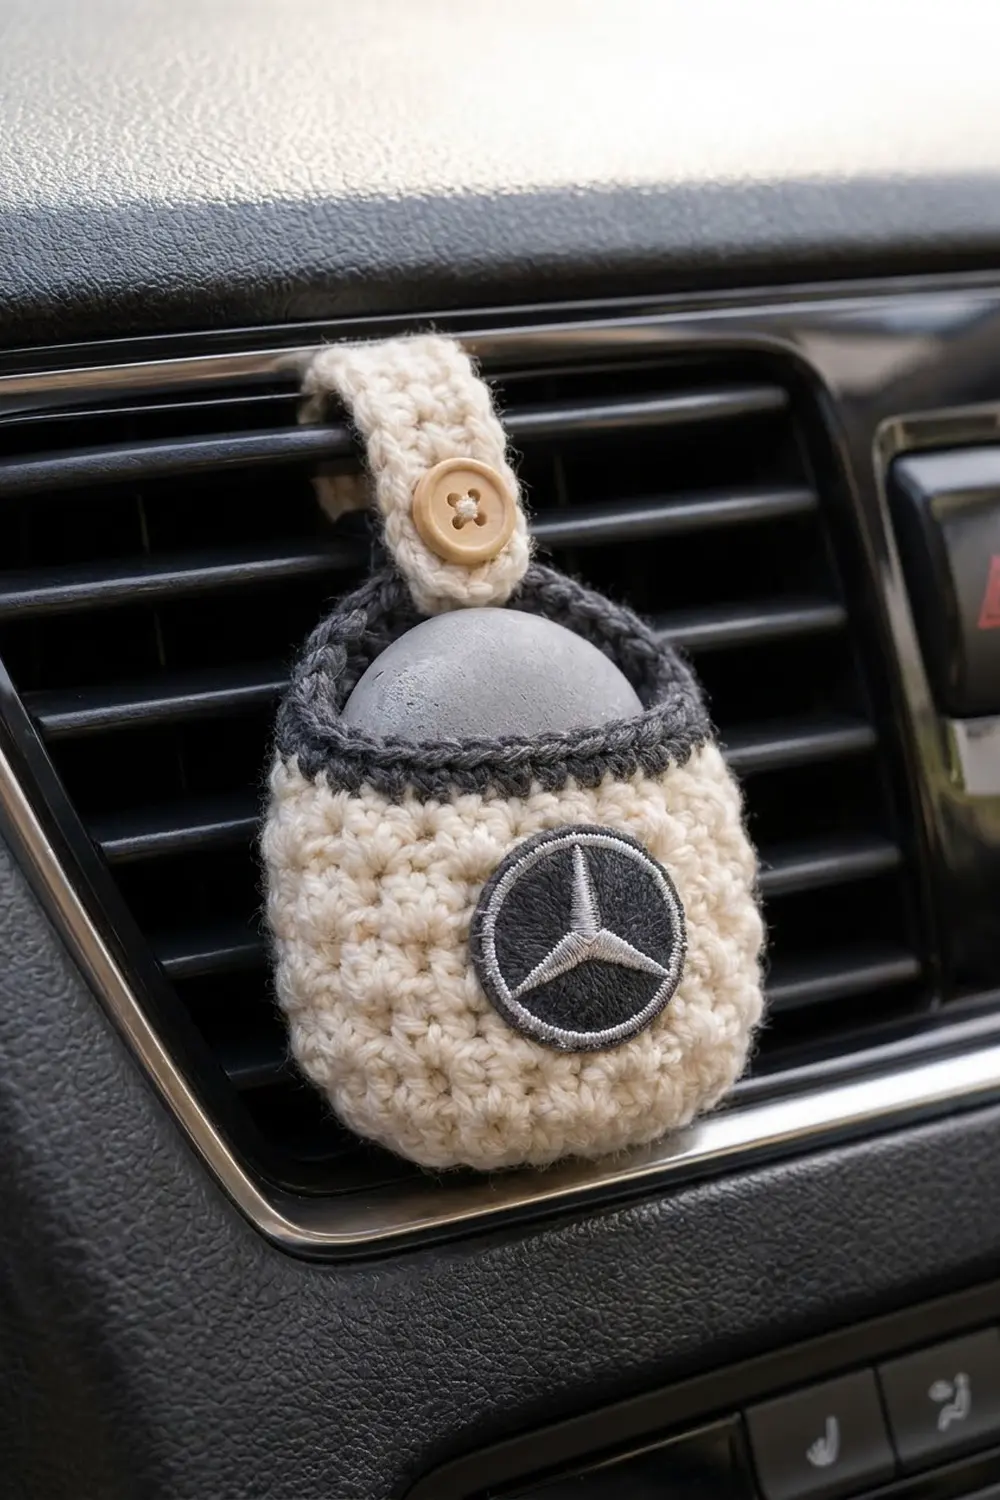
This little pouch hangs from a car air vent and holds a scent stone or a small fabric sachet. The body is soft cream with a pebbly texture. A charcoal rim frames the opening, and a round dark patch sits on the front like a badge. A narrow cream strap with a wooden button loops over a vent slat to hold the pouch in place.
The look is tidy and a little upscale, so it suits a modern dashboard. The texture comes from a single crochet V-stitch. This stitch makes a firm fabric that keeps its shape, so a small insert won’t slip through.
The pattern uses US crochet terms. The finished pouch measures about 3.5 in (8.9 cm) wide and 4 in (10.2 cm) tall when laid flat, not counting the strap. The strap is about 5.6 in (14.2 cm) long and 0.9 in (2.3 cm) wide.
Construction is simple. You crochet an oval base in rounds, turn up the walls with a back-loop round, and work the textured body in joined rounds. Then you add a two-round charcoal rim and make a separate strap with a buttonhole. To finish, sew on the strap, the button and the patch.
Finished Size and Construction
- Finished size: 3.5 in (8.9 cm) wide × 4 in (10.2 cm) tall, flat
- Skill level: Easy
- Terminology: US crochet terms
- Yarn weight: Worsted (medium, #4), cotton or cotton blend
- Hook: 4.0 mm (US G-6)
- Number of pieces: 1 pouch, plus 1 strap and 1 patch sewn on
- Layout: Single pouch, no joining of motifs
- Base size: about 2.75 in (7.0 cm) × 1.75 in (4.4 cm)
- Size before rim: 3.5 in (8.9 cm) wide × 3.6 in (9.1 cm) tall, flat
- Rim depth: 2 rounds, about 0.4 in (1.0 cm)
Materials
Choose a smooth worsted-weight cotton. Cotton holds its shape in a warm car and won’t get fuzzy against a vent. The sample yarn has about 85 m per 50 g.
- Cream (main color): 22 g, about 37 m
- Charcoal (rim and patch): 6 g, about 10 m
- Light gray (optional patch edge): 2 g, about 3 m
These amounts include a small margin for swatching and weaving in ends.
Tools and notions:
- 4.0 mm (US G-6) crochet hook
- Tapestry needle
- Sewing needle and matching thread
- 1 wooden button, 15 mm (0.6 in)
- 1 round sew-on patch, about 1.5 in (3.8 cm) across, or the crocheted patch below
- Stitch marker
- Scissors and a ruler
- A scent stone, felt pad or small fabric sachet about 2.5 in (6.4 cm) wide
Abbreviations (US Terms)
- ch – chain
- sc – single crochet
- sl st – slip stitch
- st(s) – stitch(es)
- sk – skip
- sp – space
- BLO – back loop only
- rnd(s) – round(s)
- inc – 2 sc in the same st
Special stitch – V-st (single crochet V-stitch): (sc, ch 1, sc) in the stitch or space indicated. Each V-st holds 2 sc and 1 ch-1 sp.
Gauge and Checkpoints
Gauge matters here because the pouch has to fit your insert. Make the base first and measure it before you go on.
- Single crochet: 18 sc and 20 rows = 4 in (10.2 cm)
- V-st pattern: 8 V-sts = 3.5 in (8.9 cm) wide, and 8 rnds = 2 in (5.1 cm) tall
Checkpoints:
- After Rnd 4, the base should measure about 2.75 in (7.0 cm) × 1.75 in (4.4 cm).
- After Rnd 9, the V-st body should be about 1 in (2.5 cm) tall above the base edge.
- After Rnd 17, the flat pouch should be about 3.5 in (8.9 cm) wide × 3.6 in (9.1 cm) tall.
- After the rim, the pouch should be about 4 in (10.2 cm) tall.
If your base is too big, go down a hook size to 3.75 mm. If it’s too small, go up to 4.5 mm. Don’t change the stitch counts. Changing only the hook keeps all the math intact.
Pouch Base
With cream, ch 7.
Rnd 1: 3 sc in 2nd ch from hook, sc in next 4 ch, 3 sc in last ch. Rotate to work along the other side of the foundation chain. Sc in next 4 ch. Join with sl st to first sc. (14 sts)
The base now has four sections: 3 sts at one end, 4 sts along one side, 3 sts at the other end and 4 sts along the second side. Place a marker in the first st of each round.
Rnd 2: Ch 1. *Inc in each of next 3 sts, sc in next 4 sts; repeat from * once more. Join. (20 sts)
Rnd 3: Ch 1. *[Sc in next st, inc in next st] 3 times, sc in next 4 sts; repeat from * once more. Join. (26 sts)
Rnd 4: Ch 1. *[Sc in next 2 sts, inc in next st] 3 times, sc in next 4 sts; repeat from * once more. Join. (32 sts)
Check the base now. It should lie flat as an oval about 2.75 in (7.0 cm) × 1.75 in (4.4 cm). Its edge should measure about 7.1 in (18.0 cm) around.
Pouch Body
Rnd 5 (turning round): Ch 1, sc in BLO of each st around. Join. (32 sts)
Working in the back loop leaves a clear ridge that turns the base up into walls.
Rnd 6 (setup): Ch 1. *V-st in next st, sk next st; repeat from * around. Join with sl st to first sc. (16 V-sts)
Each V-st sits over 2 sts of Rnd 5, so 32 sts ÷ 2 = 16 V-sts.
Rnd 7: Sl st into first ch-1 sp. Ch 1. V-st in each ch-1 sp around. Join. (16 V-sts)
Rnds 8–17: Repeat Rnd 7. (16 V-sts each round)
You now have 12 V-st rounds (Rnds 6–17). At 4 rounds per inch, that’s 3 in (7.6 cm) of textured body. The walls should rise straight up without flaring. Fasten off cream.
Pouch Rim
The rim works like the border on a flat piece. It finishes the opening and sets the final width.
Rim gauge: 18 sc = 4 in (10.2 cm), or 4.5 sc per inch.
Rnd 18 (conversion round): Join charcoal in any sc. Ch 1. Sc in each sc around, skipping the ch-1 sps. Join. (32 sc + 0 extra = 32 sts)
Each of the 16 V-sts holds 2 sc, so working 1 sc into each existing sc gives exactly 32 sts. You add no stitches in the ch-1 spaces, which keeps the opening from flaring.
Rnd 19: Ch 1, sc in each st around. Join. (32 sts)
Fasten off and weave in the end.
Counts per side: When the pouch lies flat, the front holds 16 sts and the back holds 16 sts. The two side folds are not corners, so you add no stitches there. 16 + 16 = 32.
Why the math works: 32 sts at 4.5 sts per inch is about 7.1 in (18.0 cm) around. Flattened, that gives a width of about 3.5 in (8.9 cm), which matches the V-st body below it. Two rounds of sc add about 0.4 in (1.0 cm), bringing the pouch from 3.6 in (9.1 cm) to 4 in (10.2 cm) tall.
Strap
With cream, ch 5.
Row 1: Sc in 2nd ch from hook and in each of next 3 ch. (4 sts)
Rows 2–24: Ch 1, turn. Sc in each st across. (4 sts)
Row 25 (buttonhole): Ch 1, turn. Sc in next st, ch 2, sk next 2 sts, sc in last st. (2 sc + 1 ch-2 sp)
Row 26: Ch 1, turn. Sc in next st, 2 sc in ch-2 sp, sc in last st. (4 sts)
Rows 27–28: Ch 1, turn. Sc in each st across. (4 sts)
Fasten off, leaving a 10 in (25.4 cm) tail. The strap has 28 rows and is about 5.6 in (14.2 cm) long and 0.9 in (2.3 cm) wide.
Attach the strap: Lay the pouch flat with the front facing you. Find the center 4 sts of the back wall. Place the Row 1 end of the strap on the inside of the back wall, 0.5 in (1.3 cm) below the top of the rim. Sew it down with the tail, stitching all four edges of the overlap. The strap now rises straight up from the inside of the back rim.
Sew the button: Sew the 15 mm button to the right side of the strap at Row 8, centered across the 4 sts. This puts it about 1.1 in (2.8 cm) above the rim. Check that the ch-2 buttonhole slides over it with a gentle push.
To hang: Bring the strap up and over a vent slat from the front. Feed the free end down behind the slat and forward under it. Then bring it up and button it over the button, so the button shows on the front.
Patch
You can use a purchased round sew-on patch about 1.5 in (3.8 cm) across, or crochet one.
Crocheted patch:
With charcoal, make a magic ring.
Rnd 1: Ch 1, 6 sc in ring. Join. (6 sts)
Rnd 2: Ch 1, inc in each st around. Join. (12 sts)
Rnd 3: Ch 1, *sc in next st, inc in next st; repeat from * around. Join. (18 sts)
Fasten off charcoal.
Rnd 4: Join light gray. Ch 1, *sc in next 2 sts, inc in next st; repeat from * around. Join. (24 sts)
Fasten off, leaving a 12 in (30.5 cm) tail. The disc should be about 1.5 in (3.8 cm) across. If you want a center design, add simple surface embroidery in light gray.
Attach the patch: Center the patch on the front wall, about 1 in (2.5 cm) up from the base ridge. Whipstitch around the edge with the tail or with matching thread. Keep one hand inside the pouch so you don’t sew the front to the back.
Final Blocking
- Weave in all remaining ends on the inside of the pouch.
- Lightly spray the pouch with water until it’s damp, not soaked.
- Stuff it firmly with a folded cloth to shape the oval.
- Pat the base flat and press the rim into an even oval.
- Lay the strap flat and pin it straight at 5.6 in (14.2 cm) long.
- Let everything dry fully, for at least 6 hours.
- Remove the stuffing and check the final size: 3.5 in (8.9 cm) × 4 in (10.2 cm) flat.
If the patch is an iron-on type, don’t steam right over it, because heat can loosen the backing.
Final Quality-Control Checklist
- The base has 32 sts and lies flat as an oval.
- The BLO ridge is clear and even all the way around.
- Every body round has 16 V-sts, and the walls don’t lean or twist.
- Rim Rnds 18 and 19 each have 32 sts.
- The flat pouch measures 3.5 in (8.9 cm) × 4 in (10.2 cm).
- The strap has 4 sts in every row and 28 rows in total.
- The buttonhole slides over the 15 mm button without stretching out of shape.
- The strap is sewn securely to the inside back wall.
- The patch is centered, and the stitching doesn’t catch the back wall.
- All ends are woven in and trimmed.
Troubleshooting
The base cups instead of lying flat. Your tension is tight. Go up a hook size, and check that you made every increase in Rnds 2–4.
The base ruffles. You probably added extra increases. Recount each section of the round against the counts above.
The body leans in a spiral. This is normal for joined rounds. Always start each round in the ch-1 sp right after the join, and block the pouch firmly.
You lose count of the V-sts. Place a marker in the first V-st of each round. If you have 15 or 17, look for a skipped or doubled space near the join.
The rim flares. You may have worked into the ch-1 sps. Rework Rnd 18 with 1 sc in each sc only.
The strap twists. Make sure you ch 1 and turn on every row, and count 4 sts in each row.
The button pops out. The buttonhole is too loose. Rework Row 25 with ch 1 instead of ch 2, still skipping 2 sts. Then work Row 26 as written, so it still has 4 sts.
The insert falls through. Your gauge is loose. Go down a hook size so the V-st fabric closes up.
Care
Take out the insert and hand-wash the pouch in cool water with mild soap. Press out the water in a towel, reshape the pouch and let it dry flat.
Final Notes
The measurement chain is short and easy to follow. The 32-st base sets the 7.1 in (18.0 cm) edge measurement. The BLO round keeps those 32 sts and turns up the walls. Sixteen V-sts carry that width up for 12 rounds, or 3 in (7.6 cm). The conversion round returns to 32 sc, with 16 sts on the front and 16 on the back, for a flat width of 3.5 in (8.9 cm). Two rim rounds bring the pouch to 4 in (10.2 cm) tall.
If your base matches the first checkpoint, the rest will follow. Add the strap, button and patch, then drop in your favorite scent stone.
Happy crocheting!