

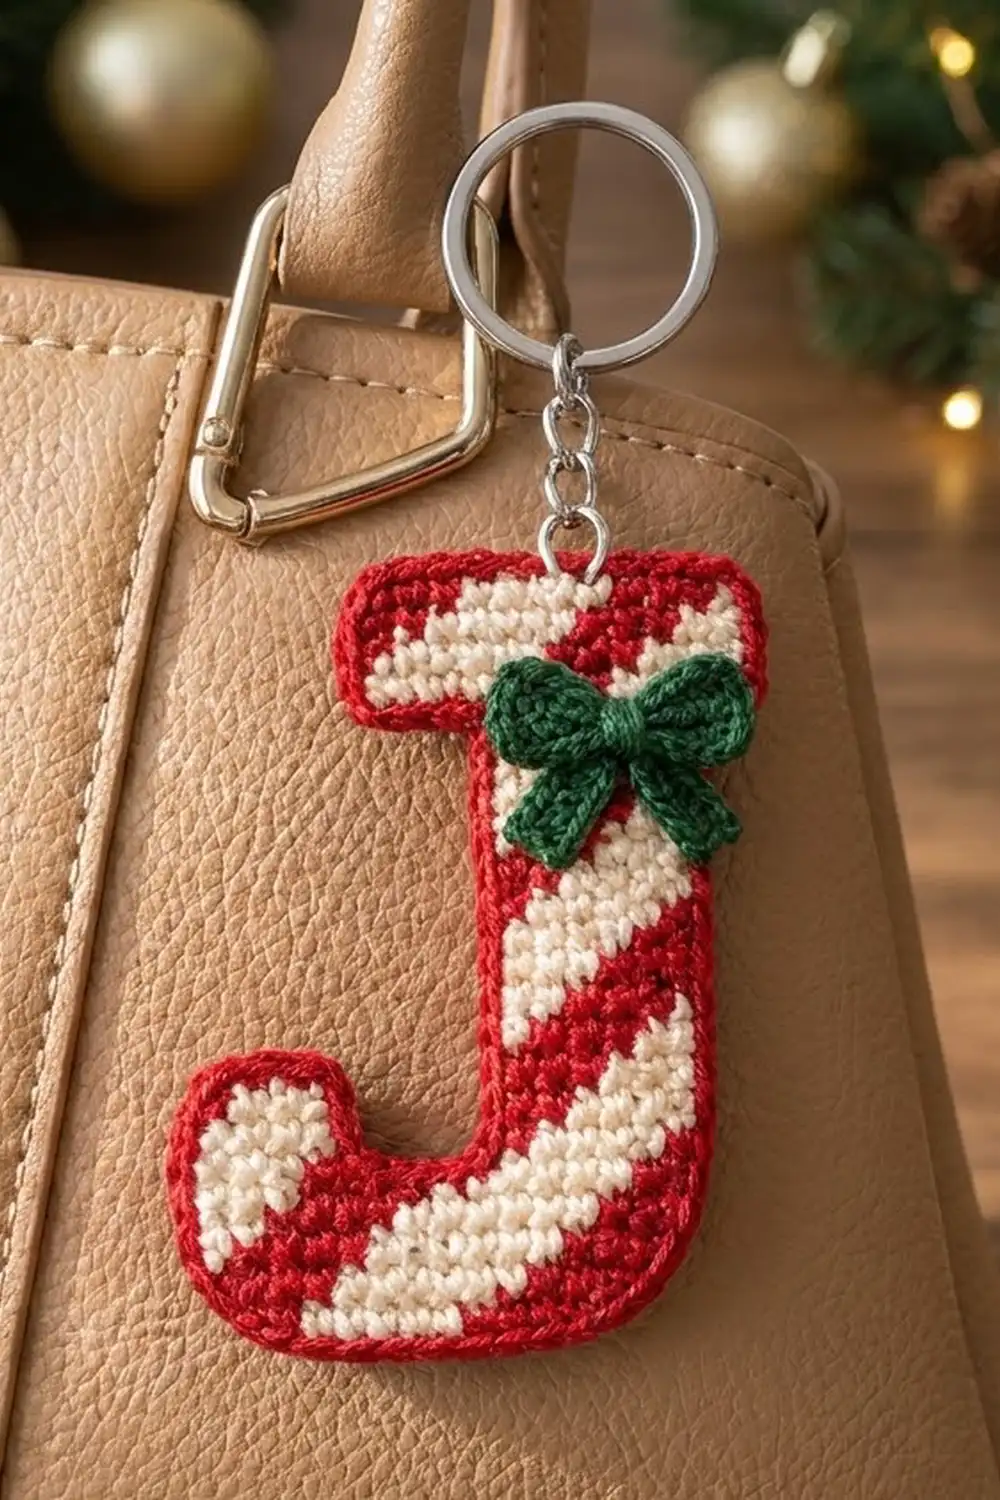
This little keychain is a capital letter J striped like a candy cane. Red and cream diagonal stripes run up the letter, a red single crochet border outlines it, and a small green bow sits where the top bar meets the stem. It works well as a stocking stuffer, a gift tag or a bag charm for anyone whose name starts with J.
The letter is worked flat in rows of tapestry single crochet. A tight gauge in fingering-weight cotton keeps the stripes crisp and makes the piece firm enough to hang from a key ring without stretching. This pattern uses US crochet terms throughout.
The finished keychain is 2.25 in (5.7 cm) wide and 3.25 in (8.3 cm) tall, not counting the ring hardware.
You’ll work the letter from the bottom up. First comes the curved base. Then the short left tip and the right stem are worked as separate columns, and a chain at the top of the stem starts the full-width top bar. One round of red border tidies the outline. The bow is made separately and sewn on.
Finished Size and Construction
- Finished size: 2.25 in x 3.25 in (5.7 cm x 8.3 cm)
- Skill level: Intermediate (tapestry color changes, simple shaping)
- Terminology: US crochet terms
- Yarn weight: Fingering / Super Fine (#1) cotton
- Hook: 2.25 mm (US B-1)
- Number of pieces: 1 letter + 1 bow appliqué
- Layout: Single piece; no joining
- Piece size before border: 2 in x 3 in (5.1 cm x 7.6 cm); 14 sts wide x 24 rows tall
- Border depth: 1 round of sc, about 1/8 in (0.3 cm) on every side
Materials
Use a smooth, mercerized cotton in fingering weight. It shows stitch definition well and holds its shape when it hangs. Avoid fuzzy or very stretchy yarns, because they blur the stripes.
- Red: 5 g, about 17 m (letter stripes and border)
- Cream: 4 g, about 14 m (letter stripes)
- Dark green: 2 g, about 7 m (bow)
These amounts include a margin for gauge swatching and carrying the unused color.
Tools:
– 2.25 mm (US B-1) crochet hook
– Tapestry needle
– 1 in (2.5 cm) silver split key ring with a short chain, about 1 in (2.5 cm) long
– One 1/4 in (0.6 cm) jump ring and two pairs of flat-nose pliers
– Rust-proof pins and a blocking board
– Scissors
Abbreviations (US Terms)
- ch – chain
- sc – single crochet
- sc2tog – single crochet 2 together
- hdc – half double crochet
- tr – treble crochet
- sl st – slip stitch
- st(s) – stitch(es)
- RS / WS – right side / wrong side
- R / C – red / cream (in the color sequences)
Tapestry sc (special technique): Hold the unused color along the top of the previous row and work each sc over it, so it stays hidden inside the stitches. To change color, work the last stitch of the old color until 2 loops remain on the hook. Then yarn over with the new color and pull through. Keep the carried strand relaxed so it doesn’t pucker the fabric.
Reading the color sequences: “1C, 3R” means 1 sc in cream, then 3 sc in red, worked in the order you meet them along the row.
Gauge and Checkpoints
Gauge: 7 sc and 8 rows = 1 in (2.5 cm) in tapestry sc.
Treat the letter itself as your test piece. Work through Row 7 and measure before going further.
- After Row 7: 2 in (5.1 cm) wide, 7/8 in (2.2 cm) tall.
- After Row 11 (tip): the tip is about 0.6 in (1.5 cm) wide, and the work is 1 3/8 in (3.5 cm) tall at the tip.
- After Row 19 (stem): the stem is 1 in (2.5 cm) wide, and the work is 2 3/8 in (6.0 cm) tall.
- After Row 24: 2 in x 3 in (5.1 cm x 7.6 cm).
- After the border: 2.25 in x 3.25 in (5.7 cm x 8.3 cm).
If Row 7 measures more than 2 in (5.1 cm), switch to a 2.0 mm hook. If it’s narrower than 1 7/8 in (4.8 cm), switch to a 2.5 mm hook. Tapestry crochet tends to tighten as you carry yarn, so check again after Row 19.
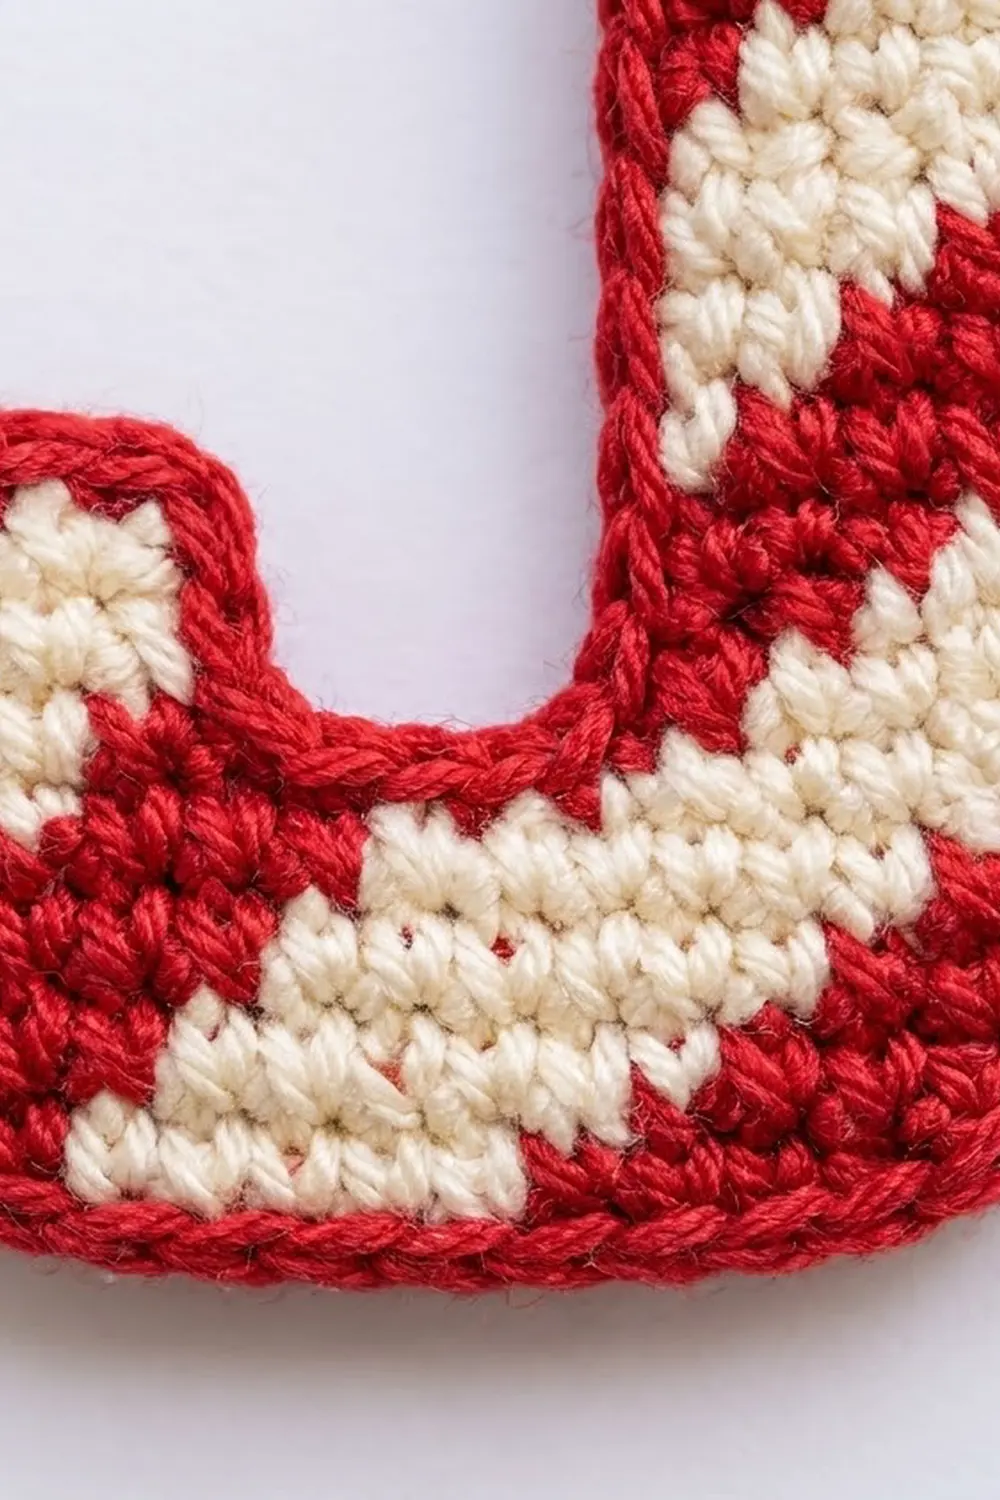
Letter Pattern
Start with red. Carry cream from Row 1, laying it along the foundation chain.
Row 1 (RS): With R, ch 13. Sc in 2nd ch from hook and in each ch across, following this sequence: 1R, 3C, 3R, 3C, 2R. Ch 1, turn. (12 sc)
Row 2 (WS): Work 2 sc in the first st (first sc in C, second sc in R). Then work 1 sc in each of the next 10 sts, and 2 sc in the last st (first sc in C, second sc in R). The full sequence is 1C, 3R, 3C, 3R, 3C, 1R. Ch 1, turn. (14 sc) The increases round off the bottom corners.
Row 3 (RS): Sc 14: 3C, 3R, 3C, 3R, 2C. Ch 1, turn. (14 sc)
Row 4 (WS): Sc 14: 3C, 3R, 3C, 3R, 2C. Ch 1, turn. (14 sc)
Row 5 (RS): Sc 14: 1C, 3R, 3C, 3R, 3C, 1R. Ch 1, turn. (14 sc)
Row 6 (WS): Sc 14: 2R, 3C, 3R, 3C, 3R. Ch 1, turn. (14 sc)
Row 7 (RS): Sc 14: 2R, 3C, 3R, 3C, 3R. Ch 1, turn. (14 sc)
Check the 2 in (5.1 cm) width now.
Left Tip
The tip uses the first 4 sts of Row 7, at the left edge when viewed from the RS.
Row 8 (WS): Sc 4: 1C, 3R. Ch 1, turn. (4 sc)
Row 9 (RS): Sc 4: 2R, 2C. Ch 1, turn. (4 sc)
Row 10 (WS): Sc 4: 3C, 1R. Ch 1, turn. (4 sc)
Row 11 (RS): Sc 4: 3C, 1R. Fasten off both colors, leaving 6 in (15.2 cm) tails.
Stem
With the WS facing, skip the next 3 sts of Row 7 after the tip. These 3 sts form the notch. Join R and C in the next st.
Row 8 (WS): Ch 1. Starting in the same st, sc 7: 3R, 3C, 1R. Ch 1, turn. (7 sc)
Row 9 (RS): Sc 7: 3C, 3R, 1C. Ch 1, turn.
Row 10 (WS): Sc 7: 2C, 3R, 2C. Ch 1, turn.
Row 11 (RS): Sc 7: 1C, 3R, 3C. Ch 1, turn.
Row 12 (WS): Sc 7: 1R, 3C, 3R. Ch 1, turn.
Row 13 (RS): Sc 7: 2R, 3C, 2R. Ch 1, turn.
Rows 14–19: Repeat Rows 8–13. Each row has 7 sc. Don’t turn at the end of Row 19.
Row 19 ends at the left edge of the stem with a red stitch, and the stem should measure 1 in (2.5 cm) wide.
Top Bar
Row 20 (WS): With R, ch 8. Sc in the 2nd ch from hook and in the next 6 ch (7 sc on the chain). Continue with 1 sc in each of the 7 stem sts. The full sequence is 1C, 3R, 3C, 3R, 3C, 1R. Ch 1, turn. (14 sc: 7 on the chain + 7 on the stem)
Row 21 (RS): Sc 14: 3C, 3R, 3C, 3R, 2C. Ch 1, turn.
Row 22 (WS): Sc 14: 3C, 3R, 3C, 3R, 2C. Ch 1, turn.
Row 23 (RS): Sc 14: 1C, 3R, 3C, 3R, 3C, 1R. Ch 1, turn.
Row 24 (WS): Sc 14: 2R, 3C, 3R, 3C, 3R. Fasten off C only. Keep R live for the border.
The letter should now measure 2 in x 3 in (5.1 cm x 7.6 cm). Each new row shifts the stripes 1 st to the right, which creates the rising diagonal.
Bow (Make 1)
With dark green, make a magic ring.
- Loop 1: Ch 3, 4 tr in ring, ch 3, sl st in ring.
- Tail 1: Ch 6, sc in 2nd ch from hook, hdc in next 4 ch, sl st in ring.
- Tail 2: Work as Tail 1.
- Loop 2: Work as Loop 1.
Pull the ring tightly closed. Wrap the yarn tail 5 times around the center so the loops point left and right and the tails hang down. Secure the wraps on the back, leaving an 8 in (20.3 cm) tail for sewing. The bow measures about 1 in (2.5 cm) wide and 3/4 in (1.9 cm) tall.
Border
Border gauge: One round of sc adds about 1/8 in (0.3 cm) on every side.
Rules for this round:
– Work 1 sc in each st and 1 sc in each row-end.
– Work 3 sc in each of the 7 outer corner sts.
– At each of the 3 inner corners, work an sc2tog across the two edges.
Round 1 (RS): With R still on the hook, ch 1 and turn so the RS faces you. Then work each side as follows.
- Top edge: 3 sc in the first st, sc in the next 12 sts, 3 sc in the last st. (18 sc)
- Top bar, left side: 1 sc in each of the 5 row-ends (Rows 24–20). (5 sc)
- Top bar, underside: Working into the free loops of the Row 20 chain, work 3 sc in the first loop and sc in the next 5. Then sc2tog across the last loop and the Row 19 row-end of the stem. (9 sts)
- Stem, left side: Sc in each row-end from Row 18 down to Row 9. (10 sc)
- Notch: Sc2tog across the Row 8 row-end and the first skipped st of Row 7. Sc in the next st. Then sc2tog across the last skipped st and the Row 8 row-end of the tip. (3 sts)
- Tip, inner side: Sc in the row-ends of Rows 9–11. (3 sc)
- Tip top: 3 sc in the first st, sc in the next 2, 3 sc in the last st. (8 sc)
- Outer left side: Sc in each row-end from Row 11 down to Row 1. (11 sc)
- Bottom edge: Working in the free loops of the foundation chain, work 3 sc in the first loop, sc in the next 10, and 3 sc in the last loop. (16 sc)
- Right side: Sc in each row-end from Row 1 up to Row 24. (24 sc)
Join with a sl st to the first sc and fasten off. Total: 107 sts.
Why the math works: The outline has 96 edge positions:
– 14 along the top and 12 along the bottom
– 24 on the right side
– 11, 4, 3 and 4 around the tip and notch
– 12 down the stem
– 7 under the top bar
– 5 on the left side of the top bar
Seven outer corners add 2 sts each, for a total of +14. Three inner corners each lose 1 st, for a total of −3. So 96 + 14 − 3 = 107. Because each corner already belongs to its edge, no corner is counted twice. The extra corner stitches let the border turn without cupping, and the inner decreases stop the notch and underside from ruffling.
Final Blocking
- Weave in all ends along same-color stitches on the WS.
- Lightly mist the letter with water until it’s damp, not soaked.
- Pin it RS up on a blocking board to 2.25 in x 3.25 in (5.7 cm x 8.3 cm). Use one pin at each outer corner and pins along the stem and the notch.
- Check that the stem is straight and the notch is open.
- Let it dry completely, at least 6 hours.
- Pin the bow to the right of center where the top bar meets the stem, so it overlaps both. Sew it on through the center wraps and the base of each loop, using the green tail.
- Use pliers to open the jump ring. Pass it through the border stitch above the 7th st of the top edge, counted from the left, and through the end link of the key ring chain. Close the ring firmly.
Final Quality-Control Checklist
- The letter measures 2.25 in x 3.25 in (5.7 cm x 8.3 cm).
- The stripes slope evenly from lower left to upper right, and each stripe is 3 sts wide.
- No cream shows through red areas, and no red shows through cream areas.
- The border is 107 sts and lies flat at every corner.
- The notch is clearly open, about 1/4 in (0.6 cm) wide.
- The bow is sewn securely and both loops are even.
- The jump ring is fully closed and holds the letter’s weight.
Troubleshooting
- The stripes look jagged: Change color on the last yarn-over of the previous stitch, not at the start of the new stitch.
- The carried color peeks through: Tighten your gauge or go down a hook size. Keep the carried strand close to the top of the row.
- The fabric puckers: The carried strand is too tight. Stretch the row gently every few stitches.
- The letter leans: This is common with tapestry sc. Block firmly, and pin the stem along a grid line.
- The border ruffles: Check your corner counts. Use 2 sc in the bottom corners instead of 3 if your stitches run large.
- The border cups: Make sure you worked 3 sc at every outer corner.
- The bow flops: Wrap the center more tightly, and add a stitch through each loop tip into the letter.
Care
Hand wash in cool water with mild soap, press out the water in a towel, and dry flat. Remove the metal ring before washing to prevent marks.
Final Notes
Every measurement depends on the gauge of 7 sc and 8 rows = 1 in (2.5 cm):
– 14 sts and 24 rows make a 2 in x 3 in (5.1 cm x 7.6 cm) letter.
– The 7-st stem is 1 in (2.5 cm) wide.
– One border round adds 1/8 in (0.3 cm) per side, for a finished 2.25 in x 3.25 in (5.7 cm x 8.3 cm) keychain.
Check those numbers at Row 7, Row 19 and Row 24, and the letter will come out the right size. Happy crocheting!