

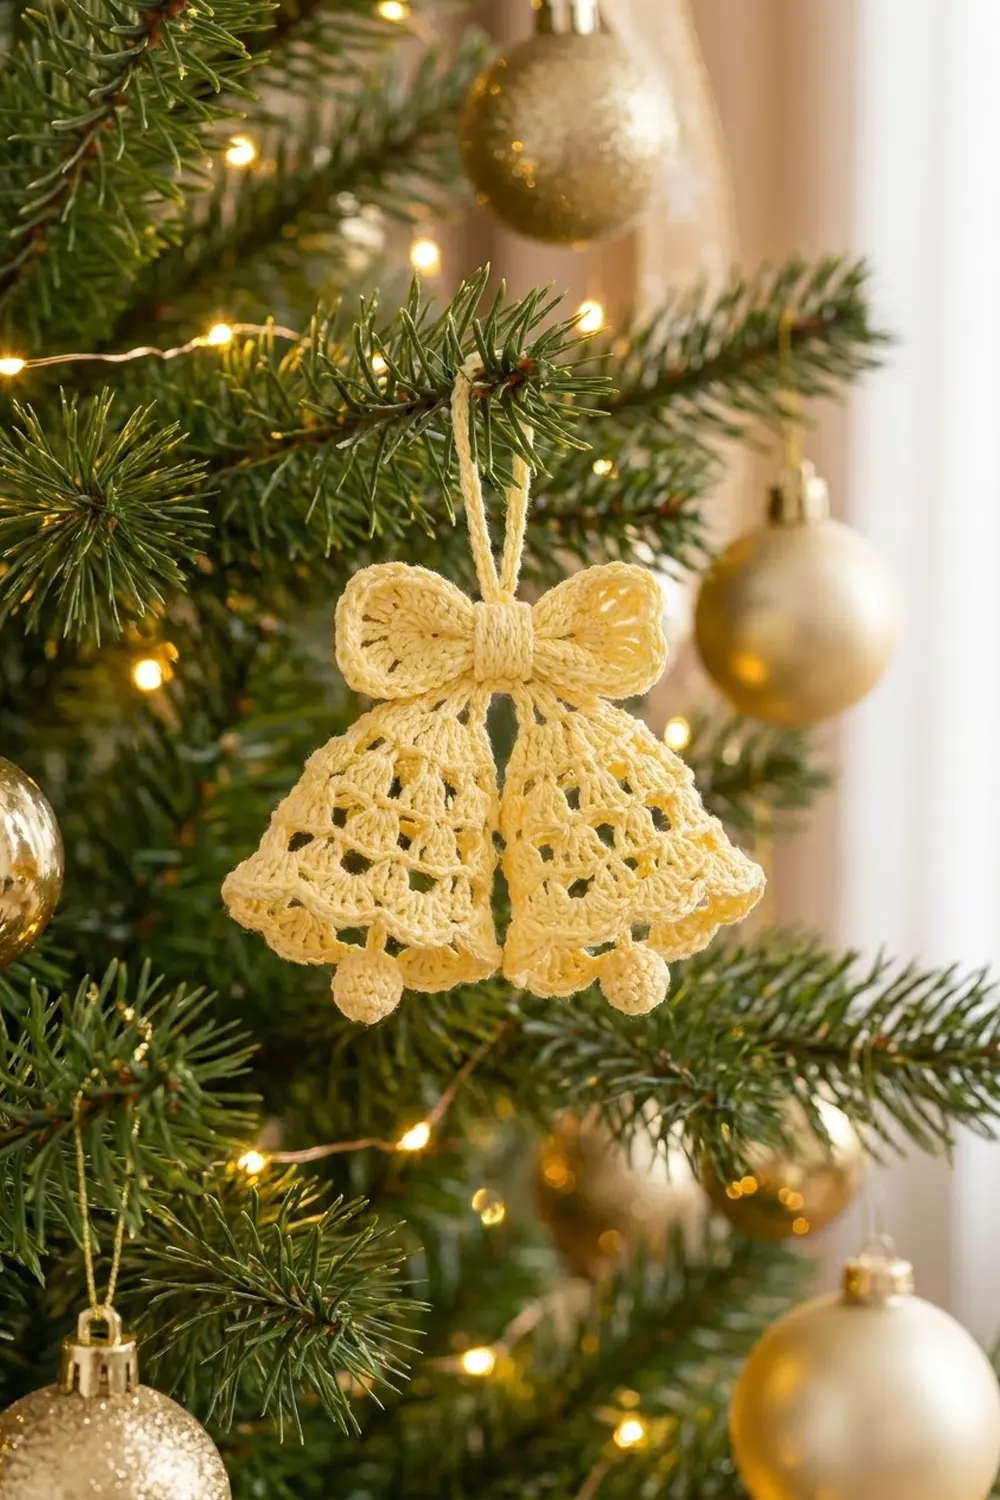
These twin bells make a small, lacy Christmas ornament. Two flat lace bells hang side by side under a soft bow, and a round clapper peeks out below each scalloped hem.
The sample uses one pale butter-yellow cotton, which gives it a warm, vintage look. Each bell has staggered shells with small triangular openings between them, so light shines through the lace on a lit tree.
The finished ornament measures about 4.5 in (11.4 cm) wide and 4.75 in (12.1 cm) tall including the hanging loop. The pattern uses US crochet terms.
You will make seven small pieces: two bells, one bow, one center band, two clappers, and one hanging loop. You work each bell flat in rows from the top point down, then finish it with a scalloped hem. Then you block the pieces and sew them into one ornament.
Finished Size and Construction
- Finished size: 4.5 in (11.4 cm) wide x 4.75 in (12.1 cm) tall with loop; 3.5 in (8.9 cm) tall without loop
- Skill level: Intermediate
- Terminology: US crochet terms
- Yarn weight: Fingering (#1) mercerized cotton
- Hook: 2.25 mm (US B-1)
- Number of pieces: 7 (2 bells, 1 bow, 1 center band, 2 clappers, 1 hanging loop)
- Layout: 2 bells side by side, bow centered over the bell tops, loop above the bow
- Bell size: 2.5 in (6.4 cm) wide at the hem x 2.25 in (5.7 cm) tall
- Bell size before hem border: 2.25 in (5.7 cm) wide x 1.75 in (4.4 cm) tall
- Hem border depth: 0.5 in (1.3 cm)
Materials
Use a smooth mercerized cotton in fingering weight. It keeps the lace openings crisp and stops the bow from going limp. Avoid fuzzy or stretchy yarns, because they close up the openings and make the bells curl.
- Pale butter yellow: 12 g (about 45 m) for one ornament
This amount includes a margin for gauge checks and sewing tails. One 50 g ball makes about four ornaments.
Tools:
- 2.25 mm (US B-1) crochet hook
- Tapestry needle
- Scissors
- 2 stitch markers
- Rust-proof pins and a foam blocking mat
- Yarn scraps or fiberfill for the clappers
- Optional: fabric stiffener or starch spray
Abbreviations (US Terms)
- ch – chain
- sl st – slip stitch
- sc – single crochet
- hdc – half double crochet
- dc – double crochet
- sc2tog – single crochet 2 together
- sp – space
- st(s) – stitch(es)
- RS / WS – right side / wrong side
Special stitches:
- Shell: (2 dc, ch 2, 2 dc) in the same stitch. One shell = 4 dc and 1 ch-2 sp.
- Beginning shell: Ch 3 (counts as dc), (dc, ch 2, 2 dc) in the same stitch. This counts as one shell.
- Picot: (sc, ch 2, sc) in the same stitch.
Gauge and Checkpoints
Make one complete bell first. It works as your gauge swatch and is also one of the two bells you need.
- Bell gauge: Rows 1–5 measure 2.25 in (5.7 cm) wide x 1.75 in (4.4 cm) tall.
- Bow gauge: 8 hdc and 6 hdc rows = 1 in (2.5 cm).
Bell checkpoints:
- After Row 1: about 0.5 in (1.3 cm) wide.
- After Row 3: about 1.25 in (3.2 cm) wide.
- After Row 5: 2.25 in (5.7 cm) wide x 1.75 in (4.4 cm) tall.
- After Row 7: 2.5 in (6.4 cm) wide x 2.25 in (5.7 cm) tall.
If your bell is too big, switch to a 2 mm hook. If it is too small, switch to a 2.5 mm hook. Small differences are fine as long as both bells match.
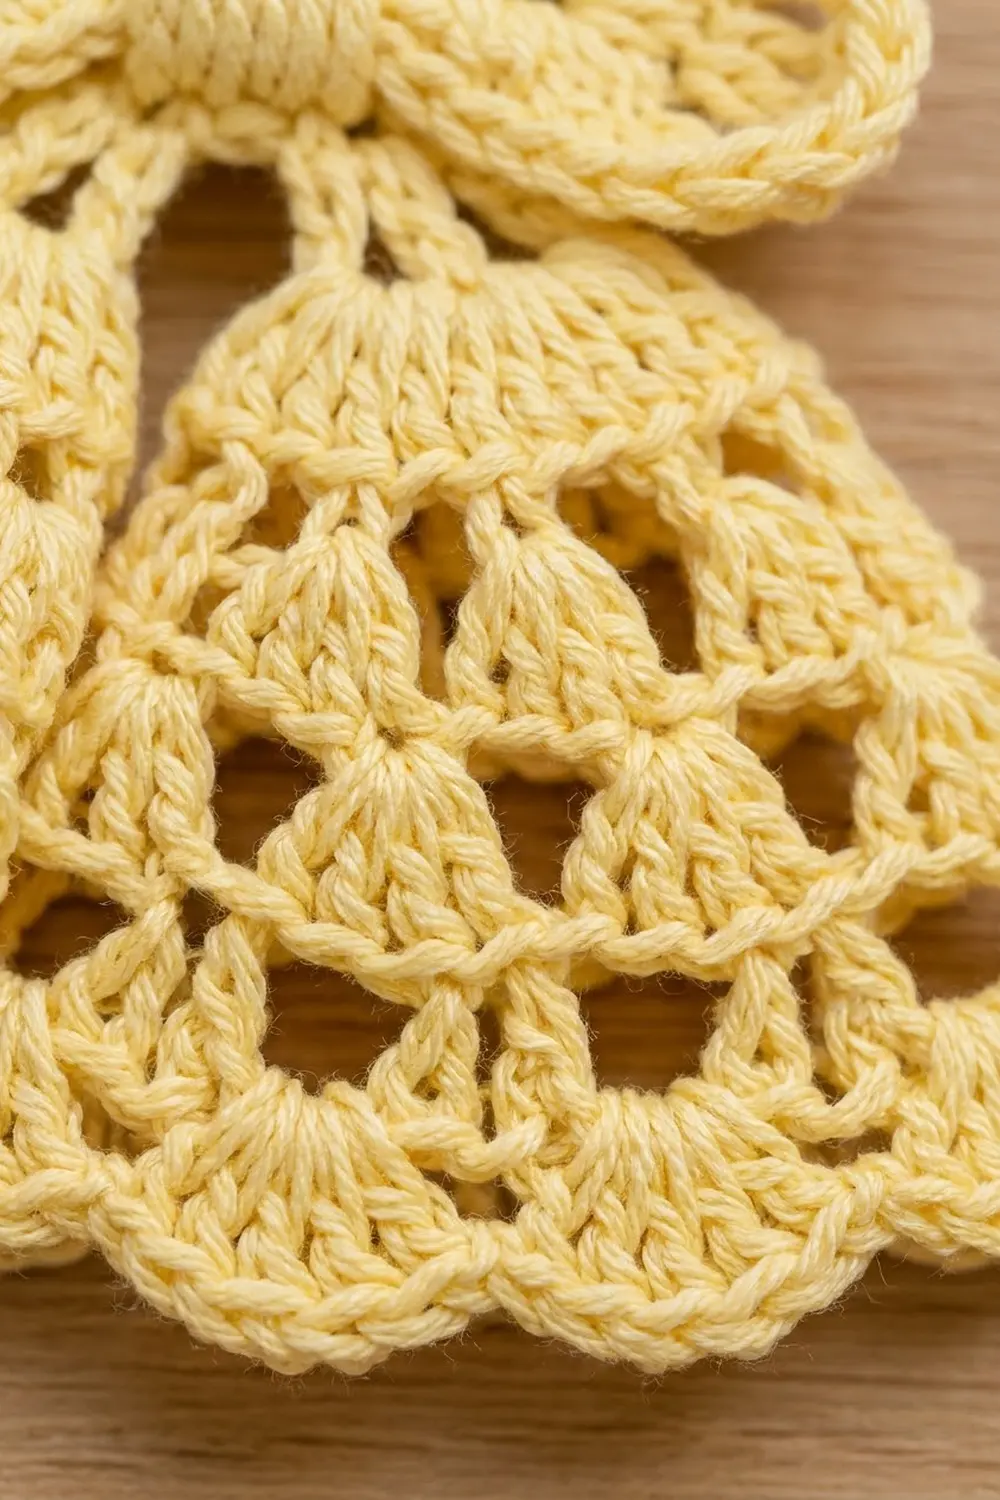
Bells (Make 2)
Each bell is worked flat in rows from the narrow top down to the hem. Every row adds one shell, and each new shell sits between two shells of the row below. The ch-2, sc, ch-2 bridges between the shells form the triangular openings.
Row 1 (RS): Ch 4, (dc, ch 2, 2 dc) in 4th ch from hook. The 3 skipped ch count as the first dc. Turn. (1 shell: 4 dc, 1 ch-2 sp)
Row 2: Beginning shell in the first st, ch 2, sc in the ch-2 sp of the Row 1 shell, ch 2, shell in the top of the beginning ch. Turn. (2 shells: 8 dc, 1 sc)
Row 3: Beginning shell in the first st, ch 2, sc in the ch-2 sp of the next shell, ch 2, shell in the next sc, ch 2, sc in the ch-2 sp of the next shell, ch 2, shell in the top of the turning ch. Turn. (3 shells: 12 dc, 2 sc)
Rows 4–5: Beginning shell in the first st, ch 2, sc in the ch-2 sp of the next shell, ch 2, shell in the next sc; repeat from * until 1 shell remains, ch 2, sc in the ch-2 sp of the last shell, ch 2, shell in the top of the turning ch. Turn.
- Row 4: 4 shells (16 dc), 3 sc
- Row 5: 5 shells (20 dc), 4 sc
The rule is the same in every row: a beginning shell, one shell in each sc of the row below, and one shell in the turning ch. So Row n always has n shells and n − 1 sc.
Checkpoint: The bell should measure 2.25 in (5.7 cm) wide x 1.75 in (4.4 cm) tall, with three tiers of openings. Don’t fasten off yet. Go straight into the hem.
Hem Border
The hem is worked across the bottom edge only. It flares the bell into its classic shape.
Border gauge: Each finished fan is about 0.5 in (1.3 cm) wide, so five fans = 2.5 in (6.4 cm).
Row 6 (fans): Ch 1, sc in the first dc, skip 1 dc, 7 dc in the ch-2 sp of the shell, skip 2 dc and the next ch-2 sp, sc in the next sc, skip the next ch-2 sp and 2 dc, 7 dc in the ch-2 sp of the next shell; repeat from * 3 more times, skip 1 dc, sc in the top of the turning ch. Turn.
Count: 5 fans of 7 dc (35 dc) + 6 sc = 41 sts.
Row 7 (picot edge): Ch 1, sc in the first sc, sc in the next 3 dc, picot in the next dc (the center dc of the fan), sc in the next 3 dc, sc in the next sc; repeat from * 4 more times. Fasten off, leaving a 6 in (15.2 cm) tail.
Count: 1 sc + 5 x (3 + 2 + 3 + 1) sc = 46 sc and 5 ch-2 picots.
Why the math works: Row 5 has 5 shells and 4 sc, so Row 6 gets one fan per shell. There are 6 sc anchors: one on each of the 4 sc, plus 2 at the edges. A 7-dc fan has a true center stitch (the 4th dc), so each picot lands right at the point of its scallop. Five fans at 0.5 in (1.3 cm) each widen the bell from 2.25 in (5.7 cm) to 2.5 in (6.4 cm).
Weave in the starting tail. Keep the final tail for attaching the clapper.
Bow
Row 1: Ch 26, hdc in the 3rd ch from hook and in each ch across. Turn. (24 hdc)
Rows 2–6: Ch 2 (does not count as a st), hdc in each st across. Turn. (24 hdc)
Checkpoint: The rectangle should measure 3 in (7.6 cm) x 1 in (2.5 cm).
Edging round: Ch 1. Working across Row 6, 3 sc in the first st, sc in the next 22 sts, 3 sc in the last st (28 sc). Work 8 sc evenly across the 6 row ends (8 sc). Working in the foundation ch, 3 sc in the first ch, sc in the next 22 ch, 3 sc in the last ch (28 sc). Work 8 sc evenly across the 6 row ends (8 sc). Sl st to the first sc to join. (72 sc)
Fasten off and weave in the ends. The bow measures 3.25 in (8.3 cm) x 1.25 in (3.2 cm).
Center Band
Row 1: Ch 13, sc in the 2nd ch from hook and in each ch across. Turn. (12 sc)
Rows 2–4: Ch 1, sc in each st across. Turn. (12 sc)
Fasten off, leaving an 8 in (20.3 cm) tail. The band measures 1.5 in (3.8 cm) x 0.5 in (1.3 cm). Its sc rows give it the ridged look of a wrapped knot.
Clappers (Make 2)
Work in continuous rounds, and move a marker up each round.
Rnd 1: 6 sc in a magic ring. (6 sc)
Rnd 2: 2 sc in each st around. (12 sc)
Rnds 3–4: Sc in each st around. (12 sc)
Stuff firmly with yarn scraps or fiberfill.
Rnd 5: Sc2tog 6 times. (6 sc)
Fasten off, leaving a 6 in (15.2 cm) tail. Thread the tail through the front loops of the last 6 sts and pull tight. Each clapper is about 0.5 in (1.3 cm) across.
Hanging Loop
Ch 31, sl st in the back bump of the 2nd ch from hook and in each ch across. (30 sl st)
Fasten off, leaving a 6 in (15.2 cm) tail. The strip is about 3 in (7.6 cm) long.
Make All Pieces
You need 7 pieces, all in pale butter yellow:
- Bells: 2
- Bow: 1
- Center band: 1
- Clappers: 2
- Hanging loop: 1
Layout (front view):
          [ loop ]
      [ bow + band ]
   [ Bell A ][ Bell B ]
      (o)        (o)
Joining
Block the bells and bow flat first (see Final Blocking) so the pieces match before you sew.
- Bow: Fold the center of the bow into three small accordion pleats so the middle narrows to about 0.5 in (1.3 cm). Wrap the center band around the pleats with its ends at the back. Sew the band ends together with the long tail, then stitch through the bow once to lock the pleats.
- Bells: Hold the bells RS together with the top points matching. Whipstitch the inner side edges together, one stitch per row end, along the row ends of Rows 1–3, about 1 in (2.5 cm). Open the bells flat. Below Row 3 they angle apart, and the hems just meet.
- Bow to bells: Center the bow over the joined points so it covers Rows 1–2 of both bells. Sew it in place from the back, along the band and at the lower edge of each bow loop.
- Loop: Fold the strip in half. Sew both ends to the back of the center band so the loop stands 1.25 in (3.2 cm) above the bow.
- Clappers: Use the hem tail of each bell to sew one clapper to the WS of the center fan, so half the ball shows below the picot edge.
Tension advice: Keep your sewing stitches snug and even. If you pull too hard, the edges pucker and the openings close. Catch only the back half of each stitch so the seams don’t show from the front.
Size checkpoint: The assembled ornament should measure 4.5 in (11.4 cm) wide x 3.5 in (8.9 cm) tall without the loop, and 4.75 in (12.1 cm) tall with the loop.
Final Blocking
- Soak the ornament in cool water, then roll it in a towel to press out the water. Do not wring it.
- Lay it RS up on a foam mat.
- Pin each bell to 2.5 in (6.4 cm) wide at the hem and 2.25 in (5.7 cm) tall.
- Pin out each picot so the scallops are even.
- Open each triangular opening with a fingertip.
- Shape the bow loops so they are round and 3.25 in (8.3 cm) across.
- For a firmer ornament, apply starch or fabric stiffener now.
- Let it dry completely before you unpin it.
Final Quality-Control Checklist
- Both bells have 5 shells in Row 5 and 5 fans in the hem.
- Each hem has 46 sc and 5 centered picots.
- Both bells measure 2.5 in (6.4 cm) x 2.25 in (5.7 cm).
- The bow is 3.25 in (8.3 cm) wide, and the band hides the pleats.
- The clappers are firm, round, and hang at the same height.
- The loop is centered and secure.
- No seams or tails show from the front.
- The ornament measures 4.5 in (11.4 cm) x 4.75 in (12.1 cm).
Troubleshooting
- Bell curls: Your dc are tight. Go up one hook size, or block with stiffener.
- Openings look closed: Your ch-2 bridges are too tight. Keep the chains loose and even.
- Bell leans to one side: An edge shell is missing. Every row starts with a beginning shell and ends with a shell in the turning ch.
- Hem ruffles: Your dc are loose. Work 6 dc per fan, and place the picot between the 3rd and 4th dc.
- Bow looks flat: Add one more pleat, or stiffen the loops.
- Lumpy clapper: Stuff in small pinches and roll the ball between your palms before closing it.
Care
Hand wash in cool water, reshape, and lay flat to dry. Store the ornament flat in tissue paper so the bells and bow keep their shape.
Final Notes
Here is the measurement chain. Rows 1–5 make a bell 2.25 in (5.7 cm) wide and 1.75 in (4.4 cm) tall. The 0.5 in (1.3 cm) hem brings each bell to 2.5 in (6.4 cm) x 2.25 in (5.7 cm). Join two bells at the top and add the 3.25 in (8.3 cm) bow, the clappers, and the loop, and you have an ornament 4.5 in (11.4 cm) wide and 4.75 in (12.1 cm) tall. If your first bell matches its checkpoints, the other pieces will fit together.
Happy crocheting!