

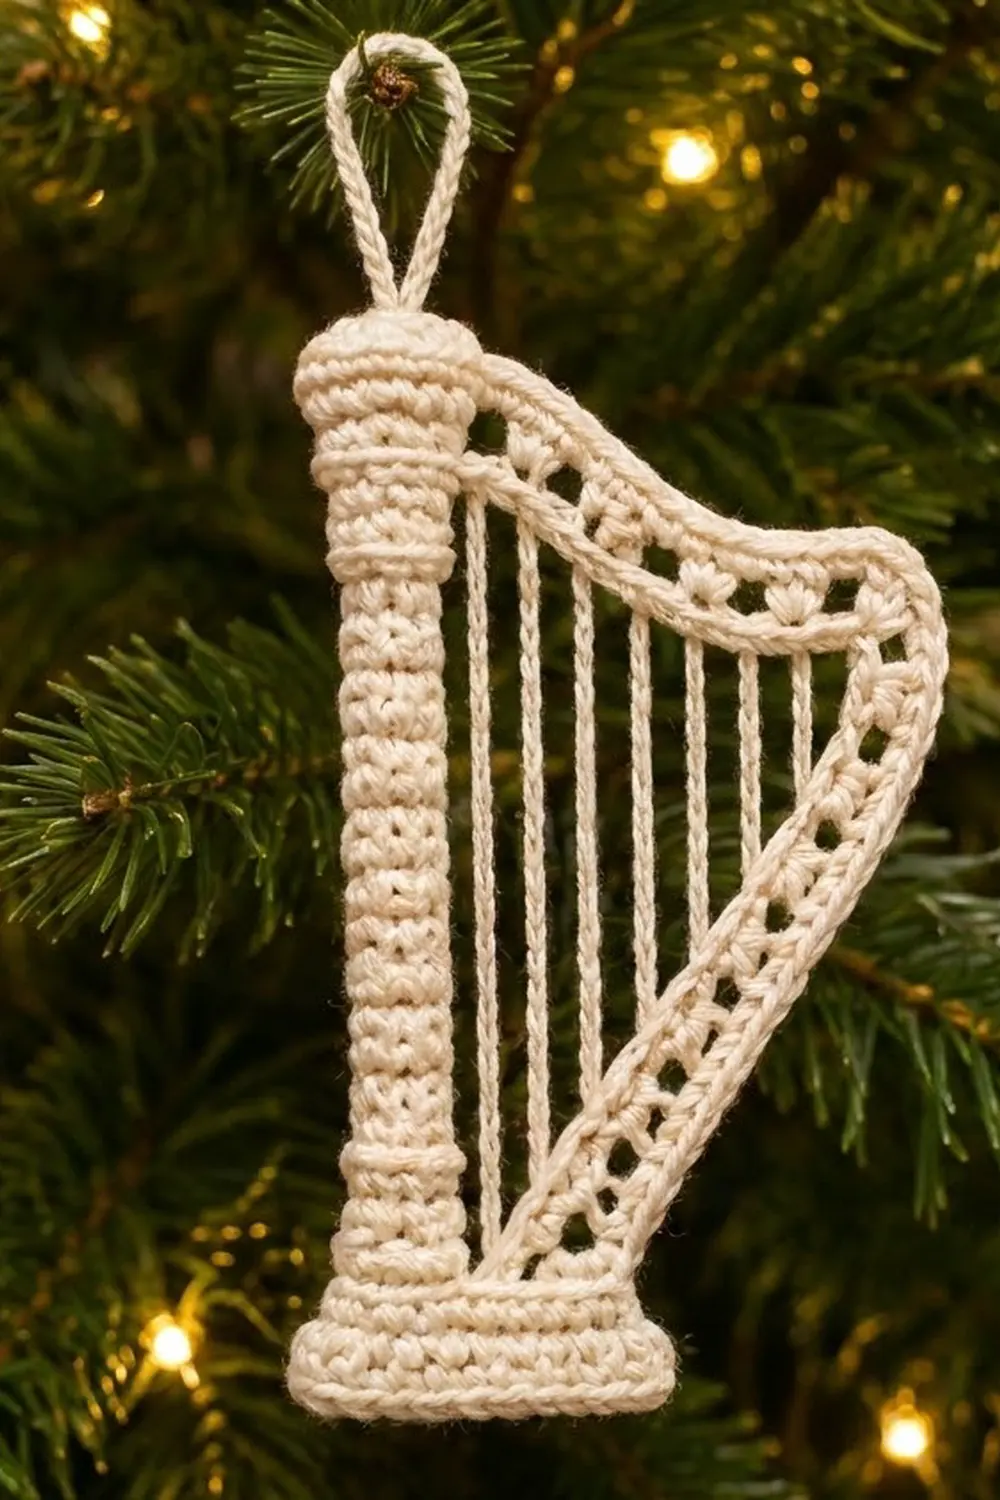
The Angel’s Song Harp is a small heirloom-style ornament worked in cream cotton thread. It has a sturdy column on the left, a curved openwork neck and forearm, and six fine chain strings. Hung on a lit tree, it looks a little like carved ivory.
This pattern uses one color only, so the texture does all the work. Ridge bands mark the base, the pillar, and the capital. A row of eyelets runs along the frame like decorative fretwork, and the strings are firm slip-stitched chains.
All instructions use US crochet terms. The finished ornament measures about 3 in (7.6 cm) wide and 5.2 in (13.2 cm) tall without the loop. With the loop it is about 6.5 in (16.5 cm) tall.
Construction is simple and stays in one piece. You crochet the base and pillar in rows, then edge that body with one round of single crochet. Next, you build the neck-and-forearm frame on a chain stretched from the capital to the base. Last, you add the strings and the hanging loop. You never sew anything.
Finished Size and Construction
- Finished size: 3 in x 5.2 in (7.6 cm x 13.2 cm), plus a 1.25 in (3.2 cm) loop
- Skill level: Intermediate (simple stitches, careful placement)
- Terminology: US
- Yarn weight: Size 3 cotton crochet thread or light fingering cotton
- Hook: 2.25 mm (US B-1)
- Number of pieces: 1
- Layout: Single ornament, no assembly
- Body size before border: 2.5 in x 4.9 in (6.4 cm x 12.4 cm)
- Border depth: 1 round of sc, about 0.15 in (0.4 cm) per edge
- Body size after border: 2.8 in x 5.2 in (7.1 cm x 13.2 cm)
- Frame strip width: about 0.6 in (1.5 cm)
Materials
Use a smooth, mercerized cotton. It gives clean stitch definition, holds the strings straight, and takes stiffener well. Fuzzy or loosely plied yarns will blur the eyelets.
- Cream / ivory: 10 g, about 30 m
Tools:
- 2.25 mm (US B-1) crochet hook
- Tapestry needle with a small eye
- Scissors
- Rustproof pins and a foam blocking board
- Fabric stiffener or a starch solution (optional, recommended)
- Ruler or tape measure
The yarn amount includes a margin of about 30% for your gauge swatch and tails.
Abbreviations (US Terms)
- ch – chain
- sl st – slip stitch
- sc – single crochet
- dc – double crochet
- sc2tog – single crochet 2 together
- sk – skip
- sp – space
- st(s) – stitch(es)
- RS / WS – right side / wrong side
- BLO / FLO – back loop only / front loop only
Special stitch: ridge sc (rsc). Work a sc in one loop only so the unused loop forms a raised line on the RS.
– On RS rows, work in the BLO.
– On WS rows, work in the FLO.
Either way, the leftover loop shows on the RS.
Gauge and Checkpoints
Gauge: 12 sc x 14 rows = 2 in (5.1 cm) in sc rows. Chains run about 7 ch per 1 in (2.5 cm).
Make a swatch 14 sc wide and work it for 16 rows. Measure the center 2 in (5.1 cm) both ways.
- Swatch too big: go down to a 2.0 mm hook.
- Swatch too small: go up to a 2.5 mm hook.
Row gauge matters as much as stitch gauge here, because the pillar height sets the string lengths.
Checkpoints as you go:
- After Row 4: base is 2.5 in x 0.6 in (6.4 cm x 1.5 cm).
- After Row 29: body is 4.1 in (10.4 cm) tall. The pillar is 0.7 in (1.8 cm) wide.
- After Row 34: body is 4.9 in (12.4 cm) tall.
- After the border: body is 2.8 in x 5.2 in (7.1 cm x 13.2 cm).
- After the frame: total width is about 3 in (7.6 cm).
If a checkpoint is off by more than 0.2 in (0.5 cm), change your hook before you continue. Don’t try to fix the size later in blocking.

Body: Base and Pillar
Row 1 is a WS row. Odd rows are WS and even rows are RS. With this setup the pillar sits on the left when the RS faces you. (Left-handed crocheters get a mirrored harp, which is equally pretty.)
Base
Row 1 (WS): Ch 16, sc in 2nd ch from hook and in each ch across, turn. (15 sc)
Rows 2–3: Ch 1, sc in each st across, turn. (15 sc)
Row 4 (RS, ridge row): Ch 1, rsc in each st across, turn. (15 sc)
Checkpoint: 2.5 in x 0.6 in (6.4 cm x 1.5 cm).
Pillar
Row 5 (WS): Ch 1, sc in the first 4 sts, turn. Leave the remaining 11 sts unworked. (4 sc)
Rows 6–26: Ch 1, sc in each st, turn. (4 sc)
Row 27 (WS, ridge band): Ch 1, rsc in each st, turn. (4 sc)
Rows 28–29: Ch 1, sc in each st, turn. (4 sc)
Checkpoint: 4.1 in (10.4 cm) total height.
Capital
Row 30 (RS, conversion row): Ch 1, 2 sc in the first st, sc in the next 2 sts, 2 sc in the last st, turn. (4 worked + 2 added = 6 sc)
Row 31 (WS, ridge band): Ch 1, rsc in each st, turn. (6 sc)
Rows 32–33: Ch 1, sc in each st, turn. (6 sc)
Row 34 (WS, trim row): Ch 1, sc2tog, sc in the next 2 sts, sc2tog. (6 sts worked down to 4 sc: 2 + 2 − 2 = 4 sc, made as 2 sc2tog + 2 sc)
Don’t fasten off. Turn so the RS faces you.
Checkpoint: 4.9 in (12.4 cm) tall. The capital is 1 in (2.5 cm) wide, and the base is 2.5 in (6.4 cm) wide.
Border
Border gauge: One round of sc adds about 0.15 in (0.4 cm) to each outer edge. Place 1 sc in each stitch and 1 sc in each sc row-end.
In this border the corner groups are counted separately from the side counts, so no stitch is counted twice.
Round 1 (RS): Ch 1. Working down the left edge, sc in the row-ends of Rows 33–30 for the capital (4 sc), then Rows 29–2 for the pillar and base (28 sc).
Continue around:
– 3 sc in the first foundation ch (bottom-left corner)
– 1 sc in each of the next 13 foundation ch
– 3 sc in the last foundation ch (bottom-right corner)
– 1 sc in each row-end of Rows 2–4 (3 sc)
– 3 sc in the last st of Row 4 (base top-right corner)
– 1 sc in each of the next 10 free sts of Row 4, working toward the pillar (10 sc)
– 1 sc in each row-end of Rows 5–29 up the pillar’s right side (25 sc)
– 1 sc in each row-end of Rows 30–33 on the capital’s right side (4 sc)
Across the top of Row 34: 2 sc in the first st, sc in the next 2 sts, 2 sc in the last st (6 sc).
Join with a sl st to the first sc. Fasten off.
Count by section:
– Left side: 4 + 28 = 32
– Bottom: 3 + 13 + 3 = 19
– Base right side: 3
– Base top: 3 + 10 = 13
– Pillar right side: 25
– Capital right side: 4
– Top: 6
Total: 32 + 19 + 3 + 13 + 25 + 4 + 6 = 102 sc.
Why the math works: Sc rows are almost as tall as a sc stitch is wide. One sc per row-end keeps the edges flat, and three sc at each outer 90° corner turn it cleanly.
For reference in the next steps:
– Base-top border sc are numbered #1–#10, starting from the pillar.
– Capital right-side border sc are numbered #1–#4, from bottom to top.
Neck and Forearm Frame
The frame is a 3-row strip worked across a chain bridge. Each row is anchored at both ends.
Stitch positions are counted from the capital end:
– Positions 1–12 form the neck.
– Position 13 is the shoulder.
– Positions 14–37 form the forearm.
Row 1 (inner edge): With the RS facing, join the thread with a sl st in capital border sc #1. Ch 37. Lay the chain in an arch: right across the top, then diagonally down. Sl st into base-top border sc #7, then turn.
Ch 1, sc in each ch back to the capital, then sl st in capital border sc #2. Turn. (37 sc)
Row 2 (eyelets): Ch 4 (counts as dc + ch 1). Sk the next sc. Dc in the next sc, ch 1, sk 1 sc. Repeat from * to the last sc, then dc in the last sc. Sl st in base-top border sc #8 and #9, then turn. (19 dc + 18 ch-1 sps = 37 sts)
Row 3 (outer edge): Ch 1. Work 1 sc in each dc and each ch-1 sp in this order:
– Sc in the first 24 sts.
– 3 sc in the next dc (the shoulder, position 13).
– Sc in the remaining 12 sts, ending in the 3rd ch of the turning ch.
Sl st in capital border sc #3 and #4, then in the first top sc. Fasten off. (24 + 3 + 12 = 37 sts worked + 2 added = 39 sc)
Checkpoint: the outer edge of the neck sits level with the capital top. The shoulder reaches about 3 in (7.6 cm) from the left edge.
Strings
Work into the free loops of frame Row 1, using neck positions 1, 3, 5, 7, 9, and 11 counted from the capital.
Each string is made the same way:
1. Ch the given length.
2. Sl st into the anchor point.
3. Sl st loosely back up each ch to the neck, making a firm cord.
4. Sl st across the neck to the next string position.
Lay the piece flat while you work, and adjust the chain count so each string lies straight without pulling.
- Join at position 1. Ch 25, about 3.5 in (8.9 cm), and anchor in base-top border sc #3.
- At position 3, ch 23, about 3.25 in (8.3 cm), and anchor in base-top border sc #5.
- At position 5, ch 19, about 2.75 in (7.0 cm), and anchor on the inner edge of the forearm.
- At position 7, ch 16, about 2.25 in (5.7 cm), and anchor on the forearm.
- At position 9, ch 12, about 1.75 in (4.4 cm), and anchor on the forearm.
- At position 11, ch 9, about 1.25 in (3.2 cm), and anchor on the forearm.
Fasten off and weave in the ends along the frame.
Hanging Loop
Join the thread in the 3rd top sc of the capital. Ch 16, then sl st in the 4th top sc. Turn. Work 20 sc into the ch-16 loop, then sl st in the 3rd top sc. Fasten off.
The loop stands about 1.25 in (3.2 cm) tall.
Final Blocking
- Wet the ornament, or soak it in diluted stiffener. Press out the extra liquid in a towel.
- Pin it to a board RS up. Square the base to 2.8 in (7.1 cm) wide.
- Pin the pillar straight so the body measures 5.2 in (13.2 cm) tall.
- Ease the neck into a smooth arch and round the shoulder. Pin the outer edge every 0.5 in (1.3 cm).
- Pull each string straight and pin it lightly at both ends.
- Open each eyelet with a pin tip.
- Shape the loop around a pencil.
- Let it dry completely, which usually takes 12–24 hours, before you unpin.
Final Quality-Control Checklist
- The body measures 2.8 in x 5.2 in (7.1 cm x 13.2 cm).
- The total width is about 3 in (7.6 cm).
- All three ridge bands show on the RS.
- The border count is 102 sc, and every corner lies flat.
- Frame Row 3 has 39 sc, with the 3-sc shoulder centered on the curve.
- There are six straight strings, getting shorter toward the forearm.
- All 18 eyelets are open and even.
- The loop is centered and the ends are hidden.
Troubleshooting
- The pillar leans or twists: your tension is uneven. Block firmly and use stiffener.
- The frame ruffles: the chain bridge is too long. Remove 2 ch from Row 1 and the eyelet repeat still works, because the count stays odd.
- The frame pulls the pillar inward: the chain is too tight. Work the bridge with a hook one size larger.
- Strings sag: chain 1–2 fewer, and keep the slip-stitch return snug.
- Strings bow the frame: chain 1–2 more.
- Corners cup: check that each corner has exactly 3 sc.
Care
Hand wash in cool water, reshape, and pin flat to dry. Store the ornament flat in tissue so the strings stay straight.
Final Notes
The measurement chain is short and reliable:
– Gauge: 12 sc x 14 rows = 2 in (5.1 cm)
– Base: 2.5 in (6.4 cm) wide
– Body before border: 4.9 in (12.4 cm) tall
– Body after border: 2.8 in x 5.2 in (7.1 cm x 13.2 cm)
– Finished ornament: about 3 in (7.6 cm) wide, with a 1.25 in (3.2 cm) loop
If you check each step, the frame and strings fall into place on their own. Happy crocheting!