

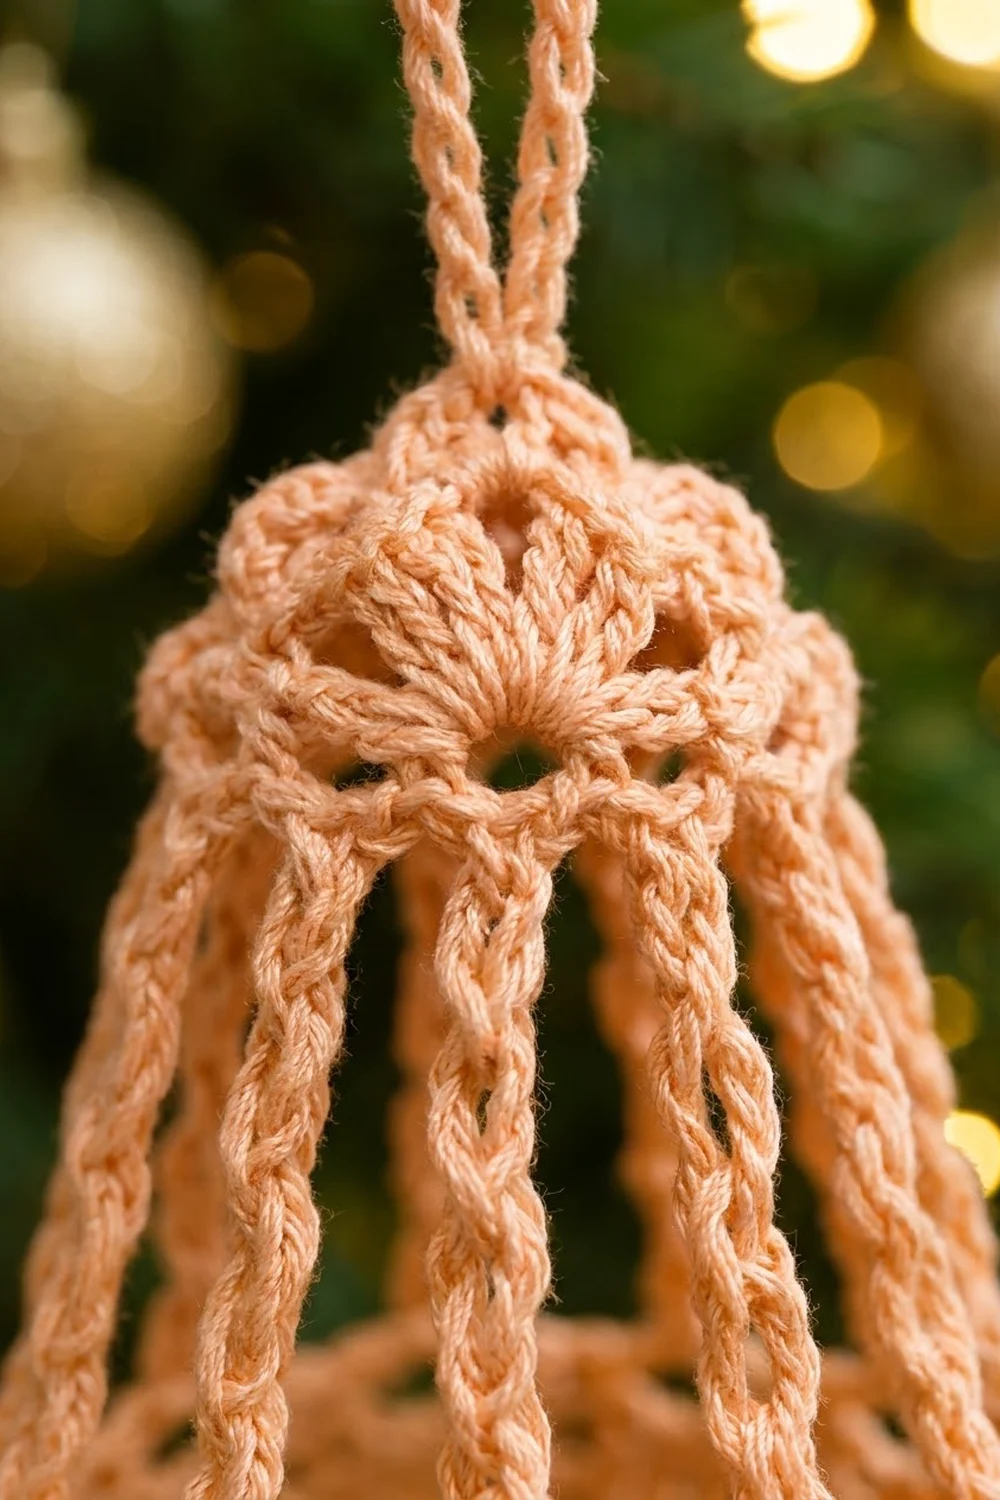
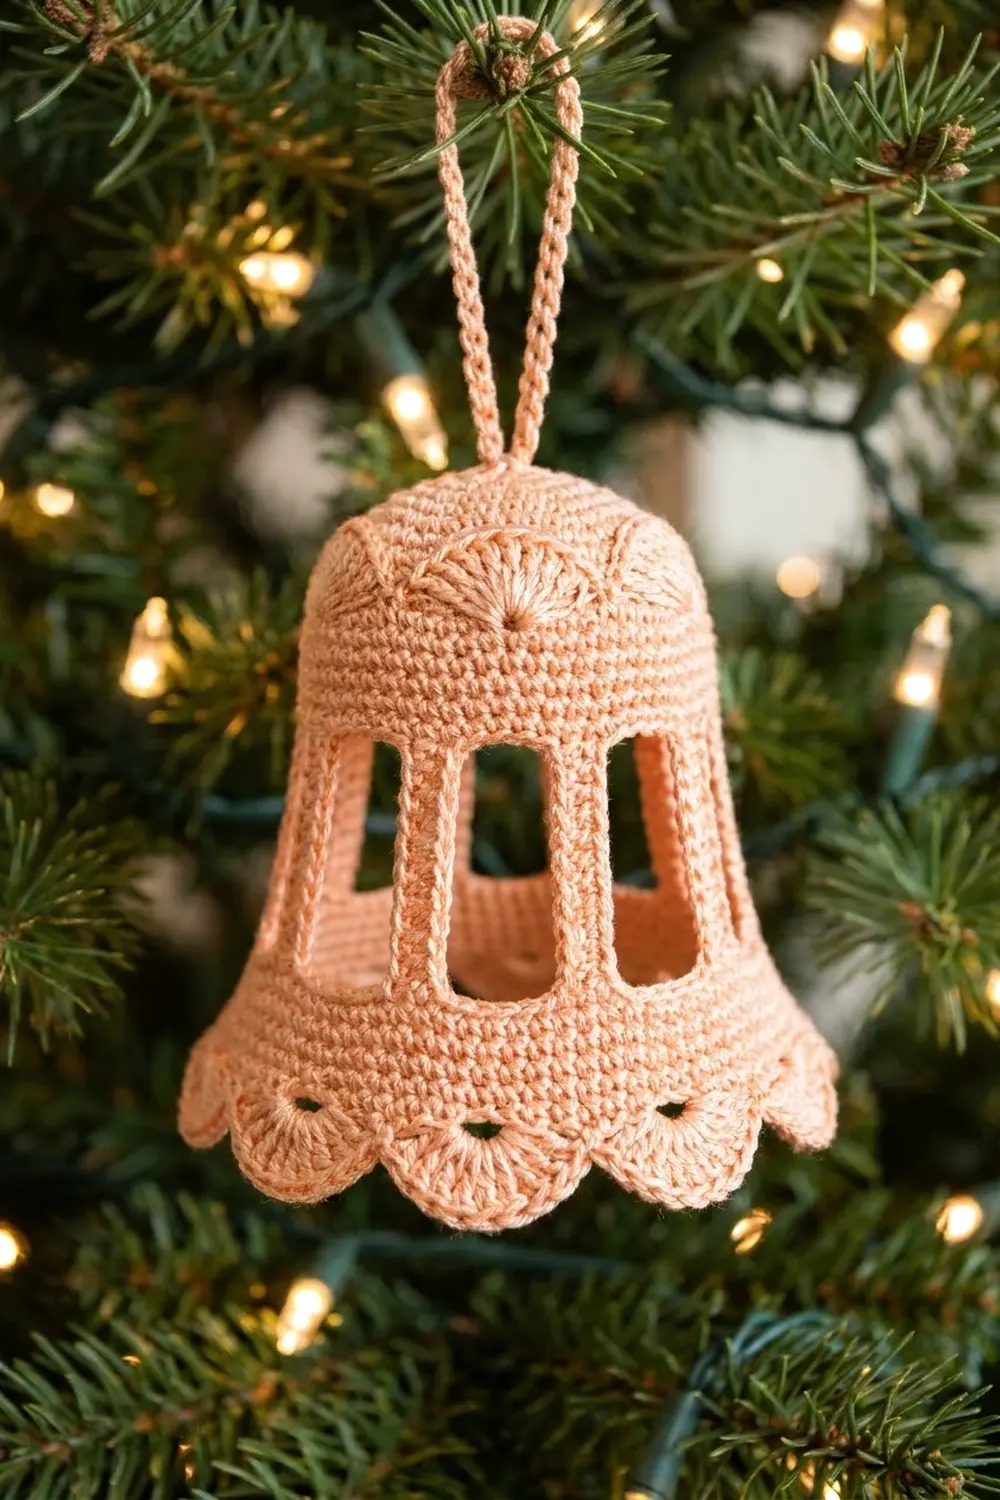
This little bell is light and airy, almost like a lantern made of thread. A domed cap of tiny fan shells sits on top. Eight slim, braided-looking pillars drop from the cap with open windows between them, and a solid band with a row of big rounded scallops finishes the hem.
The sample is worked in a warm peach cotton. It looks festive but soft against green branches and gold baubles, and it works just as well in white, cream, red, or metallic gold thread. The style is vintage-lace Christmas, simple enough that you can make a whole set in an evening or two.
The pattern uses US crochet terms throughout. The finished bell measures 3.5 in (8.9 cm) tall and 3.75 in (9.5 cm) wide at the scallops when laid flat. The hanging loop adds 1.25 in (3.2 cm), for a total hanging length of 4.75 in (12.1 cm).
The bell is worked top-down in one piece:
– Work the cap in the round.
– Make eight cord pillars hanging down from the cap band.
– Link the pillar tips together with a chain ring.
– Add a solid single crochet band and the scallop edge.
– Finish with the hanging loop.
Starching over a small form gives the bell its final shape.
Finished Size and Construction
- Finished size: 3.5 in (8.9 cm) tall × 3.75 in (9.5 cm) wide, flat
- Hanging length with loop: 4.75 in (12.1 cm)
- Skill level: Easy-intermediate
- Terminology: US crochet terms
- Yarn weight: Super fine (#1) cotton, fingering weight or size 3 crochet thread
- Hook: 2.25 mm (US B-1)
- Number of pieces: 1 (a single 3D bell)
- Layout: Worked in the round from top to bottom
- Cap size (Rnds 1–4): 1.5 in (3.8 cm) across flat, 1 in (2.5 cm) tall
- Size before the hem border (cap plus pillars): 2.75 in (7.0 cm) tall
- Hem border depth (Rnds 6–8): 0.75 in (1.9 cm)
Materials
Choose a smooth, tightly plied mercerized cotton. Cotton holds starch well and keeps the pillars crisp and straight. Acrylic and wool are too springy for this shape and tend to sag between the pillars. A thread with a light sheen shows off the shell texture best.
- Peach super fine cotton: 6 g, about 20 m (22 yd) per bell. One 50 g ball (about 170 m) makes 8 bells.
- 2.25 mm (US B-1) crochet hook
- Tapestry needle
- Scissors
- Stitch marker
- Fabric stiffener or heavy spray starch
- Blocking form: a small plastic cone, a shot glass, or plastic wrap rolled into a bell shape
- Rust-proof pins and a blocking board
The quantities include a margin of about 20% to cover gauge differences and weaving in ends.
Abbreviations (US Terms)
- ch – chain
- sl st – slip stitch
- sc – single crochet
- dc – double crochet
- st(s) – stitch(es)
- sp – space
- Rnd – round
- Fan – 3 dc in the same st (used in the cap)
- Shell – 9 dc in the same st (used on the hem)
- Pillar – ch 18, then sc in the 2nd ch from the hook and in each of the next 16 ch (17 sc). This makes a firm, braided-looking cord.
Gauge and Checkpoints
Make one complete bell before you buy thread for a full set. The checkpoints below are your gauge test. They work better than a flat swatch because they measure the real shape.
Base gauge: 9 sc = 1 in (2.5 cm), and 10 ch = 1 in (2.5 cm). A chain of 20 should measure 2 in (5.1 cm) unstretched.
Checkpoints:
– After Rnd 2: the dc circle is 0.9 in (2.3 cm) across.
– After Rnd 4: the cap is 1.5 in (3.8 cm) across when flattened.
– Each pillar: 1.75 in (4.4 cm) long.
– After Rnd 5: 2.75 in (7.0 cm) from the top of the cap to the pillar tips.
– After Rnd 7: the hem band is 3.5 in (8.9 cm) across flat, which means about 7 in (17.8 cm) around.
– After Rnd 8: the bell is 3.5 in (8.9 cm) tall and 3.75 in (9.5 cm) wide.
If the bell is too big, go down to a 2.0 mm hook or use a thinner thread. If it is too small, go up to a 2.5 mm hook. Don’t change the stitch counts, because the scallop placement depends on them.
Pattern
Cap
Rnd 1: Make a magic ring. Ch 1, then work 8 sc into the ring. Pull the ring closed and sl st to the first sc to join. (8 sc)
Rnd 2: Ch 3 (counts as a dc), then dc in the same st. Work 2 dc in each remaining st around. Join with a sl st to the top of the ch-3. (16 dc)
This round has fewer increases than a flat circle needs, so the cap begins to cup into a dome. That is intentional.
Rnd 3 (fans): Ch 1, then sc in the same st and 3 dc in the next st. Sc in the next st, 3 dc in the next st. Repeat from * 6 more times. Join with a sl st to the first sc. (8 sc + 24 dc = 32 sts, 8 fans)
Rnd 4 (cap band): Sl st in each of the next 2 dc. You are now in the center dc of the first fan. Ch 1, sc in the same st, ch 3. Sc in the center dc of the next fan, ch 3. Repeat from * 6 more times. Join with a sl st to the first sc. (8 sc + 24 ch = 32 sts, 8 ch-3 sps)
Checkpoint: the cap is 1.5 in (3.8 cm) across flat and 1 in (2.5 cm) tall.
Pillars
Rnd 5 (pillars): Start at the first sc of Rnd 4.
- Make 1 pillar: ch 18, then sc in the 2nd ch from the hook and in each of the next 16 ch (17 sc).
- Sl st in the same Rnd 4 sc that the pillar started from.
- Work 3 sl st in the next ch-3 sp.
- Sl st in the next sc.
Repeat steps 1–4 seven more times, for 8 pillars in total. On the last repeat, the sl st in step 4 lands in the sc where you started. (8 pillars of 17 sc each)
Fasten off and weave the end along the cap band.
Each pillar hangs freely from one of the 8 sc in the cap band. The tip of a pillar is its bottom end, where you made its first sc. No chains link the pillars at this stage, so the windows between them stay completely open, just like the sample.
Checkpoint: each pillar is 1.75 in (4.4 cm) long, and the bell is 2.75 in (7.0 cm) from the top of the cap to the pillar tips.
Border
The hem border has three rounds: a chain ring that links the pillar tips, a solid sc band, and the scallop edge.
Border gauge: 9 sc = 1 in (2.5 cm) across the hem band.
Rnd 6 (hem chain ring): Lay the bell on its side and check that none of the pillars are twisted or crossed. Join the thread with a sl st in the tip of any pillar. Ch 1, sc in the same place, then ch 7. Sc in the tip of the next pillar, ch 7. Repeat from * 6 more times. Join with a sl st to the first sc. (8 sc + 56 ch = 64 sts, 8 ch-7 sps)
Each ch-7 here is longer than the matching ch-3 in the cap band. That extra length makes the pillars flare out into a bell shape.
Rnd 7 (hem band): Ch 1. Sc in the next sc (the pillar tip), then 7 sc in the next ch-7 sp. Repeat from * 7 more times. Join with a sl st to the first sc. (8 sc worked 1 per existing sc + 56 sc worked 7 per ch-7 sp = 64 sc)
Each 8-st section is 1 sc above a pillar plus 7 sc under an open window. Place a marker in the first sc to keep your place.
Checkpoint: the band is 3.5 in (8.9 cm) across flat, or about 7 in (17.8 cm) around.
Rnd 8 (scallops): Ch 1, then sc in the same st, which is the sc above the first pillar. Skip 3 sts and work 1 shell (9 dc) in the next st. Skip 3 sts, then sc in the next st. Repeat from * 7 more times. On the final repeat, after skipping the last 3 sts, join with a sl st to the first sc instead of working a new sc. (8 sc + 72 dc = 80 sts, 8 shells)
Fasten off.
Why the math works: Rnd 7 has 64 sts, which is exactly 8 repeats of 8 sts. In each repeat:
– The sc goes into the pillar st.
– You skip window sts 1–3.
– The shell goes into window st 4, the exact center of the 7.
– You skip window sts 5–7.
So every shell sits centered under an open window, and every dip between scallops lines up with a pillar. A 9-dc shell over a 7-st span gives the edge a gentle ruffle, which flares the hem out to 3.75 in (9.5 cm).
Hanging Loop
- Hold the bell upside down so you can see inside the cap.
- Join the thread with a sl st in any sc of Rnd 1.
- Ch 22, then sl st in the Rnd 1 sc directly opposite (4 sts away).
- Sl st in each of the 22 ch to work back across, then sl st in the starting sc. (22 ch + 22 sl st)
- Fasten off.
The doubled cord makes a firm loop about 1.25 in (3.2 cm) tall.
Weave in all ends. Run the starting tail through Rnd 1 once more to close any gap in the magic ring.
Final Blocking
- Mix the fabric stiffener according to the label, or dilute white glue 1:1 with water.
- Soak the bell completely, then squeeze out the excess. Don’t wring it.
- Blot it in a towel until it is damp but not dripping.
- Cover your form with plastic wrap so the bell won’t stick to it.
- Ease the bell over the form. Center the cap on top and space the 8 pillars evenly, keeping each one straight and untwisted.
- Gently pull the hem down until the bell is 3.5 in (8.9 cm) tall.
- Flare the scallops outward and pin each shell into a round curve. The hem should be 3.75 in (9.5 cm) across.
- Pin the hanging loop upright.
- Let the bell dry for at least 24 hours, then slide it off the form.
Final Quality-Control Checklist
- [ ] The cap has 8 even fans and is domed, not flat.
- [ ] There are 8 pillars, each 1.75 in (4.4 cm) long and untwisted.
- [ ] The windows are fully open, with no stray chains crossing them.
- [ ] Rnd 7 has exactly 64 sc.
- [ ] There are 8 scallops, each centered under a window.
- [ ] The bell is 3.5 in (8.9 cm) tall and 3.75 in (9.5 cm) wide.
- [ ] The loop is centered and firm.
- [ ] All ends are woven in and trimmed.
- [ ] The bell is fully dry and holds its shape when it hangs.
Troubleshooting
The cap lies flat instead of doming. Your dc may be too loose. Work Rnd 2 more tightly, or go down a hook size for the cap only.
The cap cups too tightly and puckers. Work Rnd 2 a little more loosely, or use a 2.5 mm hook for Rnds 2–3.
The pillars curl or spiral. Work the sc into the back bump of the chain, and block each pillar straight while it is wet.
The pillars are different lengths. Count every chain carefully. Always ch 18 and work 17 sc.
The hem puckers. Your ch-7 spaces in Rnd 6 are too tight. Chain more loosely, or go up a hook size for that round only.
The scallops are lopsided. Count the 3 skipped sts on both sides of each shell, and recheck that Rnd 7 has 64 sc.
The bell collapses after drying. Starch it again with a stronger stiffener solution.
Care
Dust the bell gently with a soft brush. If it needs washing, hand-wash it in cool water, then starch it again and reshape it over the form.
Final Notes
Each stage builds on the one before:
– The cap is 1.5 in (3.8 cm) across and 1 in (2.5 cm) tall.
– The pillars add 1.75 in (4.4 cm), for 2.75 in (7.0 cm) before the border.
– The chain ring and sc band add 0.25 in (0.6 cm) and give you 64 sts, exactly 8 repeats of 8.
– The scallops add 0.5 in (1.3 cm), for a finished bell 3.5 in (8.9 cm) tall and 3.75 in (9.5 cm) wide.
– The loop adds 1.25 in (3.2 cm).
If you check each stage against its checkpoint, every bell in your set will match.
Happy crocheting!