

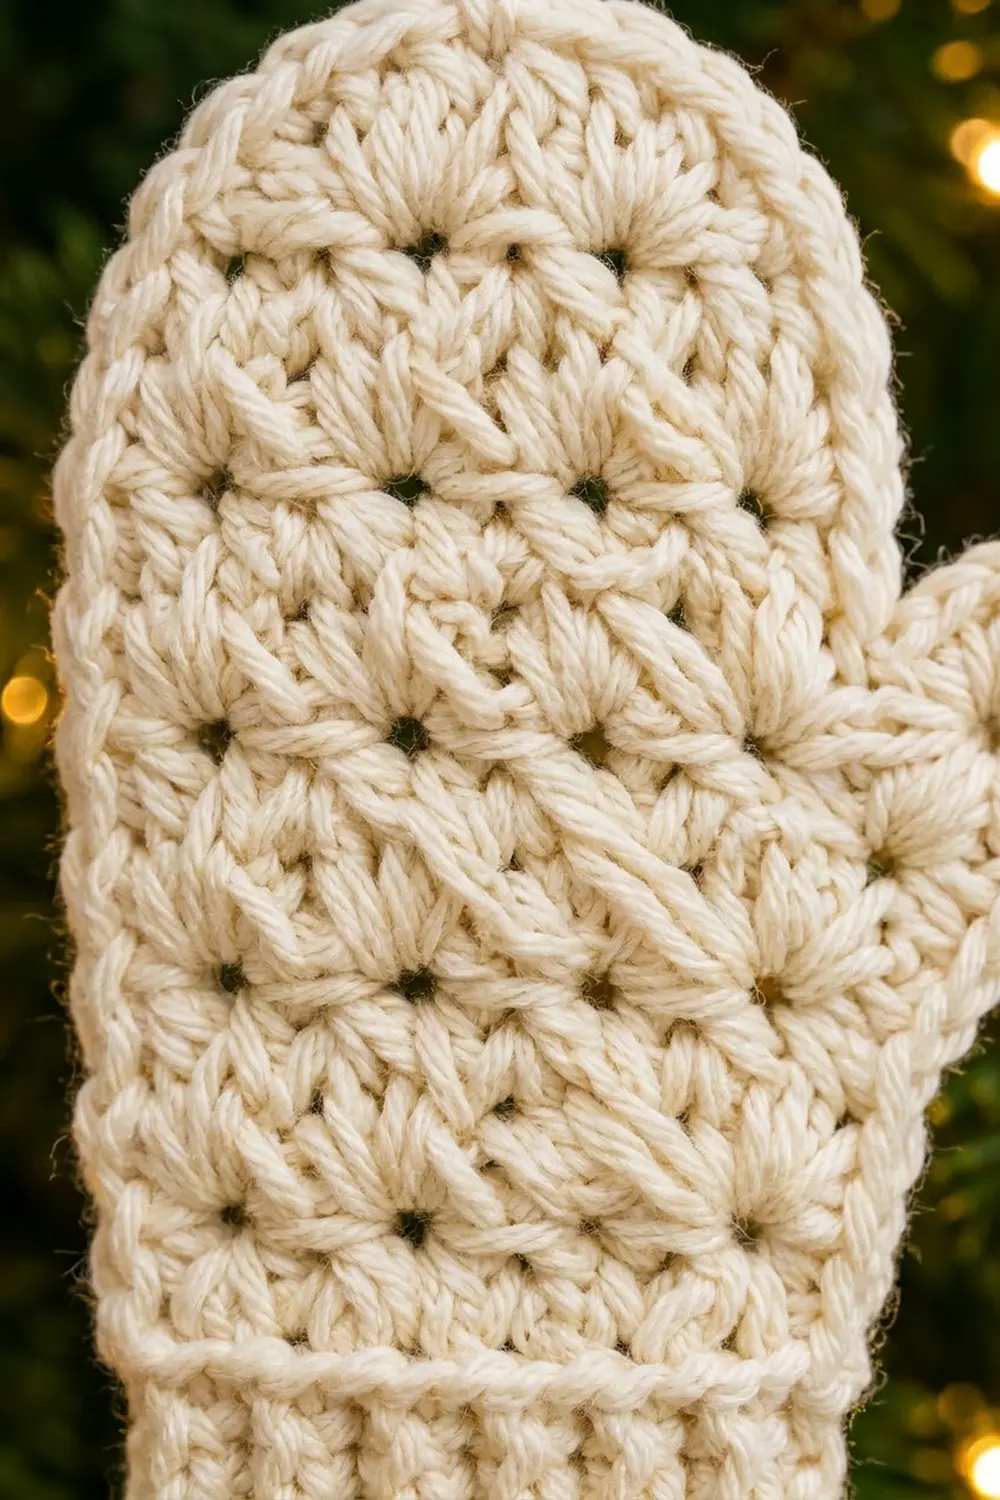
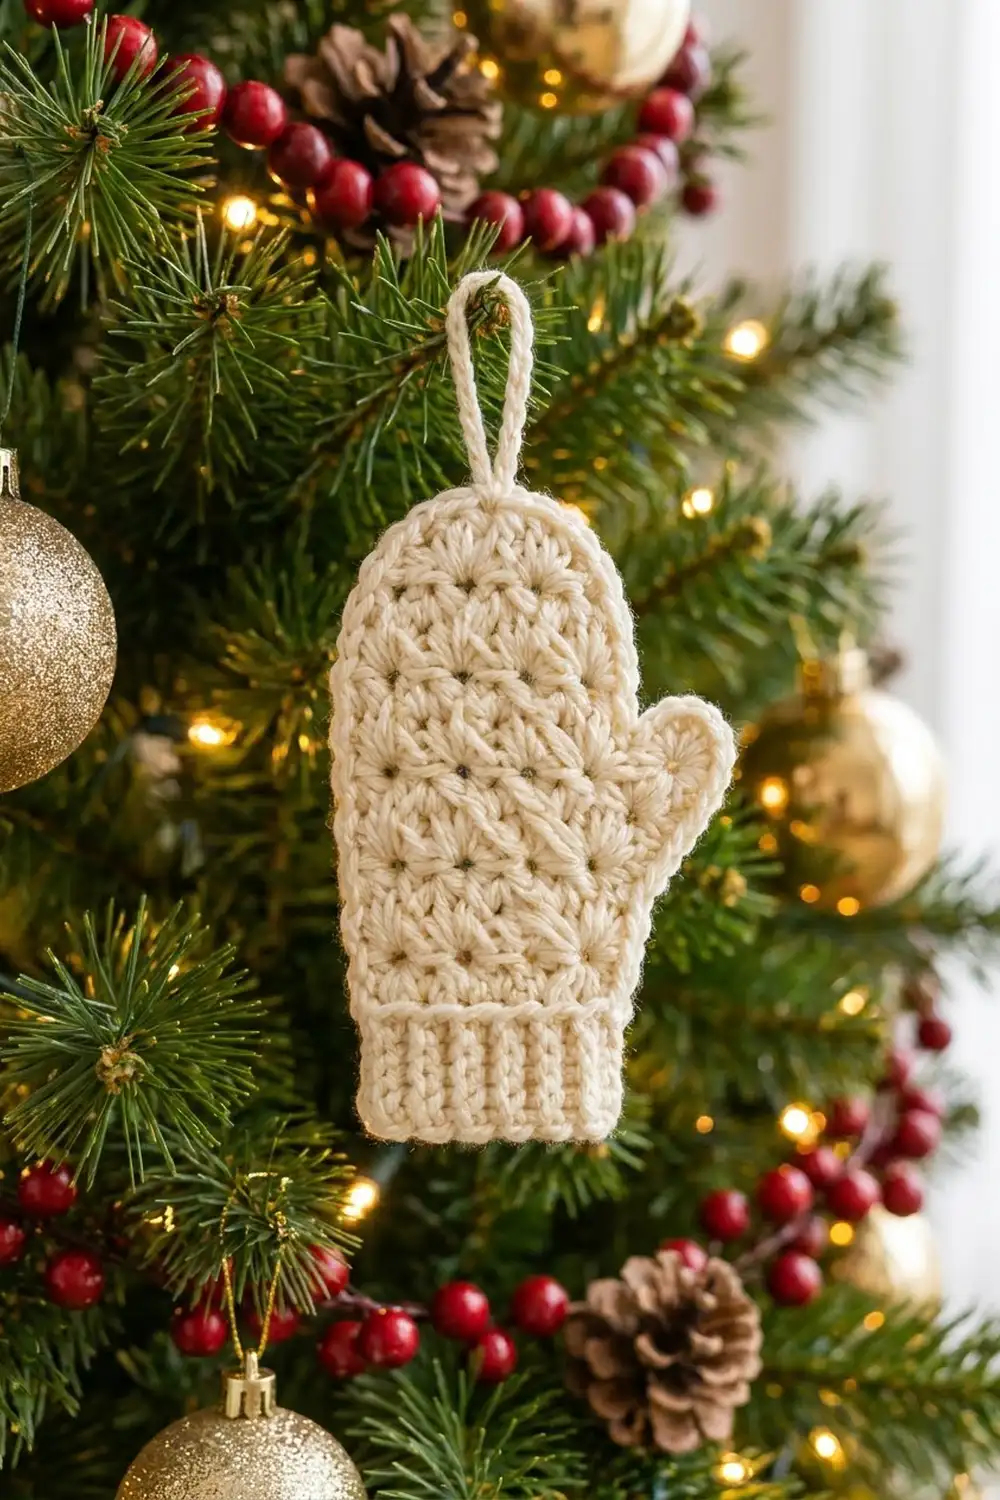
This little mitten is a single flat ornament made in one cream yarn. Small starburst clusters with open centers cover the hand in offset rows. It has a ribbed cuff, a smooth single crochet outline, and a crocheted hanging loop.
The look is soft and wintry, like a tiny cable-knit mitten. Using one neutral color keeps the texture easy to see. It looks good on a tree, on a gift tag, or strung with others as a garland.
All instructions use US crochet terms. The finished mitten measures 4.0 in (10.2 cm) wide at the thumb and 5.4 in (13.7 cm) tall, not counting the hanging loop.
Construction is simple:
– Crochet the cuff in rows of post-stitch ribbing.
– Work the hand in rows of single crochet and starburst clusters, then shape the rounded top with decreases.
– Work the thumb into the side edge of the hand.
– Finish with one border round that outlines everything and adds the loop.
Finished Size and Construction
- Finished size: 4.0 in (10.2 cm) wide at the thumb x 5.4 in (13.7 cm) tall; hand 3.2 in (8.1 cm) wide
- Height with loop: about 6.2 in (15.7 cm)
- Skill level: Easy-intermediate
- Terminology: US
- Yarn weight: Sport (#2), cotton or cotton blend
- Hook: 3.0 mm
- Number of pieces: 1
- Layout: Single flat piece, no assembly
- Piece size: same as finished size
- Size before border: 3.6 in (9.1 cm) wide at the thumb x 5.0 in (12.7 cm) tall; hand 2.8 in (7.1 cm) wide
- Border depth: 0.2 in (0.5 cm) on every edge
Materials
Choose a smooth, tightly plied sport-weight cotton or cotton blend. Mercerized cotton shows the starburst centers clearly and blocks crisply. Fuzzy or loosely spun yarn will blur the texture.
- Cream: 10 g, about 25 m (27 yd) per mitten
Tools:
- 3.0 mm crochet hook
- Tapestry needle
- Scissors
- 2 stitch markers
- Rust-proof pins and a blocking mat
- Spray bottle with clean water
- Ruler or tape measure
The yarn amount includes a margin for gauge testing and weaving in ends. One mitten uses about 8 g (20 m / 22 yd).
Abbreviations (US Terms)
- ch = chain
- sl st = slip stitch
- sc = single crochet
- sc2tog = single crochet 2 together
- dc = double crochet
- FPdc = front post double crochet
- BPdc = back post double crochet
- FLO = front loop only
- st(s) = stitch(es)
- RS / WS = right side / wrong side
- sbc = starburst cluster (see below)
Starburst cluster (sbc):
1. Yarn over, insert hook in the indicated st, yarn over and pull up a loop, yarn over and draw through 2 loops.
2. Repeat step 1 two more times in the same st (4 loops on hook).
3. Yarn over and draw through all 4 loops.
4. Ch 1 to close. This ch-1 makes the open eye in the center.
One sbc counts as 1 st. On the next row, work into the top of the cluster and skip its ch-1.
Gauge and Checkpoints
Gauge:
– Width: 12 sc = 2 in (5.1 cm).
– Hand height: 10 rows (sc rows and sbc rows alternating) = 2 in (5.1 cm), so each row averages 0.2 in (0.5 cm).
– Cuff height: 3 rows of dc ribbing = 1.0 in (2.5 cm).
The quickest test is the mitten itself. Make one, check it at each point below, and adjust your hook before starting a batch.
- After Row 1: 2.3 in (5.8 cm) wide
- After Row 3: cuff 1.0 in (2.5 cm) tall
- After Row 4: 2.8 in (7.1 cm) wide
- After Row 18: 4.0 in (10.2 cm) tall from the foundation edge
- After Row 23: 5.0 in (12.7 cm) tall
- After the thumb: 3.6 in (9.1 cm) wide at the thumb
- After the border: 4.0 in (10.2 cm) x 5.4 in (13.7 cm)
Too big: go down to a 2.75 mm hook. Too small: go up to a 3.25 mm hook. If you are off by 0.1 in (0.3 cm) or less, blocking will fix it.
Cuff
Row 1 (RS): Ch 16. Dc in 4th ch from hook (the skipped 3 ch count as 1 dc) and in each ch across, turn. (14 sts)
Row 2 (WS): Ch 2 (does not count as a st), dc in first st, FPdc around next st, BPdc around next st 6 times, dc in last st, turn. (14 sts)
Row 3 (RS): Ch 2 (does not count), dc in first st. Across the next 12 sts, FPdc around each post that sticks out toward you and BPdc around each post that sits back. Dc in last st, turn. (14 sts)
The raised posts now line up as 6 vertical ribs.
Row 4 (WS, ridge row): Ch 1, working in FLO only: 2 sc in first st, sc in next 5 sts, 2 sc in next st, sc in next 6 sts, 2 sc in last st, turn. (14 sts worked into + 3 sts added = 17 sts)
Working this WS row in FLO leaves the back loops free on the RS. They form the horizontal ridge line between the cuff and the hand.
Hand
Every RS row is a starburst row and every WS row is plain sc. Row A and Row B alternate, so each cluster sits between two clusters of the cluster row below it.
Row 5 (RS, Row A): Ch 1, sc in first 2 sts, sbc in next st, sc in next 3 sts 3 times, sbc in next st, sc in last 2 sts, turn. (17 sts: 4 sbc, 13 sc)
Row 6 (WS): Ch 1, sc in each st across, working into the top of each sbc and skipping its ch-1, turn. (17 sts)
Row 7 (RS, Row B): Ch 1, sc in first 4 sts, sbc in next st, sc in next 3 sts twice, sbc in next st, sc in last 4 sts, turn. (17 sts: 3 sbc, 14 sc)
Row 8: Repeat Row 6. (17 sts)
Rows 9-18: Repeat Rows 5-8 twice more, then work Rows 5-6 once more. Row 17 is a Row A. (17 sts in every row)
Checkpoint: 4.0 in (10.2 cm) tall from the foundation edge.
Rounded Top
Row 19 (RS): Ch 1, sc2tog, sc in next 2 sts, sbc in next st, sc in next 3 sts, sbc in next st, sc in next 3 sts, sbc in next st, sc in next 2 sts, sc2tog, turn. (15 sts: 3 sbc)
These clusters sit in the Row B positions, so the offset pattern continues.
Row 20 (WS): Ch 1, sc2tog, sc in next 11 sts, sc2tog, turn. (13 sts)
Row 21 (RS): Ch 1, sc2tog, sc in next 2 sts, sbc in next st, sc in next 3 sts, sbc in next st, sc in next 2 sts, sc2tog, turn. (11 sts: 2 sbc)
Row 22 (WS): Ch 1, sc2tog, sc in next 7 sts, sc2tog, turn. (9 sts)
Row 23 (RS): Ch 1, sc2tog, sc in next 5 sts, sc2tog. (7 sts) Fasten off.
Checkpoint: 5.0 in (12.7 cm) tall overall.
Thumb
The thumb is worked into the row ends of Rows 8-14 on the right edge of the hand, as seen with the RS facing. Place a marker in the row end of Row 8 and another in the row end of Row 14.
Thumb Row 1 (WS): With the WS facing, join yarn at the row end of Row 14. Ch 1, then work 1 sc in each row end from Row 14 down to Row 8, turn. (7 sts)
Thumb Row 2 (RS): Ch 1, sc in first 3 sts, sbc in next st, sc in last 3 sts, turn. (7 sts: 1 sbc)
Thumb Row 3 (WS): Ch 1, sc2tog, sc in next 3 sts, sc2tog, turn. (5 sts)
Thumb Row 4 (RS): Ch 1, sc2tog, sc in next st, sc2tog. (3 sts) Fasten off.
The thumb sticks out 0.8 in (2.0 cm), and its base runs 1.4 in (3.6 cm) along the edge. Checkpoint: 3.6 in (9.1 cm) wide at the thumb.
Border and Hanging Loop
Border gauge: The border is 1 round of sc, 0.2 in (0.5 cm) deep. It uses the same gauge as the body: 6 sc per 1 in (2.5 cm).
Border Round (RS): With the RS facing, join yarn at the bottom left corner of the foundation edge. Ch 1, then work these sections in order without turning:
- Bottom edge: Work into the 14 bases of Row 1 (the skipped ch-3 counts as one base): 2 sc in first base, sc in next 12, 2 sc in last base. (16 sc)
- Right side below the thumb: 2 sc in each of the 3 cuff row ends, then 1 sc in each row end of Rows 4-7. (6 + 4 = 10 sc)
- Thumb: 1 sc in each of the 4 thumb row ends on the lower edge. Across Thumb Row 4: 2 sc in first st, sc in next st, 2 sc in last st. Then 1 sc in each of the 4 thumb row ends on the upper edge. (4 + 5 + 4 = 13 sc)
- Right side above the thumb: 1 sc in each row end of Rows 15-23. (9 sc)
- Top and loop: Across Row 23: 2 sc in first st, sc in next 2 sts, (sc, ch 12, sc) in the center st, sc in next 2 sts, 2 sc in last st. (10 sc + ch-12 loop)
- Left side: 1 sc in each row end of Rows 23 down to 4, then 2 sc in each of the 3 cuff row ends. (20 + 6 = 26 sc)
Sl st to the first sc to join. Fasten off. (16 + 10 + 13 + 9 + 10 + 26 = 84 sc, plus the loop)
Don’t add extra stitches in the inside corners where the thumb meets the hand. Plain sc pulls those curves in neatly.
Why the math works:
– Cuff sides: each dc row is about 0.33 in (0.8 cm) tall, so 2 sc per cuff row end gives 6 sc per inch, the same as the body.
– Hand sides: each hand row averages 0.2 in (0.5 cm), so 1 sc per row end gives 5 sc per inch. That is slightly firm, which keeps the side edges straight instead of wavy.
– Corners: the 2-sc groups at the four corners and the thumb tip turn each corner without cupping.
The ch-12 loop is about 1.5 in (3.8 cm) long and folds to roughly 0.8 in (2.0 cm) tall.
Final Blocking
- Weave in all ends along the WS of the border, running each through at least 1 in (2.5 cm) of stitches.
- Lay the mitten RS up on the blocking mat.
- Pin the bottom corners of the cuff 2.7 in (6.9 cm) apart.
- Pin the hand sides straight so the hand is 3.2 in (8.1 cm) wide and the mitten is 5.4 in (13.7 cm) tall.
- Shape the rounded top with pins every 0.4 in (1.0 cm).
- Tip the thumb slightly upward and outward until the total width is 4.0 in (10.2 cm).
- Pin the cuff without stretching it so the ribs stay crisp.
- Mist until damp, pat flat, and pin the hanging loop pointing straight up.
- Let it dry completely before unpinning.
Final Quality-Control Checklist
- Hand rows have 17 sts, and the top rows count 15, 13, 11, 9, 7
- Cluster rows alternate 4 and 3 starbursts, all offset
- Every cluster’s ch-1 eye is open on the RS
- The cuff shows 6 clean vertical ribs under one continuous ridge line
- Thumb rows count 7, 7, 5, 3
- The border has 84 sc, and all ends are secure
- Finished size is 4.0 in (10.2 cm) x 5.4 in (13.7 cm)
- The loop is centered and straight
Troubleshooting
Clusters bulge like bobbles: You’re making the sbc too tight. Pull each loop up to full dc height before closing.
Cluster eyes are closed: Don’t skip the ch 1, and don’t work into it on the WS row.
Hand edges slant inward: You missed a first or last st somewhere. Count 17 sts at the end of every row.
Ribs look twisted: On Row 3, look at the RS of each post and work it the same way it appears: FPdc for raised posts, BPdc for recessed ones.
No ridge line: Row 4 needs to be worked in FLO with the WS facing.
Thumb ruffles: Work exactly 7 sc into the 7 row ends. If it still ruffles, use a hook one size smaller for the thumb.
Border waves: Your border tension is too loose. Rework it with a smaller hook.
Edges cup: Check that you made the 2-sc corner groups, then block more firmly.
Care
Hand wash in cool water with mild soap, roll in a towel to press out the water, and dry flat. Reblock if it needs reshaping.
Final Notes
Here is how the measurements build:
– The cuff starts 14 sts and 2.3 in (5.8 cm) wide and is 1.0 in (2.5 cm) tall.
– The ridge row widens it to 17 sts, or 2.8 in (7.1 cm).
– The straight hand reaches 4.0 in (10.2 cm) tall, and shaping brings it to 5.0 in (12.7 cm).
– The thumb makes it 3.6 in (9.1 cm) wide.
– The 84-st border brings it to 4.0 in (10.2 cm) x 5.4 in (13.7 cm).
If every checkpoint matches, all the mittens in your set will come out the same size.
Happy crocheting!