

This tree ornament is made of airy filet mesh in soft cream thread. Six little solid stars are scattered across the open grid, so the tree looks like lace when it hangs against green branches and twinkle lights.
The design uses one color, so the stitch pattern does all the work. A neat single-crochet edge gives the triangle clean, straight sides. A small open-mesh trunk and a chained loop at the tip finish the shape. The style is classic and a little vintage, and it suits any color scheme.
This pattern uses US crochet terms. The finished ornament measures 4.4 in (11.2 cm) wide and 5.4 in (13.7 cm) tall, not counting the loop. With the loop it is about 6.0 in (15.2 cm) tall.
You work the tree from the base up, taking away one mesh at each side on every other row until only one mesh is left at the tip. Next you add the trunk to the other side of the foundation chain. One border round outlines everything and makes the hanging loop.
Finished Size and Construction
- Finished size: 4.4 in (11.2 cm) wide x 5.4 in (13.7 cm) tall, plus a 0.6 in (1.5 cm) loop
- Skill level: Intermediate (filet mesh, shaped edges)
- Terminology: US
- Yarn weight: Size 3 crochet cotton thread
- Hook: 2.0 mm steel hook
- Number of pieces: 1
- Layout: One triangle with a trunk, worked in one piece
- Tree before border: 4.2 in (10.7 cm) wide x 5.2 in (13.2 cm) tall, trunk included
- Trunk: 1 in (2.5 cm) wide x 0.8 in (2.0 cm) tall
- Border depth: 0.1 in (0.3 cm) on every side
Materials
Thread: Use mercerized cotton crochet thread in size 3. Mercerized cotton holds crisp mesh, takes starch well, and doesn’t fuzz. Pick a cream, ivory, or natural shade to match the look in the photo. White and metallic-blend threads also work well.
- Cream: 10 g (about 28 m / 31 yd)
This quantity includes a margin for the gauge swatch and the weaving in. One ornament uses about 8 g.
Tools:
– 2.0 mm steel crochet hook
– Tapestry needle
– Small scissors
– Rust-proof pins and a blocking board
– Spray starch or fabric stiffener (optional, but recommended)
– Ruler or tape measure
Abbreviations (US Terms)
- ch – chain
- sl st – slip stitch
- sc – single crochet
- dc – double crochet
- sp – space
- st(s) – stitch(es)
Special stitches:
– Open mesh: ch 2, skip the next 2 sts (or the ch-2 sp), dc in the next dc.
– Block: 2 dc in the next ch-2 sp (or in the next 2 sts), dc in the next dc.
– Mesh decrease (beginning of row): Turn without chaining. Sl st in each of the next 2 ch and in the next dc. Then ch 3 (counts as dc). This moves you in by one mesh.
– Mesh decrease (end of row): Stop at the dc before the last mesh and leave that last mesh unworked.
A row of N meshes always has N + 1 dc.
Gauge and Checkpoints
Gauge: 5 meshes and 5 rows = 1 in (2.5 cm) in filet mesh.
Test first: Ch 35 and work Row 1 as written below (dc in the 8th ch from the hook) to get 10 meshes. Work 9 more open-mesh rows. The swatch should measure 2 in (5.1 cm) square. Each mesh should look close to a square.
Checkpoints:
– After Row 1: 4.2 in (10.7 cm) wide
– After Row 10: 2.0 in (5.1 cm) tall
– After Row 22: 4.4 in (11.2 cm) tall from the foundation to the tip
– After the trunk: 5.2 in (13.2 cm) total height
– After the border: 4.4 in x 5.4 in (11.2 cm x 13.7 cm)
Too big? Go down to a 1.75 mm hook. Too small? Go up to a 2.25 mm hook. If the meshes are wider than they are tall, pull up the dc a little taller. If they are taller than wide, keep your ch-2s a touch looser.
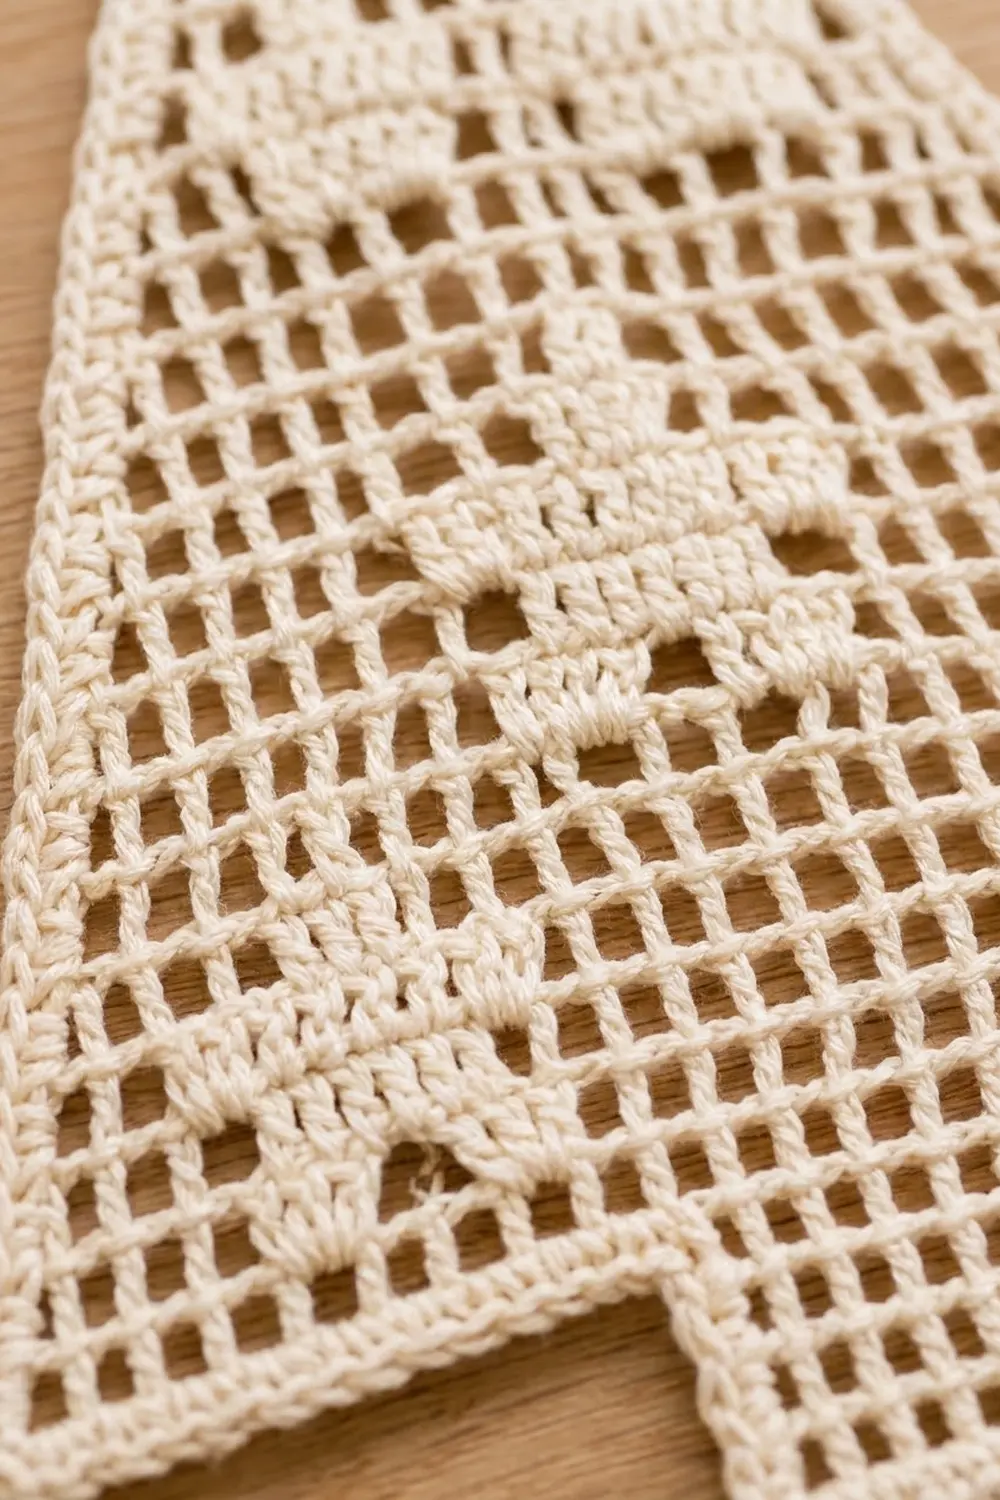
Tree Pattern
Column numbering: Row 1 has columns 1–21. The tree is symmetrical, and every star sits evenly around the center column, so each row reads the same from either side.
Every row except Row 1: Begin with ch 3 (counts as the first dc), unless the row starts with a mesh decrease. On Rows 2–22, every edge mesh is an open mesh.
Row 1 (foundation): Ch 68. Dc in the 8th ch from the hook. The 7 skipped ch count as 2 base ch, the first dc, and ch-2. Ch 2, skip 2 ch, dc in the next ch; repeat from * 19 more times. Turn. (21 meshes / 22 dc)
Row 2: Ch 3. Work 3 open, 1 block, 1 open, 1 block, 9 open, 1 block, 1 open, 1 block, 3 open. Work the last dc in the 5th ch of the skipped ch-7. Turn. (21 meshes; the feet of the two bottom stars)
Row 3: Mesh decrease at the start. Work 2 open, 3 blocks, 9 open, 3 blocks, 2 open. Mesh decrease at the end. Turn. (19 meshes / 20 dc)
Row 4: Ch 3. Work 3 open, 1 block, 11 open, 1 block, 3 open. Turn. (19 meshes; the bottom stars are complete)
Row 5: Mesh decrease at the start. Work 17 open. Mesh decrease at the end. Turn. (17 meshes)
Row 6: Ch 3. Work 17 open. Turn. (17 meshes)
Row 7: Mesh decrease at the start. Work 6 open, 1 block, 1 open, 1 block, 6 open. Mesh decrease at the end. Turn. (15 meshes)
Row 8: Ch 3. Work 6 open, 3 blocks, 6 open. Turn. (15 meshes)
Row 9: Mesh decrease at the start. Work 6 open, 1 block, 6 open. Mesh decrease at the end. Turn. (13 meshes; the center star is complete)
Row 10: Ch 3. Work 13 open. Turn. (13 meshes)
Checkpoint: the piece is 2.0 in (5.1 cm) tall.
Row 11: Mesh decrease at the start. Work 1 open, 1 block, 1 open, 1 block, 3 open, 1 block, 1 open, 1 block, 1 open. Mesh decrease at the end. Turn. (11 meshes)
Row 12: Ch 3. Work 1 open, 3 blocks, 3 open, 3 blocks, 1 open. Turn. (11 meshes)
Row 13: Mesh decrease at the start. Work 1 open, 1 block, 5 open, 1 block, 1 open. Mesh decrease at the end. Turn. (9 meshes; the middle pair of stars is complete)
Row 14: Ch 3. Work 9 open. Turn. (9 meshes)
Row 15: Mesh decrease at the start. Work 7 open. Mesh decrease at the end. Turn. (7 meshes)
Row 16: Ch 3. Work 2 open, 1 block, 1 open, 1 block, 2 open. Turn. (7 meshes)
Row 17: Mesh decrease at the start. Work 1 open, 3 blocks, 1 open. Mesh decrease at the end. Turn. (5 meshes)
Row 18: Ch 3. Work 2 open, 1 block, 2 open. Turn. (5 meshes; the top star is complete)
Row 19: Mesh decrease at the start. Work 3 open. Mesh decrease at the end. Turn. (3 meshes)
Row 20: Ch 3. Work 3 open. Turn. (3 meshes)
Row 21: Mesh decrease at the start. Work 1 open. Mesh decrease at the end. Turn. (1 mesh / 2 dc)
Row 22: Ch 3. Work 1 open. Fasten off. (1 mesh)
Checkpoint: the triangle is 4.2 in (10.7 cm) wide at the base and 4.4 in (11.2 cm) tall. Every star has 6 blocks in this layout: 1 on top, 3 in the middle, and 2 feet at the bottom.
Trunk
Turn the tree upside down so the foundation chain is on top. You’ll work into the free loops of the foundation chain.
Count 8 meshes in from either bottom corner. That puts you at the base of the 9th dc, which is foundation chain 24 when you count the corner chain as 0.
Trunk Row 1: Join with a sl st at the base of that dc. Ch 3 (counts as dc). Ch 2, skip 2 ch, dc in the next ch; repeat from * 4 more times. Each dc lands under a dc of Row 1. Turn. (5 meshes / 6 dc)
Trunk Rows 2–4: Ch 3. Work 5 open. Work the last dc in the top of the turning ch-3. Turn. (5 meshes each row)
Don’t fasten off. The trunk is centered, with 8 meshes + 5 meshes + 8 meshes = 21 meshes across the base. It measures 1 in (2.5 cm) wide and 0.8 in (2.0 cm) tall.
Border
Border gauge: On horizontal edges, work 1 sc per stitch, which is 3 sc per mesh (15 sc = 1 in / 2.5 cm). On row ends, work 2 sc around each dc post, which is 10 sc = 1 in (2.5 cm). Each outer corner gets 3 sc. Inner (concave) corners get no extra stitches.
Border Round: Continue from the end of Trunk Row 4. Ch 1.
- Trunk bottom: 3 sc in the first dc (corner). 2 sc in the next ch-2 sp, sc in the next dc; repeat from * 3 more times. 2 sc in the last ch-2 sp, then 3 sc in the top of the turning ch (corner). (20 sc)
- Trunk side: 2 sc around each of the 4 row-end posts. (8 sc)
- Base segment: Sc in each foundation chain out to the corner, starting with the chain the trunk’s edge dc sits in and stopping just before the corner chain. (24 sc)
- Outer corner: 3 sc in the corner chain at the base of the edge dc. (3 sc)
- Slanted side: Work 2 sc around each row-end post from Row 1 to Row 22 (44 sc). Also work 1 sc into each of the 10 decrease steps, either into the middle sl st or into the ch-2 sp of the skipped edge mesh. (54 sc)
- Tip: Sc in the top of the first dc of Row 22. In the ch-2 sp work 2 sc, ch 20, 2 sc. Sc in the top of the last dc. (6 sc + ch-20 loop)
- Second slanted side: Work it the same way as the first. (54 sc)
- Outer corner: 3 sc. (3 sc)
- Base segment: 24 sc, ending in the chain at the base of the trunk’s edge dc. (24 sc)
- Trunk side: 8 sc.
Sl st to the first sc. Fasten off.
Round total: 20 + 8 + 24 + 3 + 54 + 6 + 54 + 3 + 24 + 8 = 204 sc, plus the loop.
Why the math works:
– Base: The foundation has 64 chains, numbered 0 to 63. Two corner chains, two base segments of 24, and the 14 chains between the trunk’s edge dc add up to 1 + 24 + 14 + 24 + 1 = 64.
– Slanted sides: Each side rises 22 rows and steps in 10 times. Two sc per row plus one sc per step lays a smooth diagonal without ripples. Two sc in each step would ruffle the edge, and none would pull it tight.
– Corners and loop: Three sc turn each outer corner flat. The ch-20 loop folds to about 0.6 in (1.5 cm).
Final Blocking
- Weave in both tails along the border sc, never through the open mesh.
- Soak the ornament in cool water for 10 minutes, then press out the water in a towel.
- Pin it to the blocking board at 4.4 in (11.2 cm) across the base and 5.4 in (13.7 cm) from the base of the trunk to the tip.
- Lay a ruler along each slanted side and pin every 0.5 in (1.3 cm) so the diagonals are dead straight.
- Pin the trunk square at 1.2 in (3.0 cm) wide including the border.
- Gently nudge each mesh square with a pin tip.
- Spray with starch or brush on stiffener, and let it dry completely before unpinning.
- Shape the loop upright while it is still slightly damp.
Final Quality-Control Checklist
- 21 meshes across Row 1 and 1 mesh at the tip
- Exactly 6 stars, arranged 1-2-1-2, each with the same 6-block shape
- Every edge mesh is open
- Trunk is 5 meshes wide, 4 rows tall, and centered
- Border has 204 sc with 3 sc at each of the 4 outer corners
- Size is 4.4 in x 5.4 in (11.2 cm x 13.7 cm)
- Both slanted sides are straight and the same length
- Loop is securely anchored, with no tails visible
Troubleshooting
- The tree leans to one side: You probably skipped a mesh decrease on one side. Count the meshes on each odd row; each should be 2 fewer than the row before.
- Stars look lopsided: Check the block placement against the column counts. For each row, the open meshes before and after the stars should match.
- Meshes are tall rectangles: Your dc are loose compared to your chains. Shorten the dc or loosen the ch-2s.
- The border ruffles on the slants: You’ve added too many sc at the steps. Use exactly 1 sc per step.
- The border cups: Your tension is too tight. Go up 0.25 mm for the border round only.
- The trunk is off-center: Recount 8 meshes from the corner before joining.
Care
Hand wash in cool water with mild soap, press dry in a towel, and re-block with starch. Store flat, wrapped in tissue paper.
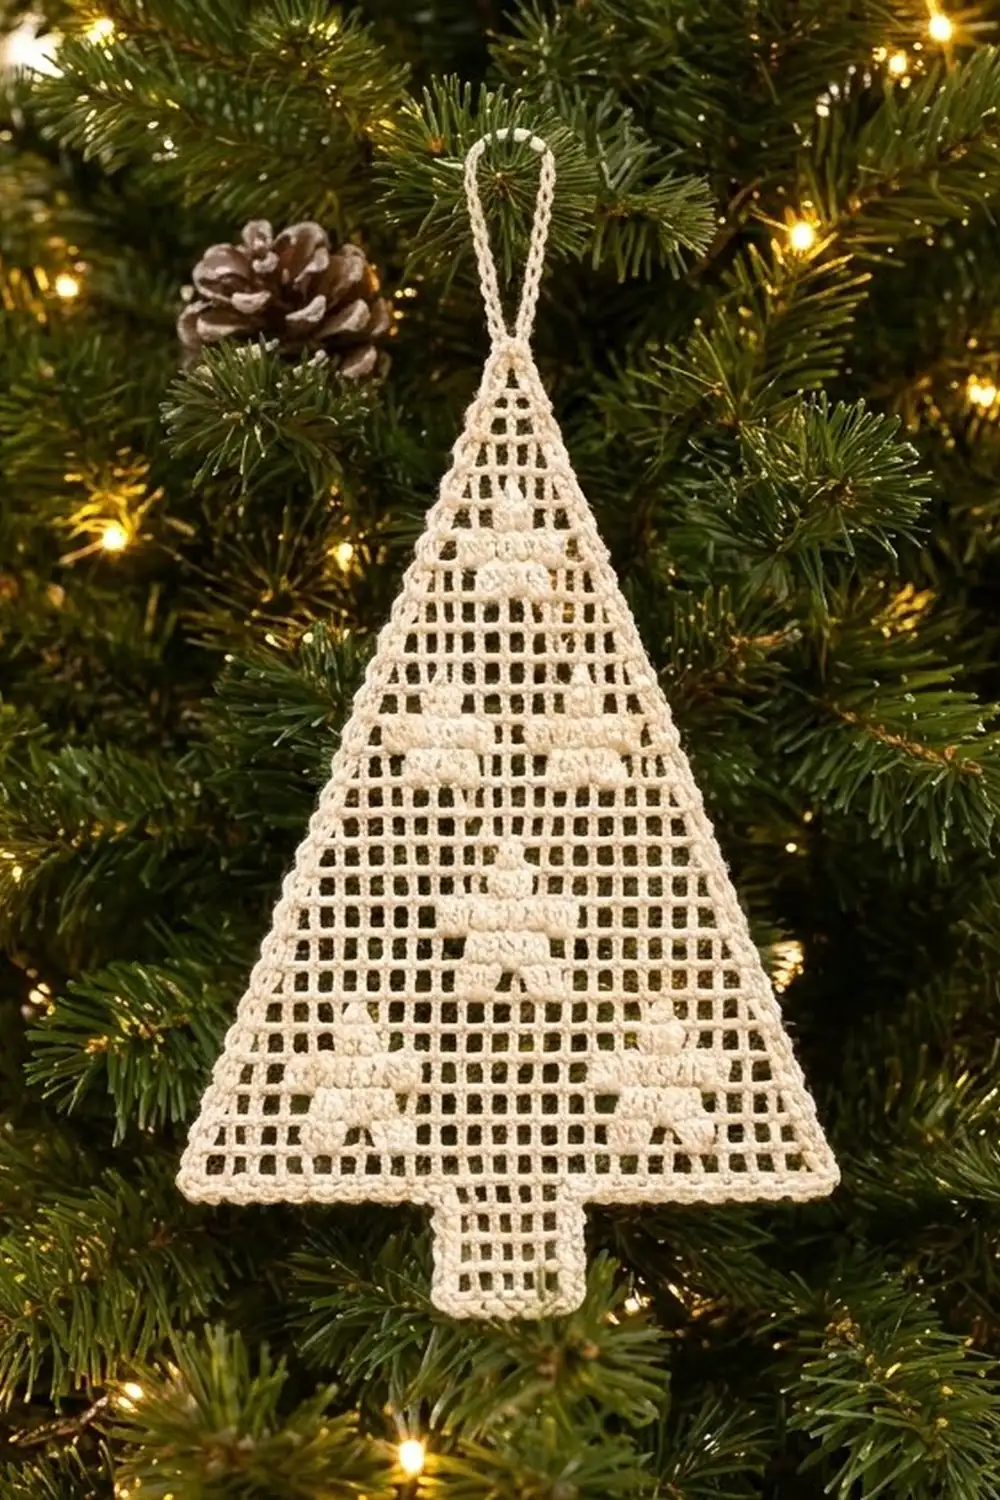
Final Notes
The measurement chain is simple: 5 meshes per 1 in (2.5 cm) gives a 4.2 in (10.7 cm) base and a 4.4 in (11.2 cm) triangle. The trunk adds 0.8 in (2.0 cm) for a total of 5.2 in (13.2 cm). The border adds 0.1 in (0.3 cm) on each side, for a finished size of 4.4 in x 5.4 in (11.2 cm x 13.7 cm). If your swatch matches, every later checkpoint will fall into place. Make one for your tree or a whole set for gifts.
Happy crocheting!