

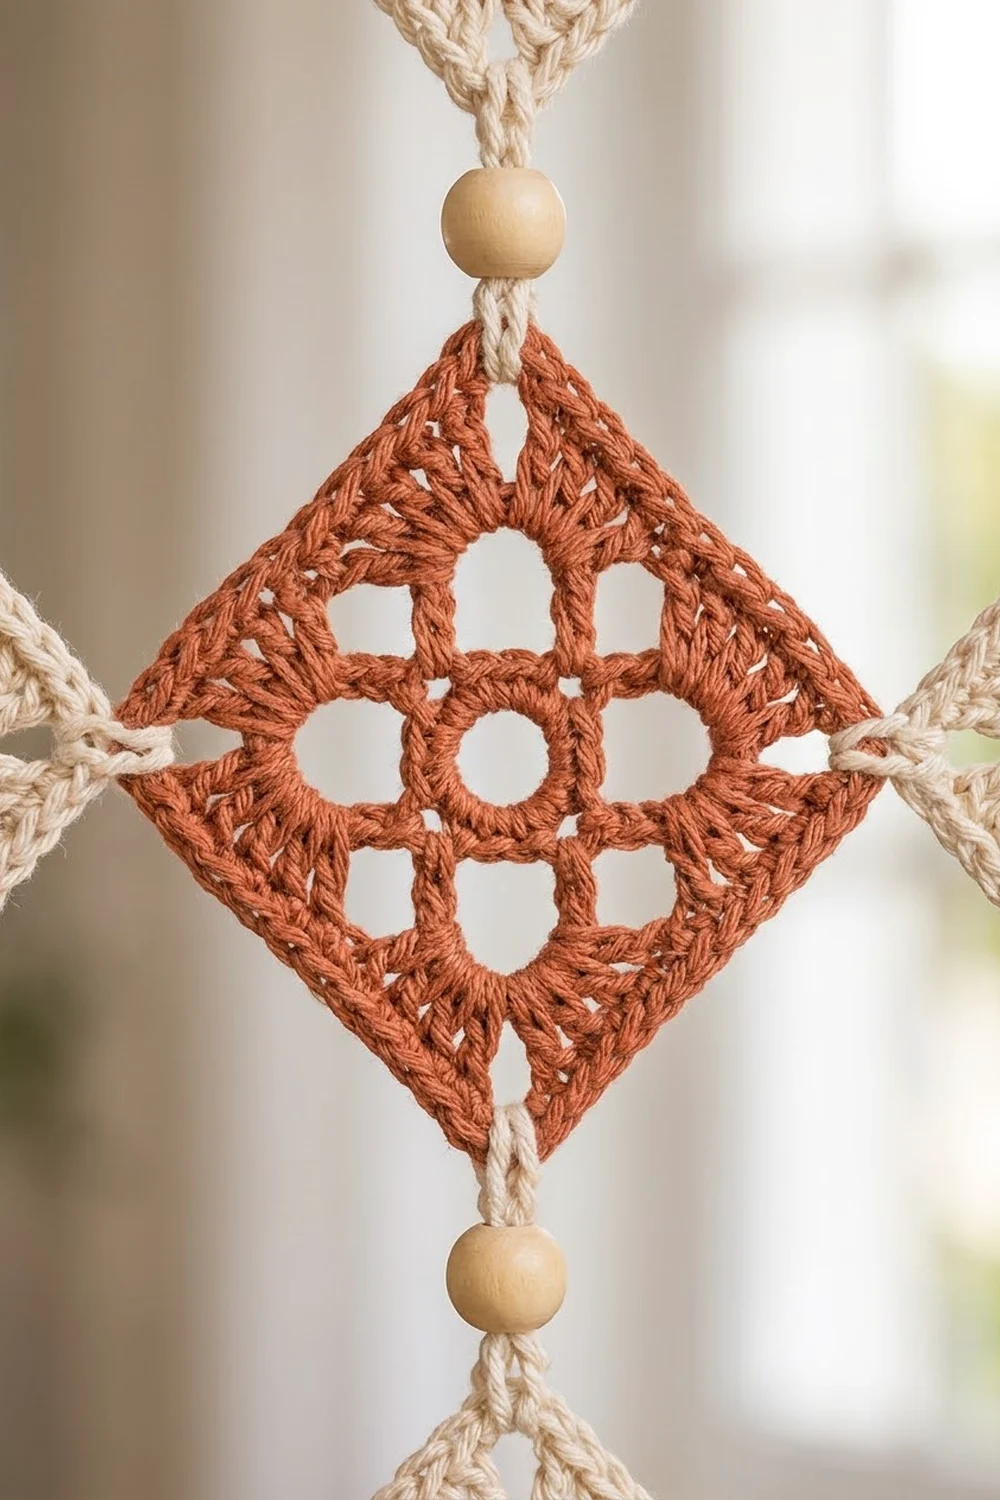
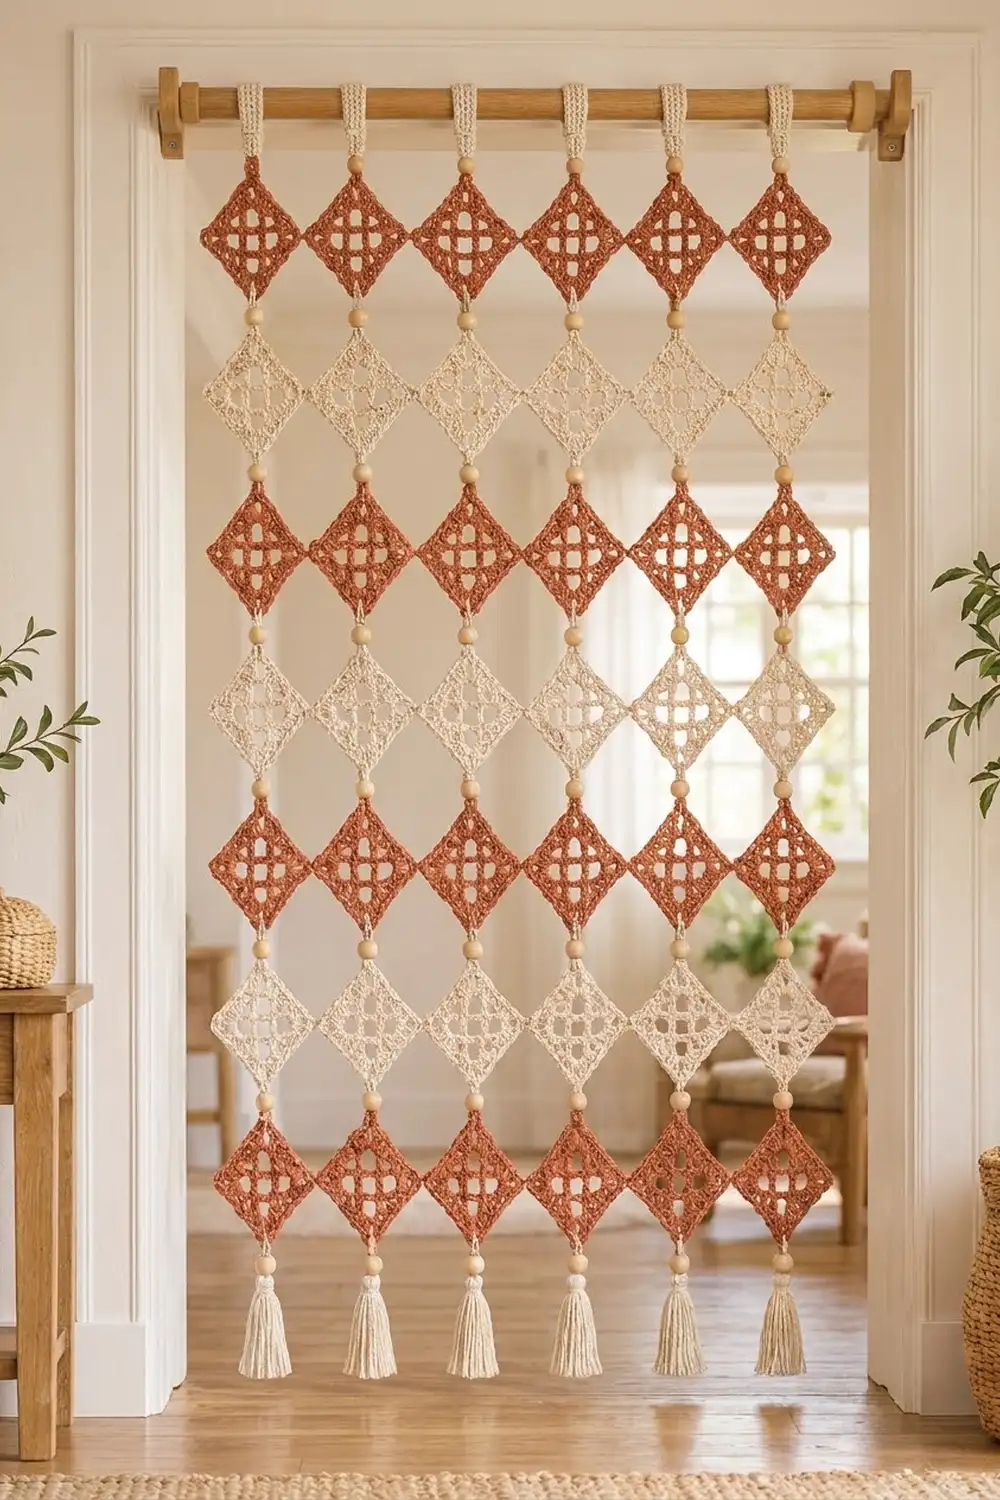
This doorway curtain is made from small openwork squares turned on point so they hang as diamonds. Each square has a small open center and a neat grid of windows, and a solid single crochet edge keeps its shape crisp. Short chain links threaded with wooden beads join the diamonds tip to tip into six hanging strands.
The colors are warm and earthy: terracotta rust and natural cream, with honey-toned wooden beads and a wooden rod. The two colors alternate in horizontal bands, which looks graphic but still soft. The curtain suits boho, farmhouse and Scandinavian rooms, and it divides a space without blocking the light.
The pattern uses US crochet terms. The finished curtain measures about 32.5 in (82.6 cm) wide by 53.4 in (135.6 cm) long, measured from the fold of the hanging tabs to the tips of the tassels.
You make 42 identical four-round motifs. Then you build each strand from top to bottom: hanging tab, bead link, seven motifs joined by bead links, a final bead link and a tassel.
Finished Size and Construction
- Finished size: 32.5 in (82.6 cm) wide x 53.4 in (135.6 cm) long
- Skill level: Easy (confident beginner)
- Terminology: US crochet terms
- Yarn weight: Worsted (#4) cotton
- Hook: 4.5 mm (US 7)
- Number of pieces: 42 motifs, 6 tabs, 6 tassels
- Layout: 6 strands x 7 motifs, with rust and cream rows alternating
- Motif size: 3.5 in (8.9 cm) per side, about 5 in (12.7 cm) point to point
- Motif size before edging (after Round 3): 3 in (7.6 cm) per side
- Edging depth: 0.25 in (0.6 cm), one round of single crochet
- Strand length (motifs and links only): 44 in (111.8 cm)
Materials
Use a smooth combed or mercerized worsted cotton. Cotton holds the diamond shape, doesn’t fuzz and hangs straight. Avoid acrylic, because it is lighter and tends to twist on long strands. The amounts below assume about 1.7 m per gram.
- Color A, terracotta rust: 170 g (about 290 m) for 24 motifs
- Color B, natural cream: 190 g (about 325 m) for 18 motifs plus the links, tabs and tassels
Both amounts include a margin of about 15% for gauge differences and tassel trimming.
Tools:
- 4.5 mm (US 7) crochet hook
- 1.5 mm steel hook, for pulling loops through beads
- 50 natural wooden beads, 12 mm, with a hole of at least 4 mm (you need 48; 2 are spares)
- Wooden curtain rod up to 1.25 in (3.2 cm) in diameter and at least 36 in (91.4 cm) long, with brackets
- Piece of cardboard 4 in (10.2 cm) tall, for the tassels
- Yarn needle, scissors and stitch markers
- Blocking mats, rustproof pins and a spray bottle
Abbreviations (US Terms)
- ch – chain
- sl st – slip stitch
- sc – single crochet
- dc – double crochet
- sk – skip
- sp – space
- beg – beginning
- rep – repeat
- st(s) – stitch(es)
Special technique, place bead (PB): Take the working loop off your hook. Push the 1.5 mm steel hook through the bead, catch the loop and pull it through so the bead sits at the base of the loop. Put the loop back on the 4.5 mm hook, snug it, and keep chaining. The bead is now locked inside the chain.
Gauge and Checkpoints
Make and block one complete motif in Color A before you start making all the pieces. Gauge on the edging round is 15 sc = 3.5 in (8.9 cm) along one side, corner stitches included.
Measure each side of the motif flat at these points:
- After Round 1: 1.5 in (3.8 cm)
- After Round 2: 2.25 in (5.7 cm)
- After Round 3: 3 in (7.6 cm)
- After Round 4: 3.5 in (8.9 cm)
If your motif is more than 0.25 in (0.6 cm) too big per side, switch to a 4 mm hook. If it is too small by the same amount, switch to a 5 mm hook. Gauge matters here: an error of 0.25 in (0.6 cm) per side adds about 2.5 in (6.4 cm) over seven diamonds.
Diamond Lattice Motif
Make 24 in Color A and 18 in Color B. Work each motif in one color only.
Round 1: Ch 4, then sl st in the first ch to form a ring. Ch 3 (counts as dc), 2 dc in ring, ch 2, [3 dc in ring, ch 2] 3 times, sl st in top of beg ch-3. (12 dc, 4 corner ch-2 sps)
The ch-4 ring leaves the small open center. Don’t pull the tail to close it.
Round 2: Sl st in next 2 dc and in the corner ch-2 sp. Ch 3 (counts as dc), (dc, ch 2, 2 dc) in same sp. Ch 2, sk next dc, dc in next dc, ch 2, sk next dc, (2 dc, ch 2, 2 dc) in next corner sp. Rep from * 2 more times. Ch 2, sk the beg ch-3 of Round 1, dc in next dc, ch 2, sk last dc, sl st in top of beg ch-3. (20 dc: 4 corner groups of 4 dc plus 4 center dc; 8 side ch-2 sps; 4 corner ch-2 sps)*
Each side now reads: 2 dc, window, dc, window, 2 dc.
Round 3: Sl st in next dc and in the corner ch-2 sp. Ch 3 (counts as dc), (dc, ch 2, 2 dc) in same sp. Dc in next 2 dc, ch 2, sk ch-2 sp, dc in next dc, ch 2, sk ch-2 sp, dc in next 2 dc, (2 dc, ch 2, 2 dc) in next corner sp. Rep from * 2 more times. Dc in next 2 dc, ch 2, sk ch-2 sp, dc in next dc, ch 2, sk ch-2 sp, dc in next 2 sts, sl st in top of beg ch-3. (36 dc, 9 per side; 8 side ch-2 sps; 4 corner ch-2 sps)*
Each window sits directly above a window from Round 2, and each center dc sits above a center dc. Stacking them this way makes the lattice of square openings.
Round 4 (edging): Ch 1, sc in same st as join and in next dc, (sc, ch 2, sc) in corner sp. Sc in next 4 dc, 2 sc in ch-2 sp, sc in next dc, 2 sc in ch-2 sp, sc in next 4 dc, (sc, ch 2, sc) in next corner sp. Rep from * 2 more times. Sc in next 4 dc, 2 sc in ch-2 sp, sc in next dc, 2 sc in ch-2 sp, sc in next 2 dc, sl st in first sc. (60 sc, 4 corner ch-2 sps)*
This is a trim round. On each side you work 9 sc (1 per dc), add 4 sc in the two windows, and add 2 corner sc, for 15 sc per side. Four sides x 15 sc = 60 sc. The ch-2 corners are the points where the bead links attach.
Fasten off, leaving a 6 in (15.2 cm) tail. Weave in both tails along the back of the sc edge.
Make All Pieces
- Color A motifs: 24 (rows 1, 3, 5 and 7)
- Color B motifs: 18 (rows 2, 4 and 6)
- Color B tabs: 6
- Color B tassels: 6
Layout grid (each column is one strand):
Row 1:  A  A  A  A  A  A
Row 2:  B  B  B  B  B  B
Row 3:  A  A  A  A  A  A
Row 4:  B  B  B  B  B  B
Row 5:  A  A  A  A  A  A
Row 6:  B  B  B  B  B  B
Row 7:  A  A  A  A  A  A
Block all the motifs before you join them (see Final Blocking). If you join them unblocked, the diamonds hang crooked.
Joining
The motifs are joined point to point with bead links, not sewn edge to edge. One corner ch-2 sp is the top point of the diamond, and the opposite corner ch-2 sp is the bottom point.
Bead link (6 per strand, between motifs): With Color B, sl st in the bottom corner ch-2 sp of the upper motif. Ch 3, PB, ch 3, then sl st in the top corner ch-2 sp of the next motif. Fasten off and weave the ends into the sc edge.
Stitch-to-stitch logic: Always join corner ch-2 sp to corner ch-2 sp. Every side has exactly 15 sc, so the top and bottom points are directly opposite each other and each diamond hangs straight. Before you attach a link, check that the two side corners sit level.
Tension: Chain at your normal gauge. Tight chains twist, and loose chains stretch once the curtain hangs. Each link, including the bead, should measure 1.5 in (3.8 cm) from point to point.
Size checkpoint: Lay each strand flat. From the top point of motif 1 to the bottom point of motif 7, it should measure 7 x 5 in + 6 x 1.5 in = 44 in (111.8 cm). All strands should be within 0.5 in (1.3 cm) of each other.
Border: Hanging Tabs and Tassels
On this curtain, the tabs form the top edge and the tassels form the bottom edge. Tab gauge is 5 sc = 1.2 in (3.0 cm) wide and 5 rows = 1 in (2.5 cm) tall.
Hanging tab (make 6 in Color B):
- Foundation: Ch 6.
- Row 1: Sc in 2nd ch from hook and in each ch across. (5 sc)
- Rows 2–24: Ch 1, turn, sc in each st across. (5 sc)
Fasten off. The strip measures 1.2 in (3.0 cm) x 4.8 in (12.2 cm). Fold it in half so Row 1 meets Row 24. Whipstitch the short ends together through all 5 pairs of stitches. The folded loop is 2.4 in (6.1 cm) long.
Top link: With Color B, sl st in the top corner ch-2 sp of motif 1. Ch 3, PB, ch 3, then sl st through both layers at the center (3rd) st of the tab’s seamed end. Fasten off.
Bottom link and tassel: With Color B, sl st in the bottom corner ch-2 sp of motif 7. Ch 3, PB, ch 3, then fasten off, leaving a 12 in (30.5 cm) tail. Wrap Color B 20 times around the 4 in (10.2 cm) cardboard. Pass the tail under the wraps at the top and tie it tightly, then cut the wraps at the bottom. Wrap a separate 10 in (25.4 cm) strand 6 times around the tassel, 0.5 in (1.3 cm) below the top, and knot it. Bury the ends inside the tassel and trim the tassel to 4 in (10.2 cm).
Why the math works:
- A rod 1.25 in (3.2 cm) across has a circumference of about 3.9 in (9.9 cm). The 4.8 in (12.2 cm) strip leaves 0.9 in (2.3 cm) of ease, so the tabs slide freely.
- The 5-stitch width centers exactly on the corner point.
- Length: 2.4 + 1.5 + 44 + 1.5 + 4 in = 53.4 in (135.6 cm).
- Width: 6 diamonds x 5 in + 5 gaps x 0.5 in = 32.5 in (82.6 cm). Space the tabs 5.5 in (14.0 cm) apart, center to center.
Final Blocking
- Soak the motifs in cool water for 10 minutes, then press out the water. Don’t wring them.
- Roll them in a towel to remove the rest of the moisture.
- Pin each motif square at 3.5 in (8.9 cm) per side, with a pin in each corner point.
- Open each window with a fingertip.
- Let the motifs dry completely, which takes 12 to 24 hours.
- After joining, mist each strand, hang it on the rod and clip a clothespin to each tassel neck overnight.
Final Quality-Control Checklist
- 42 motifs, each with 60 sc (15 per side)
- Every motif measures 3.5 in (8.9 cm) per side
- Each strand follows the color order A, B, A, B, A, B, A
- 8 beads per strand, 48 in total
- Every link measures 1.5 in (3.8 cm)
- Every strand is 44 in (111.8 cm) from motif 1 to motif 7
- Tabs slide freely on the rod
- Tassels are all trimmed to 4 in (10.2 cm)
- No tails show through the windows
Troubleshooting
- The motif cups or ruffles: Your tension has changed. Check the size after Round 3 and adjust the hook if needed.
- The windows are uneven: Each ch-2 should skip exactly one stitch, and each center dc should sit on the center dc below it.
- The diamonds tilt: The link is attached to a side sp. Move it to the true corner ch-2 sp.
- The bead won’t pass over the loop: Enlarge the loop first, or use beads with a 5 mm hole.
- The strands are different lengths: Remake the long links with tighter chains.
- The strands twist: Block them again while hanging, with light weight on the tassels.
Care
Hand wash in cool water with mild soap and dry flat or hanging. Don’t tumble dry, because the heat can crack the wooden beads.
Final Notes
The whole curtain follows one chain of measurements:
- A 3 in (7.6 cm) motif after Round 3 becomes 3.5 in (8.9 cm) after the edging, with 15 sc per side.
- That makes a 5 in (12.7 cm) diamond.
- Seven diamonds plus six 1.5 in (3.8 cm) links make a 44 in (111.8 cm) strand.
- Adding the tab, the two end links and the tassel brings each strand to 53.4 in (135.6 cm).
- Six strands spaced 5.5 in (14.0 cm) apart make a curtain 32.5 in (82.6 cm) wide.
Check your gauge on the first motif and every other measurement will follow.
Happy crocheting!