

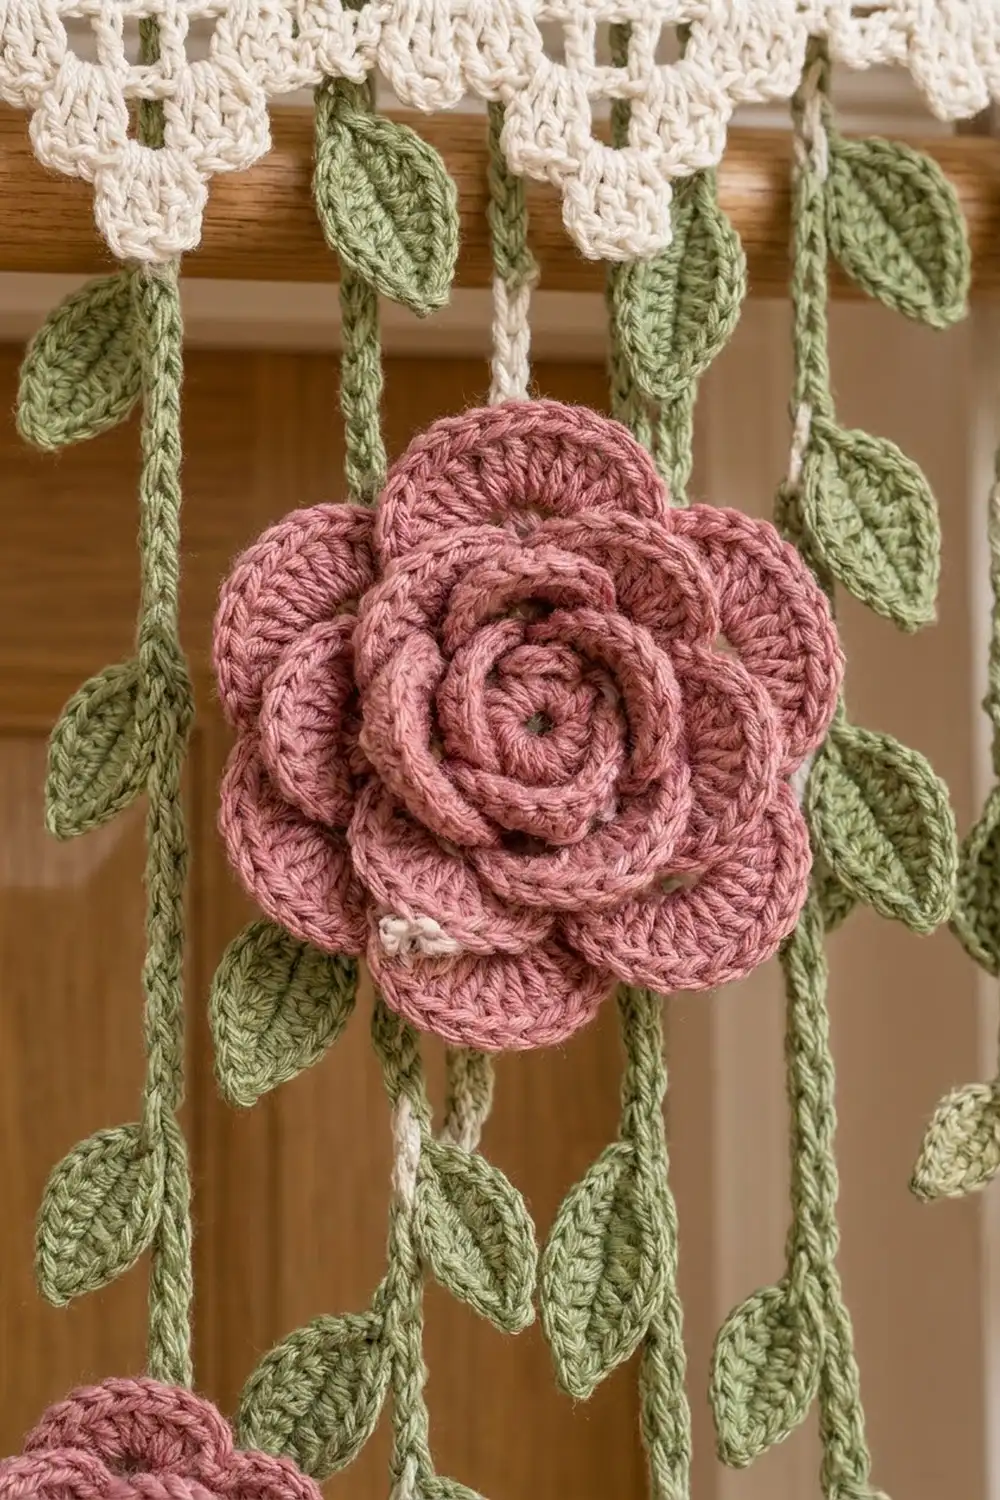
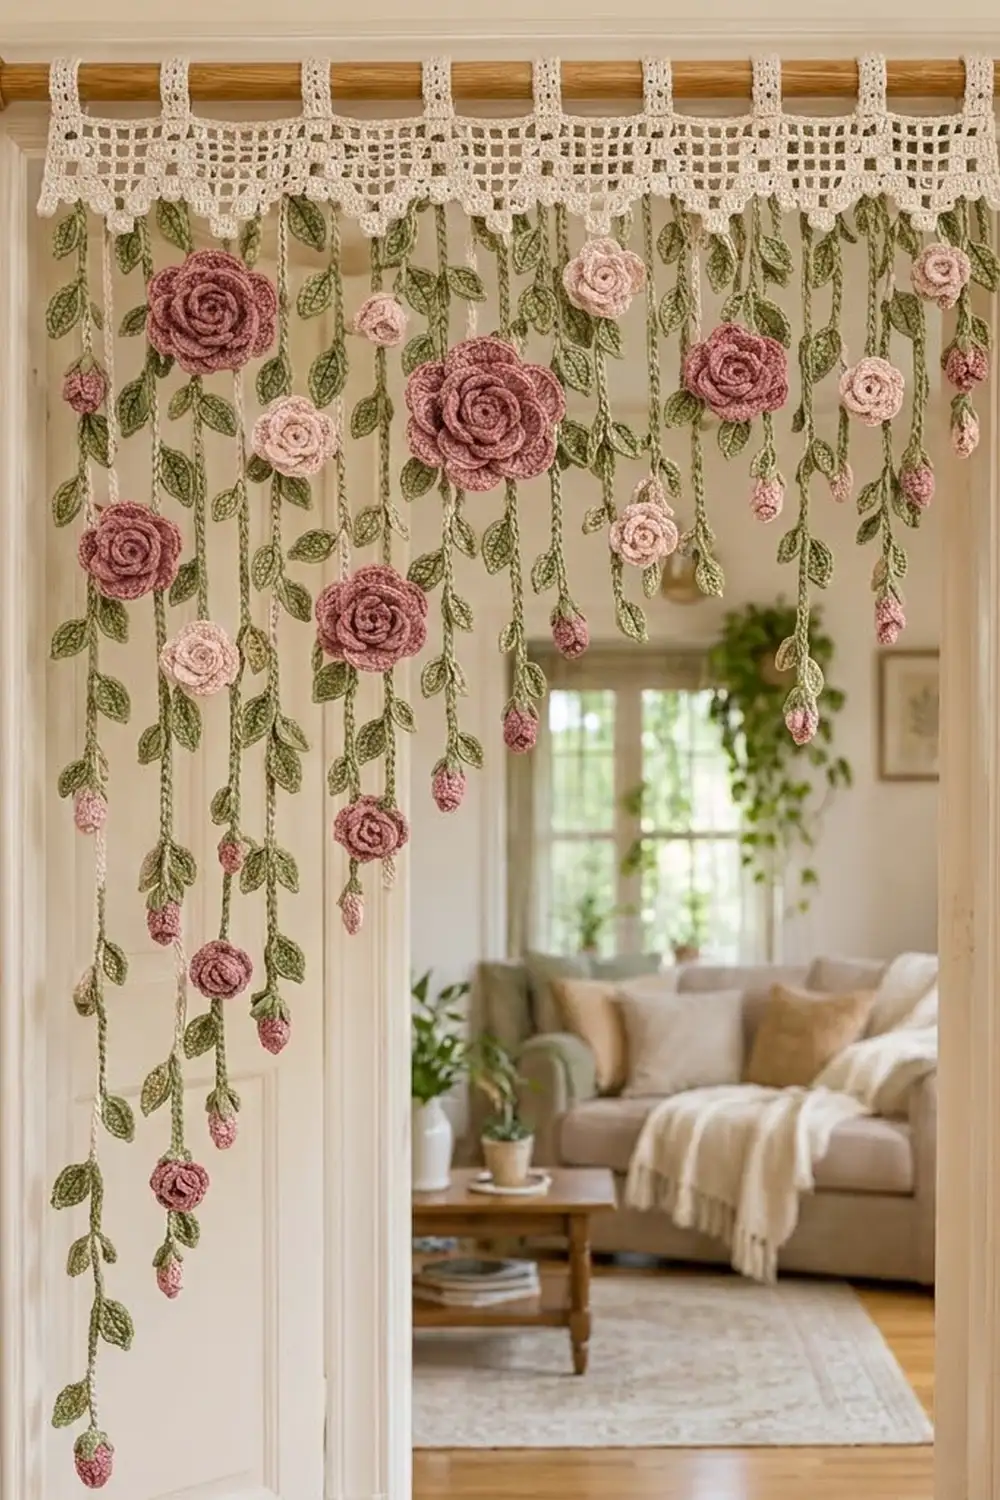
The Rose Arbor Doorway Curtain turns a plain doorway into a cottage garden. A cream filet-lace header hangs from a wooden rod on simple tab loops. Its lower edge drops into stepped points, and leafy green vines fall from them, dotted with layered roses and small teardrop buds.
The colors are soft and vintage: cream for the header, sage green for the vines and leaves, dusty rose for the large roses and buds, and light blush pink for the small roses.
All instructions use US crochet terms. The finished header measures 30.75 in (78.1 cm) wide and 6.5 in (16.5 cm) deep, plus tab loops of about 2 in (5.1 cm). The vines hang 60 in (152.4 cm), 48 in (121.9 cm), or 36 in (91.4 cm) below the header.
You will work the header in rows and add the pointed edge. Then you make the vines, roses, and buds as separate pieces and sew them on. Last, a border round locks the vines in place and adds picots, and the tabs are worked off the top edge.
Finished Size and Construction
- Finished header size: 30.75 in x 6.5 in (78.1 cm x 16.5 cm), plus 2 in (5.1 cm) tab loops
- Vine lengths: 60 in, 48 in, 36 in (152.4 cm, 121.9 cm, 91.4 cm)
- Skill level: Intermediate
- Terminology: US
- Yarn weight: Worsted (#4) cotton
- Hook: US H-8 (5 mm)
- Number of pieces: 69 (1 header, 24 vines, 8 large roses, 12 small roses, 24 buds)
- Layout: 24 vines in one row, 3 per point across 8 points
- Header size before border: 30.25 in x 6 in (76.8 cm x 15.2 cm)
- Border depth: 0.25 in (0.6 cm) on every edge
- Rose sizes: large 4 in (10.2 cm), small 2.25 in (5.7 cm); buds are 1.25 in (3.2 cm) long
Materials
Choose a smooth worsted-weight cotton. Cotton hangs straight, keeps the petals crisp, and doesn’t stretch on long vines the way acrylic can. The amounts below assume about 1.7 m per gram.
- Cream (header): 175 g, about 300 m
- Sage green (vines, leaves, calyxes): 425 g, about 725 m
- Dusty rose (large roses, buds): 150 g, about 255 m
- Light blush pink (small roses): 60 g, about 100 m
All quantities include a margin of about 15 percent for gauge differences and swatching.
Tools: US H-8 (5 mm) hook, plus one hook each 0.5 mm smaller and larger in case you need to adjust gauge; tapestry needle; stitch markers; rust-proof pins and a blocking mat; tape measure; scissors; a wooden rod up to 1.25 in (3.2 cm) in diameter.
Abbreviations (US Terms)
- ch – chain
- sl st – slip stitch
- sc – single crochet
- hdc – half double crochet
- dc – double crochet
- sc2tog – single crochet 2 together
- MR – magic ring
- sk – skip
- sp – space
- st(s) – stitch(es)
- rep – repeat
Back-post single crochet (bpsc): Insert the hook from back to front to back around the post of the indicated stitch, then complete a sc.
Picot: Ch 3, sl st in 3rd ch from hook.
Leaf: Ch 7. Sc in 2nd ch from hook, hdc in next ch, dc in next 2 ch, hdc in next ch, sc in last ch (6 sts). Ch 1, then work along the opposite side of the same chain: sc, hdc, dc in next 2, hdc, sc (6 sts). Sl st into the main vine ch at the base of the leaf. Each leaf has 12 sts and is about 1.5 in (3.8 cm) long.
Gauge and Checkpoints
Test one piece first. Before you start the header, make one large rose and one short vine of 4 segments.
- Dc gauge: 16 dc and 8 rows = 4 in (10.2 cm)
- Sc gauge: 16 sc and 18 rows = 4 in (10.2 cm)
- Vine gauge: 9 main ch, after the return row = 2 in (5.1 cm)
Checkpoints:
- Rose after Rnd 3: 1.5 in (3.8 cm)
- Rose after Rnd 5: 2.25 in (5.7 cm)
- Rose after Rnd 7: 3.25 in (8.3 cm)
- Rose after Rnd 9: 4 in (10.2 cm)
- Header after Row 9: 30.25 in x 4.5 in (76.8 cm x 11.4 cm)
- Header after the points: 30.25 in x 6 in (76.8 cm x 15.2 cm)
If your pieces are too big, go down 0.5 mm. If they are too small, go up 0.5 mm. Always measure a vine after the return row. A raw chain is always longer.
Header
With cream, ch 123.
Row 1: Dc in 4th ch from hook (the skipped ch count as 1 dc) and in each ch across. Turn. (121 sts)
Row 2: Ch 3 (counts as dc throughout), dc in each st across. Turn. (121 sts)
Row 3: Ch 5 (counts as dc and ch 2), sk 2 sts, dc in next st, *ch 2, sk 2 sts, dc in next st; rep from * across. Turn. (40 mesh sps; 41 dc + 80 ch = 121 sts)
Rows 4–8: Ch 5, sk ch-2 sp, dc in next dc, *ch 2, sk ch-2 sp, dc in next dc; rep from * across. Work the last dc in the 3rd ch of the turning ch. Turn. (40 mesh sps, 121 sts per row)
Row 9: Ch 3, *2 dc in next ch-2 sp, dc in next dc; rep from * across. Turn. (1 + 120 = 121 sts)
Checkpoint: 30.25 in x 4.5 in (76.8 cm x 11.4 cm).
Pointed Edge
Row 9 divides into 8 points of 16 sts each. Next-door points share their end stitch, so 8 x 15 + 1 = 121. Number each point’s sts from 1 to 16 in your working direction.
Point Row 1: Ch 3 (st 1), dc in next 3 sts (sts 2–4), [ch 2, sk 2, dc in next st] 3 times (posts at sts 7, 10, 13), dc in next 3 sts (sts 14–16). Turn. (16 sts: block, 3 meshes, block)
Point Row 2: Sl st in first 4 sts, ending in st 13. Ch 3, 2 dc in ch-2 sp, dc in st 10, ch 2, dc in st 7, 2 dc in ch-2 sp, dc in st 4. Turn. (10 sts: block, mesh, block)
Point Row 3: Sl st in first 4 sts, ending in st 7. Ch 3, 2 dc in ch-2 sp, dc in st 10. (4 sts) Fasten off.
Remaining 7 points: Join cream in the shared st 16 of the previous point and repeat Point Rows 1–3, starting with the ch 3 in that shared st.
Each point is 3.75 in (9.5 cm) wide at its base and 1.5 in (3.8 cm) tall. Checkpoint: 30.25 in x 6 in (76.8 cm x 15.2 cm).
Vines
Use sage green, and leave an 8 in (20.3 cm) tail at the top of each vine.
Long vine, 60 in (152.4 cm): Ch 9, *Leaf, ch 9; rep from * 28 more times. (270 main ch, 29 leaves, 30 segments)
Medium vine, 48 in (121.9 cm): Ch 9, *Leaf, ch 9; rep from * 22 more times. (216 main ch, 23 leaves, 24 segments)
Short vine, 36 in (91.4 cm): Ch 9, *Leaf, ch 9; rep from * 16 more times. (162 main ch, 17 leaves, 18 segments)
Flip the work before each new leaf so the leaves fall on alternating sides.
Return row: Sl st in the back bump of each main ch back up to the top, skipping the leaves. (270, 216, or 162 sl sts) Fasten off, leaving an 8 in (20.3 cm) tail. The return row firms the cord so it won’t stretch under the weight of the roses.
Layered Roses
Make 8 large roses in dusty rose, working Rnds 1–9. Make 12 small roses in blush pink, working Rnds 1–5.
Rnd 1: MR, ch 1, 10 sc in ring, sl st to first sc. Pull the ring closed. (10 sc)
Rnd 2: Ch 1, sc in first sc, ch 3, sk 1, *sc in next sc, ch 3, sk 1; rep from * 3 more times, sl st to first sc. (5 sc, 5 ch-3 sps)
Rnd 3: (Sc, hdc, 3 dc, hdc, sc) in each ch-3 sp, sl st to first sc. (5 petals, 35 sts)
Rnd 4: Working behind the petals, ch 1, *bpsc around next Rnd 2 sc, ch 4; rep from * 4 more times, sl st to first bpsc. (5 sc, 5 ch-4 sps)
Rnd 5: (Sc, hdc, 5 dc, hdc, sc) in each ch-4 sp, sl st to first sc. (5 petals, 45 sts) For a small rose, fasten off here, leaving a 10 in (25.4 cm) tail.
Rnd 6: Ch 1, *bpsc around next Rnd 4 sc, ch 5; rep from * 4 more times, sl st to first bpsc. (5 sc, 5 ch-5 sps)
Rnd 7: (Sc, hdc, 7 dc, hdc, sc) in each ch-5 sp, sl st to first sc. (5 petals, 55 sts)
Rnd 8: Ch 1, *bpsc around next Rnd 6 sc, ch 6; rep from * 4 more times, sl st to first bpsc. (5 sc, 5 ch-6 sps)
Rnd 9: (Sc, hdc, 9 dc, hdc, sc) in each ch-6 sp, sl st to first sc. (5 petals, 65 sts) Fasten off, leaving a 10 in (25.4 cm) tail.
Each layer of petals sits behind the one before it. This gives the stacked, cupped rose shape.
Rosebuds
Rnd 1: With dusty rose, MR, 6 sc in ring. Work in a continuous spiral. (6 sc)
Rnd 2: 2 sc in each st around. (12 sc)
Rnds 3–5: Sc in each st around. (12 sc per round)
Rnd 6: Sc2tog 6 times. (6 sc) Stuff lightly with scraps of dusty rose yarn, then change to sage green.
Rnd 7: *Sc in next st, ch 3, sl st in 2nd ch from hook and in next ch, sc in next st; rep from * 2 more times. (6 sc, 3 calyx points)
Rnd 8: Sc2tog 3 times, working into the sc only. (3 sc) Fasten off, leaving an 8 in (20.3 cm) tail.
Each bud is 1.25 in (3.2 cm) long and 1 in (2.5 cm) wide.
Make All Pieces
- Cream: 1 header with 8 points
- Sage green: 8 long, 8 medium, and 8 short vines
- Dusty rose: 8 large roses, 24 buds
- Blush pink: 12 small roses
Number the vines 1–24 from left to right. Each point holds 3 vines: one on its left step, one at its tip, and one on its right step. Rose heights are measured in inches, from the header’s bottom edge to the rose center.
Point:   P1        P2        P3        P4
Vine:    1  2  3   4  5  6   7  8  9   10 11 12
Length:  L  L  L   L  L  L   L  L  M   M  M  M
Rose:    s  R  -   s  R  s   s  R  s   -  R  s
Height:  20 6  -   28 14 4   24 8  30  -  18 5

Point:   P5        P6        P7        P8
Vine:    13 14 15  16 17 18  19 20 21  22 23 24
Length:  M  M  M   M  S  S   S  S  S   S  S  S
Rose:    s  R  s   -  R  s   s  R  s   s  R  -
Height:  26 10 22  -  16 30  3  7  24  9  12 -
Key: L = 60 in (152.4 cm), M = 48 in (121.9 cm), S = 36 in (91.4 cm). R = large rose, s = small rose. Every vine ends in 1 bud.
Joining
Method: Sew each vine to the header with its two top tails. Then sew the roses and buds to the vines.
Stitch-to-stitch logic: Each vine attaches to exactly 1 header stitch.
- Left-step vine: Point Row 1, st 2
- Tip vine: Point Row 3, between sts 8 and 9 (the center of the 4-st tip)
- Right-step vine: Point Row 1, st 15
Pass both tails through the stitch twice and knot them on the back. Leave the tails unwoven until the border is done.
Sew each rose at the leaf joint closest to its height in the grid. Stitch only through the bpsc rounds on the back so the petals stay free. Sew the calyx end of each bud to the bottom of its vine.
Tension: Pull the stitches snug, but don’t gather the header stitch. The top of each vine should sit level with the header edge.
Size checkpoint: Hang the header and measure each vine. It should be within 1 in (2.5 cm) of its listed length.
Border
Border gauge: Work 1 sc per stitch top and 2 sc per dc row-end. The border adds 0.25 in (0.6 cm) to each edge.
Round 1 (sc and picot): With cream, join at the top right corner in the first foundation ch.
- Top edge: Ch 1, 3 sc in first ch, sc in next 119 ch, 3 sc in last ch. (121 worked 1 per ch + 4 extra corner sts = 123 sc)
- Left side: 2 sc in the end of each of Rows 1–9. (18 sc)
- Each point: 2 sc up the side of Point Row 1, sc in sts 1–3; 2 sc up the side of Row 2, sc in sts 4–6; 2 sc up the side of Row 3, sc in sts 7–8, picot, sc in sts 9–10; 2 sc down the side of Row 3, sc in sts 11–13; 2 sc down the side of Row 2, sc in sts 14–16; 2 sc down the side of Row 1. (12 + 4 + 12 = 28 sc and 1 picot per point)
- Valleys: 1 sc in each valley between points. (8 x 28 + 7 = 231 sc, 8 picots)
- Right side: 2 sc in the end of each of Rows 9–1. (18 sc)
Sl st to first sc. (123 + 18 + 231 + 18 = 390 sc, plus 8 picots)
Wherever a vine is attached, work the sc over the vine’s knotted tails as well. Then weave in the tails.
Round 2 (tabs, top edge only): Number the 123 top sc from right to left. Make 9 tabs of 5 sts each on sts 2–6, 15–19, 30–34, 45–49, 60–64, 75–79, 90–94, 105–109, and 118–122.
Each tab: Join in the first st, ch 1, sc in same st and next 4 sts. Turn. (5 sc) Work 19 more rows of 5 sc, for 20 rows total, about 4.4 in (11.2 cm). Fasten off, leaving a 12 in (30.5 cm) tail. Fold the tab to the back and whipstitch it to the back of header Row 2.
Why the math works: The top edge has 121 stitches plus 4 corner extras, for 123. Each side has 9 rows x 2 sc = 18. The bottom has 8 identical points of 28 sc plus 7 valleys, for 231. The gaps between tabs total 1 + 8 + (6 x 10) + 8 + 1 = 78 stitches, and 78 + (9 x 5) = 123. That puts tab 5 exactly on the center stitch, st 62. The bottom corners need no extra stitches because the stepped points already turn them.
Final Blocking
- Lay the header face down, with the vines moved aside.
- Mist it until it’s damp, but don’t soak it.
- Pin it to 30.75 in x 6.5 in (78.1 cm x 16.5 cm), with a pin at each picot.
- Line the mesh holes up in straight columns.
- Let it dry completely.
- Hang the curtain, mist the vines, and let their own weight straighten them.
- Steam each rose from 1 in (2.5 cm) away and cup the petals with your fingers.
Final Quality-Control Checklist
- The header measures 30.75 in x 6.5 in (78.1 cm x 16.5 cm).
- All 8 points match.
- The 9 tabs are evenly spaced, with tab 5 centered.
- All 24 vines are attached at the correct stitches and have the correct lengths.
- All 8 large roses, 12 small roses, and 24 buds are secure.
- No tails show on the front.
Troubleshooting
- The header ripples: The foundation chain is too tight. Chain it with a larger hook.
- The mesh leans: Your turning chains are loose. Try a ch 4 turning chain.
- The vines stretch: Work the return row more firmly.
- The roses flop: Go down 0.5 mm for the bpsc rounds (Rnds 4, 6, and 8).
- The points curl: Re-block with a pin at each picot.
Care
Hand-wash in cool water, roll in a towel, and dry flat with the vines laid straight. Don’t tumble dry.
Final Notes
Each measurement leads to the next. A dc gauge of 16 sts = 4 in (10.2 cm) makes the header 30.25 in (76.8 cm) wide. The points bring it to 6 in (15.2 cm) deep, and the border finishes it at 30.75 in x 6.5 in (78.1 cm x 16.5 cm). A vine gauge of 9 ch = 2 in (5.1 cm) gives vines of 60 in, 48 in, and 36 in (152.4 cm, 121.9 cm, 91.4 cm), cascading from left to right.
Happy crocheting!