

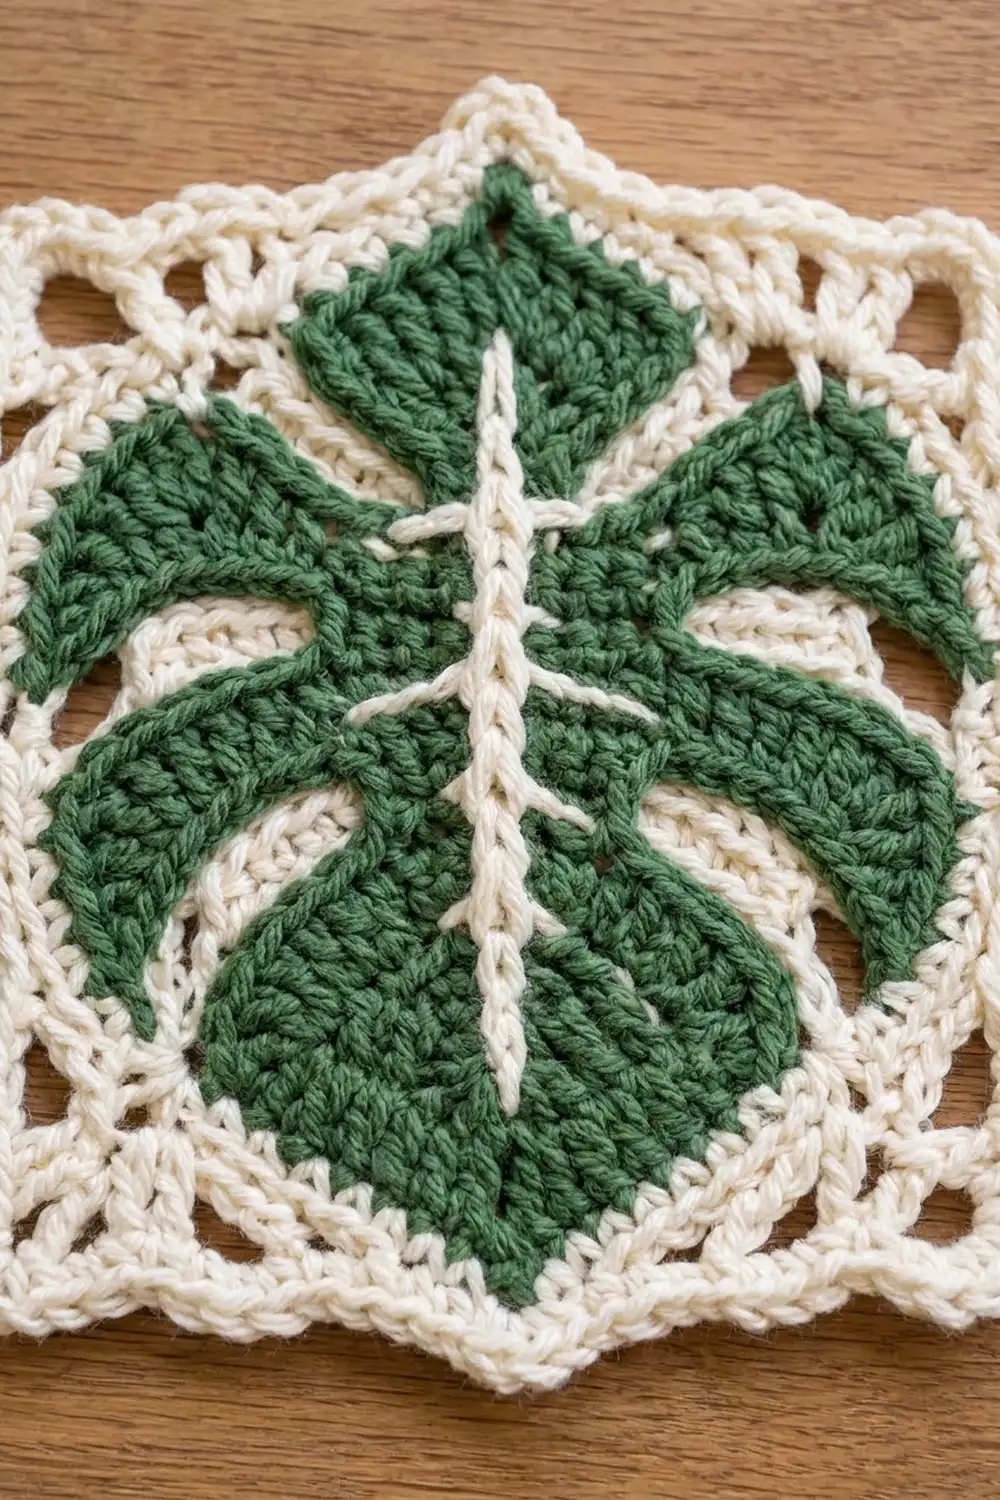
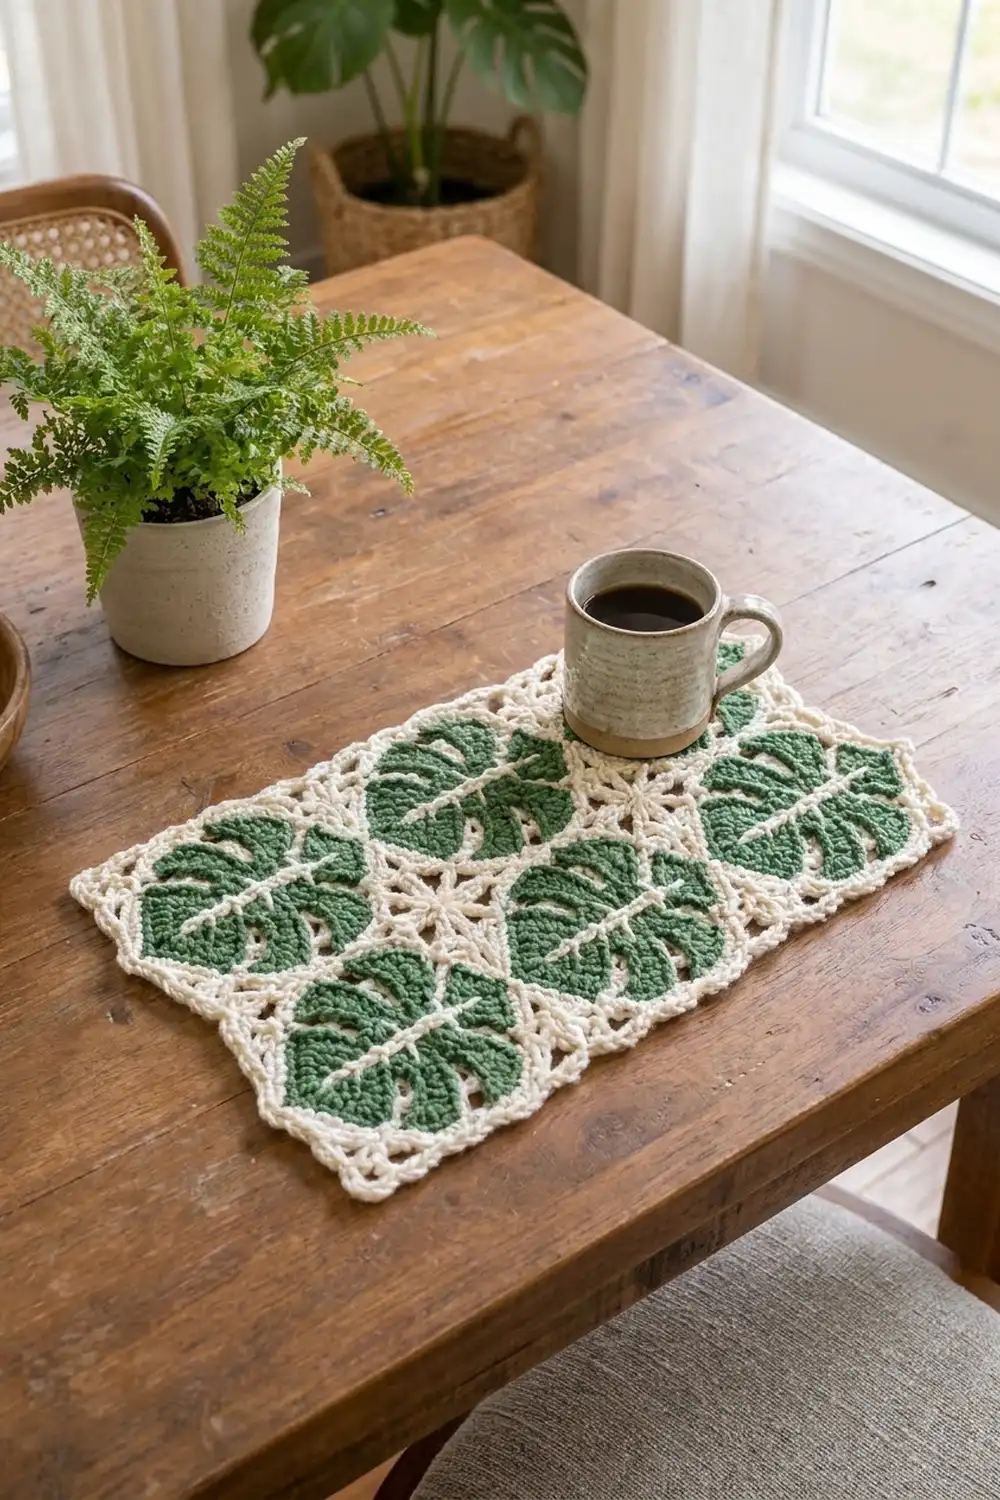
This panel has six monstera leaf motifs, each set inside a lacy cream frame. Every leaf is solid forest green, with a pointed tip, a notched heart-shaped base, and deep notches cut into its edge. A cream midrib and cream side veins are slip-stitched over the top. Where four motifs meet, the open frames form a small star of chain spaces.
There are only two colors, forest green and cream. The look is botanical and modern. The panel works as a table mat, a wall hanging, or a dresser centerpiece.
The pattern uses US terms. After blocking, the panel measures 11 in x 16 in (27.9 cm x 40.6 cm). Each motif is a 5 in (12.7 cm) square.
You work each leaf in the round around a short chain, add the cream veins, and then work three cream rounds that square it off. The six squares are joined with a flat slip-stitch seam, and a three-round picot border goes around the outside.
Finished Size and Construction
- Finished size: 11 in x 16 in (27.9 cm x 40.6 cm)
- Skill level: Intermediate
- Terminology: US crochet terms
- Yarn weight: DK (#3) cotton
- Hook: 4.0 mm (G-6)
- Number of pieces: 6 identical motifs, joined
- Layout: 2 across x 3 down
- Motif size: 5 in x 5 in (12.7 cm x 12.7 cm), 23 sts per side
- Size before border: 10 in x 15 in (25.4 cm x 38.1 cm)
- Border depth: about 1/2 in (1.3 cm) per side
Materials
Use a smooth cotton DK. Cotton keeps the lobes and notches crisp and blocks flat. Pick a deep, even green so the cream veins stand out against it.
- Color A, forest green: 50 g, about 120 m (131 yd)
- Color B, cream: 100 g, about 240 m (262 yd)
Tools:
- 4.0 mm (G-6) hook
- Tapestry needle
- 4 stitch markers
- Scissors and measuring tape
- Blocking mat, rust-proof pins, spray bottle
The quantities include about a 20% margin for your swatch and for differences in tension.
Abbreviations (US Terms)
- ch: chain
- sl st: slip stitch
- sc: single crochet
- hdc: half double crochet
- dc: double crochet
- tr: treble crochet
- sk: skip
- sp(s): space(s)
- st(s): stitch(es)
- RS: right side
Special stitches
- Picot: ch 3, sl st in 3rd ch from hook.
- Surface sl st: Hold the yarn under the work. Insert the hook from the front between stitches, pull up a loop, and draw it through the loop on the hook.
- Lobe: hdc in next st, 2 dc in each of next 2 sts, hdc in next st. It is worked over 4 sts and makes 6 sts.
Gauge and Checkpoints
Gauge: 23 sc = 5 in (12.7 cm) along the motif’s final round, which is 4.6 sc per inch.
Make one complete motif first and measure it. That gives you a more accurate test than a plain swatch, because the lacy rounds behave differently from solid sc.
- After Round 4 (leaf): about 3 in (7.6 cm) wide x 3 3/4 in (9.5 cm) long
- After Round 5 (outline): about 3 1/2 in (8.9 cm) x 4 1/4 in (10.8 cm)
- After Round 7: 5 in x 5 in (12.7 cm x 12.7 cm), lightly blocked
If the motif is larger than 5 1/4 in (13.3 cm), go down to a 3.75 mm hook. If it is smaller than 4 3/4 in (12.1 cm), go up to a 4.5 mm hook. Change the hook, never the counts, because the joining and border depend on 23 sts per side.
Leaf (Make 6)
Use Color A. Do not turn. Keep the RS facing you throughout.
Foundation: Ch 8.
Round 1: 2 sc in 2nd ch from hook (base end), sc in next 5 ch, 4 sc in last ch (tip end). Rotate and work along the other side of the chain: sc in next 5 ch, 2 sc in same ch as first sts. Join with sl st to first sc. (18 sts)
Layout: 2 base + 5 side + 4 tip + 5 side + 2 base.
Round 2: Ch 2 (does not count as a st). 2 hdc in each of next 2 sts, hdc in next 5 sts, 2 hdc in each of next 4 sts, hdc in next 5 sts, 2 hdc in each of last 2 sts. Join. (26 sts)
Layout: 4 base + 5 side + 8 tip + 5 side + 4 base.
Round 3: Ch 3 (does not count as a st). (Dc in next st, 2 dc in next st) 2 times, dc in next 5 sts, (dc in next st, 2 dc in next st) 4 times, dc in next 5 sts, (dc in next st, 2 dc in next st) 2 times. Join. (34 sts)
Layout: 6 base + 5 side + 12 tip + 5 side + 6 base.
Round 4 (lobes and notches): Each half of the leaf is worked over 17 sts.
- First half: Sl st in first st (base notch), lobe over next 4 sts, sl st in next st (notch), lobe over next 4 sts, sl st in next st (notch), lobe over next 4 sts, hdc in next st, dc in next st. (23 sts)
- Tip: Ch 2. This makes the leaf point.
- Second half: Dc in next st, hdc in next st, lobe over next 4 sts, sl st in next st (notch), lobe over next 4 sts, sl st in next st (notch), lobe over next 4 sts, sl st in last st (base notch). (23 sts)
Join with sl st to the first sl st. Fasten off. (46 sts plus the ch-2 tip sp)
Each low sl st between two tall lobes pulls the edge inward and makes a notch. That gives three lobes and two notches per side. The two sl sts on either side of the join form the dip at the base.
Checkpoint: 3 in x 3 3/4 in (7.6 cm x 9.5 cm).
Veins
Use Color B with the RS facing you.
Midrib: Start at the base notch. Work surface sl sts along the foundation chain toward the tip, and stop just before the ch-2 point. Fasten off.
Side veins: Work a line of surface sl sts from the midrib out to each of the 4 side notches, angling slightly toward the tip. Stop 1 st short of the edge.
Weave in all ends on the wrong side.
Cream Frame
Continue with Color B.
Round 5 (outline): Join B with a sl st in the first sl st of Round 4 (base notch). Ch 1, sc in each st around, working 2 sc in the tip ch-2 sp. Join. (46 + 2 = 48 sts)
That is 46 sts worked 1 per st, plus 2 sc in the tip sp. Count st 1 as the base notch. Sts 24 and 25 are the two tip sc.
Round 6 (lace squaring): Ch 1, sc in st 1, ch 2, sk 2, hdc in next st, ch 2, sk 2.
- Side 1: (2 tr, ch 3, 2 tr) in next st (st 7, corner), ch 2, sk 2, tr in next st, ch 2, sk 2, dc in next st, ch 2, sk 2, tr in next st, ch 2, sk 2.
- Top: (2 tr, ch 3, 2 tr) in next st (st 19, corner), ch 2, sk 2, hdc in next st, ch 2, sk 2, sc in next st (st 25, tip), ch 2, sk 2, hdc in next st, ch 2, sk 2.
- Side 2: (2 tr, ch 3, 2 tr) in next st (st 31, corner), ch 2, sk 2, tr in next st, ch 2, sk 2, dc in next st, ch 2, sk 2, tr in next st, ch 2, sk 2.
- Bottom: (2 tr, ch 3, 2 tr) in next st (st 43, corner), ch 2, sk 2, hdc in next st, ch 2, sk 2.
Join to the first sc. (28 sts: 16 corner tr + 12 side sts; 16 ch-2 sps; 4 ch-3 corner sps)
The leaf is longer than it is wide. The sides therefore get tall tr and dc, and the top and bottom get short sc and hdc, which squares off the frame.
Round 7 (square edge): Ch 1. Sc in each st, 3 sc in each ch-2 sp, and 3 sc in each ch-3 corner sp. Join. Fasten off. (88 sts)
Between corner sps there are 7 sc worked into sts (2 tr + 3 side sts + 2 tr) and 12 sc worked into spaces (4 ch-2 sps x 3 sc), for 19 sc. The total is 4 x 19 + 4 corners x 3 sc = 88. Each side has 23 sts, counting both corner sts (the middle sc of each corner group).
Checkpoint: 5 in x 5 in (12.7 cm x 12.7 cm).
Make All Pieces
Make 6 complete motifs:
- Color A: 6 leaves
- Color B: 6 sets of veins and 6 frames (Rounds 5-7)
Layout, with every leaf tip pointing up:
[M1] [M2]
[M3] [M4]
[M5] [M6]
Block each motif to 5 in (12.7 cm) square before joining. Motifs that are all the same size join much more neatly.
Joining
Method: Flat slip-stitch join in Color B, worked from the RS.
Lay two motifs RS up with their edges touching. Insert the hook through the back loop of an edge st on one motif, then through the back loop of the matching st on the other motif, and work a sl st. Join stitch to stitch: corner st to corner st, then all 23 sts in order. Do not add any chains or extra stitches at the seams.
Order:
- Join M1-M2, M3-M4, and M5-M6: 23 sl sts each.
- Join the two columns with one long seam of 3 x 23 = 69 sl sts.
- Join row 1 to row 2, then row 2 to row 3: 2 x 23 = 46 sl sts each.
Where seams cross, work straight over the earlier seam. At the four-way points, the corner chain spaces open into the lacy star.
Tension: Keep the sl sts as loose as your sc. Tight seams will pucker and pull the panel short. If you need to, use a 4.5 mm hook for the seams only.
Checkpoint: 10 in x 15 in (25.4 cm x 38.1 cm).
Border
Border gauge: 4.6 sc per inch, the same as the motif edges.
Starting counts: Each short edge has 2 x 23 = 46 sts and each long edge has 3 x 23 = 69 sts, and both counts include the panel corner sts. At every seam, both motifs’ corner sts are worked, and nothing is added. The edge total is 2 x 46 + 2 x 69 – 4 shared panel corners = 226 sts.
Round 1: Join B in any panel corner st. Ch 1, 3 sc in that st, then sc in each st around, working 3 sc in each panel corner st. Join. (226 + 8 = 234 sts)
That is 226 sts worked 1 per st, plus 2 extra sts at each of the 4 corners. Counting both corner middle sts, each short side has 48 sts and each long side has 71 sts.
Round 2: Ch 1. Sc in each st, with 3 sc in each corner middle st. Join. (234 + 8 = 242 sts)
Counting the corners, short sides have 50 sts and long sides have 73 sts. That leaves 48 and 71 sts between the corners.
Round 3 (picots): Ch 1. Work (sc, picot, sc) in each corner middle st.
- Short sides: Sc in next 3 sts, (picot, sc in next 3 sts) 15 times. This uses 48 sts.
- Long sides: Sc in next 2 sts, (picot, sc in next 3 sts) 23 times. This uses 71 sts.
Join. Fasten off. (242 + 4 = 246 sc; 80 picots)
Why the math works: 46 sts over 10 in and 69 sts over 15 in both equal 4.6 sts per inch, which matches the motif gauge. That keeps the border flat. The only added stitches are the 3-sc corner groups, and they ease the turns without ruffling. Three rounds of about 1/6 in (0.4 cm) each add 1/2 in (1.3 cm) per side, for a total of 11 in x 16 in (27.9 cm x 40.6 cm).
Final Blocking
- Weave in all ends on the wrong side, inside stitches of the same color.
- Lay the panel RS up on the mat.
- Pin the corners to 11 in x 16 in (27.9 cm x 40.6 cm).
- Pin the center of each edge, then pin out each picot.
- Pin the leaf tips and lobes flat so the notches open.
- Spray until damp, not soaked.
- Let it dry fully, at least 12 hours, before unpinning.
Final Quality-Control Checklist
- Each motif is 5 in (12.7 cm) square with 23 sts per side.
- Each leaf has 3 lobes and 2 notches per side, a pointed tip, and a notched base.
- The midrib and 4 side veins are straight.
- All tips point the same way.
- The seams are flat, and the panel measures 10 in x 15 in (25.4 cm x 38.1 cm) before the border.
- The border rounds count 234, 242, and 246 sts.
- After blocking, the panel measures 11 in x 16 in (27.9 cm x 40.6 cm).
Troubleshooting
- The leaf cups: Round 3 is too tight. Use a hook half a size larger for Rounds 3-4.
- The notches are shallow: Work the notch sl sts firmly, and pin the lobes out when blocking.
- The frame isn’t square: Check that your corners fall on sts 7, 19, 31, and 43.
- The edge ruffles: Make sure you are working 3 sc per ch-2 sp, not 4.
- The veins pucker: Work the surface sl sts more loosely.
- The panel is short after joining: Redo the seams more loosely.
Care
Hand wash in cool water with mild soap. Roll in a towel to remove water, then dry flat, reshaping to 11 in x 16 in (27.9 cm x 40.6 cm).
Final Notes
This is how the measurements build: a 3 in x 3 3/4 in (7.6 cm x 9.5 cm) leaf is framed into a 5 in (12.7 cm) square with 23 sts per side. Six squares make a 10 in x 15 in (25.4 cm x 38.1 cm) panel with 46 and 69 sts per side. The border adds 1/2 in (1.3 cm) per side, for 11 in x 16 in (27.9 cm x 40.6 cm). Check your size at each stage and the panel will finish true.
Happy crocheting!