

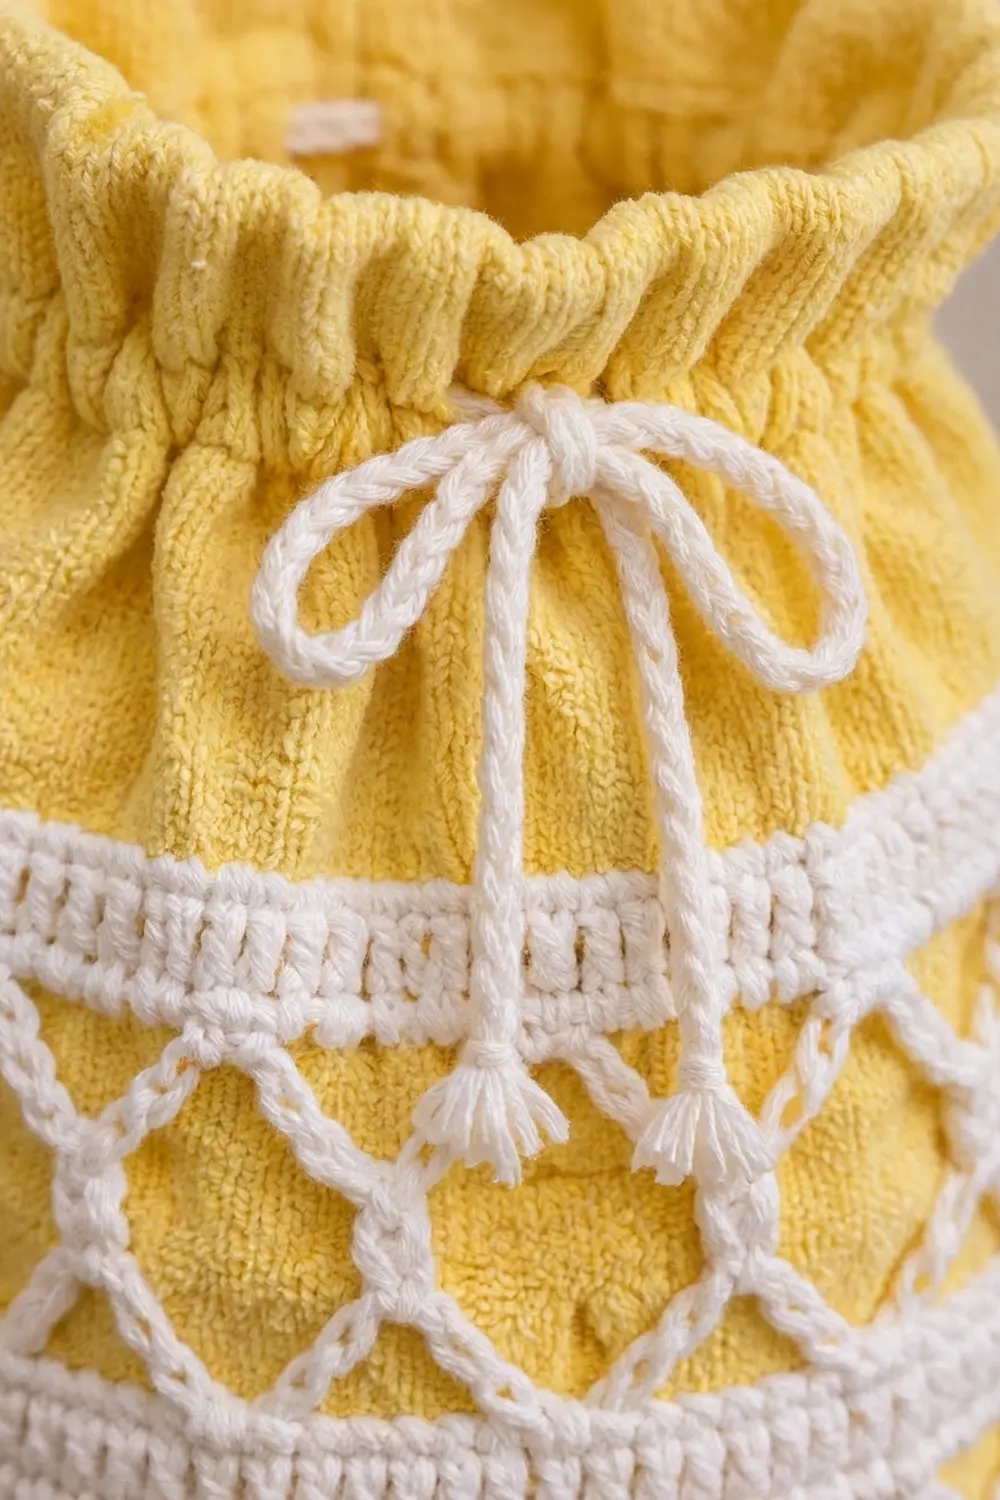
This little drawstring pouch is small but full of detail. The rounded golden yellow body has a diamond lattice of open mesh, and three stripes of white textured ribbing divide it into four clear sections. At the top, a yellow ruched closure gathers on a white drawstring.
Two small white crocheted rings reinforce the drawstring where it leaves the channel at center front. The bottom narrows to a softly gathered point with a small round opening. A white cord loop lets the pouch hang on a hook, ready to hold fabric scraps, notions, or other small items.
The pattern uses US crochet terms. The finished pouch is 3 in (7.6 cm) wide and 4.5 in (11.4 cm) tall with the drawstring closed. Open and flat, it is 4.75 in (12.1 cm) tall.
The body is one piece, worked bottom-up in joined rounds. You start at the bottom opening, double the stitch count to form the gathered point, and then alternate yellow mesh bands with white ribbed stripes. An increase round flares the top, and a drawstring channel turns that flare into a ruched closure. A simple edging finishes both openings.
Finished Size and Construction
- Finished size: 3 in (7.6 cm) wide x 4.5 in (11.4 cm) tall, drawstring closed
- Skill level: Easy+ (advanced beginner; uses post stitches)
- Terminology: US crochet terms
- Yarn weight: Sport weight (2) cotton
- Hook: 3.25 mm (US D-3)
- Number of pieces: 1 body worked in one piece, plus small trims (drawstring, hanging loop, 2 eyelet rings)
- Layout: 4 yellow sections divided by 3 white ribbed stripes
- Body circumference: 36 sts = 6 in (15.2 cm), or 3 in (7.6 cm) wide when flat
- Size before border: 3 in (7.6 cm) x 4.5 in (11.4 cm), open
- Border depth: 0.25 in (0.6 cm) at the top; a slip-stitch edge only at the bottom
Materials
Choose a smooth cotton in sport weight, either mercerized or soft. Cotton gives crisp mesh and clear ribbing, and it holds its shape when the pouch is filled. Avoid fuzzy yarns, because they hide the lattice.
- Golden yellow: 20 g (60 m / 66 yd)
- White: 10 g (30 m / 33 yd)
These quantities include a margin of about 25% for your gauge test and for differences in tension.
Tools:
- 3.25 mm (US D-3) hook
- 1 stitch marker
- Tapestry needle
- Scissors
- Measuring tape or ruler
- Rustproof pins and a spray bottle
- A rolled washcloth or small balloon for shaping
Abbreviations (US Terms)
- ch: chain
- sl st: slip stitch
- sc: single crochet
- dc: double crochet
- FPdc: front post double crochet
- BPdc: back post double crochet
- sk: skip
- st(s): stitch(es)
- sp: space
- beg: beginning
- rnd(s): round(s)
- rep: repeat
Special stitches:
- FPdc: Yarn over and insert the hook from front to back to front around the post of the stitch. Complete the stitch as a dc.
- BPdc: Yarn over and insert the hook from back to front to back around the post of the stitch. Complete the stitch as a dc.
- Mesh loop: A ch-3 that bridges stitches or loops. The loops in each round sit offset from the loops in the round before, which creates the diamond lattice.
Gauge and Checkpoints
Gauge: 24 sc and 28 rows = 4 in (10.2 cm). That is 6 sc and 7 rows per 1 in (2.5 cm).
Test the pouch itself first. Work Rnds 1-3, then flatten the tube. It should measure 3 in (7.6 cm) wide, which means 36 sts = 6 in (15.2 cm) around. If it measures more than 3.25 in (8.3 cm), change to a 3.0 mm hook. If it measures less than 2.75 in (7.0 cm), change to a 3.5 mm (US E-4) hook.
Height checkpoints (measure up the side from the bottom opening, with the pouch flat):
- After Rnd 7: 1 in (2.5 cm)
- After Rnd 9: 1.5 in (3.8 cm)
- After Rnd 13: 2.25 in (5.7 cm)
- After Rnd 15: 2.75 in (7.0 cm)
- After Rnd 19: 3.5 in (8.9 cm)
- After Rnd 21: 4 in (10.2 cm)
- After Rnd 23: 4.5 in (11.4 cm)
- After Rnd 25: 4.75 in (12.1 cm)
If your pouch is more than 0.25 in (0.6 cm) taller than a checkpoint, your mesh loops are probably loose, so keep each ch-3 snug. If it is more than 0.25 in (0.6 cm) shorter, relax your chains. Also check that your FPdc and BPdc stitches are full height.
Pattern
Join every round with a sl st to the first stitch. The beg ch 1 never counts as a stitch. Each round says whether its beg ch 3 or ch 2 counts. Every round begins at center back.
Section 1: Gathered Point and First Lattice Band (Yellow)
Foundation: With yellow, ch 18 and sl st to the first ch to form a ring. Do not twist the chain. The ring is 3 in (7.6 cm) around, so the opening is about 1 in (2.5 cm) across.
Rnd 1: Ch 1, sc in each ch around, join. (18 sc)
Rnd 2: Ch 1, 2 sc in each st around, join. (36 sc)
Doubling the count in a single round makes the fabric gather slightly around the opening. This gathering forms the soft point.
Rnd 3: Ch 1, sc in each st around, join. (36 sc)
Rnd 4 (mesh base): Ch 1, sc in first st, ch 3, sk 2 sts, sc in next st; rep from * 10 more times, ch 3, sk 2 sts, join to first sc. (12 sc, 12 ch-3 loops)*
Each repeat covers 3 stitches, and 12 x 3 = 36.
Rnd 5 (mesh): Sl st into next ch-3 loop, ch 1, sc in same loop, ch 3, sc in next ch-3 loop; rep from * 10 more times, ch 3, join to first sc. (12 sc, 12 ch-3 loops)*
Rnd 6 (mesh): Rep Rnd 5. (12 sc, 12 ch-3 loops)
Rnd 7 (closing): Ch 1, sc in first sc, 2 sc in next ch-3 loop, sc in next sc, 2 sc in next ch-3 loop; rep from * 10 more times, join. (36 sc)*
This round turns the mesh back into solid fabric. You work 12 sc into the existing sc, plus 2 sc into each of the 12 loops (24 sc), for 12 + 24 = 36. Change to white on the final sl st. Either fasten off the yellow or carry it loosely up the inside.
Checkpoint: 1 in (2.5 cm) tall and 3 in (7.6 cm) wide.
White Ribbed Stripe (Worked 3 Times)
Rnd 8: With white, ch 1, sc in each st around, join. (36 sc)
Rnd 9: Ch 2 (does not count), FPdc around next st, BPdc around next st; rep from * 17 more times, join to first FPdc. (36 sts: 18 FPdc, 18 BPdc)*
The alternating post stitches make a raised rib. Change to yellow on the join.
Checkpoint: 1.5 in (3.8 cm) tall.
Sections 2 and 3: Lattice Bands (Yellow)
Rnd 10: Work as Rnd 4, placing each sc into the top of a rib stitch. (12 sc, 12 ch-3 loops)
Rnds 11-12: Work as Rnd 5. (12 sc, 12 ch-3 loops)
Rnd 13: Work as Rnd 7. (36 sc) Change to white.
Checkpoint: 2.25 in (5.7 cm).
Rnds 14-15: Work as Rnds 8-9 (white stripe 2). (36 sts)
Checkpoint: 2.75 in (7.0 cm).
Rnds 16-19: Work as Rnds 10-13 (lattice band 3). (36 sc after Rnd 19)
Checkpoint: 3.5 in (8.9 cm).
Rnds 20-21: Work as Rnds 8-9 (white stripe 3). (36 sts)
Checkpoint: 4 in (10.2 cm). Three white stripes now separate three yellow sections. The fourth section comes next.
Section 4: Ruched Top and Drawstring Channel (Yellow)
Rnd 22 (flare): With yellow, ch 1, sc in next st, 2 sc in next st; rep from * 17 more times, join. (54 sc)*
This round adds 18 stitches. The top now measures 9 in (22.9 cm) around, which is 1.5 times the body. When the drawstring is pulled, this extra fabric becomes the ruching.
Rnd 23 (channel): Ch 3 (counts as dc), dc in next st, ch 1, sk next st, dc in next 2 sts, ch 1, sk next st; rep from * 16 more times, join to top of beg ch-3. (36 dc + 18 ch-1 sps = 54 sts)*
Each repeat covers 3 stitches, and 18 x 3 = 54. The 18 spaces form the drawstring channel. Because 18 is an even number, both drawstring ends will finish on the outside.
Checkpoint: 4.5 in (11.4 cm) tall. Laid flat, the top is 4.5 in (11.4 cm) wide before gathering.
Border
Border gauge: 6 sts per 1 in (2.5 cm), the same as the body.
Top Border (Yellow)
Rnd 24: Ch 1, sc in each dc and in each ch-1 sp around, join. (54 sc: 36 into dc + 18 into sps)
Rnd 25: Ch 1, sc in each st around, join. Fasten off. (54 sc)
Why the math works: 54 sts at 6 sts per in = 9 in (22.9 cm). That is exactly the length of the flared round below, so the edge stays even before gathering. The border adds 0.25 in (0.6 cm) of height. When you pull the drawstring, these 54 sts gather into a soft ruched header.
Bottom Opening Edge (Yellow)
Join yellow to any free loop of the foundation chain. Sl st loosely in each of the 18 free loops, join, and fasten off. (18 sl st)
Why the math works: 18 sts at 6 sts per in = 3 in (7.6 cm), which matches the foundation ring. A slip-stitch edge adds no measurable height. It firms up the opening without making it smaller.
Drawstring (White)
Ch until the chain measures 18 in (45.7 cm). Sl st in the back bump of each ch back along the chain. Fasten off and knot each end.
This length goes around the full 9 in (22.9 cm) top and leaves two 4.5 in (11.4 cm) tails to tie a bow.
Eyelet Rings (White, Make 2)
Ch 4 and sl st to form a ring. Ch 1, 8 sc in the ring, join. Fasten off, leaving a 6 in (15.2 cm) tail. (8 sc) Each ring is about 0.5 in (1.3 cm) across.
Hanging Loop (White)
Ch until the chain measures 8 in (20.3 cm). Sl st in the back bump of each ch back along the chain. Fasten off, leaving a 6 in (15.2 cm) tail at each end.
Assembly
- Flatten the pouch so the round joins are at center back. Counting from the beginning of the round, the two ch-1 spaces at center front are spaces 9 and 10.
- On the outside, center one eyelet ring over each of those two spaces. Line up the hole in each ring with its space, then whipstitch each ring down all the way around.
- Pass the drawstring through space 10 from outside to inside. Weave it in and out through spaces 11-18, then through spaces 1-9. That is 18 passes, so the cord comes back out through space 9 and its ring.
- Sew each end of the hanging loop to the inside of Rnd 24, one at each side fold. The loop should rise about 3.5 in (8.9 cm) above the top edge.
Final Blocking
- Weave in all ends on the inside, through solid sc rounds only.
- Spray the pouch with water until it is damp all the way through.
- Fill it with a rolled washcloth or a small balloon inflated to about 3 in (7.6 cm) across. This sets the rounded, bulbous shape.
- Ease the mesh loops by hand until each diamond opens evenly.
- Straighten the white stripes so they run level all the way around.
- Shape the gathered point by pressing the bottom opening into a neat circle about 1 in (2.5 cm) across.
- Let the pouch dry completely before you remove the filler. Then pull up the drawstring and tie a bow.
Final Quality-Control Checklist
- The body measures 3 in (7.6 cm) wide when flat.
- The height is 4.75 in (12.1 cm) open and 4.5 in (11.4 cm) closed.
- There are 4 yellow sections and 3 white ribbed stripes, all level.
- Every mesh round has 12 loops, and the diamonds are evenly offset.
- Rnds 7, 13 and 19 each have 36 sc.
- Rnds 22-25 each have 54 sts, and the channel has 18 spaces.
- Both drawstring ends come out through the eyelet rings at center front.
- The bottom opening is round and firm, 3 in (7.6 cm) around.
- The hanging loop is sewn on evenly at both sides.
- All ends are hidden in solid rounds.
Troubleshooting
The lattice band spirals or leans. You may have started Rnd 5 in the wrong loop. Always sl st into the next loop after the join, and count 12 sc.
The bottom point puckers too much. Rnd 2 is too tight. Work it with looser loops, or use a hook 0.25 mm larger for that round.
The white stripes flare. Your post stitches are too tall. Snug each yarn over before you complete each FPdc and BPdc.
The top won’t gather smoothly. The drawstring may be too thick, or it may skip a space. Weave it again through all 18 spaces.
The rings sit off-center. Remove them and pin them again with each hole directly over space 9 or space 10.
The pouch is too wide. Count Rnd 7 and Rnd 13 again. Extra stitches often come from working 3 sc into a loop instead of 2.
Care
Hand wash in cool water with mild soap, then gently press out the water. Reshape the pouch over a rolled washcloth and lay it flat to dry.

Final Notes
Here is the measurement chain. 18 sts make a 3 in (7.6 cm) opening. Doubling to 36 sts gives a 6 in (15.2 cm) body that lies 3 in (7.6 cm) wide. Each lattice band has 12 repeats of 3 stitches and closes back to 36 sts. Each white stripe keeps 36 sts. The flare to 54 sts makes 9 in (22.9 cm) of fabric, and the 18-space channel gathers it into a ruched top.
Section by section, the body adds up to 4.5 in (11.4 cm). The top border brings it to 4.75 in (12.1 cm) open, and it gathers to 4.5 in (11.4 cm) closed. If your pouch matches each checkpoint along the way, it will match the finished size.
Happy crocheting!