

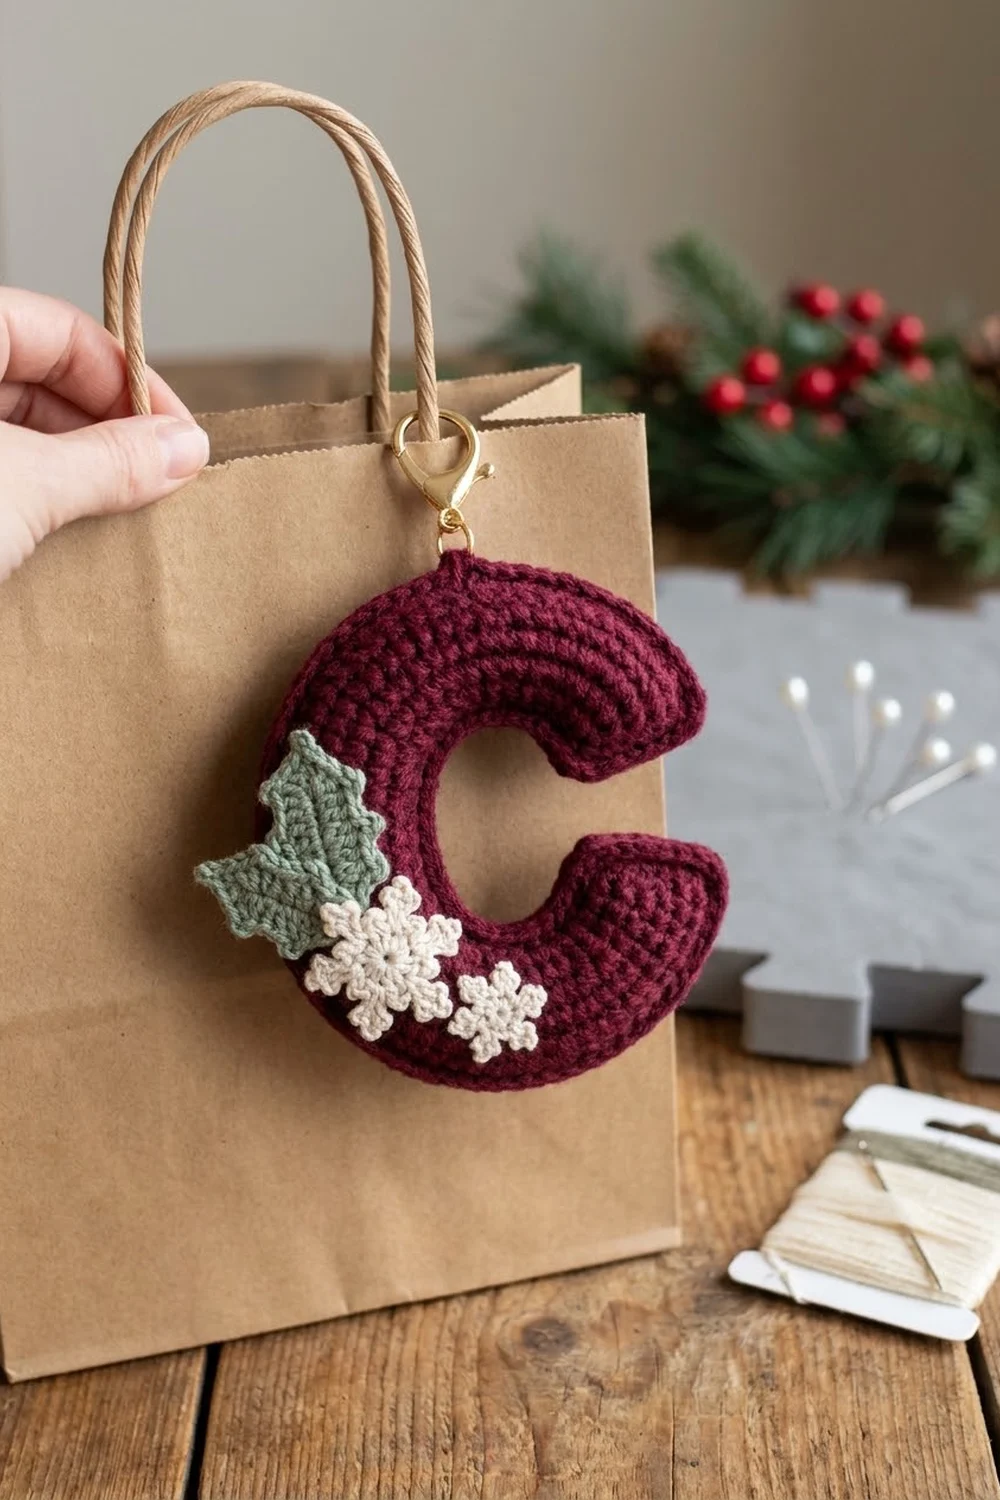
This little charm is a puffy, bobble-textured letter C in deep burgundy, finished with two cream snowflakes and a sage green holly leaf. It hangs from a gold split ring, so you can use it as a keychain, a bag charm, or a personalized gift tag tied to a present.
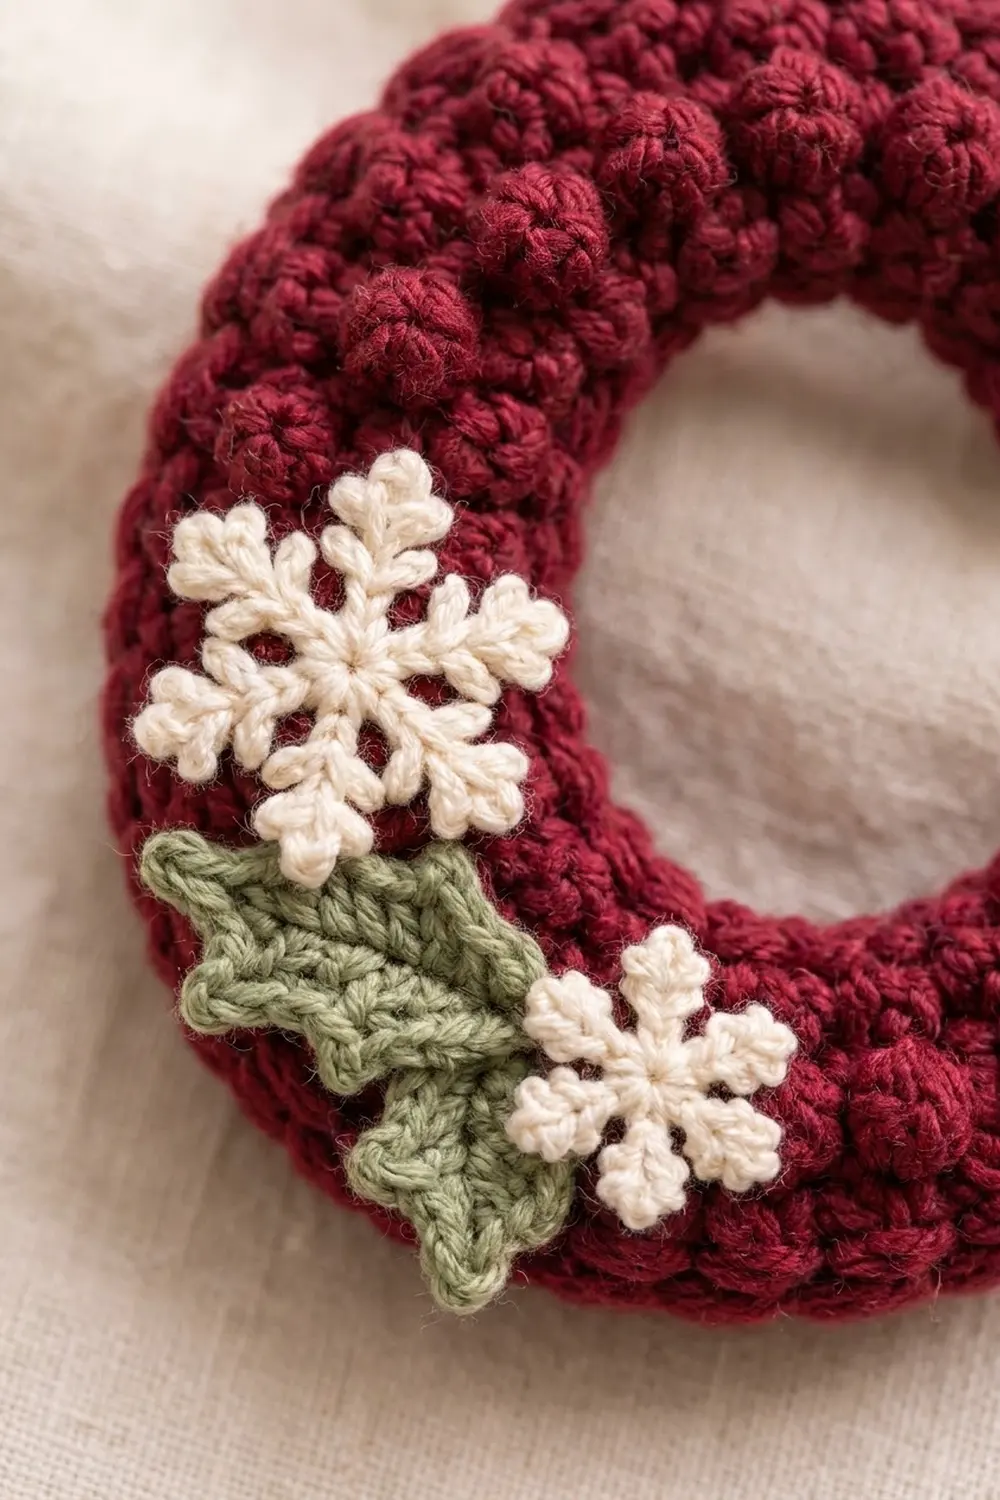
The look is cozy and festive without being busy. All the texture is on the burgundy body: small bobbles stand up across the front, and the back stays smooth. The appliqués sit together on the lower left curve of the letter, with the holly leaf underneath and the snowflakes layered on top.
The pattern uses US crochet terms. The finished charm measures about 4 in (10.2 cm) tall and 3.5 in (8.9 cm) wide, not counting the ring. The padded strip is about 1.5 in (3.8 cm) wide.
Construction is simple. You crochet a bobbled front panel and a plain back panel in short rows that fan into a curve. Then you join them with one round of single crochet, adding a little stuffing as you go. Finally, you make the three appliqués, sew them on, and attach the ring.
Finished Size and Construction
- Finished size: 4 in (10.2 cm) tall x 3.5 in (8.9 cm) wide, ring not included
- Skill level: Easy-intermediate
- Terminology: US crochet terms
- Yarn weight: DK (light worsted) for the letter; sport or fingering cotton for the appliqués
- Hook: 3.5 mm (E-4) for the letter; 2.25 mm (B-1) for the appliqués
- Number of pieces: 1 finished charm, made from 2 letter panels (front and back) plus 3 appliqués
- Layout: a single letter C opening to the right, with the ring at the top end
- Panel size: 3.5 in (8.9 cm) tall x 3 in (7.6 cm) wide, with a strip 1 in (2.5 cm) wide
- Size before border: 3.5 in x 3 in (8.9 cm x 7.6 cm), the same as the panel size
- Border depth: 0.25 in (0.6 cm) on every edge
Materials
Choose a smooth, firmly twisted DK yarn so the bobbles stay crisp. Cotton or a cotton blend holds its shape best on a keychain that gets handled every day. For the appliqués, a mercerized sport or fingering cotton gives clean snowflake points.
- Burgundy DK: 12 g, about 30 m (33 yd)
- Cream sport/fingering cotton: 3 g, about 15 m (16 yd)
- Sage green sport/fingering cotton: 2 g, about 8 m (9 yd)
These quantities include extra for a gauge swatch and longer tails.
Tools:
- 3.5 mm (E-4) hook
- 2.25 mm (B-1) hook
- Small pinch of polyester fiberfill
- 1 in (2.5 cm) gold split key ring
- 1 gold jump ring, about 0.3 in (0.8 cm)
- 2 pairs of flat-nose pliers
- Tapestry needle and a sharp sewing needle
- Stitch markers
- Blocking mat and pins
Abbreviations (US Terms)
- ch – chain
- sl st – slip stitch
- sc – single crochet
- hdc – half double crochet
- dc – double crochet
- sc2tog – single crochet 2 together
- st(s) – stitch(es)
- RS / WS – right side / wrong side
- MR – magic ring
Special stitches:
- Bobble (bob): *Yarn over, insert hook in st, pull up a loop, yarn over, pull through 2 loops; repeat from * 3 more times in the same st (5 loops on hook), yarn over, pull through all 5 loops. A bobble counts as 1 st. When you work it on a WS row, it pops out on the RS.
- Ch-2 picot: Ch 2, sl st in the top of the st just made.
Gauge and Checkpoints
Gauge: 10 sc and 12 rows = 2 in (5.1 cm) with DK yarn and a 3.5 mm hook.
Test with one panel first. Make the back panel, which has no bobbles and is quick, and measure it before you start the front.
Checkpoints:
- After Row 1, the strip of 18 sc measures 3.6 in (9.1 cm).
- After Row 5, the outer edge measures about 8.4 in (21.3 cm) along the curve. The strip is 1 in (2.5 cm) wide, and the panel lies in a C shape about 3.5 in x 3 in (8.9 cm x 7.6 cm).
- After the border, the charm measures 4 in x 3.5 in (10.2 cm x 8.9 cm), and the strip is 1.5 in (3.8 cm) wide.
If your panel is too big, go down 0.25 mm in hook size. If it is too small, go up 0.25 mm. If the panel cups instead of lying flat, your increases are too tight. If it ruffles, your gauge is too loose. Change the hook size rather than the stitch counts, because the counts set the curve.
Pattern
How the curve works
Each panel is worked in rows along the length of the letter. Row 1 is the inner edge. Every row after that adds 6 sts, spread evenly, so the outer edge ends up longer than the inner edge. The finished ratio is 42 outer sts to 18 inner sts. That matches a C with an inner radius of 0.75 in (1.9 cm) and an outer radius of 1.75 in (4.4 cm).
Front Panel (bobbled)
With burgundy and the 3.5 mm hook:
Row 1 (RS): Ch 19, sc in 2nd ch from hook and in each ch across. (18 sts)
Row 2 (WS): Ch 1, turn. Sc in next st, bob in next st, 2 sc in next st; repeat from * 5 more times. (24 sts: 18 sc + 6 bobbles)*
Row 3 (RS): Ch 1, turn. Sc in each of next 3 sts, 2 sc in next st; repeat from * 5 more times. (30 sts)*
Row 4 (WS): Ch 1, turn. Sc in next st, bob in next st, sc in next st, bob in next st, 2 sc in next st; repeat from * 5 more times. (36 sts: 24 sc + 12 bobbles)*
Row 5 (RS): Ch 1, turn. Sc in each of next 5 sts, 2 sc in next st; repeat from * 5 more times. (42 sts)*
Fasten off and weave in ends. The RS now has 18 raised bobbles in two staggered bands along the letter.
Back Panel (plain)
Work the same as the front panel, but replace every bobble with a sc:
Row 1: Ch 19, sc in 2nd ch from hook and in each ch across. (18 sts)
Row 2: Ch 1, turn. Sc in each of next 2 sts, 2 sc in next st; repeat from * 5 more times. (24 sts)*
Row 3: Ch 1, turn. Sc in each of next 3 sts, 2 sc in next st; repeat from * 5 more times. (30 sts)*
Row 4: Ch 1, turn. Sc in each of next 4 sts, 2 sc in next st; repeat from * 5 more times. (36 sts)*
Row 5: Ch 1, turn. Sc in each of next 5 sts, 2 sc in next st; repeat from * 5 more times. (42 sts)*
Do not fasten off. Put the loop on a stitch marker, because you’ll use this yarn for the border.
The arc is symmetrical, so the back panel fits the front without being mirrored.
Border (Joining Round)
Border gauge: the same as the body, 5 sc per 1 in (2.5 cm). Work every border stitch through both panels at once.
Place the front panel on the back panel with wrong sides together and the bobbles facing you. Line up the inner edges, the outer edges, and the ends, and hold them in place with clips or markers.
The C has four edges: the outer edge (42 sts), the inner edge (18 foundation loops), and two short ends (5 row-ends each).
Border round: Put the back panel’s loop back on the hook and work through both layers.
- Outer edge: Sc in each of next 6 sts, 2 sc in next st; repeat from * 5 more times. (48 sc: 42 worked 1-per-st + 6 extra)*
- First end: Work 2 sc in the Row 5 row-end, 1 sc in each of the Row 4, 3, and 2 row-ends, then 2 sc in the Row 1 row-end. (7 sc: 5 worked 1-per-row-end + 2 extra)
- Inner edge: Working in the foundation loops, sc in each of next 4 sts, sc2tog; repeat from * 2 more times. (15 sc: 18 loops used, 3 fewer sts)*
- Second end: Work the first end in reverse: 2 sc in the Row 1 row-end, 1 sc in each of the Row 2, 3, and 4 row-ends, then 2 sc in the Row 5 row-end. (7 sc: 5 worked 1-per-row-end + 2 extra)
Before you close the last 2 in (5.1 cm), push in a small pinch of fiberfill with the back of your hook. Spread it so the strip is evenly padded and about 0.5 in (1.3 cm) thick, not round and hard. Finish the edge, then sl st to the first sc.
Total: 77 sc (48 + 7 + 15 + 7).
Fasten off, leaving a 6 in (15.2 cm) tail, and hide the tail inside the padding.
Why the math works: The border sits 0.25 in (0.6 cm) outside the panel. The outer curve gets a larger radius, so it needs more length: 42 x (1.95 / 1.75) is about 47 sts, and 48 keeps it flat. On the inner curve the radius shrinks, so 18 sts drop to 15, and the padding absorbs the small difference. The 2 extra sts at each corner round off the ends of the C into soft, domed tips.
Appliqués
Large Snowflake (make 1)
With cream and the 2.25 mm hook:
Rnd 1: 6 sc in MR, sl st to first sc. (6 sts)
Rnd 2: Ch 5, sl st in 3rd ch from hook (tip picot), [ch 2, sl st in same ch] twice (side picots), sl st in each of next 2 ch, sl st in next sc of Rnd 1; repeat from * 5 more times. (6 arms)*
Fasten off. The snowflake is about 0.9 in (2.3 cm) across.
Small Snowflake (make 1)
Work as for the large snowflake, but start each arm with ch 4 and sl st in only 1 ch on the way back down. (6 arms) The snowflake is about 0.75 in (1.9 cm) across.
Holly Leaf (make 1)
With sage green and the 2.25 mm hook:
Foundation: Ch 10.
Side 1: Sl st in 2nd ch from hook, sc in next ch, hdc in next ch, ch-2 picot, dc in next ch, dc in next ch, ch-2 picot, dc in next ch, hdc in next ch, ch-2 picot, sc in next ch, sl st in last ch. (9 sts, 3 picots)
Tip: Ch 2, sl st in 2nd ch from hook.
Side 2: Working in the opposite side of the foundation, sl st in first ch, sc in next ch, ch-2 picot, hdc in next ch, dc in next ch, ch-2 picot, dc in next ch, dc in next ch, ch-2 picot, hdc in next ch, sc in next ch, sl st in last ch. (9 sts, 3 picots)
Fasten off, leaving a 10 in (25.4 cm) tail for sewing. The leaf is about 1.4 in (3.6 cm) long.
Placement
Sew all three appliqués onto the lower left curve of the letter.
- Sew the holly leaf flat, angled down and to the right, with its tip pointing toward the bottom of the C.
- Sew the large snowflake above the leaf so it overlaps the leaf’s upper end.
- Sew the small snowflake to the right of the large one so it overlaps the leaf’s lower end, near the bottom of the curve.
Use a sharp needle and matching thread. Tack each snowflake at its center and at the base of each arm, catching only the front panel.
Ring
Open the jump ring with two pairs of pliers by twisting it sideways, not pulling it apart. Pass it through the border at the top end of the C, between 2 sts, catching both layers. Add the split ring and close the jump ring completely.
Final Blocking
- Lightly mist the charm with water. Don’t soak it, because of the stuffing.
- Pin it to the mat in a C shape, 4 in (10.2 cm) tall and 3.5 in (8.9 cm) wide.
- Pin only along the outer edge so you don’t flatten the padding.
- Round the two ends with your fingers.
- Let it dry completely, then unpin.
- If you can, block the snowflakes before sewing them on: pin out each arm and spray with light starch.
Final Quality-Control Checklist
- Front: 42 sts on the outer edge and 18 bobbles, all on the RS.
- Back: 42 sts on the outer edge and a smooth surface.
- Border: 77 sc total, worked through both layers, with no gaps.
- Padding is even, with no lumps at the ends.
- Size is 4 in x 3.5 in (10.2 cm x 8.9 cm), with a 1.5 in (3.8 cm) strip.
- Appliqués sit on the lower left curve, with the leaf underneath and the snowflakes on top.
- The jump ring is fully closed and passes through both layers.
- All tails are hidden inside.
Troubleshooting
Bobbles appear on the wrong side: Work bobbles only on WS rows (Rows 2 and 4), and keep the bobbled side facing out when you join.
The panel is straight, not curved: Check that each row adds 6 sts. Missing increases straighten the curve.
The panel twists or ruffles: Your gauge is loose. Go down a hook size.
The outer border edge cups inward: You skipped the border increases. Rework it with 48 sts on the outer edge.
The inner edge is wavy: Check that you worked all 3 sc2tog decreases.
The panels don’t line up: Count each row. Both panels must end with 42 sts.
Stuffing shows through: Use less fiberfill, or go down to a 3.25 mm hook.
Snowflake arms curl: Starch them and pin them flat before sewing.
Care
Spot clean with mild soap and cool water, press dry in a towel, and let it air dry flat. Don’t machine wash it, because that can damage the stuffing and the gold ring.
Final Notes
The measurement chain is short and easy to track. A gauge of 10 sc = 2 in (5.1 cm) gives an 18-st inner edge of 3.6 in (9.1 cm). Five rows build a 1 in (2.5 cm) strip with a 42-st outer edge, which makes a 3.5 in x 3 in (8.9 cm x 7.6 cm) panel. The 77-st border joins both layers and adds 0.25 in (0.6 cm) on every edge, for a finished charm of 4 in x 3.5 in (10.2 cm x 8.9 cm).
Once you’ve made the C, you can use the same method for other curved letters. Change the starting chain and keep the 6 increases per row.
Happy crocheting!