

The Violet Iris Lattice Lace Panel is a light, airy rectangle covered in deep purple iris flowers. Each flower sits inside a cream lattice of chain loops. A cream vein runs down every petal, and a small yellow accent at each petal base brings the flowers to life.
The panel uses three colors: violet purple, ivory cream and golden yellow. The style is vintage lace with a garden feel. The panel works as a table centerpiece, a dresser scarf or a wall piece.
This pattern uses US crochet terms. The finished panel measures 18 x 29 in (45.7 x 73.7 cm) after blocking.
You make 15 square motifs, join them into a grid 3 motifs wide by 5 motifs long, and then work a three-round border with small pointed loops. Each motif starts as a flower worked in the round, and cream mesh rounds turn it into a square.
Finished Size and Construction
- Finished size: 18 x 29 in (45.7 x 73.7 cm)
- Skill level: Intermediate
- Terminology: US crochet terms
- Yarn weight: DK / light worsted (#3), cotton or cotton blend
- Hook: 4.0 mm (G-6)
- Number of pieces: 15 identical motifs
- Layout: 3 motifs wide x 5 motifs long
- Motif size: 5.5 in (14.0 cm) square
- Size before border: 16.5 x 27.5 in (41.9 x 69.9 cm)
- Border depth: 0.75 in (1.9 cm) on each side
Materials
Yarn: Use a smooth mercerized or soft cotton DK. Cotton shows the petal texture clearly and blocks crisply. The amounts below assume about 110 m per 50 g.
- Color A, cream: 130 g (286 m)
- Color B, violet purple: 60 g (132 m)
- Color C, golden yellow: 5 g (11 m)
All amounts include a safety margin of about 20%.
Tools:
– 4.0 mm (G-6) crochet hook
– Tapestry needle
– Stitch markers
– Rust-proof pins and blocking mats
– Spray bottle
– Measuring tape
Abbreviations (US Terms)
- ch – chain
- sl st – slip stitch
- sc – single crochet
- hdc – half double crochet
- dc – double crochet
- tr – treble crochet
- sp – space
- st(s) – stitch(es)
- MR – magic ring
- RS / WS – right side / wrong side
- BLO – back loop only
Surface slip stitch: Hold the yarn behind the work. Insert the hook from the front to the back, pull up a loop, and draw it through the loop on your hook. This makes a chain-like line on top of the fabric.
Gauge and Checkpoints
Gauge: 18 sc and 20 rows = 4 in (10.2 cm) in sc with a 4.0 mm hook.
Make one complete motif before you start the rest, and measure it at each of these checkpoints:
- After Round 3: the flower measures 3.5 in (8.9 cm) from tip to tip.
- After Round 5: the mesh square measures about 5 in (12.7 cm).
- After Round 6: the motif measures 5.5 in (14.0 cm) square, give or take 0.25 in (0.6 cm).
Motif too big? Go down to a 3.75 mm hook.
Motif too small? Go up to a 4.25 mm or 4.5 mm hook.
Change the hook, not the stitch counts. The joining and border math depends on exactly 25 sc per side.
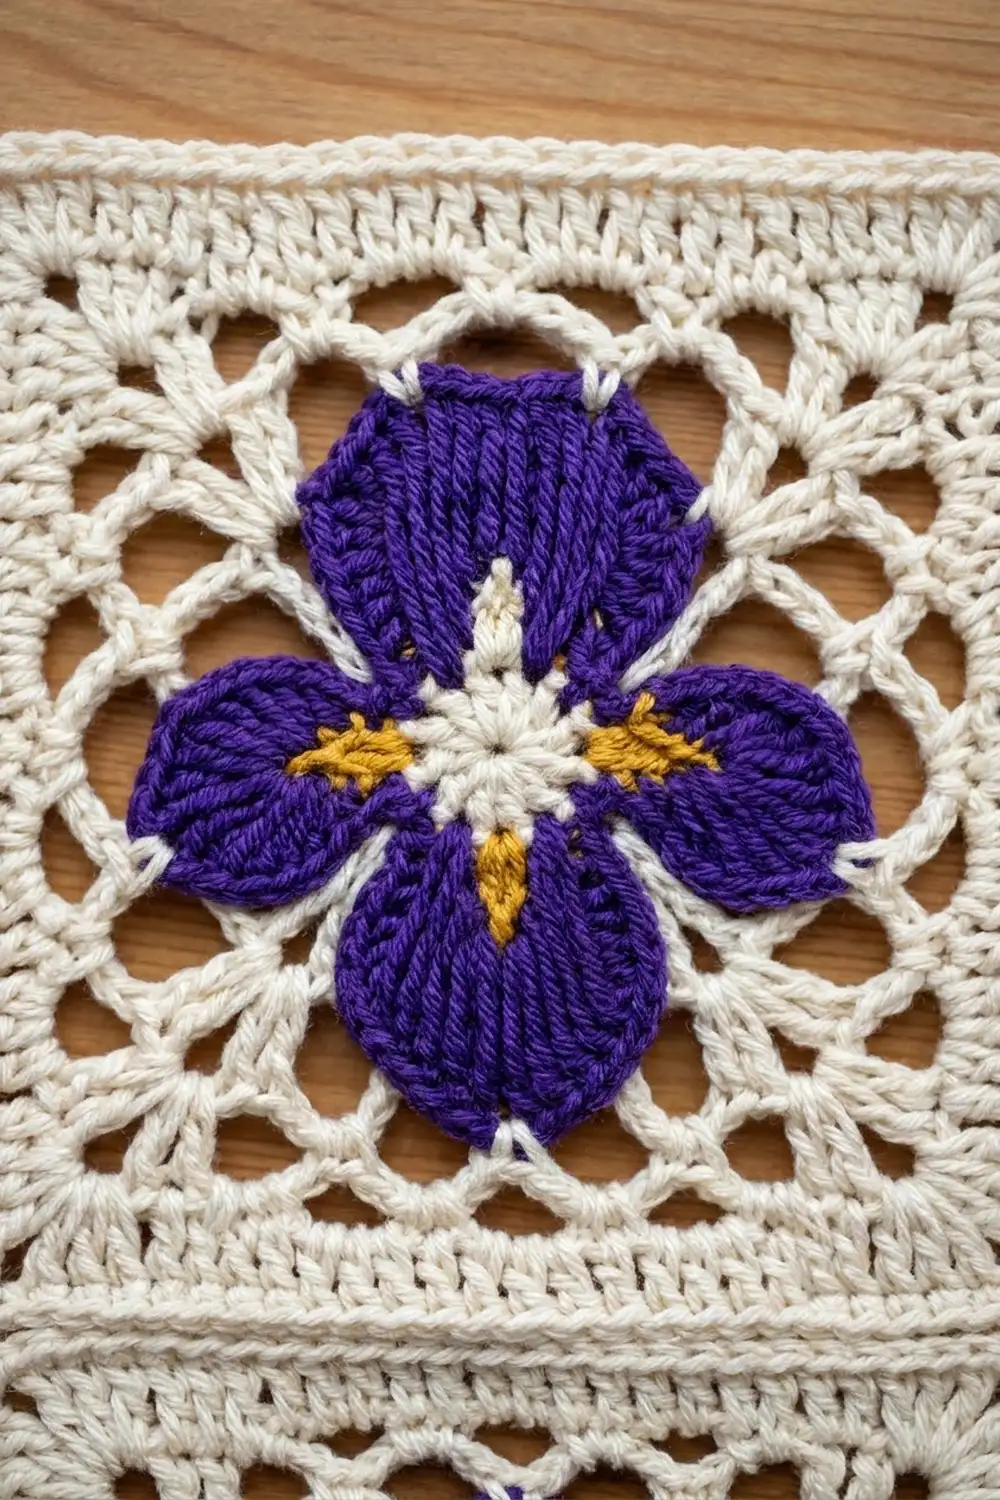
Iris Motif (Make 15)
Flower Center and Petals
Round 1 (Color A): Make a MR. Ch 1, then work 12 sc into the ring. Sl st to the first sc and pull the ring closed. Fasten off. (12 sc)
Round 2 (Color B): Join Color B with a sl st in any sc. You now make three petals, and each petal uses 4 sts of Round 1.
Work (hdc, 2 dc) in the next sc. Work (2 tr, ch 2, 2 tr) in the next sc for the petal tip. Work (2 dc, hdc) in the next sc. Sl st in the next sc. Repeat from * to * 2 more times. The last sl st lands in the joining st.
Count: 30 sts (10 per petal), 3 ch-2 tips and 3 sl sts.
Round 3 (Color B): This round widens each petal. Work each petal as follows.
Sc in the hdc, 2 hdc in each of the next 2 dc (4 hdc), 2 dc in each of the next 2 tr (4 dc), (2 dc, ch 2, 2 dc) in the ch-2 tip, 2 dc in each of the next 2 tr (4 dc), 2 hdc in each of the next 2 dc (4 hdc), sc in the hdc, sl st in the sl st between petals. Repeat from * to * 2 more times. Fasten off.
Count: 66 sts (22 per petal), 3 ch-2 tips and 3 sl sts.
Checkpoint: 3.5 in (8.9 cm) from tip to tip.
Lay the flower RS up with one petal pointing straight up. That is the top petal. The other two petals point down to the lower left and lower right.
Petal veins (Color A): Start at the center. Work a line of surface slip stitches straight down the middle of each petal and stop just before the tip. Fasten off on the WS.
Yellow accents (Color C): Embroider 3 short straight stitches at the base of each petal, fanning out from the center.
Lace Frame
Round 4 (Color A): Join Color A with a sc in the ch-2 tip of the top petal.
Ch 5. Sc in the 3rd hdc of the 4 hdc after the tip. Ch 5. Tr in the sl st between petals. Ch 5. Sc in the 2nd hdc of the next petal. Ch 5. Sc in the next ch-2 tip. Repeat from * to * 2 more times. On the last repeat, skip the final sc and sl st to the first sc instead.
Count: 12 ch-5 loops. For reference, number them L1 to L12, starting with L1 just after the top tip.
Round 5 (Color A): Sl st in the first 3 ch of L1. Ch 1, then sc in the same loop.
Ch 5. Work (sc, ch 7, sc) in the next loop; this is a corner. Ch 5, sc in the next loop. Ch 5, sc in the next loop. Repeat from * to * 3 more times. On the final repeat, replace the last “sc in the next loop” with a sl st to the first sc.
Count: 16 sc, 12 ch-5 spaces and 4 ch-7 corners. Each side has 3 ch-5 spaces. The corners fall in loops L2, L5, L8 and L11, so the top petal points to the center of the top edge.
Checkpoint: about 5 in (12.7 cm) square.
Round 6 (Color A): Ch 1, then sc in the same st.
5 sc in the next ch-5 space. Sc in the corner sc. Work (3 sc, ch 2, 3 sc) in the ch-7 corner. Sc in the next corner sc. Then work [5 sc in the next ch-5 space, sc in the next sc] 2 times. Repeat from * to * 3 more times. On the last repeat, omit the final sc. Sl st to the first sc and fasten off.
Count: 100 sc (25 per side) and 4 corner ch-2 spaces.
Here is how each side adds up: 3 + 1 + 5 + 1 + 5 + 1 + 5 + 1 + 3 = 25 sc, counted between the corner ch-2 spaces. The corner ch-2 spaces are not part of the side count.
Checkpoint: 5.5 in (14.0 cm) square.
Weave in all ends along the WS of matching colors.
Make All Pieces
- 15 motifs total. All motifs use the same colors.
- Per motif: Color B for Rounds 2–3, Color A for Rounds 1 and 4–6 and the veins, Color C for the accents.
Lay out the motifs with every top petal pointing toward the same short end:
[M] [M] [M]
[M] [M] [M]
[M] [M] [M]
[M] [M] [M]
[M] [M] [M]
That is 3 across by 5 down.
Joining
Method: Slip stitch join in BLO, worked with Color A and the 4.0 mm hook.
- Place two motifs WS together and line up the corners.
- Sl st through both corner ch-2 spaces.
- Sl st through the back loops of the facing sts, one st to one st, for all 25 sts.
- Sl st through the next pair of corner ch-2 spaces.
Join the 5 motifs of each column into a strip. Then join the 3 strips along their long edges. Where four corners meet, sl st through all of the corner spaces together so you don’t leave a hole.
Stitch logic: Each side has exactly 25 sc, so every seam pairs 25 sts with 25 sts. You never skip or add a stitch.
Tension: Keep the slip stitches loose, about as wide as a sc. A tight join will pucker the lace. If needed, go up half a hook size for joining only.
Checkpoint: 16.5 x 27.5 in (41.9 x 69.9 cm).
Border
Border gauge: 18 sc = 4 in (10.2 cm), the same as the motifs.
Round 1 (Color A): Join with a sc in any outer corner ch-2 space of the panel.
- Outer corners: Work (sc, ch 2, sc) in each outer corner ch-2 space.
- Along the edges: Sc in each sc.
- At seams: Skip the joined corner spaces. Go straight from the last sc of one motif to the first sc of the next.
Starting counts per side:
– Short sides: 3 x 25 = 75 sc
– Long sides: 5 x 25 = 125 sc
Counts per side at the end of this round, including the 2 corner sc of that side:
– Short sides: 75 + 2 = 77 sc
– Long sides: 125 + 2 = 127 sc
The ch-2 corner spaces are not counted. Round total: 408 sc.
Round 2 (Color A): Sl st into a corner ch-2 space. Ch 1, then work (sc, ch 5, sc) in the same space; this is the corner loop.
Along each side:
1. Ch 5, skip the first 3 sc, sc in the next sc.
2. Ch 5, skip 4 sc, sc in the next sc. Repeat from * to * across.
3. End with ch 5, skip the last 3 sc, and work the next corner as (sc, ch 5, sc) in the ch-2 space.
Sl st to the first sc to close the round.
- Short sides: 16 ch-5 loops (1 + 14 repeats + 1)
- Long sides: 26 ch-5 loops (1 + 24 repeats + 1)
- Corners: 4 corner loops
Round 3 (Color A): Sl st into the next corner loop.
- Corner loops: Work (3 sc, ch 5, 3 sc) in each corner loop.
- Side loops: Work (2 sc, ch 3, 2 sc) in each side ch-5 loop.
Sl st to the first sc and fasten off.
- Short sides: 16 points and 64 sc
- Long sides: 26 points and 104 sc
Why the math works: Each side is 3 skipped sts, then sets of 5 sts (1 sc anchor and 4 skipped), then a final anchor, then 3 skipped sts.
- Short side: 3 + (5 x 14) + 1 + 3 = 77
- Long side: 3 + (5 x 24) + 1 + 3 = 127
Both counts come out exactly, so every side starts and ends the same way.
Round 1 adds about 0.25 in (0.6 cm) of depth, and Rounds 2–3 add about 0.5 in (1.3 cm). That gives 0.75 in (1.9 cm) per side and a finished size of 18 x 29 in (45.7 x 73.7 cm).
Final Blocking
- Soak the panel in cool water for 15 minutes.
- Gently press out the water. Do not wring.
- Roll the panel in a towel and press to remove more water.
- Lay it flat RS up on the blocking mats.
- Pin the four corners to 18 x 29 in (45.7 x 73.7 cm).
- Pin the edges straight between the corners.
- Pin each ch-3 point of the border into a small sharp peak.
- Shape each petal’s tip with your fingers so it points outward.
- Open the mesh loops evenly.
- Let the panel dry completely, which takes 12–24 hours.
Final Quality-Control Checklist
- Every motif measures 5.5 in (14.0 cm) and has 25 sc per side.
- All top petals point the same way.
- The veins are centered and stop before the petal tips.
- The yellow accents look the same on every flower.
- The seams lie flat, with no puckers or gaps.
- There are no holes where four corners meet.
- Border Round 1 has 77/127 sc per side.
- There are 16 points on each short side and 26 points on each long side.
- The panel measures 18 x 29 in (45.7 x 73.7 cm).
- All ends are secured and trimmed.
Troubleshooting
Petals cup instead of lying flat: Your Round 3 tension is too tight. Go up half a hook size for the purple rounds.
Round 4 loops pull the petals out of shape: Loosen your chains, or work ch 6 in place of ch 5. Keep 12 loops either way.
Motif is not square: Check that the corners fall in L2, L5, L8 and L11. Block the motif on its own before you join it.
Seams ridge or pucker: Rework the seam with a looser sl st, or use a larger hook for joining.
Border ruffles: Go down half a hook size for border Rounds 2–3.
Border count is off: Recount Round 1 between the corner sc. Check that you skipped the seam spaces.
Care
Hand wash in cool water with a mild soap and dry flat, reshaping the panel as it dries. If needed, press lightly with a cool iron on the WS through a cloth.
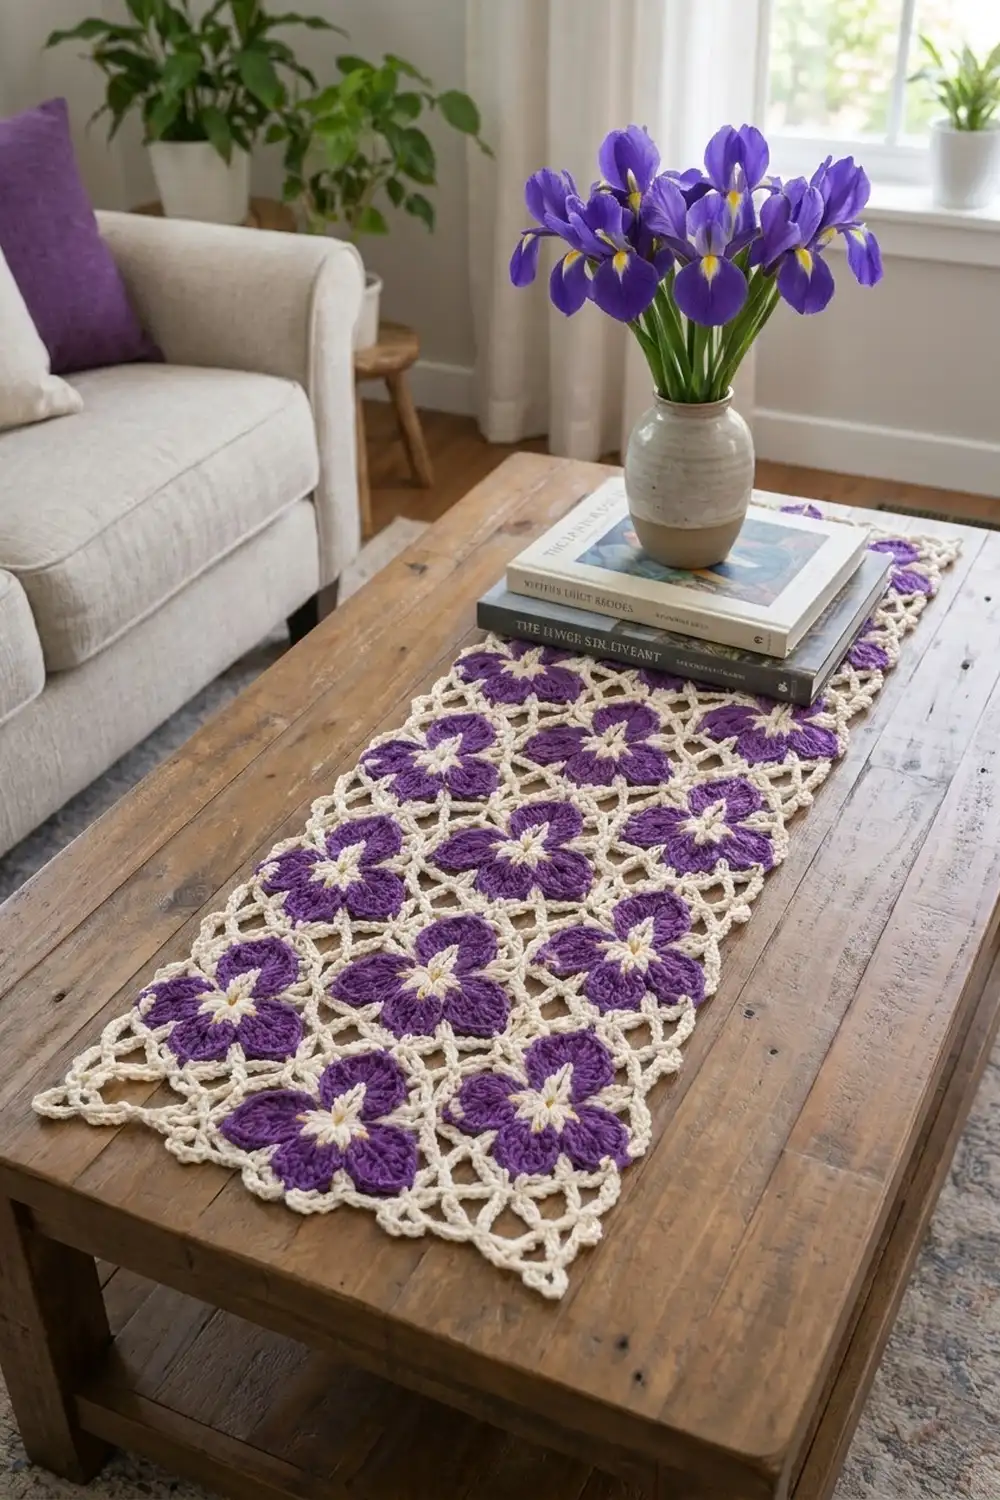
Final Notes
Here is how the measurements build on each other. The flower measures 3.5 in (8.9 cm). The mesh grows the motif to 5 in (12.7 cm). Round 6 brings it to 5.5 in (14.0 cm), with 25 sc per side. Joining 3 x 5 motifs gives 16.5 x 27.5 in (41.9 x 69.9 cm) and border sides of 75 and 125 sts. Border Round 1 brings these to 77 and 127 sts, and the finished, blocked panel measures 18 x 29 in (45.7 x 73.7 cm).
If your first motif matches the checkpoints, everything after it will fit. Happy crocheting!