

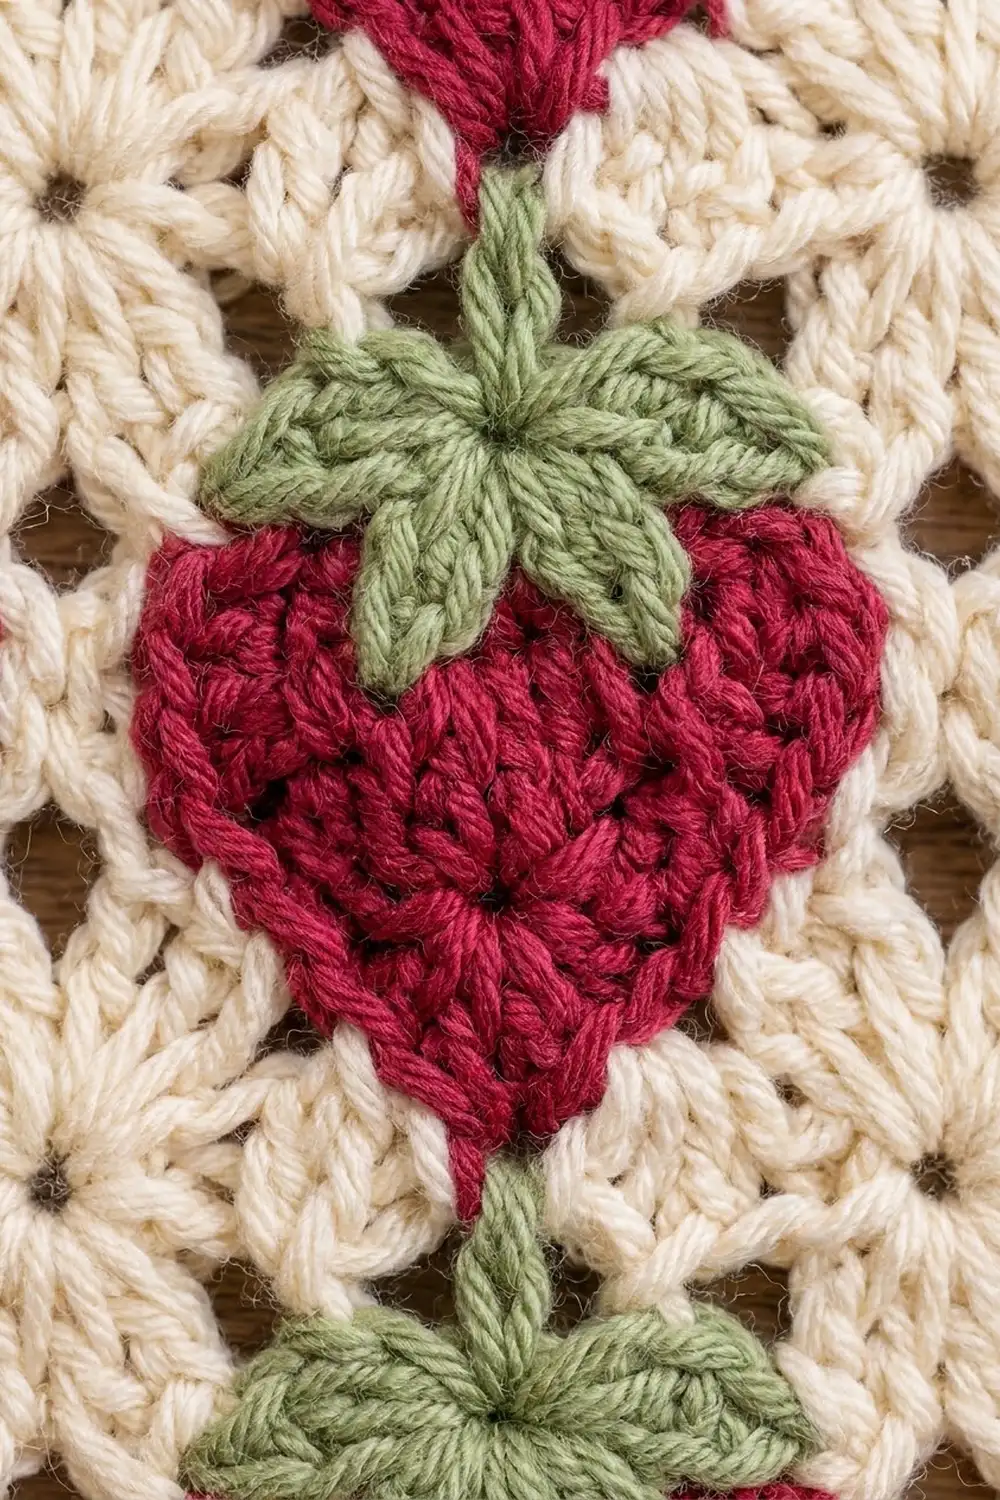
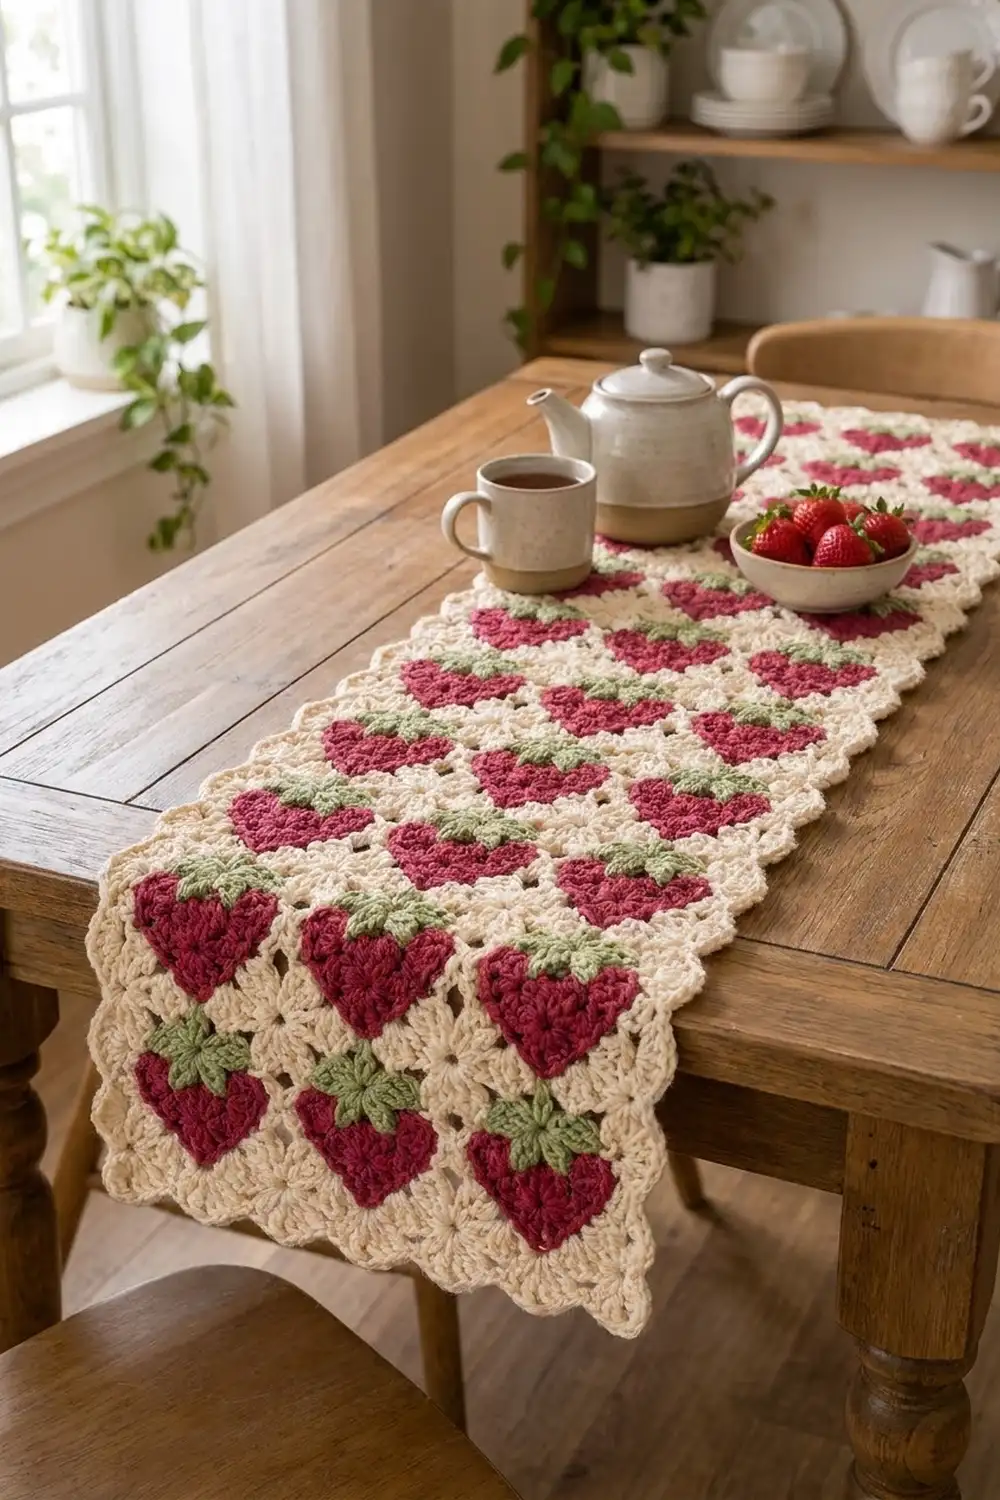
The Berry Patch Panel is a flat rectangle with 12 raspberry-red strawberries set in a lacy cream background. There are three berries across and four up, all in neat columns. Each berry is a small heart shape with a pointed bottom and two rounded lobes on top. A sage-green star of leaves sits on top of each one.
The look is cottage-style and summery. You can use the panel as a table mat, a wall hanging, a doily, or a sample before you take on a bigger project. A cream scalloped border frames the finished piece.
This pattern uses US crochet terms. The finished panel measures 8.5 x 11.75 in (21.6 x 29.8 cm) after blocking.
The panel is one piece, worked in rows from the bottom up. Each band of strawberries takes four rows: two red rows shape the berries and two cream rows level the fabric. Every band starts at the same edge, so you can carry the yarns up the side and skip most of the cutting. The green leaves go on afterward as surface stars. Two rounds of border finish the piece.
Finished Size and Construction
- Finished size: 8.5 x 11.75 in (21.6 x 29.8 cm)
- Skill level: Intermediate
- Terminology: US
- Yarn weight: Worsted (#4)
- Hook: 5.0 mm (H-8)
- Number of pieces: 1
- Layout: 3 berries across x 4 bands of berries
- Each berry: about 2 in (5.1 cm) wide x 1.5 in (3.8 cm) tall
- Size before border: 7 x 10.25 in (17.8 x 26.0 cm)
- Border depth: 0.75 in (1.9 cm) on each side
Materials
Use a smooth worsted-weight cotton or cotton blend so the berry shapes and scallops show clearly. Fuzzy or very splitty yarns hide the lace. The quantities below are for yarn of about 200 m per 100 g.
- Cream: 50 g / 100 m
- Raspberry red: 35 g / 70 m
- Sage green: 10 g / 20 m
All quantities include a margin of about 15% for your gauge swatch and tails.
Tools:
- 5.0 mm (H-8) crochet hook
- Yarn needle
- Scissors
- 2 stitch markers
- Blocking mat, rust-proof pins and a spray bottle
- Tape measure
Abbreviations (US Terms)
- ch – chain
- sl st – slip stitch
- sc – single crochet
- hdc – half double crochet
- dc – double crochet
- tr – treble crochet
- sk – skip
- sp – space
- st(s) – stitch(es)
- RS / WS – right side / wrong side
Special stitches:
- dc2tog (double crochet 2 together): Yarn over, insert hook in the next st, pull up a loop, yarn over and pull through 2 loops. Yarn over, insert hook in the following st, pull up a loop, yarn over and pull through 2 loops. Yarn over and pull through all 3 loops on the hook. This makes 1 stitch.
- Shell: 7 dc in the same stitch.
- Leaf: Ch 4, sl st in 2nd ch from hook, sc in next ch, hdc in next ch, sl st in the base stitch.
Gauge and Checkpoints
Because this is a single piece, your first band works as the gauge test. Make Row 0 and Band 1, then measure before you go on.
- Row 0: 25 sc = 7 in (17.8 cm) wide.
- Row 0 plus Band 1 (5 rows): 2.75 in (7.0 cm) tall, measured gently flat.
- Border gauge: about 3.6 sc per inch (1.4 sc per cm).
If your piece is too big, go down to a 4.5 mm hook. If it’s too small, go up to a 5.5 mm hook. Change the hook rather than your grip; a forced change in tension usually shows in the lace. A difference of 0.25 in (0.6 cm) or less is fine, because blocking will even it out.
Height checkpoints (measured from the foundation edge):
- After Band 1: 2.75 in (7.0 cm)
- After Band 2: 5.25 in (13.3 cm)
- After Band 3: 7.75 in (19.7 cm)
- After Band 4: 10.25 in (26.0 cm)
Every band adds 2.5 in (6.4 cm). The width should stay at 7 in (17.8 cm) the whole way up.
The Panel
Color notes: Every band starts at the same edge, the edge where Row 0 ends. Red finishes there after Row 2 and cream finishes there after Row 4. Don’t cut either color. Drop the yarn you’re not using and carry it loosely up that side edge. The border will cover the carried strands later.
Foundation
With cream, ch 26.
Row 0 (WS): Sc in the 2nd ch from hook and in each ch across. Turn. (25 sc)
Drop cream at this edge and pick up red.
Band (Rows 1–4) — work 4 times in total
Row 1 (RS, red): Ch 1. Sc in the first st, then sk 3 sts, shell (7 dc) in the next st, sk 3 sts, sc in the next st. Repeat from * to * 2 more times. Turn.
(25 sts: 3 shells of 7 dc + 4 sc)
Each shell fans upward from a single stitch, which forms the pointed bottom of the berry. The sc between the shells is small, and the cream tr in Row 3 will hide it.
Row 2 (WS, red): Ch 1. Sl st in the first sc. Then work across each shell like this: sc in the 1st dc, hdc in the 2nd dc, 2 dc in the 3rd dc, sl st in the 4th (center) dc, 2 dc in the 5th dc, hdc in the 6th dc, sc in the 7th dc, sl st in the next sc. Repeat from * to * 2 more times. Turn.
(31 sts = 25 sts worked one into each existing stitch + 6 extra, from the 2-dc increases: 2 per berry)
The two 2-dc groups make the rounded top lobes. The sl st in the center makes the dip at the top of the heart. Drop red at this edge and pick up cream.
Row 3 (RS, cream): Ch 4 (counts as tr) in the first sl st. Then work across each berry like this: dc2tog over the next sc and hdc, sc in each of the next 2 dc, hdc in the center sl st, sc in each of the next 2 dc, dc2tog over the next hdc and sc, tr in the next sl st. Repeat from * to * 2 more times. Turn.
(25 sts = 31 sts worked − 6 removed by the dc2tog decreases: 4 tr + 3 groups of 7)
The tall tr stitches fill the V-shaped gaps between the berries and at the edges. The short sc and hdc stitches sit on top of the lobes. Together they level the fabric again. The hdc sitting in each berry’s center dip will be where its leaves go later, so place a marker in the first one if you like.
Row 4 (WS, cream): Ch 1. Sc in the first tr, then ch 1, sk 1 st, sc in the next st. Repeat from * to * 11 more times. Turn.
(25 sts: 13 sc + 12 ch-1 sps)
This mesh row makes the small eyelet holes in the cream background. Check that the sc stitches fall on the 1st, 5th, 9th, 13th, 17th, 21st and 25th stitches. The next band’s shells and sc go into these, which keeps the berries stacked in straight columns.
Drop cream and pick up red. Repeat Rows 1–4 three more times, for 4 bands and 17 rows in total.
At the end of Band 4, fasten off red. Keep cream attached for the border.
Leaves (12 times)
With the RS facing you, find the hdc from Row 3 that sits right above the center dip of a berry. With green, join with a sl st in that hdc. Work 5 leaves into the same stitch, then fasten off with an 8 in (20.3 cm) tail.
Spread the 5 leaves into a star:
- 2 leaves point down and out over the red lobes.
- 1 leaf points straight up.
- 2 leaves point sideways.
Use the tail to tack the 2 lower leaf tips to the red with one small stitch each. Weave in the ends on the WS. Repeat on all 12 berries.
Border
Border gauge: about 3.6 sc per inch (1.4 sc per cm). Along the top and bottom that is 25 sc over 7 in. Along the sides it is 37 sc over 10.25 in. Both directions work out to almost the same density, so the edge lies flat and doesn’t ruffle or pull in.
Side counts: Each count below includes the first and last stitch on that side. The corner ch-2 spaces are extra and are not counted in the side totals.
Round 1 (RS, cream): Ch 1 and turn so the RS faces you. Work around the panel like this:
- Top edge: Sc in each sc and each ch-1 sp across Row 4, for 25 sc. Ch 2 for the corner.
- First side: Sc evenly down the row ends, working over any carried strands, for 37 sc. Work 2 sc over the ends of Rows 1–2, 5 sc around the post of the Row 3 edge tr, and 2 sc over the end of Row 4. That’s 9 sc per band, 36 for the 4 bands, plus 1 sc in the end of Row 0. Ch 2 for the corner.
- Bottom edge: Sc in each of the 25 foundation ch loops, for 25 sc. Ch 2 for the corner.
- Second side: Work the same as the first side, for 37 sc. Ch 2 for the corner.
Join with a sl st to the first sc.
(124 sc: 25 + 37 + 25 + 37, plus 4 corner ch-2 sps)
Checkpoint: the piece now measures 7.5 x 10.75 in (19.1 x 27.3 cm).
Round 2 (scallops): Sl st into the next corner ch-2 sp.
- Ch 3 (counts as dc), then work 6 dc in the same sp for the first corner scallop of 7 dc.
- Along each side: sc in the first st, sk 1, 5 dc in the next st, sk 1, sc in the next st. Repeat from * to * to the end of the side.
- In each remaining corner ch-2 sp, work 7 dc.
Join with a sl st to the top of the ch-3 and fasten off.
Stitch counts:
| Edge | Scallops | Stitches |
|---|---|---|
| Top and bottom (each) | 6 | 30 dc + 7 sc = 37 sts |
| Sides (each) | 9 | 45 dc + 10 sc = 55 sts |
| Corners (each) | 1 | 7 dc |
Total: 212 sts and 34 scallops.
Why the math works: Each scallop uses 4 stitches (sk, 5 dc, sk, sc). Each side also needs 1 extra sc so it starts and ends on an sc. A side therefore needs 4n + 1 stitches.
- Top and bottom: 25 = 4 × 6 + 1, so 6 scallops.
- Sides: 37 = 4 × 9 + 1, so 9 scallops.
Every side ends on an sc, so the 7-dc corner scallops sit evenly between the side scallops. Round 2 adds 0.5 in (1.3 cm) to Round 1’s 0.25 in (0.6 cm), which gives the 0.75 in (1.9 cm) border depth.
Final Blocking
- Weave in all remaining ends on the WS, following the same color.
- Soak the panel in cool water for 10 minutes. Press out the water gently; don’t wring it.
- Roll it in a towel to take out the extra moisture.
- Lay it RS up on the blocking mat and shape it to 8.5 x 11.75 in (21.6 x 29.8 cm).
- Pin the four corner scallops first. Then pin the tip of every side scallop so the spacing is even.
- Smooth each berry into a clear heart shape and open up the eyelets.
- Arrange the 5 leaves on each berry into a neat star.
- Leave it to dry completely, at least 24 hours, before you unpin it.
Final Quality-Control Checklist
- [ ] The panel measures 8.5 x 11.75 in (21.6 x 29.8 cm).
- [ ] There are 12 berries, 3 across and 4 up, in straight columns.
- [ ] Each berry has a pointed bottom, two rounded lobes and a center dip.
- [ ] Each berry has one 5-leaf green star centered over the dip.
- [ ] No red sc between berries shows through the cream tr.
- [ ] Carried strands are fully hidden inside the border.
- [ ] There are 6 scallops on the top and bottom and 9 on each side, with a 7-dc scallop at each corner.
- [ ] The edges lie flat, with no ruffling or cupping.
- [ ] All ends are secure and invisible from the RS.
Troubleshooting
The berries lean or drift out of their columns. In Row 4, the sc stitches must land on stitches 1, 5, 9, 13, 17, 21 and 25. Count the Row 4 stitches before you start each new band.
The gaps between berries pucker. Your tr stitches in Row 3 are too short. Pull up a slightly taller loop on each tr.
The berry tops look flat. Check that you worked 2 dc in both the 3rd and 5th dc of Row 2, and a sl st in the center dc.
The side edge is tight. The carried yarn is pulling. Leave a small slack loop each time you pick a color up again.
The scallops won’t fit the side. Recount Round 1. Each side must be 4n + 1, so 25 or 37 sc.
The border ruffles. Use the next hook size down for Round 2 only.
Care
Hand wash in cool water with a mild detergent, then lay flat to dry, reshaping the scallops while the panel is damp. Don’t tumble dry or hang it while it’s wet.
Final Notes
The measurements build on each other:
- Row 0 sets the width: 25 sc = 7 in (17.8 cm).
- Each band adds 2.5 in (6.4 cm), and the body reaches 10.25 in (26.0 cm) after Band 4.
- Border Round 1 places 25 sc on the top and bottom and 37 sc on each side, at the same density both ways.
- Round 2 turns those 4n + 1 counts into even scallops.
- Blocking brings the panel to 8.5 x 11.75 in (21.6 x 29.8 cm).
If you check each stage as you go, the finished panel will lie flat and square. Happy crocheting!