

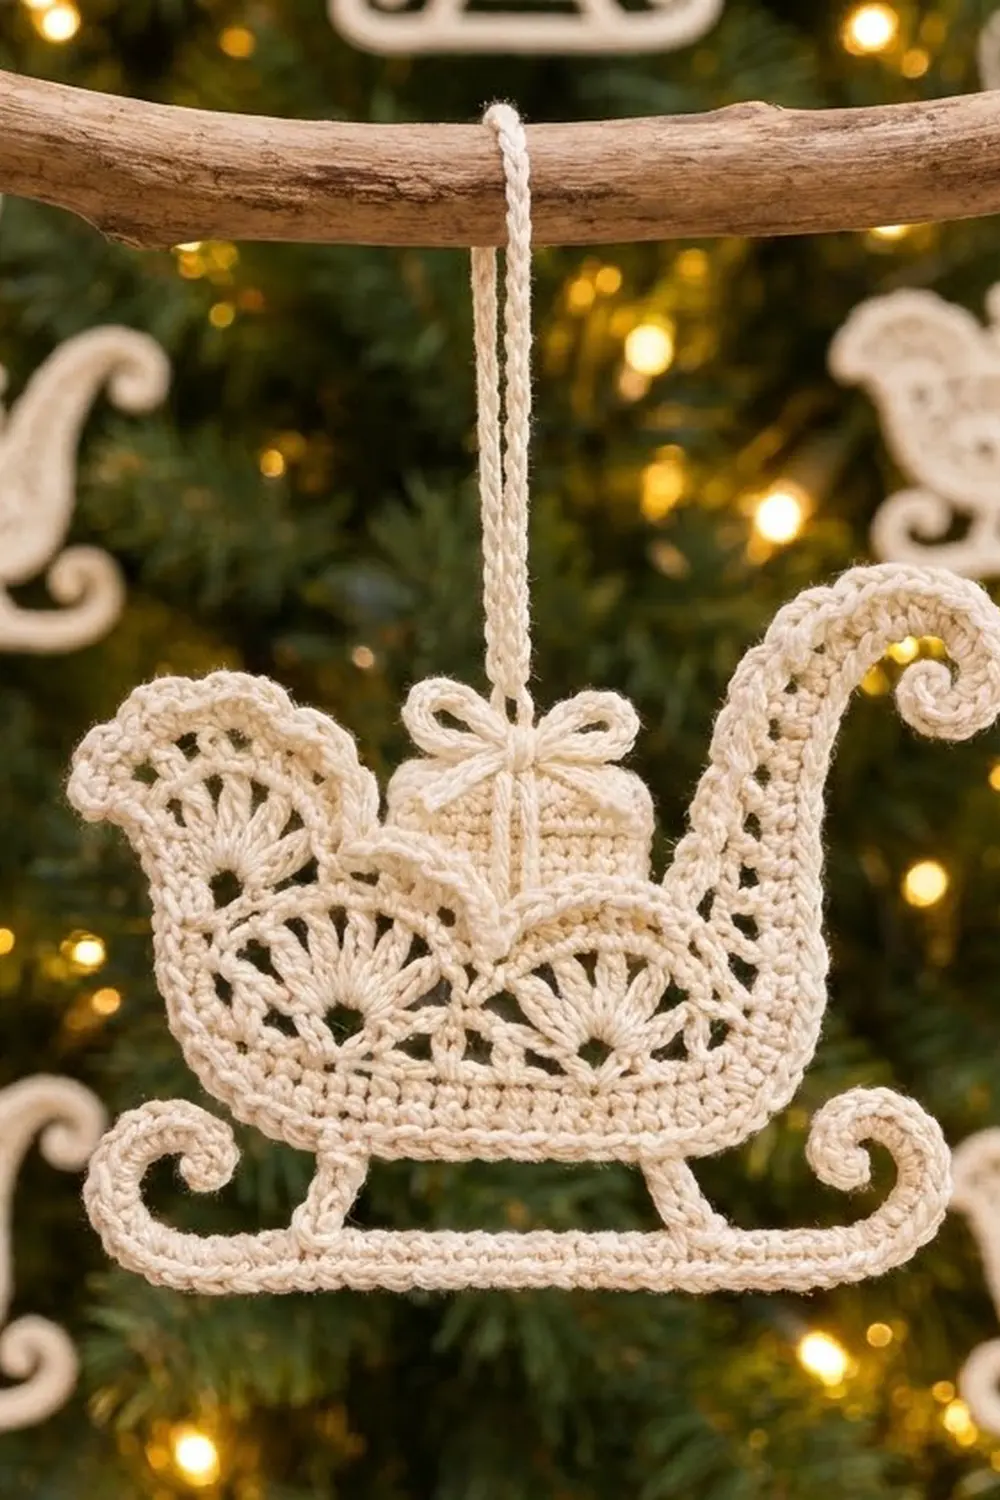
This ivory lace sleigh is a small, flat Christmas ornament with a vintage, heirloom feel. It has a solid sleigh body with a tall scrolled front, a lace front panel of fan motifs, a little wrapped gift sitting in the seat, and curled runners on two short struts. Every outer edge is finished with a raised, rope-like trim.
It is worked in one color, ivory cotton thread, so the texture does all the work. It looks right on a natural tree, tied to a gift, or hung in a window.
The pattern uses US crochet terms. The finished ornament is about 5.5 in (14.0 cm) wide and 5.25 in (13.3 cm) tall, not counting the 3 in (7.6 cm) hanging loop.
You’ll crochet seven small parts: the body, the lace panel, the gift box, the bow, the runner and two struts. Then you add the hanging loop. The body gets a two-round border and a rolled scroll, and then you stack and sew everything into a single layered ornament.
Finished Size and Construction
- Finished size: 5.5 in (14.0 cm) wide x 5.25 in (13.3 cm) tall, excluding loop
- Skill level: Intermediate
- Terminology: US crochet terms
- Yarn weight: Size 3 mercerized cotton crochet thread (Super Fine, category 1)
- Hook: 2.5 mm
- Number of pieces: 1 finished ornament, assembled from 7 crocheted parts plus a hanging loop
- Layout: Layered appliqué. The gift sits on the body, the lace panel overlaps the gift’s lower edge, and the runner is attached below
- Body size before border: 5 in (12.7 cm) wide at the top x 3.5 in (8.9 cm) tall at the front post
- Body size after border: 5.5 in (14.0 cm) x 4 in (10.2 cm)
- Border depth: 0.25 in (0.6 cm), 2 rounds
Materials
Use a smooth, mercerized cotton thread. It shows the stitches clearly, holds the fan shapes well and survives starching. Avoid fuzzy or acrylic yarns because the lace will lose its definition.
- Ivory (one color): 10 g, about 40 m (44 yd)
Tools:
- 2.5 mm crochet hook
- Tapestry needle (small eye)
- Sewing needle and ivory sewing thread (optional, for invisible tacking)
- Stitch markers (2)
- Fabric stiffener or spray starch
- Pins and a foam blocking board
The thread quantity includes a margin of about 25% for swatching and sewing tails.
Abbreviations (US Terms)
- ch – chain
- sl st – slip stitch
- sc – single crochet
- sc2tog – single crochet 2 together
- dc – double crochet
- rev sc – reverse single crochet (crab stitch)
- st(s) – stitch(es)
- sp – space
- RS – right side
Special stitch – rev sc: Don’t turn. Working from left to right (right to left if you’re left-handed), insert the hook into the next st to the right, yarn over, pull up a loop, yarn over and draw through both loops. The result is a twisted, corded edge.
Gauge and Checkpoints
Gauge: 12 sc and 12 rows = 2 in (5.1 cm) in sc rows.
Because stitch gauge and row gauge match, 1 sc per row end lies flat on the border. That makes this gauge important.
Test one piece first. Make the gift box first (7 sc x 7 rows). It should measure 1.2 in (3.0 cm) square. If it’s bigger, change to a 2.25 mm hook. If it’s smaller, change to a 2.75 mm hook. Then make a new box. A box that’s slightly off can still be used, as long as the body is made at the same tension.
Checkpoints:
- Body Row 4 (30 sts): 5 in (12.7 cm) wide
- Body Row 12: 2 in (5.1 cm) tall
- Body Row 21 (front post): 3.5 in (8.9 cm) tall
- Lace panel: 4.25 in (10.8 cm) x 1.5 in (3.8 cm)
- Runner strip before rolling: 7.3 in (18.5 cm) long
- Strut: 0.7 in (1.8 cm) long
If a measurement is more than 0.25 in (0.6 cm) off, check your tension before continuing. The lace panel has to fit inside the body outline.
Body
The body is worked flat in sc rows from the bottom edge up. Then it splits into a back rest and a tall front post. Only the RS faces out, so mark Row 1 as the RS.
Row 1 (RS): Ch 25. Sc in the 2nd ch from the hook and in each ch across. Turn. (24 sc)
Place a marker in the first sc of Row 1. That end is the front of the sleigh, and the other end is the back.
Row 2: Ch 1. Work 2 sc in the first st, sc in each st to the last st, 2 sc in the last st. Turn. (26 sc)
Row 3: Repeat Row 2. (28 sc)
Row 4: Repeat Row 2. (30 sc)
Checkpoint: 5 in (12.7 cm) wide. The increases make the sleigh’s sides flare outward.
Rows 5–12: Ch 1. Sc in each st across. Turn. (30 sc on each row)
Checkpoint: 2 in (5.1 cm) tall. Count from the back end and place a marker in the 9th st of Row 12. Count from the front end and place a marker in the 6th st. The 15 sts between the markers form the seat dip, and you leave them unworked.
Back Rest
Work only over the 9 sts at the back end.
Row 13: Join at the back-end edge if needed. Ch 1, sc in each of the 9 back-end sts. Turn. (9 sc)
Row 14: Ch 1. Sc to the last 2 sts, sc2tog (inner edge). Turn. (8 sc)
Row 15: Ch 1, sc in each st across. Turn. (8 sc)
Row 16: Ch 1. Sc2tog (inner edge), sc in each remaining st. (7 sc) Fasten off.
Front Post
Row 13: With the RS facing, join the thread in the 6th st from the front end of Row 12. Ch 1, sc in the same st and the next 5 sts. Turn. (6 sc)
Rows 14–19: Ch 1, sc in each st. Turn. (6 sc on each row)
Row 20: Ch 1. Sc2tog, sc in the next 2 sts, sc2tog. Turn. (4 sc)
Row 21: Ch 1, sc2tog twice. (2 sc) Don’t fasten off. Continue into the border.
Checkpoint: the front post is 3.5 in (8.9 cm) tall, measured from the foundation.
Lace Front Panel
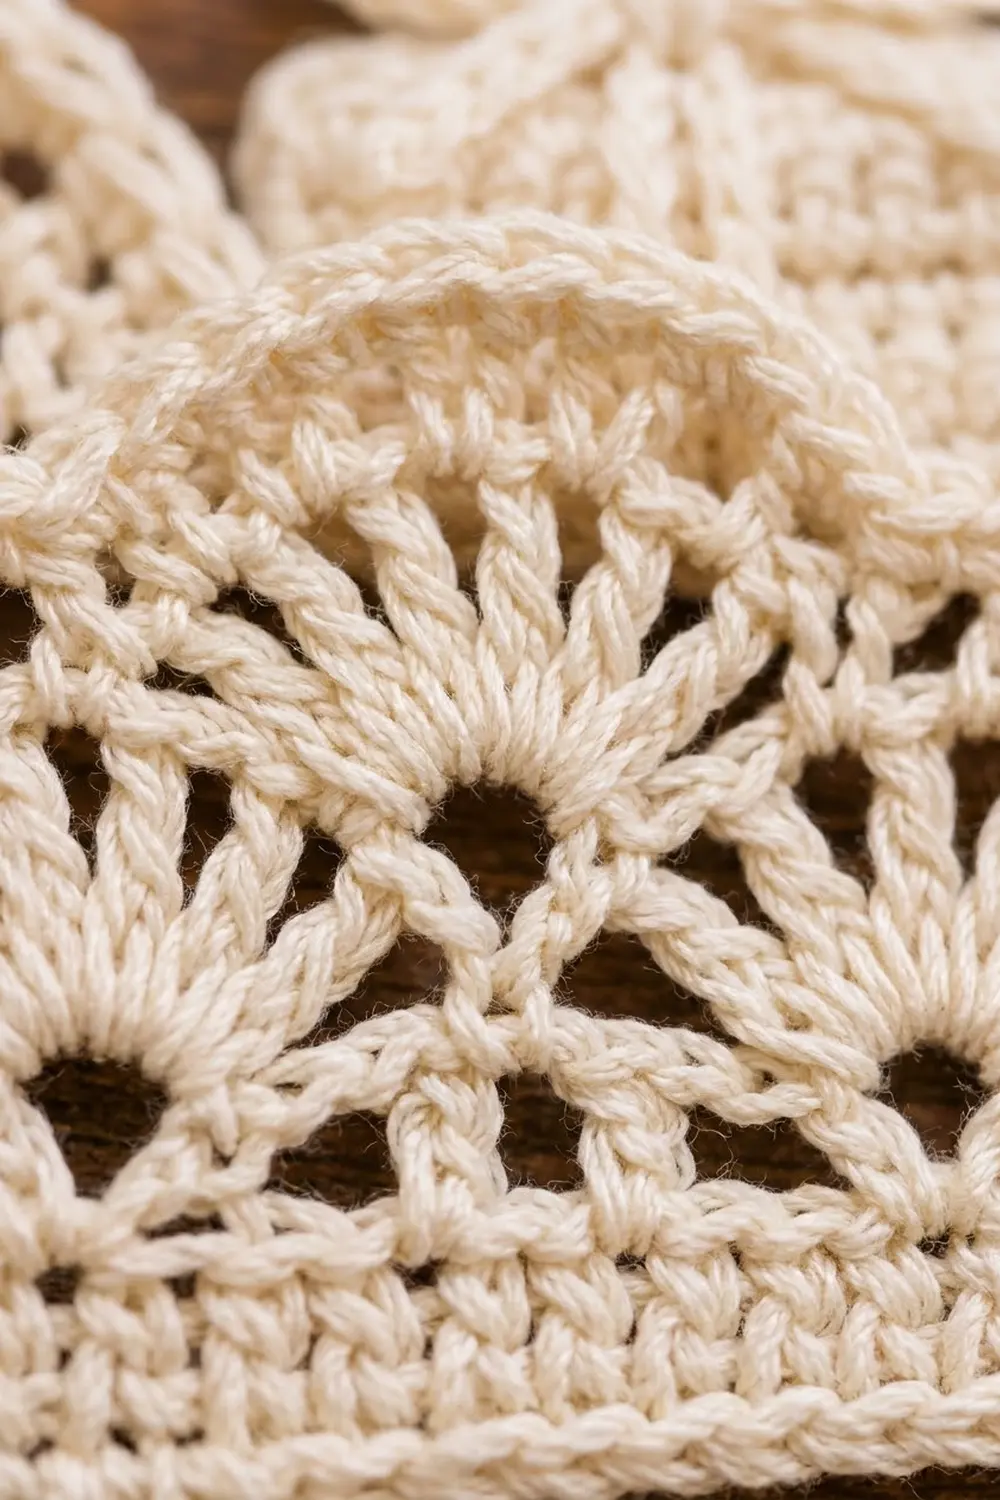
The panel is a strip with three fan sunbursts along the lower half and a scalloped shell crest on top.
Row 1: Ch 26. Sc in the 2nd ch from the hook and in each ch across. Turn. (25 sc)
Row 2 (fans): Ch 1, sc in the first st. Skip 3 sts, 9 dc in the next st, skip 3 sts, sc in the next st. Repeat from * to * 2 more times. Turn. (3 fans: 27 dc + 4 sc = 31 sts)
Each repeat uses 8 sts, so 1 + (3 x 8) = 25 sts. That’s every stitch in Row 1.
Row 3 (arches): Ch 1, sc in the first sc. Ch 5, sc in the 5th (center) dc of the next fan, ch 5, sc in the next sc. Repeat from * to * 2 more times. Turn. (7 sc and 6 ch-5 sps)
Row 4: Ch 1, sc in the first sc. 5 sc in the next ch-5 sp, sc in the next sc. Repeat from * to * 5 more times. Turn. (1 + 6 x 6 = 37 sc)
Row 5 (crest): Ch 1, sc in the first st. Skip 2 sts, 7 dc in the next st, skip 2 sts, sc in the next st. Repeat from * to * 5 more times. (6 shells: 42 dc + 7 sc = 49 sts) Fasten off.
Checkpoint: 4.25 in (10.8 cm) wide x 1.5 in (3.8 cm) tall.
Gift Box and Bow
Box Row 1: Ch 8. Sc in the 2nd ch from the hook and in each ch across. Turn. (7 sc)
Rows 2–7: Ch 1, sc in each st. Turn. (7 sc on each row) Fasten off.
Checkpoint: 1.2 in (3.0 cm) square.
Ribbon: Use a separate strand. Surface sl st up the 4th (center) column of sts from Row 1 to Row 7. Then work across the 4th (center) row from edge to edge. This makes a raised cross.
Bow: Ch 25 and fasten off. Fold the chain into two 0.5 in (1.3 cm) loops with short tails. Wrap the center twice with the thread tail and knot it.
Runner and Struts
Runner Row 1: Ch 45. Sc in the 2nd ch from the hook and in each ch across. Turn. (44 sc)
Row 2: Ch 1, sc in each st. (44 sc) Don’t turn.
Row 3: Ch 1, rev sc in each st back across. (44 rev sc) Fasten off.
Checkpoint: 7.3 in (18.5 cm) long and about 0.5 in (1.3 cm) tall.
Curls: With the rope edge facing up, roll the front 10 sts upward and inward into a scroll, then tack it. Roll the back 6 sts the same way into a smaller curl and tack it. The straight section between the curls is 28 sts, or 4.7 in (11.9 cm), and the finished runner is about 5.5 in (14.0 cm) end to end.
Struts (make 2): Ch 5. Sc in the 2nd ch from the hook and in each ch across. (4 sc) Fasten off and leave a 6 in (15.2 cm) tail.
Hanging Loop
Ch 36. Sl st in the back bump of the 2nd ch from the hook and in each ch across. (35 sl sts) Fasten off and leave long tails. Fold the cord in half to make a 3 in (7.6 cm) loop.
Border and Assembly
Border gauge: 1 sc per st along stitch edges and 1 sc per row end along side edges. This matches the 6 sts = 6 rows per 1 in (2.5 cm) gauge.
Rnd 1: Continue from the front post, with the RS facing. Work around the body as follows. Each count includes that edge’s corner sts.
- Post top: 2 sc in the outer st, sc in the inner st. (3 sc)
- Post inner edge: 1 sc in each row end of Rows 21–13. (9 sc)
- Seat dip: 1 sc in each of the 15 unworked sts of Row 12. (15 sc)
- Back rest inner edge: 1 sc in each row end of Rows 13–16. (4 sc)
- Back rest top: Sc in each st across Row 16, with 2 sc in the outer st. (8 sc)
- Back edge: 1 sc in each row end of Rows 16–1. (16 sc)
- Bottom: Work into the foundation ch, with 2 sc in the first and last sts. (26 sc)
- Front edge: 1 sc in each row end of Rows 1–21. (21 sc)
Sl st to the first sc. (3 + 9 + 15 + 4 + 8 + 16 + 26 + 21 = 102 sc)
Rnd 2: Ch 1, rev sc in each st around. (102 rev sc) Sl st to the first st. Fasten off.
Why the math works: The four convex corners (both bottom corners, the back rest top and the post top) each get 1 extra stitch. That gives 98 edge stitches + 4 = 102. The two inner corners next to the seat dip get no increase, so they stay crisp instead of ruffling. Rnd 2 works 1 rev sc into each of the 102 sts, so the count doesn’t change.
Scroll: Join the thread in the outer st of the post top. Ch 13. Sc in the 2nd ch from the hook and in each ch across (12 sc). Sl st in the next 2 sts of the post top and fasten off. Roll the strip forward and down into a spiral and tack it. It rises about 0.35 in (0.9 cm) above the post.
Assembly order:
- Gift: Center the box over the 8th st of the seat dip, with its bottom edge at Row 9. Whipstitch the sides and the bottom to the body.
- Lace panel: Center it on the body, with Row 1 along body Row 2. Its crest covers the gift’s lower edge. Sew around all four edges with small stitches through the outer loops.
- Bow: Sew the bow to the center top of the gift.
- Struts: Sew one strut 1 in (2.5 cm) in from each bottom corner. Each strut overlaps the body’s bottom border and the runner’s top edge by 0.15 in (0.4 cm), leaving a 0.4 in (1.0 cm) visible gap.
- Runner: Sew the runner to the struts, with the large curl under the front post.
- Loop: Sew both loop ends to the back of the gift’s top edge, then tack them through the body for strength.
Final Blocking
- Weave in all the ends along matching stitches on the back.
- Dampen the ornament and press out the excess water in a towel.
- Pin it to a board, face up, at 5.5 in (14.0 cm) wide.
- Open each fan and shell with a pin so the stitches radiate evenly.
- Shape both runner curls and the scroll into round spirals.
- Brush or spray on fabric stiffener, and dab away any pooling.
- Let it dry completely, at least 12 hours, before unpinning.
Final Quality-Control Checklist
- The body border has 102 sts and lies flat without ruffling or cupping
- The lace panel shows 3 fans and 6 shells, all opened evenly
- The gift’s ribbon cross is centered, and the bow is secure
- The struts are parallel and the runner hangs level
- The ornament hangs straight from its loop without tipping forward
- No ends or sewing stitches show on the front
Troubleshooting
- Body edge ruffles: You’ve added extra sc at the row ends. Rework at exactly 1 sc per row.
- Body edge pulls in: Your row gauge is shorter than your stitch gauge. Use a hook 0.25 mm larger for Rnd 1 only.
- Fans look flat or crowded: Check that you skipped 3 sts on each side of every fan.
- Lace panel is wider than the body: Remake it with a hook 0.25 mm smaller.
- Ornament tips forward: Move the loop slightly toward the back rest.
- Curls unroll: Add another tacking stitch and apply more stiffener to the curls.
Care
Dust gently, or hand wash in cool water and reshape while damp. Re-stiffen if needed, and store flat in tissue paper.
Final Notes
The measurement chain is short. A 1.2 in (3.0 cm) gift box confirms your gauge. The body grows to 5 in (12.7 cm) wide and 3.5 in (8.9 cm) tall, and the 102-st border brings it to 5.5 in (14.0 cm) x 4 in (10.2 cm). The 4.25 in (10.8 cm) lace panel fits inside it. The runner, the struts and the scroll complete the 5.5 in (14.0 cm) x 5.25 in (13.3 cm) ornament. Make one for each branch, or tie one to a special package.
Happy crocheting!