

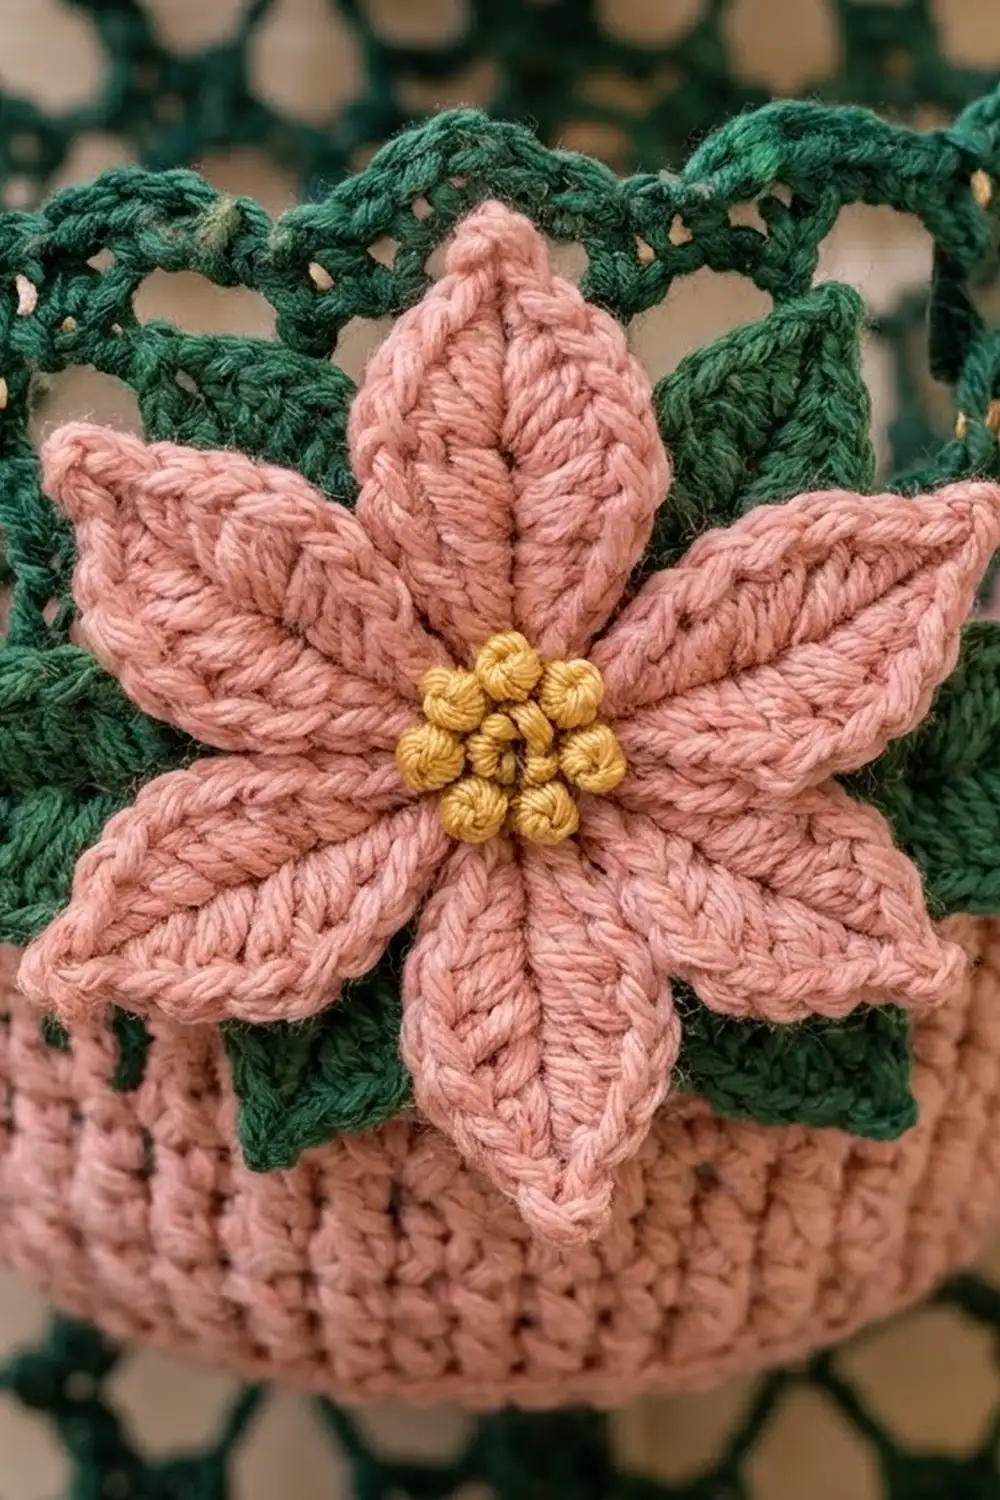
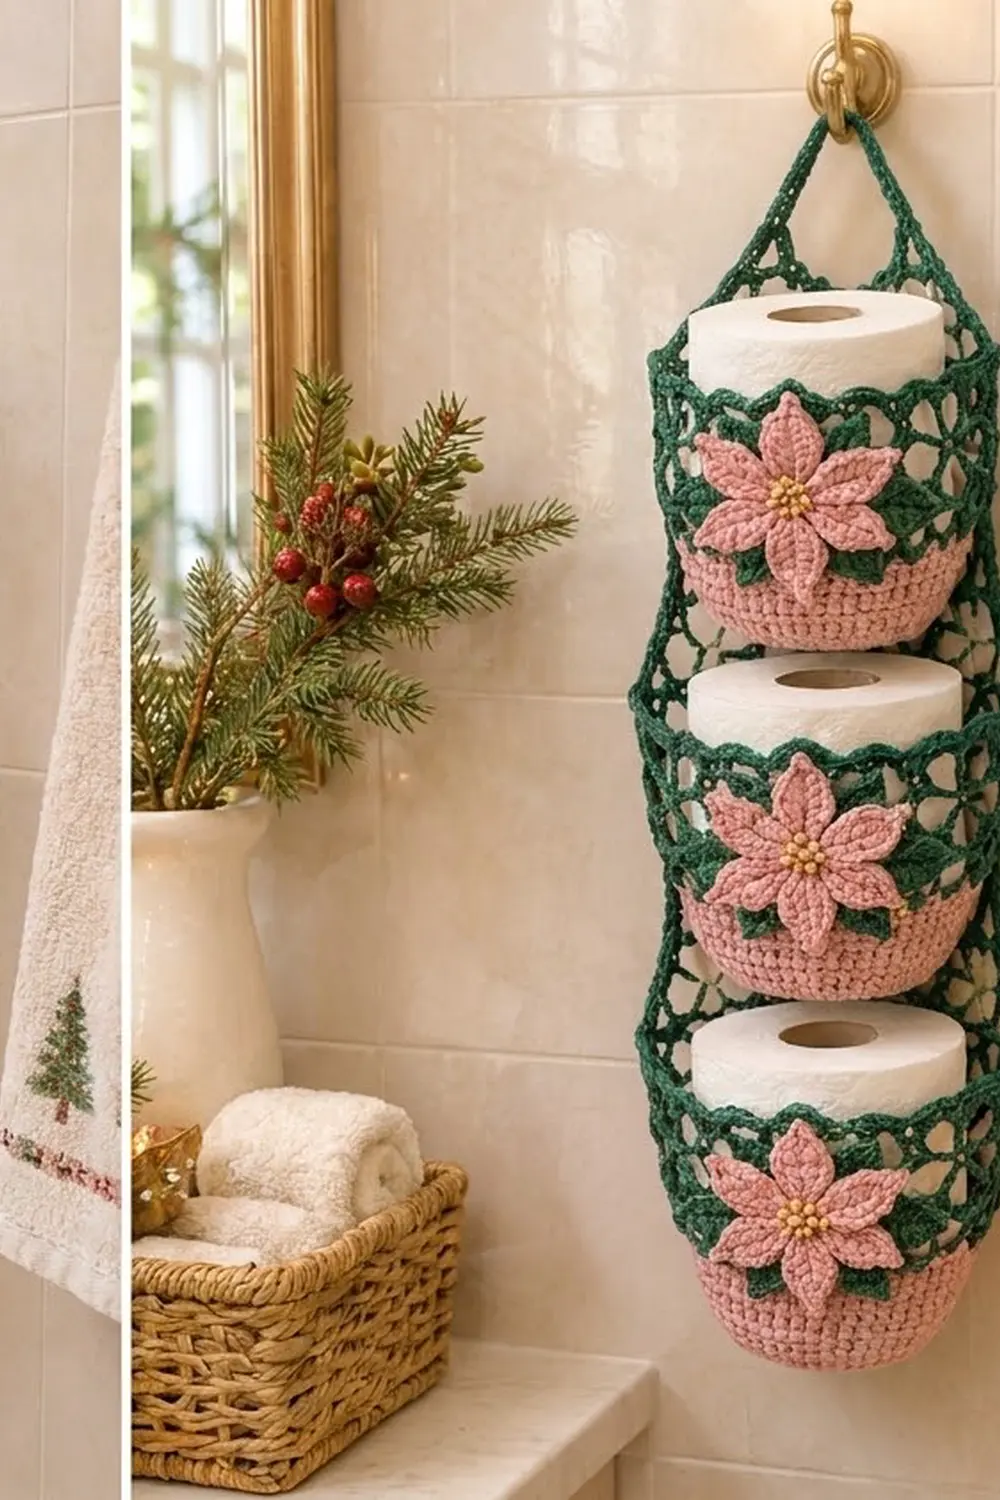
This hanging holder stacks three spare rolls in a slim column on the bathroom wall. Each tier has a solid dusty-pink cup at the bottom and an open forest-green lace band around the roll. A pink poinsettia with green leaves and a golden center sits on the front of each tier.
The palette is a soft holiday mix of dusty pink, deep forest green, and a touch of golden yellow. The look is cozy and a little vintage. It suits December, but the pink and green also work the rest of the year.
The pattern uses US crochet terms. The finished holder is about 4.75 in (12.1 cm) across each tier and 20.5 in (52.1 cm) tall, measured from the bottom cup to the top of the loop. Each tier holds a standard roll up to about 4.5 in (11.4 cm) wide and 4 in (10.2 cm) tall.
You crochet three identical tiers in the round. Each tier is a pink cup with a green lace band worked straight onto it. You stack the tiers and join them along the back only, so the front stays open for loading rolls. Then you work a lace hanger onto the top tier, edge the openings, and sew a layered poinsettia onto each cup.
Finished Size and Construction
- Finished size: 4.75 in (12.1 cm) wide x 20.5 in (52.1 cm) tall, including the loop
- Skill level: Intermediate
- Terminology: US crochet terms
- Yarn weight: Worsted (#4) cotton
- Hook: 4.0 mm (US G-6)
- Number of pieces: 9 (3 tiers, 3 petal layers, 3 leaf layers)
- Layout: 1 column of 3 tiers, with the hanger on top
- Piece size (one tier): 4.75 in (12.1 cm) across x 4.75 in (12.1 cm) tall, 60 sts around
- Size before border: 4.75 in (12.1 cm) x 19.25 in (48.9 cm), without the loop
- Border depth: 0.25 in (0.6 cm)
Materials
Choose a smooth worsted cotton or cotton blend. Cotton holds its shape, copes with bathroom humidity, and makes a firm cup. The amounts below assume about 170 m (186 yd) per 100 g.
- Color A, dusty pink: 150 g, about 255 m (cups and petals)
- Color B, forest green: 100 g, about 170 m (lace, hanger, leaves, and edging)
- Color C, golden yellow: 5 g, about 9 m (flower centers)
These quantities include a margin of roughly 10–15% for swatching and weaving in ends.
Tools:
- 4.0 mm (US G-6) crochet hook
- Tapestry needle
- 6 locking stitch markers
- Measuring tape and scissors
- Rustproof pins and a towel for blocking
- Optional: 18 small gold seed beads to use instead of French knots
Abbreviations (US Terms)
- ch chain
- sl st slip stitch
- sc single crochet
- hdc half double crochet
- dc double crochet
- tr treble crochet
- sc2tog single crochet 2 together
- BLO back loop only
- st(s) stitch(es)
- rev sc reverse single crochet
Reverse sc (crab stitch): Work from left to right (if you crochet right-handed). Insert the hook into the next stitch to the right, yarn over, and pull up a loop. Yarn over again and pull through both loops. This makes a corded, twisted rim.
Gauge and Checkpoints
Gauge: 16 sc x 18 rounds = 4 in (10.2 cm), in sc worked in the round.
Make one complete tier first. It is your real gauge test, and you will use it in the finished holder.
Checkpoints:
- After Rnd 5 (30 sts): the base is 2.4 in (6.1 cm) across.
- After Rnd 10 (60 sts): the base is 4.75 in (12.1 cm) across, with a circumference of 15 in (38.1 cm).
- After Rnd 19: the pink wall is 2 in (5.1 cm) tall.
- After Rnd 24: the tier is 4.75 in (12.1 cm) tall, and the lace band is 2.75 in (7.0 cm).
- Finished hanger: 5 in (12.7 cm) tall.
If the base is too big, change to a 3.75 mm hook, because a loose cup sags under a roll. If it is too small, change to a 4.5 mm hook. Don’t add stitches, because every later count depends on 60 sts around.
Tier (Make 3)
Each tier is one piece worked in joined rounds. Join each round with a sl st to the first st, then ch 1 to start the next round. The ch 1 does not count as a stitch.
Pink Cup Base
With Color A, make a magic ring.
- Rnd 1: 6 sc in ring. (6 sts)
- Rnd 2: 2 sc in each st around. (12 sts)
- Rnd 3: (Sc 1, 2 sc in next st) 6 times. (18 sts)
- Rnd 4: (Sc 2, 2 sc in next st) 6 times. (24 sts)
- Rnd 5: (Sc 3, 2 sc in next st) 6 times. (30 sts)
- Rnd 6: (Sc 4, 2 sc in next st) 6 times. (36 sts)
- Rnd 7: (Sc 5, 2 sc in next st) 6 times. (42 sts)
- Rnd 8: (Sc 6, 2 sc in next st) 6 times. (48 sts)
- Rnd 9: (Sc 7, 2 sc in next st) 6 times. (54 sts)
- Rnd 10: (Sc 8, 2 sc in next st) 6 times. (60 sts)
Pink Cup Wall
- Rnd 11: Sc in BLO of each st around. (60 sts) This turns the wall upward and leaves a ring of 60 free front loops from Rnd 10. You will join into these loops later.
- Rnds 12–19: Sc in each st around. (60 sts)
The wall is now 2 in (5.1 cm) tall. Fasten off Color A.
Green Lace Band
- Rnd 20: Join Color B in any st. Sc in each st around. (60 sts)
- Rnd 21: Ch 1, sc in first st, (ch 5, skip 2 sts, sc in next st) 19 times, ch 5, skip 2 sts, sl st to first sc. (20 ch-5 loops; 20 x 3 sts = 60)
- Rnd 22: Sl st in each of the first 3 ch of the next loop, ch 1, sc in same loop, (ch 5, sc in next loop) 19 times, ch 5, sl st to first sc. (20 ch-5 loops)
- Rnd 23: Repeat Rnd 22. (20 ch-5 loops)
- Rnd 24 (conversion round): Sl st into the next loop, ch 1, then work 3 sc in each loop around. (20 loops x 3 sc = 60 sts) Join and fasten off.
Because each round’s loops sit over the centers of the loops below, they form an open diamond mesh.
Mark Front and Back
Flatten the tier with the round seam at one side. Place a marker at each side fold of Rnd 24, so each half has 30 sts. Choose the neater half as the front. On the back half, mark the center 20 sts. These are the join stitches. Then mark the matching 20 center-back front loops on Rnd 10.
Poinsettia Appliqué
Petal Layer (Make 3)
With Color C, make a magic ring.
- Rnd 1: 6 sc in ring. (6 sts) Join and fasten off.
- Rnd 2: Join Color A in any st. 2 sc in each st around. (12 sts)
- Rnd 3 (petals): *Ch 8. Working back along the chain: sl st in 2nd ch from hook, then sc, hdc, dc, dc, hdc, sc in the remaining 6 ch (7 sts per petal). Sl st in each of the next 2 sc of Rnd 2.* Repeat from * 5 more times. (6 petals) Fasten off.
Each petal is about 1.5 in (3.8 cm) long, pointed at the tip and narrow at the base. The finished flower spans about 3.75 in (9.5 cm).
Leaf Layer (Make 3)
With Color B, make a magic ring.
- Rnd 1: 6 sc in ring. (6 sts)
- Rnd 2 (leaves): *Ch 9. Working back along the chain: sl st in 2nd ch from hook, then sc, hdc, dc, tr, dc, hdc, sc in the remaining 7 ch (8 sts per leaf). Sl st in next sc of Rnd 1.* Repeat from * 5 more times. (6 leaves) Fasten off.
The leaf layer spans about 4 in (10.2 cm), so the leaf tips show past the petals.
Center: With Color C, work 6 French knots over the yellow center. You can sew on 6 gold seed beads instead.
Make All Pieces
- Color A: 3 cups (Rnds 1–19 of each tier) and 3 petal layers (Rnds 2–3)
- Color B: 3 lace bands (Rnds 20–24), 3 leaf layers, the hanger, and all edging
- Color C: 3 flower centers and their French knots
Layout, front view:
        [ hanging loop ]
        [ lace hanger  ]
[ Tier 3: cup + lace + poinsettia ]
[ Tier 2: cup + lace + poinsettia ]
[ Tier 1: cup + lace + poinsettia ]
Joining
Method: sc through both layers, along the back only.
- Stand Tier 2 on top of Tier 1, with both fronts facing you.
- Line up the 20 marked sts on Rnd 24 of Tier 1 with the 20 marked front loops on Rnd 10 of Tier 2.
- Join Color B at the first pair. Work 1 sc through each stitch-and-loop pair. (20 sc) Fasten off.
- Join Tier 3 to the top of Tier 2 the same way. (20 sc)
Stitch-to-stitch logic: Each tier has 60 sts at the rim and 60 free loops at the base, so the two edges match exactly. Joining them 1 to 1 keeps the seam flat, with no gathering. On Tiers 1 and 2, the other 40 rim sts stay free as the front opening (20 + 40 = 60).
Tension: Work the joining sc at your normal gauge, not tighter. This seam carries the weight of the rolls, so make sure every sc goes through both layers.
Size checkpoint: The stack should now be 14.25 in (36.2 cm) tall at the back (3 x 4.75 in), and still 4.75 in (12.1 cm) across.
Hanger
Work the hanger in rows on the back 30 sts of Rnd 24 on Tier 3, between the two side markers.
- Row 1 (trim row): Join Color B at one side marker. Ch 1, sc2tog, sc 26, sc2tog. (26 sc + 2 sc2tog = 28 sts) Turn.
- Row 2: Ch 1, sc in first st, (ch 4, skip 2 sts, sc in next st) 9 times. (9 ch-4 loops; 1 + 9 x 3 = 28) Turn.
- Row 3: Sl st in each of the first 2 ch of the first loop, ch 1, sc in same loop, (ch 4, sc in next loop) across. (8 loops) Turn.
- Rows 4–10: Repeat Row 3. Each row has one fewer loop: 7, 6, 5, 4, 3, 2, 1. (Row 10: 1 loop)
- Row 11: Sl st in each of the first 2 ch of the loop, ch 1, 5 sc in the loop. (5 sts)
- Hanging loop: Ch 14, sl st in the first sc of Row 11. Ch 1, work 20 sc over the ch-14, then sl st in the last sc of Row 11. Fasten off.
The hanger is 5 in (12.7 cm) tall and narrows to 5 sts, about 1.25 in (3.2 cm) wide. The loop rises about 1.25 in (3.2 cm) above it.
Border
Border gauge: 4 sts per inch (1.6 sts per cm), the same as the cup. Work 1 border stitch into each stitch so the edge doesn’t flare or pull in.
Front openings (Color B, rev sc):
- Tier 1: Rev sc in each of the 40 free sts of Rnd 24. (40 sts)
- Tier 2: Same as Tier 1. (40 sts)
- Tier 3: Rev sc in each of the 30 free front sts, from side marker to side marker. (30 sts)
Hanger sides (Color B, sc): Along each slanted edge, work 1 sc in the end of Row 1, 2 sc in the end of each of Rows 2–10, and 1 sc in the end of Row 11. (1 + 18 + 1 = 20 sc per side)
Why the math works: On Tiers 1 and 2, 40 free + 20 joined = 60 sts. On Tier 3, 30 front + 30 hanger = 60 sts. The border adds no stitches, so the 40-st edge stays 10 in (25.4 cm), the 30-st edge stays 7.5 in (19.1 cm), and each tier keeps its 15 in (38.1 cm) circumference. Each hanger mesh row is about 0.5 in (1.3 cm) tall, so 2 sc per row keeps the 4-sts-per-inch gauge.
Attach the flowers: Center a leaf layer on the front of each cup, over the color change between Rnds 19 and 20. Lay a petal layer on top, turned so the petals sit between the leaves. Sew through the center ring and along the petal bases, then tack down each leaf tip.
Final Blocking
- Weave in all ends securely, especially at the back seams.
- Soak the holder in cool water, then squeeze gently. Don’t wring it.
- Roll it in a towel to remove excess water.
- Slip a roll wrapped in a plastic bag into each tier to set the cup shape.
- Spread the lace loops evenly around each band.
- Pin the petals and leaves flat with the points outward.
- Pin the hanger to 5 in (12.7 cm) tall and let everything dry completely.
Final Quality-Control Checklist
- Each cup has 60 sts and is 4.75 in (12.1 cm) across.
- Each tier is 4.75 in (12.1 cm) tall.
- Each lace round has 20 even ch-5 loops.
- Each back seam has exactly 20 sc, centered at the back.
- The front openings have 40, 40, and 30 rev sc.
- The hanger narrows from 28 sts to 5 sts and has 20 sc along each side.
- Each flower has 6 petals over 6 offset leaves.
- The total height is 20.5 in (52.1 cm).
Troubleshooting
- Base ruffles: You have extra stitches. Recount Rnds 6–10.
- Base curls up early: Your tension is too tight. Go up one hook size for the base.
- Roll is hard to load: Stretch the front opening downward and tilt the roll in.
- Tiers lean forward: The back seam is off-center. Re-center the 20 join sts between the markers.
- Hanger is lopsided: A loop was skipped or doubled. Each row should have one fewer loop, from 9 down to 1.
- Petals curl: Pin them flat while wet and let them dry fully.
Care
Hand wash in cool water with mild soap. Dry flat, reshaping each cup over a roll, and avoid the dryer.
Final Notes
A gauge of 16 sc = 4 in (10.2 cm) gives a 60-st cup 4.75 in (12.1 cm) across. Three tiers, each 4.75 in (12.1 cm) tall, make 14.25 in (36.2 cm). The 5 in (12.7 cm) hanger brings the height to 19.25 in (48.9 cm), and the loop finishes it at 20.5 in (52.1 cm). Check your gauge on the first tier and everything else will line up.
Happy crocheting!