

This hanging toilet paper holder looks like a row of three small cottages. Each cottage is a round pocket with a peaked back gable. A scalloped cream roofline runs along the gable, and a cream four-pane window sits on the front. All three are sewn to a green back panel with a tall center peak, and three straps run up to a wooden ring.
The main color is a deep teal green, with soft cream accents. The style is cozy and Scandinavian, so it suits a holiday bathroom, but you can leave it up all year. Each pocket holds one standard roll with room to spare.
This pattern uses US crochet terms. The holder is 16.3 in (41.4 cm) wide and 8.9 in (22.6 cm) tall to the panel peak. It hangs about 14 in (35.6 cm) tall to the top of the ring.
Each pocket is crocheted bottom-up. You start with a round base, then work the wall, then work a gable in rows over the back stitches. You add a window and roof trim to each pocket, and make a shaped back panel and three straps. Everything is sewn together stitch-to-stitch.
Finished Size and Construction
- Finished size: 16.3 in (41.4 cm) wide × 8.9 in (22.6 cm) tall; about 14 in (35.6 cm) to the top of the ring
- Skill level: Easy-intermediate
- Terminology: US
- Yarn weight: Medium/Aran (#4) cotton or cotton blend
- Hook: 5.0 mm (H-8)
- Number of pieces: 7 green pieces (3 pockets, 1 back panel, 3 straps), plus cream trim and windows worked onto the pockets
- Layout: 3 pockets in one row on a single back panel
- Pocket size: base 5.5 in (14.0 cm) across
- Size before border: each pocket is 6.3 in (16.0 cm) tall; each gable is 5.4 in (13.7 cm) wide
- Border depth: the roof trim adds 0.75 in (1.9 cm), so each pocket is about 7 in (17.8 cm) tall
Materials
Use a firm cotton or cotton-acrylic blend with crisp stitch definition, about 170 m per 100 g. Soft or fuzzy yarns won’t hold the pocket shape.
- Color A, deep teal green: 380 g, about 650 m (710 yd)
- Color B, cream: 50 g, about 85 m (93 yd)
Tools:
- 5.0 mm (H-8) crochet hook
- Wooden ring, 2.75 in (7.0 cm) diameter
- Tapestry needle
- Stitch markers (at least 4)
- Scissors and measuring tape
- Rust-proof pins
The yarn quantities include a margin of about 15% for swatching, seaming, and tension differences.
Abbreviations (US Terms)
- ch: chain
- sc: single crochet
- dc: double crochet
- sl st: slip stitch
- inc: 2 sc in the same stitch
- sc2tog / sc3tog: single crochet 2 / 3 together
- BLO: back loop only
- MR: magic ring
- st(s): stitch(es)
- rnd(s): round(s)
Scallop (special stitch): Skip 1 st, work 5 dc in the next st, skip 1 st. One scallop plus the sc that follows uses 4 stitches.
Gauge and Checkpoints
Gauge: 14 sc × 14 rows = 4 in (10.2 cm), worked firmly.
Make one complete pocket first. It is your gauge test, and it also shows you whether a roll fits.
Checkpoints:
- After Rnd 10, the base is 5.5 in (14.0 cm) across and about 17.1 in (43.4 cm) around.
- After Rnd 22, the wall is 3.4 in (8.6 cm) tall.
- After Gable Row 1, the gable is 5.4 in (13.7 cm) wide.
- After Gable Row 10, the pocket is 6.3 in (16.0 cm) tall.
- After Panel Row 12, the panel is 16.3 in (41.4 cm) × 3.4 in (8.6 cm).
Too big? Go down 0.5 mm in hook size. Too small? Go up 0.5 mm. A standard roll is about 4.5 in (11.4 cm) across, so fix your gauge rather than skipping rounds. Make the panel at the same gauge as the pockets, or the seams won’t line up.
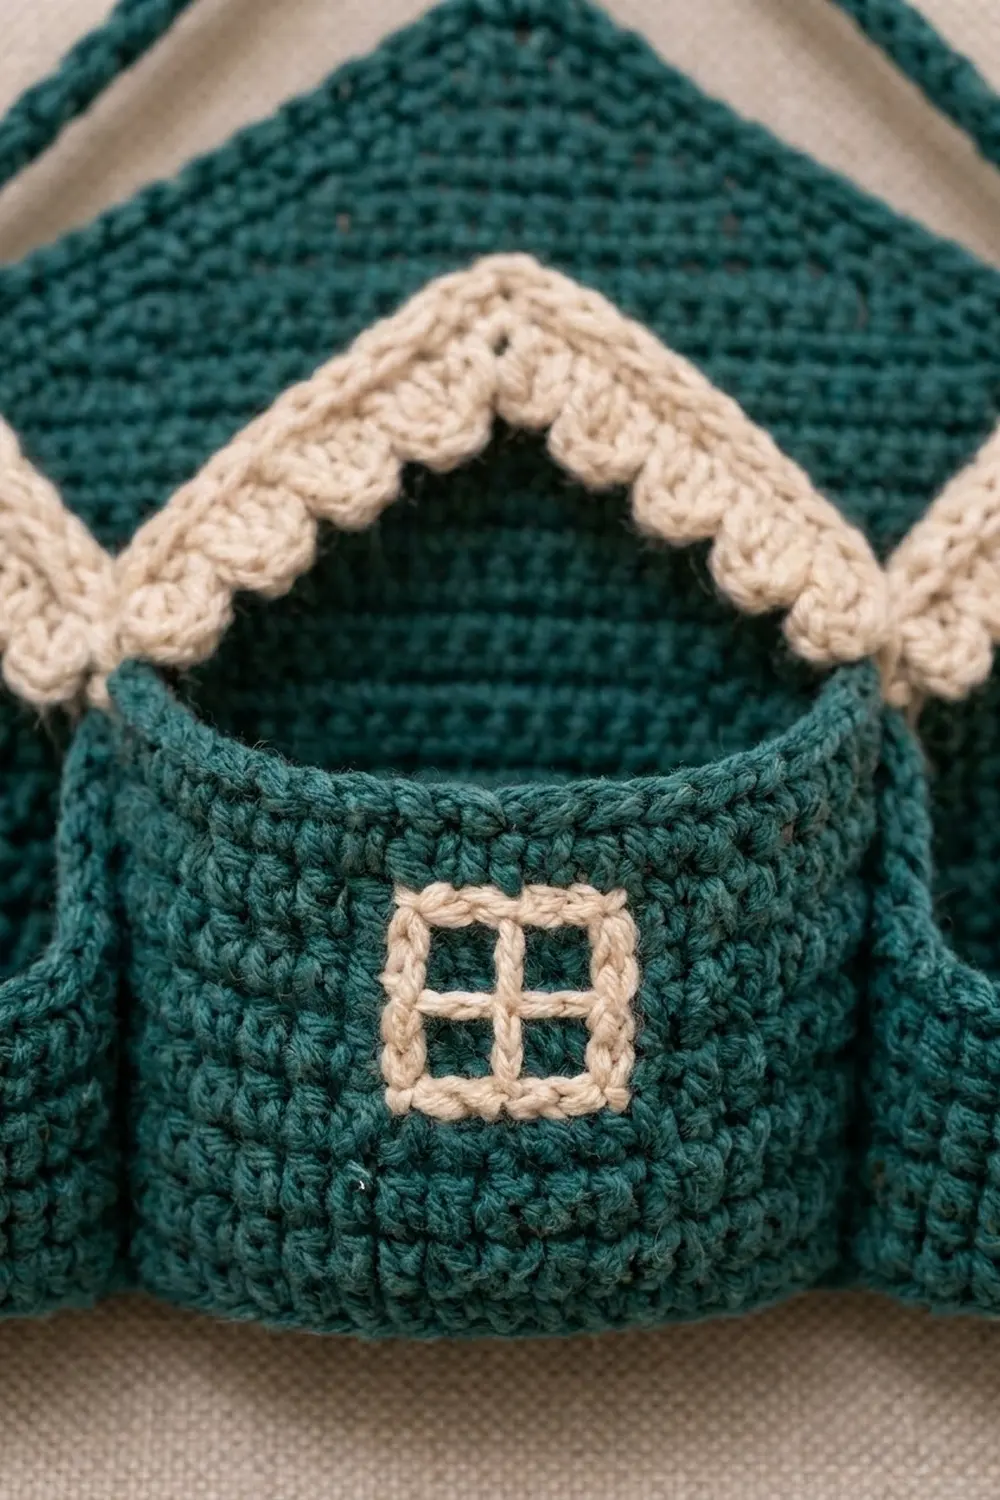
Pocket (Make 3, Color A)
Work in joined rounds: at the end of each round, sl st to the first sc. The ch 1 at the start of a round doesn’t count as a stitch. Keep the join at the back, because the gable is built over it.
Base
Rnd 1: In MR, ch 1, work 6 sc, join. (6)
Rnd 2: Inc in each st around. (12)
Rnd 3: (Sc 1, inc) 6 times. (18)
Rnd 4: (Sc 2, inc) 6 times. (24)
Rnd 5: (Sc 3, inc) 6 times. (30)
Rnd 6: (Sc 4, inc) 6 times. (36)
Rnd 7: (Sc 5, inc) 6 times. (42)
Rnd 8: (Sc 6, inc) 6 times. (48)
Rnd 9: (Sc 7, inc) 6 times. (54)
Rnd 10: (Sc 8, inc) 6 times. (60)
The increases tend to stack into six corners. To keep the base round, stagger where they fall on even rounds.
Wall
Rnd 11: Ch 1, sc BLO in each st around. (60) This makes the ridge at the base edge.
Rnds 12–22: Ch 1, sc in each st around. (60 per round)
That gives 12 wall rounds, 3.4 in (8.6 cm) tall. Do not fasten off.
Gable (rows over the back 19 stitches)
Row 1: Ch 1, sc in the same st as the join and in the next 18 sts, turn. (19) These are sts 1–19 of the round, and st 10 is the center back.
Row 2: Ch 1, sc2tog, sc to the last 2 sts, sc2tog, turn. (17)
Row 3: Repeat Row 2. (15)
Row 4: Repeat Row 2. (13)
Row 5: Repeat Row 2. (11)
Row 6: Repeat Row 2. (9)
Row 7: Repeat Row 2. (7)
Row 8: Repeat Row 2. (5)
Row 9: Repeat Row 2. (3)
Row 10: Ch 1, sc3tog. (1) Fasten off.
The gable is 2.9 in (7.4 cm) tall, with 10 row-ends along each slope. The 41 front stitches (sts 20–60) form the open rim of the pocket.
Window (Color B)
- Mark a block 5 sts wide (sts 38–42) and 5 rounds tall (Rnds 15–19), centered on st 40 at the front. It measures 1.4 in (3.6 cm) square.
- Work surface slip stitch around the outside of the block to make the frame.
- Work one vertical line of surface slip stitch up st 40, then one horizontal line along Rnd 17. This divides the window into four panes.
- Weave the ends in on the inside.
Back Panel (Make 1, Color A)
Foundation: Ch 58.
Row 1: Sc in the 2nd ch from the hook and in each ch across, turn. (57)
Rows 2–12: Ch 1, sc in each st across, turn. (57 per row)
At this point the panel is 16.3 in (41.4 cm) wide × 3.4 in (8.6 cm) tall.
Peak shaping: Odd rows lose 2 sts at each end and even rows lose 1 st at each end. Each pair of rows removes 6 sts.
Row 13: Ch 1, sc3tog, sc to the last 3 sts, sc3tog, turn. (53)
Row 14: Ch 1, sc2tog, sc to the last 2 sts, sc2tog, turn. (51)
Rows 15–30: Alternate Row 13 and Row 14. The stitch counts are 47, 45, 41, 39, 35, 33, 29, 27, 23, 21, 17, 15, 11, 9, 5, 3.
Row 31: Ch 1, sc3tog. (1) Fasten off.
The finished panel is 8.9 in (22.6 cm) tall, and the peak section is 5.4 in (13.7 cm) of that height.
Straps (Color A)
Side straps (make 2):
- Ch 45.
- Row 1: Sc in the 2nd ch from the hook and in each ch across, turn. (44)
- Row 2: Ch 1, sc in each st across. (44) Fasten off.
Each side strap is 12.6 in (32.0 cm) × 0.6 in (1.5 cm).
Center strap (make 1): Ch 15 and work Rows 1–2 the same way. (14) It is 4.0 in (10.2 cm) long.
Make All Pieces
Color A: 3 pockets, 1 back panel, 2 side straps, 1 center strap
Color B: 3 windows (on the pockets) and 3 roof trims (see Border)
Layout (front view):
              [ ring ]
             /   |    \
            /  [peak]  \
   [ Pocket A ][ Pocket B ][ Pocket C ]
    panel sts   panel sts   panel sts
      1–19        20–38       39–57
Joining
Use Color A and a tapestry needle. Whipstitch through both layers, stitch-to-stitch.
1. Base edge to panel. Lay the panel right side up and set the pockets on it, gables against the panel. Rnd 11 left the front loops of Rnd 10 free, and that ridge is your seam line. Match each pocket’s 19 back stitches (sts 1–19) to 19 panel foundation stitches:
- Pocket A to sts 1–19
- Pocket B to sts 20–38
- Pocket C to sts 39–57
That is 3 × 19 = 57, exactly the panel width, with no extra stitches at the seams.
2. Back corners. Sew the st 1 and st 19 columns of each pocket to the panel, one stitch per round from Rnd 11 to Rnd 22. That is 12 stitches per column. On Pockets A and C, the outer column lines up 1-to-1 with the panel’s side row-ends (Rows 1–12).
3. Pocket to pocket. Neighboring pockets touch about 5 sts past their back corners: st 24 on one pocket and st 56 on the next. Whipstitch these columns together for Rnds 11–18 (8 stitches).
4. Straps.
- Sew each side strap to the back of the panel at the end of Row 12, overlapping 0.5 in (1.3 cm).
- Sew the center strap behind the Row 31 peak the same way.
- Fold the free ends 1.25 in (3.2 cm) over the ring.
- Hang the holder and check that it sits level with the straps just taut, then sew the ends down.
Tension: Keep the seams snug but not tight. A tight whipstitch curls the base edge upward.
Size checkpoint: The joined bottom edge measures 16.3 in (41.4 cm).
Border: Scalloped Roof Trim (Color B)
Work the trim on the two sloped edges of each gable. Then tack each gable peak and the middle of each slope to the panel so the roofs lie flat.
Border gauge: Each slope is about 3.9 in (9.9 cm) long. At gauge, 13 sc = 3.7 in (9.4 cm). The bias edge stretches a little, so this slightly snug count keeps the roof from rippling.
Row 1: With the right side facing, join B at the lower right corner of the gable.
- Right slope: 2 sc in the end of Row 1, then 1 sc in each row-end of Rows 2–4. Work 2 sc in the end of Row 5, then 1 sc in each row-end of Rows 6–8. Work 2 sc in the end of Row 9 and 1 sc in the end of Row 10. (13)
- Peak: 3 sc in the single stitch of Row 10. (3)
- Left slope: Mirror the right slope, working from Row 10 down to Row 1. (13)
Turn. (29 = 13 + 3 + 13)
Row 2: Ch 1, sc in the first st, then (Scallop, sc in next st) 7 times. (8 sc + 7 scallops) Fasten off.
Why the math works: Each scallop repeat uses 4 stitches, plus 1 extra stitch to end on a sc. So the row needs a multiple of 4 plus 1, and 29 = (7 × 4) + 1.
- The sc land on positions 1, 5, 9, 13, 17, 21, 25, and 29.
- The scallops land on positions 3, 7, 11, 15, 19, 23, and 27.
- Position 15 is the middle peak sc, so one scallop sits on the peak, with 3 more on each slope.
The trim adds 0.75 in (1.9 cm). On Pockets A and C, the outer roof slopes extend past the panel edge, as intended.
Final Blocking
- Weave in all ends along stitches of the same color.
- Mist the holder lightly. Don’t soak it, because wet cotton stretches.
- Put a roll in each pocket to round out the walls.
- Lay the holder on its back and pin the panel to 16.3 in (41.4 cm) × 8.9 in (22.6 cm).
- Pin each scallop open, evenly spaced.
- Let it dry for at least 24 hours, then remove the rolls and pins.
Final Quality-Control Checklist
- Each base is 5.5 in (14.0 cm) across and lies flat.
- Each wall has 60 stitches and 12 rounds.
- Each gable has 10 rows and ends in 1 stitch.
- Each roof has 29 sc and 7 scallops, with one scallop centered on the peak.
- Each window is square and centered on st 40.
- The panel starts at 57 stitches and ends at 1.
- The bottom seam matches 19 + 19 + 19 = 57.
- The holder hangs level, and each roll drops in easily.
Troubleshooting
Base cups upward: The increases are too tight. Use a hook 0.5 mm larger for the base.
Base ruffles: You have extra stitches. Recount each round.
Roll won’t fit: Your gauge is too tight. Remake the pocket with a larger hook.
Roof ripples: There are too many stitches or they are too loose. Use exactly 13 sc per slope.
Roof pulls the gable inward: Work Row 1 of the trim more loosely.
Window puckers: Redo the surface slip stitches more loosely.
Holder tilts: Re-sew the side straps at the ring until the holder hangs level.
Gap between pockets: Extend the pocket-to-pocket seam up to Rnd 20.
Care
Hand wash in cool water. Lay flat to dry, shaping the pockets around rolls, and do not tumble dry.

Final Notes
Each measurement depends on the one before it:
- A gauge of 14 sc = 4 in (10.2 cm) gives a 60-stitch base 5.5 in (14.0 cm) across.
- Twelve wall rounds add 3.4 in (8.6 cm).
- The 10-row gable brings each pocket to 6.3 in (16.0 cm), or about 7 in (17.8 cm) with the roof trim.
- Three 19-stitch backs fill the 57-stitch panel exactly, giving a holder 16.3 in (41.4 cm) wide and 8.9 in (22.6 cm) tall.
- With the straps and ring, it hangs about 14 in (35.6 cm) tall.
Check each number as you go, and your three cottages will line up neatly on the wall.
Happy crocheting!