

This panel has fifteen chunky crescent moons, each one floating inside its own open circle of navy chain. The circles link side to side and top to bottom into an airy lattice, and a scalloped navy arch edging finishes the outer edge.
Navy and silver gray moons alternate in a checkerboard, so the panel reads as a night sky with a modern, graphic feel. You can use it as a small table mat, a wall piece, a window panel, or a tester before you scale the design up.
The pattern uses US crochet terms. The finished panel measures 10 x 16 in (25.4 x 40.6 cm) after blocking.
Each motif is made in three stages: a short crescent worked in two rows, a navy frame round that closes it into a circle, and a loop round that joins the motif to its neighbors as you go. A two-round border finishes the panel.
Finished Size and Construction
- Finished size: 10 x 16 in (25.4 x 40.6 cm)
- Skill level: Easy-Intermediate
- Terminology: US
- Yarn weight: DK (light worsted / #3)
- Hook: 4 mm (G-6)
- Number of pieces: 15 motifs, joined as you go
- Layout: 3 motifs wide x 5 motifs long
- Motif size: 3 in (7.6 cm) across, measured loop tip to loop tip
- Size before border: 9 x 15 in (22.9 x 38.1 cm)
- Border depth: 0.5 in (1.3 cm) on every side
Materials
Use a smooth, tightly plied cotton or cotton-blend DK. It gives crisp stitch definition and blocks flat. Fuzzy or very soft yarns blur the moon outlines and make the open lattice look muddy.
- Color A, Navy: 100 g, about 230 m (252 yd). Used for 8 crescents, all 15 frames, and the border.
- Color B, Silver Gray: 25 g, about 58 m (63 yd). Used for 7 crescents.
These quantities include a safety margin of about 20%. The panel itself uses roughly 70 g of Navy and 14 g of Silver Gray.
Tools:
– 4 mm (G-6) crochet hook
– Tapestry needle
– Scissors
– Stitch markers (4 or more)
– Blocking mat and rust-proof pins
– Spray bottle
– Measuring tape
Abbreviations (US Terms)
- ch – chain
- sl st – slip stitch
- sc – single crochet
- hdc – half double crochet
- dc – double crochet
- sp – space
- st(s) – stitch(es)
- rep – repeat
Special technique: Loop join. Work ch 2. Remove the hook, insert it from front to back through the matching ch-5 loop of the finished neighbor motif, pick up the dropped loop, and pull it through. Work ch 2. This replaces one ch-5 loop, keeps the loop the same length, and locks the two motifs together at that point.
Gauge and Checkpoints
Make one complete motif before you start the panel. All the sizes in this pattern depend on it.
- After crescent Row 1: the crescent measures about 2.25 in (5.7 cm) tip to tip, measured in a straight line.
- After Frame Rnd 2: the closed circle measures 2.4 in (6.1 cm) across.
- After Frame Rnd 3: the motif measures 3 in (7.6 cm) loop tip to loop tip.
If your motif is larger than 3 in (7.6 cm), go down half a hook size. If it is smaller, go up half a size. A difference of only 0.25 in (0.6 cm) per motif adds up to 1.25 in (3.2 cm) over the 5-motif length, so it is worth checking.
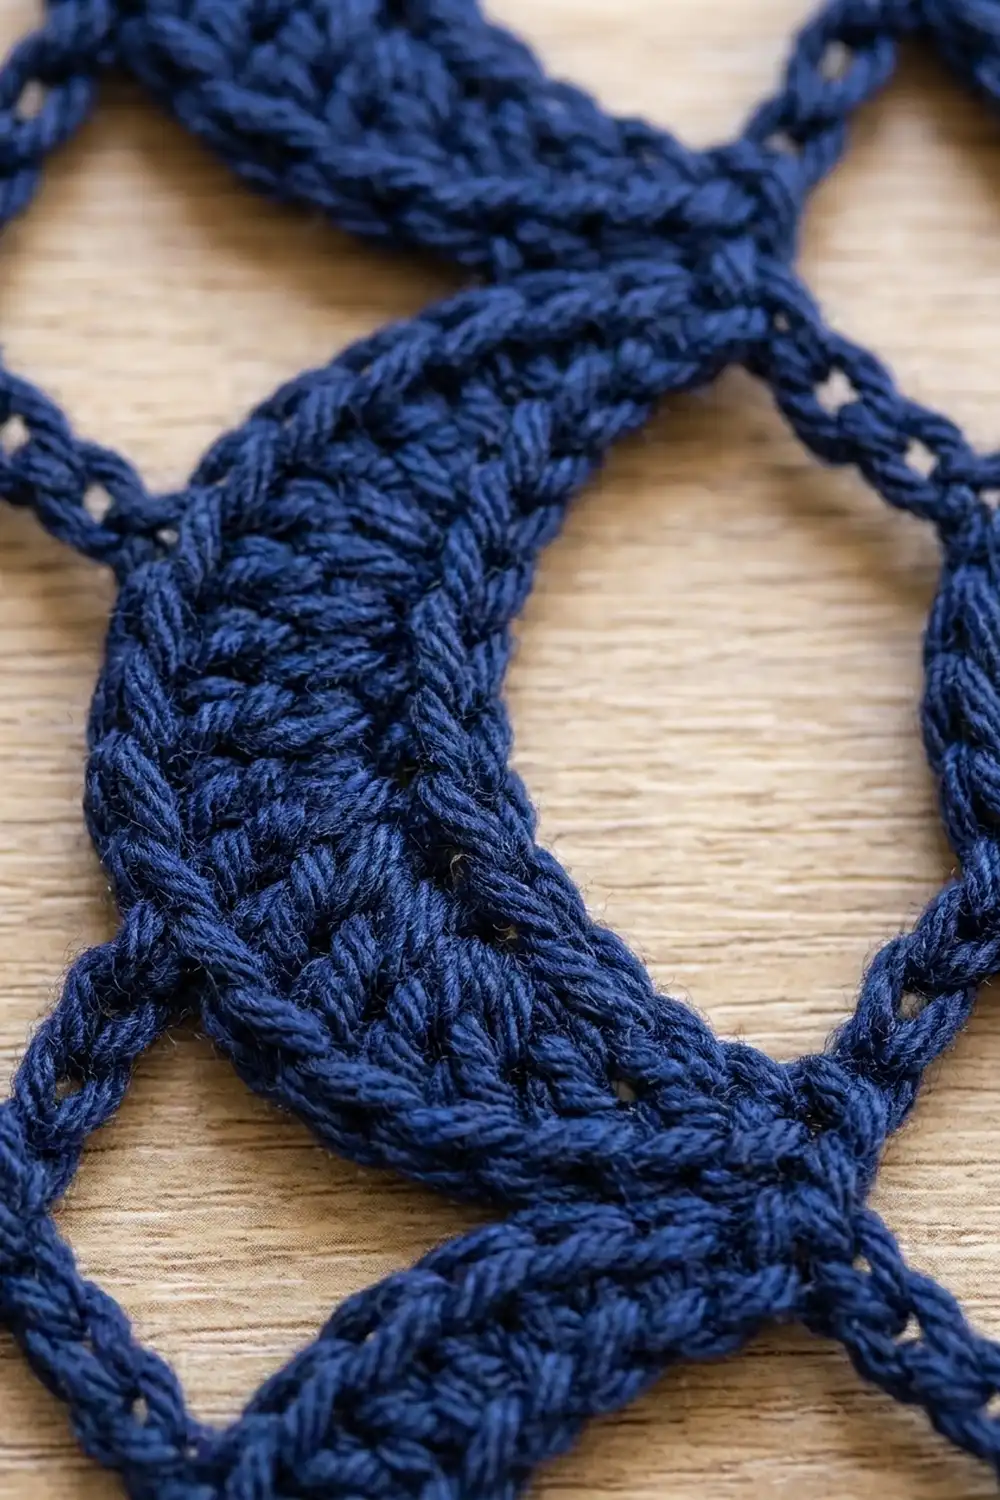
Crescent (Make 15: 8 in A, 7 in B)
Foundation: With the crescent color, ch 16.
Row 1: Sl st in 2nd ch from hook, sc in next ch, hdc in next 2 ch, dc in next 2 ch, 2 dc in each of next 3 ch, dc in next 2 ch, hdc in next 2 ch, sc in next ch, sl st in last ch. (18 sts)
Check: 15 chains are worked (1 + 1 + 2 + 2 + 3 + 2 + 2 + 1 + 1). The 3 doubled chains in the middle add 3 sts, so 15 + 3 = 18.
The tall stitches and increases in the center push the strip into a curve. This makes the full middle of the moon, and the sl sts make the tapered horn tips.
Row 2: Ch 1, turn. Skip the first sl st. Sc in next sc, sc in next 2 hdc, sc in next 2 dc, 2 sc in each of next 6 dc, sc in next 2 dc, sc in next 2 hdc, sc in next sc, sl st in last sl st. (22 sc + 1 sl st = 23 sts)
Check: 1 + 2 + 2 + 12 + 2 + 2 + 1 = 22 sc, plus 1 sl st. The extra 6 sc are all in the middle, which deepens the curve and makes the outer edge of the moon.
Fasten off and weave in the tail. Row 2 is the convex outer edge. The underside of the foundation chain is the concave inner edge.
Frame (All Motifs, Color A)
All frames are worked in Navy, including the ones around Silver Gray crescents. This is what makes the continuous navy lattice.
Frame Rnd 1: Join A with a sl st in the last sl st of Row 2 (one horn tip). Ch 1. Sc in the same st and in each st across Row 2 to the opposite tip (23 sc). Ch 9 across the open inner side and sl st to the first sc to close the circle. (23 sc + 9 ch = 32 sts)
The ch-9 bridge sits a little beyond the inner curve of the moon. This leaves the crescent-shaped opening you see inside each circle.
Frame Rnd 2: Ch 1. Sc in each of the 23 sc, then 1 sc in each of the 9 ch. Sl st to the first sc. (32 sc)
Place a marker in the 12th sc. This is the center of the moon’s outer curve.
Frame Rnd 3 (loop round): Sl st in each st up to and including the marked 12th sc. Ch 1, sc in the same st, ch 5, skip 3 sts. Sc in next st, ch 5, skip 3 sts. Rep from * 6 more times. Sl st to the first sc. (8 sc and 8 ch-5 loops)
Check: 8 repeats x 4 sts (1 sc + 3 skipped) = 32 sts.
Hold the motif with the moon’s tips pointing right. The 8 loops sit in pairs: 2 on top, 2 on the right, 2 on the bottom, 2 on the left. Each side has exactly 2 loops and no separate corner stitch. Because you started at the center of the outer curve, the left pair straddles the fullest part of the moon.
For Motif 1 only, work Frame Rnd 3 as written and fasten off. For every other motif, work Frame Rnd 3 using the loop joins described below.
Make All Pieces
- Navy (A) crescents: 8
- Silver Gray (B) crescents: 7
- Frames: 15, all in Navy
Layout, 3 wide x 5 long, with all moon tips pointing right:
Row 1:  A  B  A
Row 2:  B  A  B
Row 3:  A  B  A
Row 4:  B  A  B
Row 5:  A  B  A
Rows 1, 3 and 5 hold 2 A + 1 B each, which is 6 A and 3 B. Rows 2 and 4 hold 1 A + 2 B each, which is 2 A and 4 B. The totals are 8 A and 7 B, or 15 motifs.
Make all 15 crescents first and work Frame Rnds 1–2 on each. Join each motif during its own Frame Rnd 3, following the grid.
Joining (Join-As-You-Go)
Method: Work across the panel row by row, left to right. Each new motif joins to the motif on its left and/or the motif above it.
Stitch-to-stitch logic:
– Joining to a motif on the left: When you reach the new motif’s 2 left-side loops, replace each ch 5 with a loop join. The upper-left loop joins the neighbor’s upper-right loop, and the lower-left loop joins the neighbor’s lower-right loop.
– Joining to a motif above: When you reach the new motif’s 2 top loops, use loop joins in place of each ch 5. The top-left loop joins the upper motif’s bottom-left loop, and the top-right loop joins its bottom-right loop.
– Motifs that join on two sides (any motif not in Row 1 or the first column) get 4 loop joins.
Join totals:
– Side-to-side seams: 2 per row x 5 rows = 10 seams, or 20 loop joins.
– Top-to-bottom seams: 3 per row break x 4 breaks = 12 seams, or 24 loop joins.
– Total: 44 loop joins.
Where four motifs meet, the diagonal loops stay free. This leaves the open diamond spaces between the circles.
Tension: Keep the ch 2 on each side of a join the same size as your normal chains. Tight joins pucker the circles together, and loose joins let the lattice sag.
Size checkpoint: The joined panel should measure 9 x 15 in (22.9 x 38.1 cm) when relaxed. That is 3 motifs x 3 in (7.6 cm) wide and 5 motifs x 3 in (7.6 cm) long. The joined loops meet tip to tip, so they add no width.
Border
Border gauge: Border Rnd 1 averages 40 sts per 9 in (22.9 cm) along the short sides. Border Rnd 2 adds 0.5 in (1.3 cm) of arches all around.
Each motif on the outer edge has 2 free loops facing outward. The short sides have 3 edge motifs, so 3 x 2 = 6 loops. The long sides have 5 edge motifs, so 5 x 2 = 10 loops.
Border Rnd 1: With A, join with a sl st in the first free top loop of the top-left motif. Ch 1.
- Top side: Work 5 sc in each of the motif’s 2 free loops, then ch 5 to bridge the gap to the next motif. Rep from * once more. Work 5 sc in each of the last motif’s 2 loops.
Count: 3 motifs x 2 loops x 5 sc = 30 sc, plus 2 bridges x 5 ch = 10 ch. 40 sts. - Corner: ch 3 (corner sp).
- Long side: Work as for the top side across 5 motifs.
Count: 5 x 2 x 5 = 50 sc, plus 4 bridges x 5 ch = 20 ch. 70 sts. - Work the corner, then rep the short side and long side. After the last long side, ch 3 and sl st to the first sc.
Rnd 1 total: 40 + 70 + 40 + 70 = 220 sts, plus 4 corner ch-3 sps.
No stitches are added at the joins. The bridges are the only extra stitches, and each one is counted above.
Border Rnd 2 (arches): Sl st into the first st of the top side. Ch 1.
- Each side: Sc in next st (working into chain sts where needed), ch 3, skip next st. Rep from * across the side.
- Short sides: 40 sts ÷ 2 = 20 arches.
- Long sides: 70 sts ÷ 2 = 35 arches.
- Each corner: (sc, ch 3, sc) in the corner ch-3 sp, which makes 1 corner arch.
- At the end, sl st to the first sc and fasten off.
Rnd 2 total: 20 + 35 + 20 + 35 = 110 arches, plus 4 corner arches, for 114 arches.
Why the math works: Both side counts are even (40 and 70), so the 2-stitch arch repeat ends exactly at each corner with no half-repeat. The arches add 0.5 in (1.3 cm) on every side. That turns 9 x 15 in (22.9 x 38.1 cm) into 10 x 16 in (25.4 x 40.6 cm).
Final Blocking
- Weave in all remaining ends along the frame stitches in their matching color.
- Lay the panel right side up on the blocking mat.
- Pin the four corners to a 10 x 16 in (25.4 x 40.6 cm) rectangle.
- Pin the tip of each border arch so the scallops sit evenly.
- Pin the center of each open diamond so the circles stay round.
- Spray until the panel is evenly damp, but not soaked.
- Smooth each crescent with your fingers so the horn tips point cleanly right.
- Let it dry completely, at least 12 hours, before unpinning.
Final Quality-Control Checklist
- 15 motifs in a 3 x 5 checkerboard, 8 Navy and 7 Silver Gray
- All moon tips point the same direction
- Every crescent has 23 sts in Row 2
- Every frame has 32 sc in Rnd 2 and 8 loops in Rnd 3
- 44 loop joins, with open diamonds between the circles
- Border Rnd 1 has 40 / 70 / 40 / 70 sts
- Border Rnd 2 has 20 / 35 / 20 / 35 arches plus 4 corner arches
- Blocked size is 10 x 16 in (25.4 x 40.6 cm)
- All ends are woven in securely
Troubleshooting
- Crescent is flat, not curved: Check that the 3 center chains each got 2 dc in Row 1 and the 6 center dc each got 2 sc in Row 2.
- Circle ruffles: The ch-9 bridge is too loose. Work Frame Rnd 1 with a smaller hook for the chain only.
- Circle cups: Your Frame Rnd 2 sc are too tight. Relax your tension or go up half a hook size.
- Loops don’t sit in side pairs: You started Frame Rnd 3 in the wrong st. Recount to the 12th sc of Rnd 2.
- Panel skews: One loop join went into the wrong loop. Recheck the matching pairs: upper to upper, lower to lower, left to left.
- Border ripples: The bridges are too long for your tension. Use ch 4 bridges and work 2 sc in one loop per side to keep the even count.
Care
Hand wash in cool water with mild soap, press out the water in a towel, and dry flat, reshaping to 10 x 16 in (25.4 x 40.6 cm). Don’t hang it while wet.

Final Notes
The measurements chain from one stage to the next. A crescent of 2.25 in (5.7 cm) becomes a circle of 2.4 in (6.1 cm), then a motif of 3 in (7.6 cm). Fifteen motifs joined tip to tip make a 9 x 15 in (22.9 x 38.1 cm) panel, and a 0.5 in (1.3 cm) arch border brings it to 10 x 16 in (25.4 x 40.6 cm). If your first motif matches gauge, the rest of the panel will come out the right size.
Happy crocheting!