

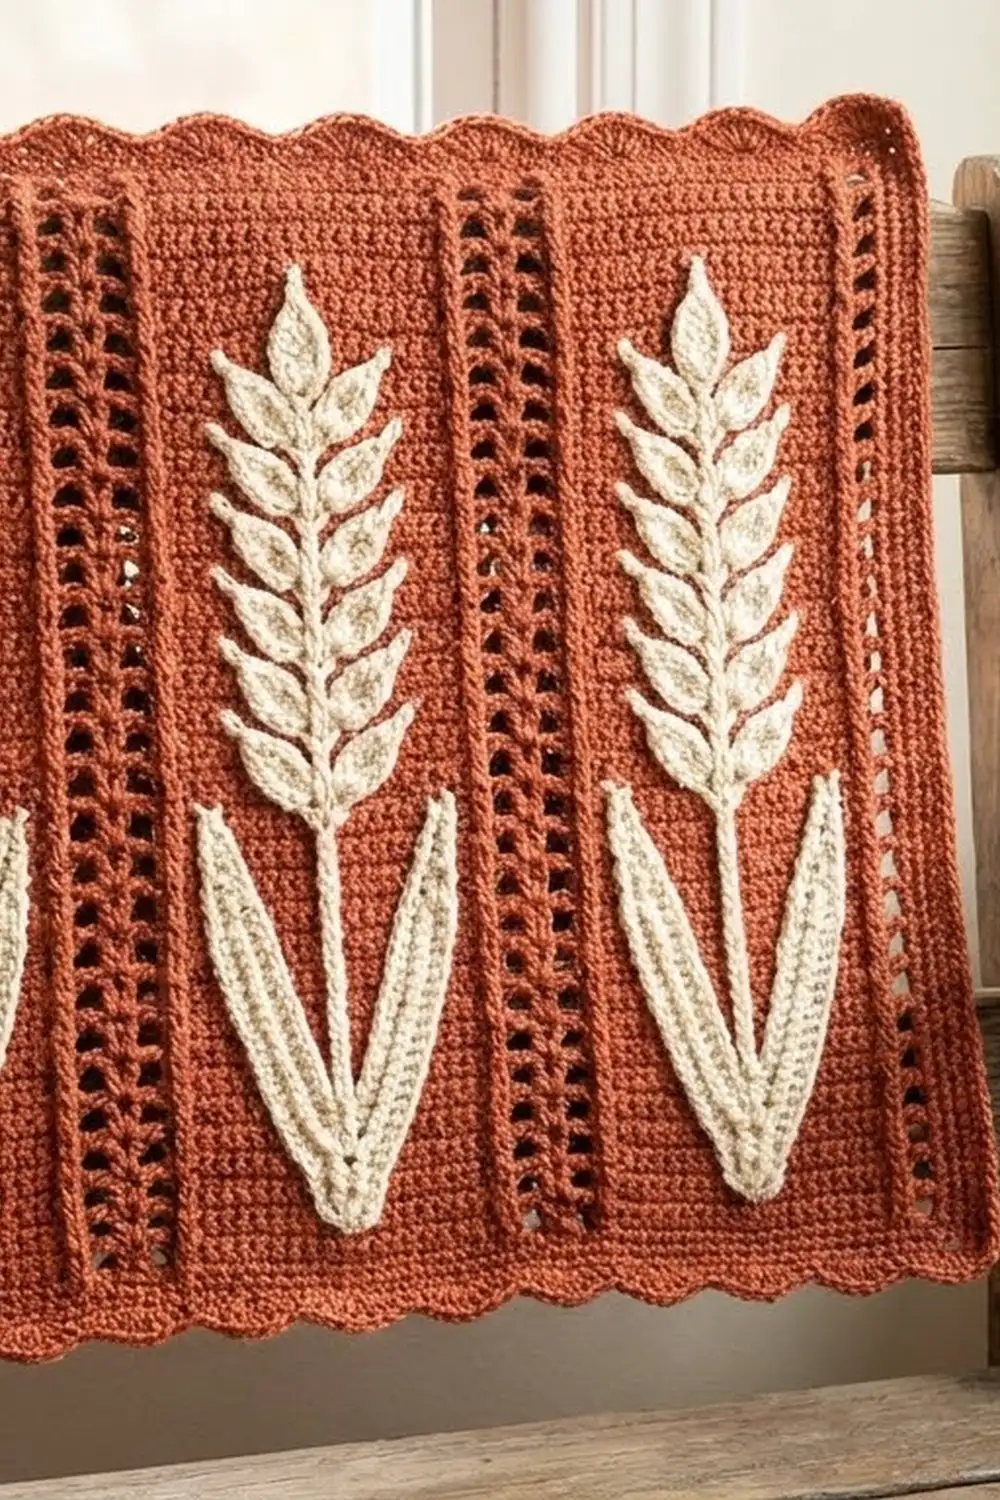
This panel brings autumn colors into one piece. A rust lace background holds three raised cream wheat ears, each standing in its own column. Raised post-stitch ribs divide the columns, and scalloped edges finish the top and bottom.
The palette uses two colors: a deep rust for the background and border and a soft cream for the wheat. The style is rustic and slightly vintage. You can use the panel as a wall hanging, a table mat, or a decorative cover for a basket lid or shelf.
The pattern uses US crochet terms. The finished panel measures 10 in wide x 15 in tall (25.4 x 38.1 cm) at the scallop peaks.
You work the rust background flat in rows. Next you crochet three separate cream wheat ears and sew them onto the center strip of each column. A two-round border adds firm long sides and scalloped short ends.
Finished Size and Construction
- Finished size: 10 x 15 in (25.4 x 38.1 cm) at scallop peaks; 10 x 14 in (25.4 x 35.6 cm) at the scallop valleys
- Skill level: Intermediate
- Terminology: US
- Yarn weight: Worsted (#4)
- Hook: 5.0 mm (H-8)
- Number of pieces: 1 background panel plus 3 wheat appliqués, sewn into one finished piece
- Layout: 3 vertical columns, 1 wheat ear per column
- Wheat ear size: 11 in long (27.9 cm), about 2.25 in wide (5.7 cm) across the grains
- Size before border: 9 x 13 in (22.9 x 33.0 cm)
- Border depth: 0.5 in (1.3 cm) on the long sides; 1 in (2.5 cm) at the scallop peaks on the short ends
Materials
Use a smooth worsted-weight yarn so the stitches show clearly. A cotton or cotton-acrylic blend holds the raised grains well and blocks flat. The quantities below assume a yarn of about 200 m per 100 g.
- Rust (Color A): 100 g / 200 m, for the background and border
- Cream (Color B): 30 g / 60 m, for the three wheat ears and for sewing them on
Both quantities include a margin of roughly 15–20% for your gauge swatch and the sewing tails.
Tools:
– 5.0 mm (H-8) crochet hook
– Tapestry needle
– Scissors
– 4–6 stitch markers
– Rust-proof pins
– Blocking mat and spray bottle
– Tape measure
Abbreviations (US Terms)
- ch – chain
- sl st – slip stitch
- sc – single crochet
- hdc – half double crochet
- dc – double crochet
- tr – treble crochet
- fpdc – front post double crochet
- bpdc – back post double crochet
- sk – skip
- sp – space
- st(s) – stitch(es)
- RS / WS – right side / wrong side
Special stitch – Grain: Ch 5, sl st in the 2nd ch from hook, sc in the next ch, hdc in the next ch, dc in the last ch. This makes a small pointed oval of 4 sts.
Special stitch – Long Leaf: Ch 17, sl st in the 2nd ch from hook, sc in the next 3 ch, hdc in the next 4 ch, dc in the next 4 ch, hdc in the next 2 ch, sc in the last 2 ch. That is 16 sts.
Gauge and Checkpoints
Gauge: 16 sts x 8 rows = 4 in (10.2 cm) in the background pattern. Each ch-1 sp counts as 1 st. That works out to 4 sts and 2 rows per inch (2.5 cm).
Make one test piece first: chain 18 and work Rows 1–9 on 16 sts. Block it lightly and measure it. It should be 4 in (10.2 cm) wide and 4.5 in (11.4 cm) tall.
Checkpoints:
– After Row 1: 9 in (22.9 cm) wide
– After Row 9: 4.5 in (11.4 cm) tall
– After Row 26: 9 x 13 in (22.9 x 33.0 cm)
– One wheat ear: 11 in (27.9 cm) long
– After Border Round 1: 9.5 x 13.5 in (24.1 x 34.3 cm)
– After Border Round 2: 10 x 15 in (25.4 x 38.1 cm) at the peaks
If your piece is too big, go down 0.5 mm in hook size. If it is too small, go up 0.5 mm. Row height matters as much as width here, because the 26 rows must reach 13 in (33.0 cm) to fit the 11 in (27.9 cm) wheat ears with a 1 in (2.5 cm) margin at each end.
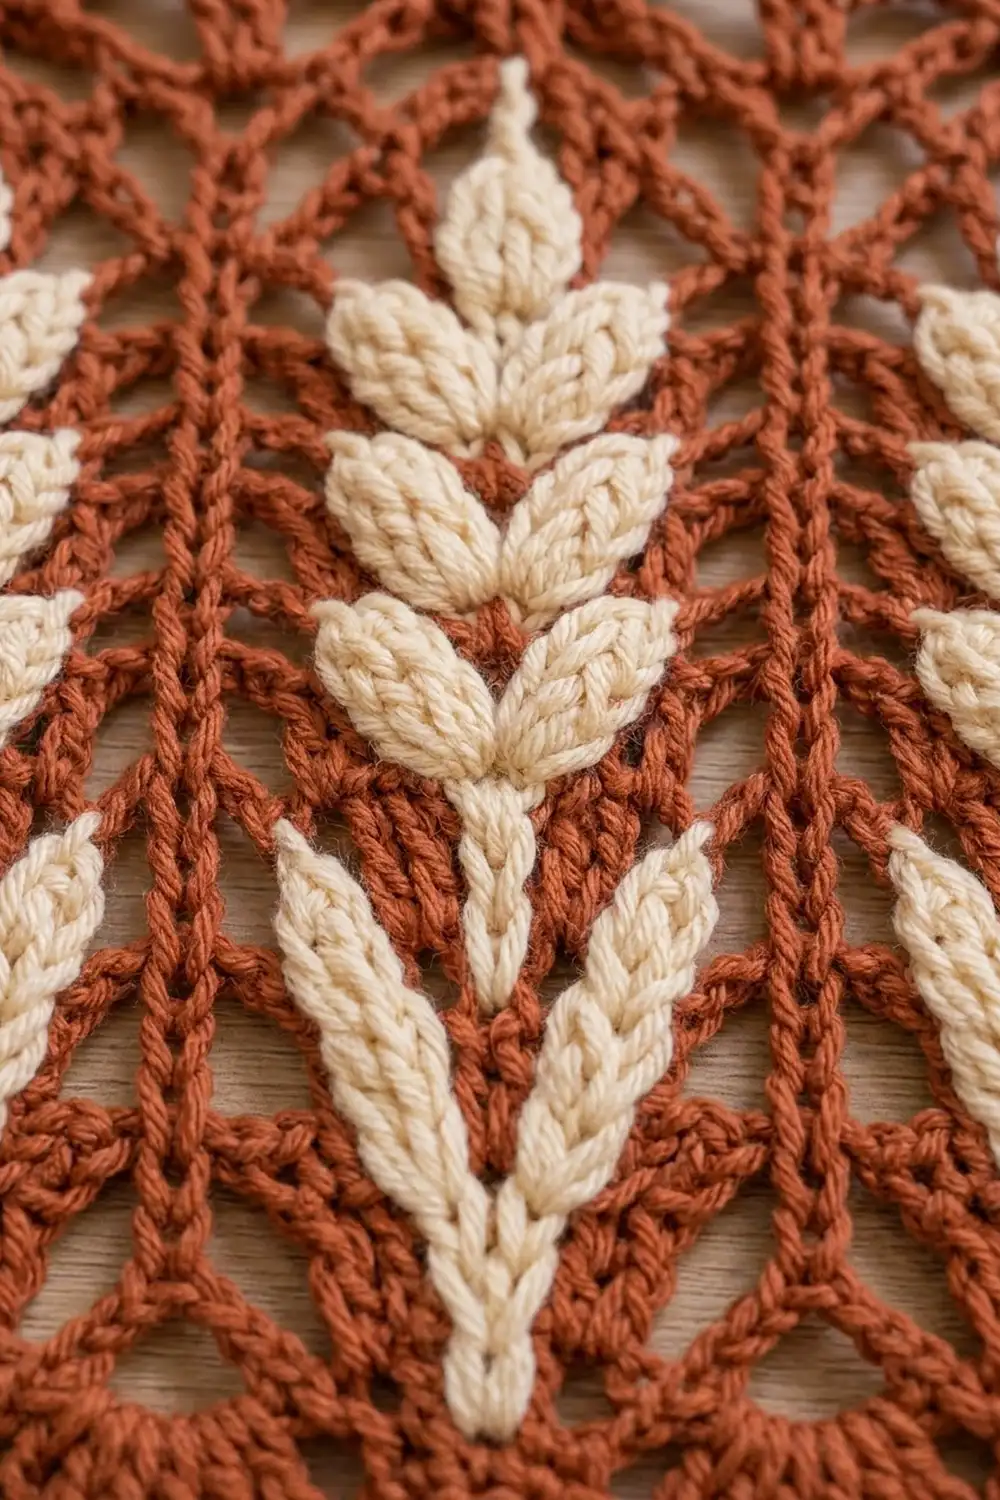
Background Panel
Use Color A (rust).
Foundation: Ch 38.
Row 1 (WS): Dc in the 4th ch from hook and in each ch across. Turn. (36 sts. The skipped 3 ch count as the first dc.)
Row 2 (RS): Ch 3 (counts as dc throughout), fpdc around next st. Then repeat this column sequence 3 times in total:
– ch 1, sk next st, dc in next st, ch 1, sk next st
– dc in next 4 sts
– ch 1, sk next st, dc in next st, ch 1, sk next st
– fpdc around next st
Dc in the top of the turning ch. Turn.
(36 sts: 2 edge dc, 4 fpdc, 18 dc and 12 ch-1 sps.)
Here is how one column lines up. The first fpdc sits on st 2. The first column covers sts 3–12, and the next fpdc sits on st 13. The second column covers sts 14–23 (fpdc on st 24), and the third covers sts 25–34 (fpdc on st 35). The final dc lands on st 36. Each column is 10 sts wide, or 2.5 in (6.4 cm).
Row 3 (WS): Ch 3, bpdc around next fpdc. Then repeat this sequence 3 times in total:
– ch 1, sk ch-1 sp, dc in next dc, ch 1, sk ch-1 sp
– dc in next 4 dc
– ch 1, sk ch-1 sp, dc in next dc, ch 1, sk ch-1 sp
– bpdc around next post st
Dc in the top of the turning ch. Turn. (36 sts.)
Working bpdc on the WS keeps the ribs raised on the RS. You now have four rust ribs: one at each edge and two between the columns.
Rows 4–25: Repeat Rows 2–3 eleven more times. Row 25 is a WS row. (36 sts in every row.)
Checkpoint: the piece should measure 9 in (22.9 cm) wide and 12.5 in (31.8 cm) tall.
Row 26 (RS): Ch 3, fpdc around next post st. Then repeat 3 times in total: dc in each dc and in each ch-1 sp of the column (10 dc), then fpdc around next post st. Dc in the top of the turning ch. (36 sts: 2 edge dc, 4 fpdc, 30 dc.)
Fasten off and weave in the ends.
Checkpoint: 9 x 13 in (22.9 x 33.0 cm).
Wheat Ears (Make 3)
Use Color B (cream). Each ear is worked around one long spine chain. You go down one side, make the two base leaves, then come back up the other side, so the grains end up in matching pairs.
Foundation: Ch 45.
Top grain: Sl st in the 2nd ch from hook, sc in the next ch, hdc in the next ch, dc in the next ch. This uses the last 5 ch. The 40 ch that remain are the spine. Number the spine chains 1 to 40, starting from the top grain.
Side A (working down the spine):
1. Sl st in spine ch 1.
2. Repeat 7 times: Grain, then sl st in the next 3 spine ch. This brings you to spine ch 22.
3. Sl st in each of the next 18 spine ch (ch 23–40). This is the plain lower stem.
Spine used on Side A: 1 + 21 + 18 = 40 ch.
Base: Long Leaf, then sl st into the base of spine ch 40. Make a second Long Leaf, then sl st into the base of spine ch 40 again.
Side B (working up the free loops of the spine):
1. Sl st in each of the next 18 ch (ch 40 back to ch 23).
2. Repeat 7 times: sl st in the next 3 ch, then Grain. This brings you to ch 2.
3. Sl st in ch 1, then sl st into the base of the top grain.
Spine used on Side B: 18 + 21 + 1 = 40 ch. Because both sides use the same spine positions, each Side B grain sits directly opposite a Side A grain. That gives 7 pairs below one top grain.
Fasten off and leave a 12 in (30.5 cm) tail for sewing.
Ear checkpoint: The grain section, including the top grain, is 6.5 in (16.5 cm). The stem is 4.5 in (11.4 cm), and each Long Leaf is 4 in (10.2 cm). The whole ear should be 11 in (27.9 cm) long.
Attaching the Wheat Ears
- Lay the panel flat with the RS up. Place a stitch marker 1 in (2.5 cm) from the top and another 1 in (2.5 cm) from the bottom of each column’s 4-dc center strip.
- Pin the spine of one ear straight down the center strip, with the top grain at the upper marker and the stem base at the lower marker.
- Angle each pair of grains upward and outward at about 45 degrees so they partly cover the mesh on each side.
- Fan the two Long Leaves out from the base into a V. Each leaf tip should sit about 0.75 in (1.9 cm) out from the stem and 3 in (7.6 cm) above the base.
- Using the cream tail, whipstitch along the spine through the dc posts of the center strip. Tack each grain at its tip and its base only, so the grains stay plump and raised.
- Repeat for the other two columns, checking that all three top grains sit at the same height.
Border
Border gauge: 4 sc per inch (2.5 cm), the same as the body. Each short edge is 36 sts and 9 in (22.9 cm) wide, which equals 4 per inch. Each long edge is 26 rows of dc at 2 rows per inch; working 2 sc per row-end gives 52 sc over 13 in (33.0 cm), also 4 per inch. Because the border density matches the body, the edges will lie flat without rippling or pulling in.
Use Color A (rust).
Round 1 (RS): Join the yarn in the first st of Row 26.
– Top edge: Ch 1, sc in each st across. (36 sc: 1 per st, 0 added.)
– Top corner: Ch 1. This corner ch-1 sp is not counted as a stitch.
– Long side: Work 2 sc in each row-end. (52 sc: 26 row-ends x 2.)
– Bottom corner: Ch 1.
– Bottom edge: Sc in the free loop of each foundation ch. (36 sc.)
– Bottom corner: Ch 1.
– Second long side: Work 2 sc in each row-end. (52 sc.)
– Last corner: Ch 1, then join with a sl st to the first sc.
(176 sc + 4 corner ch-1 sps.)
Checkpoint: 9.5 x 13.5 in (24.1 x 34.3 cm).
Round 2 (Scallops): Work around the round as follows.
– Short edges: Ch 1. Repeat the Arch 3 times across each short edge. Arch (worked into 12 sts): sc in next, hdc in next, dc in next, 2 dc in next, tr in next, 2 tr in next, 2 tr in next, tr in next, 2 dc in next, dc in next, hdc in next, sc in next.
– Corners: Work 1 sc in each corner ch-1 sp.
– Long sides: Sc in each sc. (52 + 0 = 52 sc.)
– Join with a sl st to the first st and fasten off.
Each Arch gives 12 sts worked 1 per existing st + 4 added = 16 sts. Each short edge is 36 + 12 = 48 sts.
(Round total: 48 + 52 + 48 + 52 + 4 corner sc = 204 sts.)
Why the math works: 36 sts divide evenly into three 12-st Arches. That puts one scallop over each wheat column and a valley above each inner rib. The 4 added sts per Arch sit at the peak, which makes the curve without crowding the edge. The long sides add nothing, so they stay straight. The tr peaks rise about 0.75 in (1.9 cm). Together with Round 1’s 0.25 in (0.6 cm), that gives the 1 in (2.5 cm) border depth on the short ends.
Final checkpoint: 10 x 15 in (25.4 x 38.1 cm) at the peaks.
Final Blocking
- Weave in all remaining ends along the WS rib columns.
- Pin the panel RS up to 10 in (25.4 cm) wide, with the long sides straight and parallel.
- Pin the center of each scallop out to 15 in (38.1 cm) total length. Put the valleys at 14 in (35.6 cm).
- Gently open each ch-1 sp in the mesh with your fingertip.
- Mist the rust fabric evenly until it is damp, avoiding heavy soaking on the wheat.
- Puff each grain upward with your fingers so it stays rounded.
- Let it dry completely, about 12–24 hours, before unpinning.
Final Quality-Control Checklist
- Body has 36 sts per row and 26 rows
- 4 raised rust ribs, all on the RS
- Each column has 2 open ch-1 sps on each side of a 4-dc center strip
- Each ear has 1 top grain, 7 matched grain pairs, an 18-ch stem and 2 Long Leaves
- All three ears are the same length and start at the same height
- Border Round 1 has 36 / 52 / 36 / 52 sc
- Border Round 2 has 3 Arches per short end, centered over the columns
- Final size is 10 x 15 in (25.4 x 38.1 cm)
Troubleshooting
Ribs appear on the wrong side: You used fpdc on a WS row. Use bpdc on all odd rows.
Panel narrows toward the top: You missed a ch-1 or skipped the turning ch. Count to 36 at the end of every row.
Panel is too short: Your rows are tight. Go up a hook size, or add one more Row 2–3 repeat and measure again before Row 26.
Grains lie flat: You tacked them along their full length. Re-sew them at the tip and base only.
Side B grains don’t line up with Side A: You miscounted the stem. Make sure you work exactly 18 sl sts before the grain section on each side.
Scallops flip upward: Your border tension is tight. Re-block, or rework Round 2 with a hook 0.5 mm larger.
Long sides wave: You worked more than 2 sc per row-end. Recount to 52.
Care
Hand wash in cool water with mild soap, press out water in a towel, and dry flat, reshaping the scallops and grains. Do not tumble dry.
Final Notes
Everything in this panel comes from one measurement chain:
– At 4 sts per inch, 36 sts give a 9 in (22.9 cm) width.
– At 2 rows per inch, 26 rows give a 13 in (33.0 cm) height.
– Three 10-st columns, each 2.5 in (6.4 cm) wide, hold three 11 in (27.9 cm) wheat ears with a 1 in (2.5 cm) margin at each end.
– The border keeps the same 4-per-inch density, adding 0.5 in (1.3 cm) on the long sides and 1 in (2.5 cm) at the scallop peaks, for a final 10 x 15 in (25.4 x 38.1 cm).
Check your gauge first and count at every checkpoint, and the wheat will sit in the right place.
Happy crocheting!