

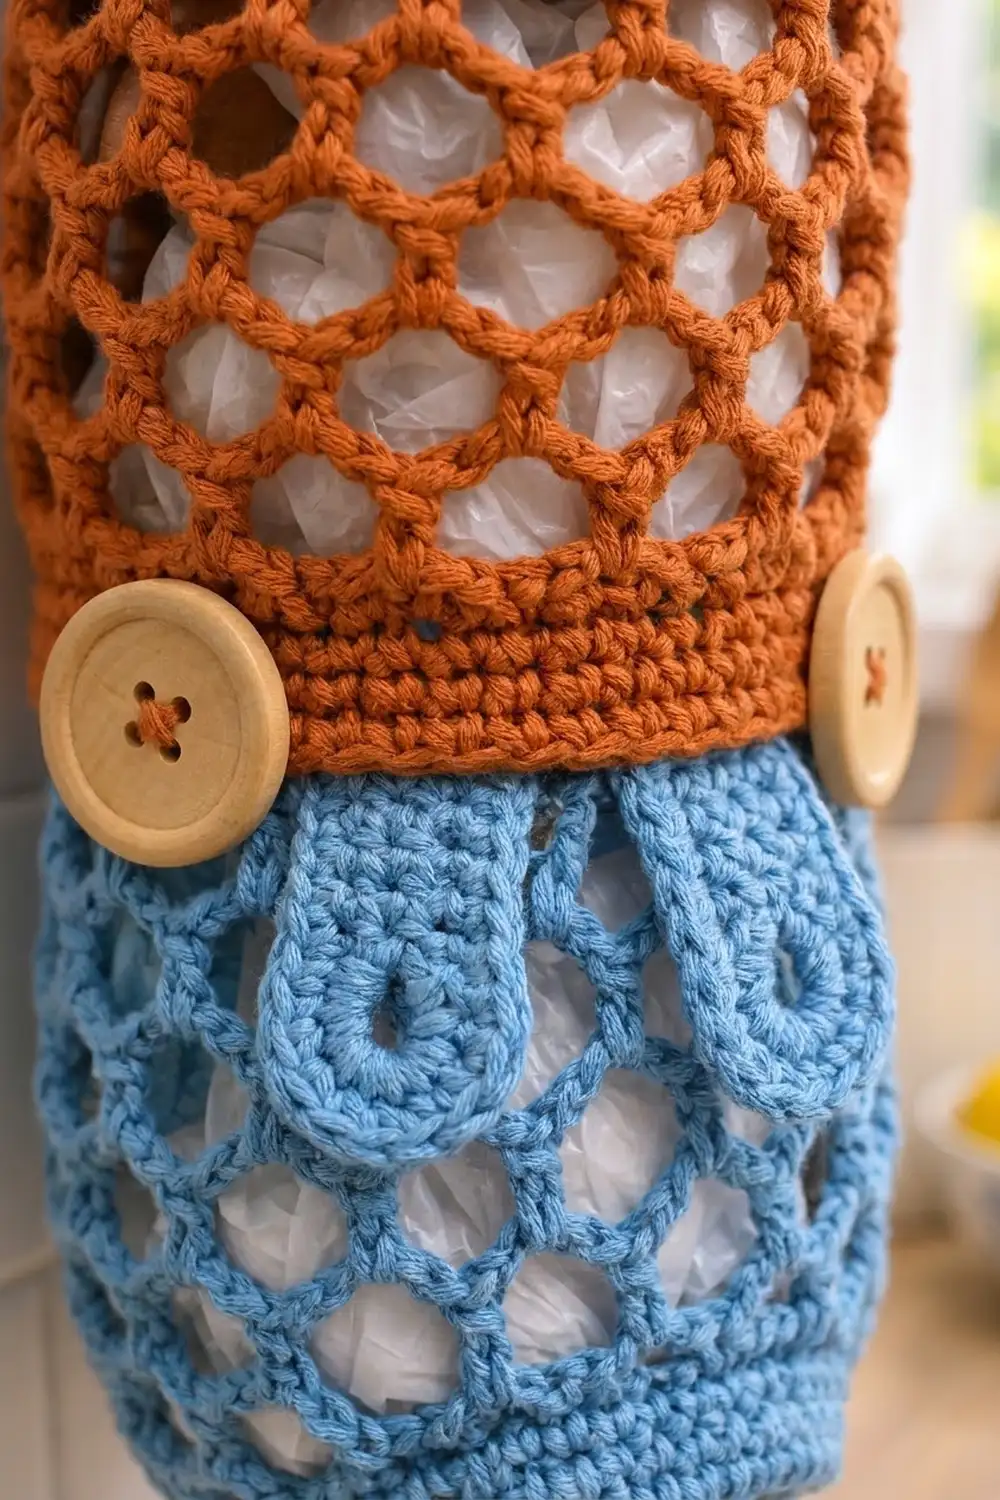
This hanging bag holder keeps plastic grocery bags neat and easy to grab. A rust-orange upper tube buttons onto a sky-blue lower tube. Open diamond mesh lets you see how many bags are left, and a narrow handle hangs it from a rail or hook.
The look is warm and a little retro. The terracotta and sky blue go well with wood, tile, and kitchen plants. Two light natural-wood buttons join the colors and add a simple farmhouse touch.
This pattern uses US crochet terms. The finished holder measures 7.5 in (19.1 cm) wide when flat and about 13.25 in (33.7 cm) tall without the handle. With the handle raised, it is about 16.25 in (41.3 cm) tall.
Both pieces are worked in joined rounds from the top down. Each one starts with a solid band, moves into a fishnet section, and ends with another solid band. The blue piece decreases into a small opening for pulling out bags. The rust piece gets a strap handle and two buttons, the blue piece gets two buttonhole tabs, and the two tubes button together.
Finished Size and Construction
- Finished size: 7.5 in (19.1 cm) wide flat × 13.25 in (33.7 cm) tall, or 16.25 in (41.3 cm) with the handle raised
- Skill level: Easy / advanced beginner
- Terminology: US
- Yarn weight: Worsted (#4), cotton or cotton blend
- Hook: US H-8 (5.0 mm)
- Number of pieces: 2 tubes (the handle and tabs are worked onto them)
- Layout: 1 column × 2 tubes, stacked vertically
- Piece size: Rust tube 7.5 in (19.1 cm) wide × 7 in (17.8 cm) tall; blue tube 7.5 in (19.1 cm) wide at the top × 6.25 in (15.9 cm) tall
- Size before border: Same as the finished size, because the slip-stitch edging adds no width
- Border depth: Under 1/8 in (0.3 cm)
Materials
Choose a smooth worsted cotton. It holds the mesh shape, doesn’t stretch much under the weight of the bags, and washes well. Acrylic also works, but the mesh will be softer and may sag a little.
- Color A, rust orange: 65 g, about 117 m (128 yd)
- Color B, sky blue: 55 g, about 99 m (108 yd)
These quantities include a margin of about 15% for your gauge swatch and small tension differences.
Tools:
– US H-8 (5.0 mm) crochet hook
– 2 wooden four-hole buttons, 1 in (2.5 cm) across
– Sewing needle and matching thread, or a tapestry needle and yarn, for the buttons
– Tapestry needle
– 4 stitch markers
– Scissors
– Measuring tape
Abbreviations (US Terms)
- ch – chain
- sc – single crochet
- sc2tog – single crochet 2 together
- sl st – slip stitch
- sk – skip
- st(s) – stitch(es)
- sp – space
- Rnd – round
Special stitch: ch-5 loop (fishnet loop). A ch-5 loop is 5 chains anchored by one sc at each end. In the next round, you work one sc into the center of each loop. This staggers the anchor points and creates the diamond mesh.
Gauge and Checkpoints
Gauge: 16 sc × 18 rnds = 4 in (10.2 cm) in sc worked in the round.
Mesh gauge: 1 mesh round = about 0.5 in (1.3 cm) tall.
Make the rust tube first and treat it as your test piece. Measure it at each checkpoint before you buy more yarn or start the blue tube.
- Checkpoint 1 (after Rnd 1): The tube measures 7.5 in (19.1 cm) wide when flat. This is a circumference of 15 in (38.1 cm).
- Checkpoint 2 (after Rnd 5): The solid top band is 1.1 in (2.8 cm) deep.
- Checkpoint 3 (after the mesh): 8 mesh rounds measure 4 in (10.2 cm) when gently stretched lengthwise.
- Checkpoint 4 (finished rust tube): 7 in (17.8 cm) tall.
If your piece is too big, go down to a G-6 (4.0 mm) hook. If it’s too small, go up to an I-9 (5.5 mm) hook. Don’t change the stitch counts. The joining and the button positions depend on both tubes having exactly 60 stitches at the top.
Piece 1: Rust Upper Tube (Color A)
Join each round with a sl st to the first sc. Ch 1 at the start of each sc round, and don’t count it as a stitch.
Foundation: Ch 60 and join with a sl st to form a ring, taking care not to twist the chain.
Rnd 1: Ch 1, sc in each ch around. Join. (60 sts)
Rnds 2–5: Ch 1, sc in each st around. Join. (60 sts)
Check Checkpoint 2 here.
Rnd 6 (mesh setup): Ch 1, sc in the first st, ch 5, sk 3 sts, sc in next st; repeat from * 13 more times; ch 5, sk the last 3 sts, and join to the first sc. (15 ch-5 loops)
Each repeat uses 4 stitches (1 sc plus 3 skipped), and 15 × 4 = 60, so the loops are spaced evenly with no leftover stitches.
Rnds 7–13 (mesh): Sl st into each of the first 2 ch of the next loop, ch 1, sc in the same loop, ch 5, sc in the next loop; repeat from * 13 more times; ch 5 and join to the first sc. (15 ch-5 loops)
That gives 8 mesh rounds in total. The diamonds should sit straight up the tube. Check Checkpoint 3.
Rnd 14 (conversion): Ch 1, work 4 sc in each ch-5 loop around. Join. (15 loops × 4 sc = 60 sts)
Rnds 15–21: Ch 1, sc in each st around. Join. (60 sts)
Rnds 14–21 form the bottom button band, which is 1.8 in (4.6 cm) deep. Fasten off and weave in the end. The tube should be 7 in (17.8 cm) tall (Checkpoint 4).
Button markers: Turn the tube so the beginning-of-round seam is at the back. On Rnd 18, place one marker between sts 15 and 16 and another between sts 45 and 46. These points are directly opposite each other, and each sits 3.5 rounds, or 0.8 in (2.0 cm), above the bottom edge. Leave the markers in for now.
Piece 2: Blue Lower Tube (Color B)
Foundation: Ch 60 and join with a sl st to form a ring.
Rnd 1: Ch 1, sc in each ch around. Join. (60 sts)
Rnds 2–5: Ch 1, sc in each st around. Join. (60 sts)
Rnd 6 (mesh setup): Work as for Rnd 6 of the rust tube. (15 ch-5 loops)
Rnds 7–12 (mesh): Work as for Rnds 7–13 of the rust tube. (15 ch-5 loops)
That gives 7 mesh rounds, or 3.5 in (8.9 cm).
Rnd 13 (taper conversion): Ch 1, work 3 sc in each ch-5 loop around. Join. (15 loops × 3 sc = 45 sts)
Working 3 sc instead of 4 into each loop pulls the bottom in and starts the rounded taper.
Rnd 14: Ch 1, sc in next 3 sts, sc2tog; repeat from * 8 more times. Join. (9 repeats × 4 = 36 sts)
Rnd 15: Ch 1, sc in next 4 sts, sc2tog; repeat from * 5 more times. Join. (6 repeats × 5 = 30 sts)
Rnds 16–19: Ch 1, sc in each st around. Join. (30 sts)
Fasten off. The opening rim measures 3.75 in (9.5 cm) across when flat. The blue tube should be about 6.25 in (15.9 cm) tall.
Make All Pieces
- Color A (rust): 1 upper tube, 1 handle, and 2 buttons sewn on
- Color B (blue): 1 lower tube and 2 buttonhole tabs
Layout, top to bottom:
[ Handle  – A ]
[ Tube 1  – A ]  60 sts at the joining edge
[ Tube 2  – B ]  60 sts at the joining edge
[ Opening – B ]  30 sts
Handle (Color A)
With the rust tube’s foundation edge up, count the foundation stitches from the back seam. Join A in st 1.
Row 1: Ch 1, sc in sts 1–3. Turn. (3 sts)
Rows 2–36: Ch 1, sc in each st across. Turn. (3 sts)
The strap is 0.75 in (1.9 cm) wide and 8 in (20.3 cm) long. Bring it across the top without twisting it. Sl st the last row to foundation sts 31–33, working through both layers, and fasten off. When the holder hangs, the handle forms an arch about 3 in (7.6 cm) high.
Buttonhole Tabs (Color B)
The tabs are worked into the free loops of the blue tube’s foundation chain. Hold the blue tube with the foundation edge up and the seam at the back.
Row 1: Join B in foundation st 13, ch 1, sc in sts 13–18. Turn. (6 sts)
Rows 2–3: Ch 1, sc in each st across. Turn. (6 sts)
Row 4 (buttonhole): Ch 1, sc in the first st, ch 4, sk 4 sts, sc in the last st. Turn. (2 sc + 1 ch-4 sp)
Row 5: Ch 1, sc in the first st, 4 sc in the ch-4 sp, sc in the last st. Turn. (6 sts)
Row 6: Ch 1, sc in each st across. Fasten off. (6 sts)
Repeat Rows 1–6 over foundation sts 43–48 for the second tab. Each tab is 1.5 in (3.8 cm) wide and 1.3 in (3.3 cm) tall. Its buttonhole is centered 3.5 rows, or 0.8 in (2.0 cm), above the blue tube’s top edge.
Joining
The two tubes are joined with buttons, not seamed. That way you can unbutton the blue tube to load bags from the bottom, or to wash the pieces.
Sew on the buttons: At each marker on Rnd 18 of the rust tube, sew one 1 in (2.5 cm) button through the fabric with doubled thread. Keep a short thread shank, about 1/8 in (0.3 cm) long, so the tab can sit under the button. Remove the markers.
Stitch-to-stitch logic: Both joining edges have 60 stitches, and both start at the back seam. Each tab covers sts 13–18, so the center of its buttonhole falls between sts 15 and 16. That is exactly where the button sits on the rust tube. The same applies to sts 43–48 and the button between sts 45 and 46. Because of this, the edges meet without any easing, twisting, or gaps.
Tension advice: Butt the blue top edge against the rust bottom edge instead of overlapping them. Each tab then reaches up 0.8 in (2.0 cm) to its button. If the buttonholes feel loose, sew the buttons half a round lower. If they feel tight, sew them half a round higher.
Size checkpoint: The assembled holder measures 7.5 in (19.1 cm) wide and about 13.25 in (33.7 cm) tall, not counting the handle.
Border (Slip-Stitch Edging)
Border gauge: 1 sl st per stitch, worked loosely. It adds no width and less than 1/8 in (0.3 cm) of height.
Rust top rim: Join A in the free foundation loop at st 4. Sl st in each foundation st across to st 30, skip the handle (sts 31–33), sl st in sts 34–60, and join. (27 + 27 = 54 sl sts; the 6 handle stitches are left unworked)
Rust bottom edge: Join A in any st of Rnd 21 and sl st in each st around. (60 sl sts)
Blue top edge: Join B at foundation st 19. Sl st in sts 19–42, skip the tab stitches 43–48, sl st in sts 49–60 and sts 1–12, and join. (24 + 24 = 48 sl sts; the 12 tab stitches are left unworked)
Blue opening: Join B in any st of Rnd 19 and sl st in each st around. (30 sl sts)
Why the math works: One sl st goes into each existing stitch, so every edge keeps its exact stitch count. Both joining edges stay at 60 stitches, so they still line up and the tabs still meet the buttons. The firm sl st edge also keeps the opening from stretching every time you pull out a bag.
Final Blocking
- Weave in all remaining ends along the solid bands, not in the mesh, where they would show.
- Wet both tubes with cool water and gently squeeze out the excess. Don’t wring them.
- Roll the tubes in a towel to remove more water.
- Slide each tube over a 5 in (12.7 cm) diameter bottle or can. Gently stretch the mesh lengthwise until the diamonds open evenly.
- Shape the blue taper by hand so it curves smoothly in toward the opening.
- Pin the handle flat on a towel.
- Let everything dry completely before you button the tubes together.
Final Quality-Control Checklist
- Both tubes count 60 stitches at the joining edge.
- Each mesh round has 15 loops, and the diamonds line up vertically.
- The rust tube is 7 in (17.8 cm) tall and the blue tube is 6.25 in (15.9 cm) tall.
- The opening has 30 stitches and measures 3.75 in (9.5 cm) across when flat.
- The buttons sit on Rnd 18, directly opposite each other.
- Both buttons pass through their tabs snugly.
- The handle is untwisted and both ends are anchored.
- All ends are woven into the solid bands.
Troubleshooting
- The mesh slants in a spiral: You probably missed the 2 sl sts at the start of a mesh round. Start each round from the center of a loop.
- The tube flares at Rnd 14: Check that you worked exactly 4 sc per loop. More than that adds width.
- The opening is too tight for bags: Skip Rnd 15 and work Rnds 16–19 over 36 sts instead.
- The bags fall out by themselves: Add one extra decrease round, sc 3, sc2tog around to 24 sts.
- The buttons pull through: Use 1.125 in (2.9 cm) buttons, or work 3 sc in the ch-4 space on Row 5 instead of 4.
- The handle stretches: Use a cotton yarn with less give, or work the handle with a G-6 (4.0 mm) hook.
Care
Unbutton the two tubes and hand-wash them in cool water with mild soap, then lay them flat to dry. Cotton can also go through a gentle machine cycle in a mesh laundry bag.
Final Notes
The whole design depends on one measurement chain. The 16-stitch gauge gives a 60-stitch ring that is 7.5 in (19.1 cm) wide. Spacing the loops every 4 stitches makes 15 fishnet loops. Working 4 sc per loop brings the rust tube back to exactly 60 stitches, and working 3 per loop starts the blue taper at 45. Two decrease rounds take the blue tube from 45 to 36 to 30 stitches for the opening. Because both joining edges have 60 stitches, the tabs on sts 13–18 and 43–48 line up exactly with the buttons on the rust tube. If your gauge and stitch counts match at each checkpoint, the finished holder will match the measurements above.
Happy crocheting!