

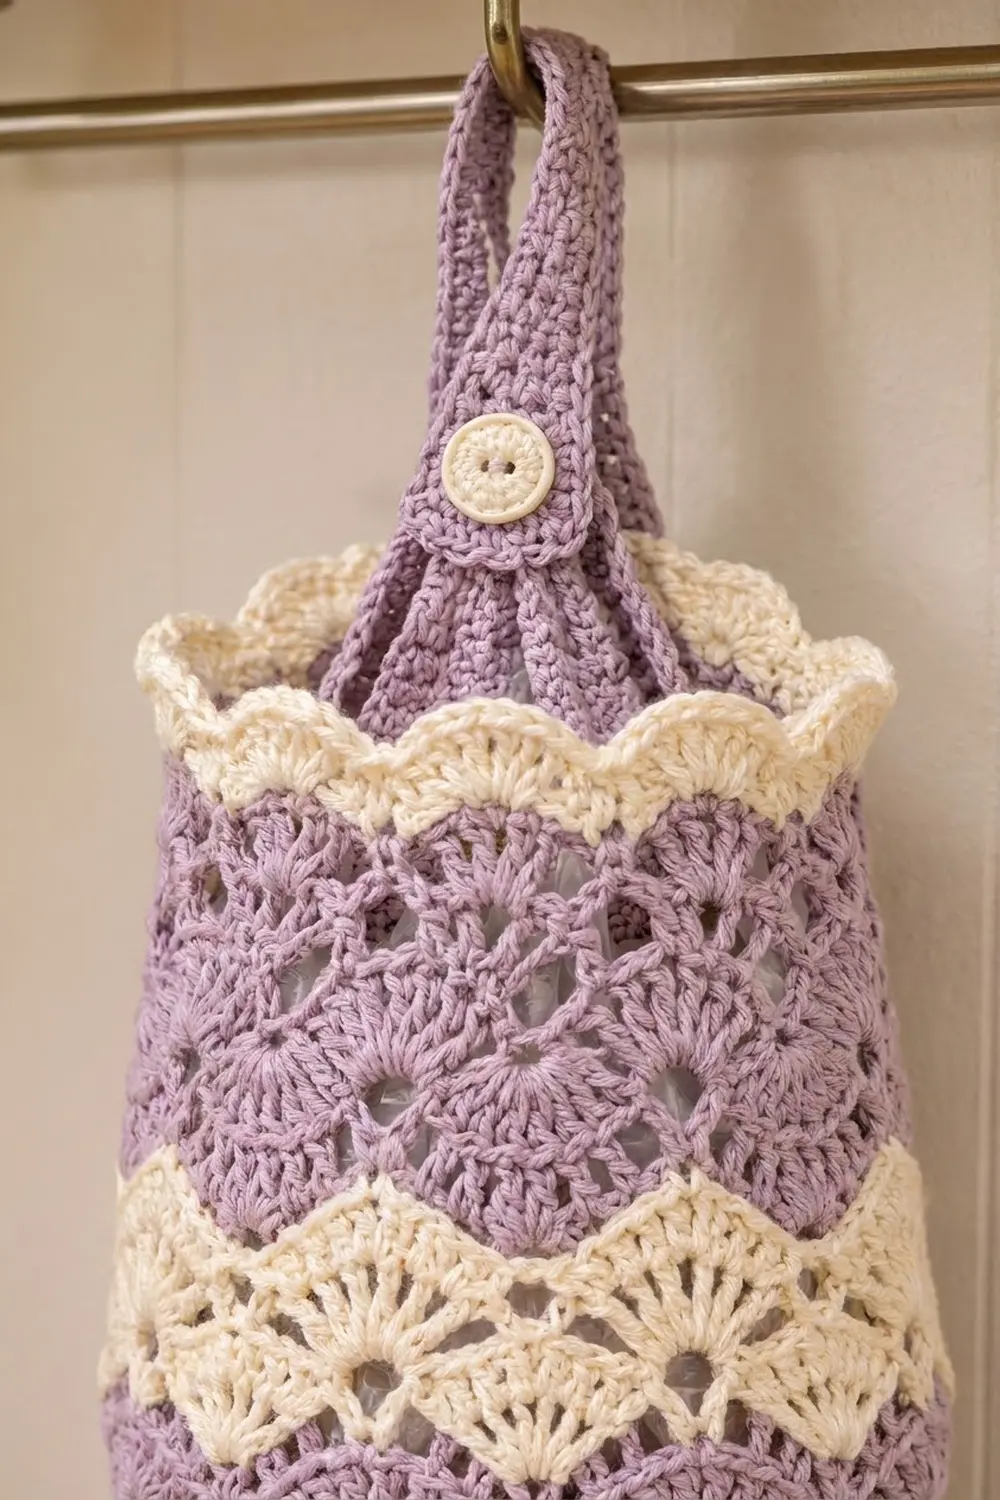
This Lavender Wave Bag Dispenser is a hanging teardrop-shaped holder for plastic grocery bags. You stuff bags in through the wide top and pull them out one at a time through the small opening at the bottom. A single strap with a button tab hangs it from a rail, hook, or cabinet knob.
The body is soft lavender with two wavy cream shell bands, a cream scalloped top edge, and a firm cream rim around the bottom opening. Open fan shells make up most of the body, and the rounded base is solid single crochet, so it holds its shape when loaded.
The pattern uses US crochet terms. After blocking, the finished dispenser is about 16.5 in (41.9 cm) tall and about 9 in (22.9 cm) wide when laid flat at its widest point. Above the button, the strap has about 6.5 in (16.5 cm) of free length that loops over your rail.
You work the body bottom-up in joined rounds. It starts with a chain ring at the bag opening, increases through a solid single crochet base, then moves into shell rounds with color bands. Smaller shells near the top narrow the shape slightly, and a cream scallop round finishes the edge. The strap is a simple row-worked band that you sew inside the back of the top edge. A cream rim worked into the starting chain finishes the bottom.
Finished Size and Construction
- Finished size: 16.5 in (41.9 cm) tall, 9 in (22.9 cm) wide flat at widest
- Skill level: Easy intermediate
- Terminology: US crochet terms
- Yarn weight: Worsted (#4) cotton
- Hook: 5.0 mm (US H-8)
- Number of pieces: 1 body + 1 strap, sewn together, plus a button
- Layout: One continuous tube worked in the round from bottom to top
- Piece size: Widest circumference 18 in (45.7 cm); top opening flat width 7.75 in (19.7 cm)
- Size before border: 15.25 in (38.7 cm) tall after Rnd 36
- Border depth: Top edging about 0.75 in (1.9 cm); bottom rim about 0.5 in (1.3 cm)
Materials
Choose a smooth, mercerized or matte worsted cotton. Cotton keeps its shape, doesn’t stretch much under the weight of the bags, and washes well. Acrylic will work too, but the dispenser will sag more when it’s full. The amounts below assume about 170 m per 100 g.
- Color A, Lavender: 160 g / 272 m
- Color B, Cream: 60 g / 102 m
These amounts include a margin of about 15 percent for swatching and small differences in tension.
Tools:
- 5.0 mm (US H-8) crochet hook
- Tapestry needle
- 4 to 6 locking stitch markers
- One 1 in (2.5 cm) button, cream or wood
- Sewing needle and matching thread
- Scissors
- Measuring tape
- Rustproof pins and a rolled towel for blocking
Abbreviations (US Terms)
- ch – chain
- sl st – slip stitch
- sc – single crochet
- hdc – half double crochet
- dc – double crochet
- sk – skip
- st(s) – stitch(es)
- sp – space
- inc – 2 sc in the same st
- rep – repeat
- Rnd – round
Special stitches:
- Shell: 7 dc in the same st.
- Small shell: 5 dc in the same st.
- Standing sc: Start with a slip knot on the hook, insert the hook into the st, yarn over, pull up a loop, yarn over, and pull through both loops.
Gauge and Checkpoints
The body is one piece, so your test piece is the base itself. Work Rnds 1 to 16, then measure before you go on.
- Single crochet gauge: 16 sc and 18 rnds = 4 in (10.2 cm)
- Shell gauge: 2 shell repeats (shell + sc) = 3 in (7.6 cm) wide; 8 shell rnds = 5 in (12.7 cm) tall
- Small shell gauge: 6 small-shell repeats = 7.75 in (19.7 cm) wide; 6 rnds = 3 in (7.6 cm) tall
Checkpoints:
- After Rnd 1: The ring measures 8 in (20.3 cm) around.
- After Rnd 16: The base measures 18 in (45.7 cm) around, 9 in (22.9 cm) flat, and about 3.5 in (8.9 cm) tall.
- After Rnd 30: The body measures 12.25 in (31.1 cm) tall.
- After Rnd 36: The body measures 15.25 in (38.7 cm) tall and about 7.75 in (19.7 cm) flat across the top.
If your piece is too big, go down to a 4.5 mm hook. If it’s too small, go up to a 5.5 mm hook. Check row height as well as width, because shells that are too tall will make a long, droopy dispenser.
Body
Start with Color A.
Foundation: Ch 32 and join with a sl st to the first ch, without twisting the chain. Place a marker in the joining sl st so you can find the base of the chain later.
Rnd 1: Ch 1, sc in each ch around, then join with a sl st to the first sc. (32 sc)
Rnd 2: Ch 1, sc in each st around, then join. (32 sc)
Rnd 3: Ch 1, *sc in next 3 sts, inc; rep from * 7 more times, then join. (40 sc)
Rnd 4: Ch 1, sc in each st around, then join. (40 sc)
Rnd 5: Ch 1, *sc in next 4 sts, inc; rep from * 7 more times, then join. (48 sc)
Rnd 6: Ch 1, sc in each st around, then join. (48 sc)
Rnd 7: Ch 1, *sc in next 5 sts, inc; rep from * 7 more times, then join. (56 sc)
Rnd 8: Ch 1, sc in each st around, then join. (56 sc)
Rnd 9: Ch 1, *sc in next 6 sts, inc; rep from * 7 more times, then join. (64 sc)
Rnd 10: Ch 1, sc in each st around, then join. (64 sc)
Rnd 11: Ch 1, *sc in next 7 sts, inc; rep from * 7 more times, then join. (72 sc)
Rnds 12–16: Ch 1, sc in each st around, then join. (72 sc in each rnd)
Measure now using Checkpoint 2. The increases every other round give the rounded, tapered bottom. With 72 sts, the shell rounds divide into exactly 12 repeats of 6 sts.
Shell Section
Rnd 17 (A): Ch 1, sc in the first st, *sk 2, shell in next st, sk 2, sc in next st; rep from * 10 more times, sk 2, shell in next st, sk 2, then join with a sl st to the first sc. (12 shells + 12 sc = 96 sts)
Rnd 18 (A): Sl st in each of the next 4 sts, ending in the center dc of the first shell. Ch 1, sc in the same st, *shell in next sc, sc in center dc of next shell; rep from * 10 more times, shell in last sc, then join to the first sc. (12 shells + 12 sc = 96 sts)
Rnds 19–20 (A): Rep Rnd 18. (96 sts in each rnd)
Fasten off Color A.
Rnd 21 (B): Join Color B with a standing sc in the center dc of any shell. *Shell in next sc, sc in center dc of next shell; rep from * 10 more times, shell in last sc, then join to the first sc. (96 sts)
Rnd 22 (B): Rep Rnd 18. (96 sts)
Fasten off Color B. The two cream rounds of offset shells make the first wavy band.
Rnd 23 (A): Join Color A with a standing sc in the center dc of any shell, then work as Rnd 21. (96 sts)
Rnds 24–28 (A): Rep Rnd 18. (96 sts in each rnd)
Fasten off Color A.
Rnds 29–30 (B): Work Rnd 29 as Rnd 21 and Rnd 30 as Rnd 18. (96 sts in each rnd)
Fasten off Color B. Measure now using Checkpoint 3.
Small Shell Section
Rnd 31 (A, conversion round): Join Color A with a standing sc in the center (4th) dc of any shell. *Small shell in next sc, sc in center dc of next shell; rep from * 10 more times, small shell in last sc, then join. (12 small shells × 5 dc + 12 sc = 72 sts)
Rnd 32 (A): Sl st in each of the next 3 sts, ending in the center (3rd) dc of the first small shell. Ch 1, sc in the same st, *small shell in next sc, sc in center dc of next small shell; rep from * 10 more times, small shell in last sc, then join. (72 sts)
Rnds 33–36 (A): Rep Rnd 32. (72 sts in each rnd)
Fasten off Color A. Measure now using Checkpoint 4. The smaller shells pull the top in gently, which gives the teardrop shape.
Strap
Use Color A. Work in rows.
Row 1: Ch 9, then sc in the 2nd ch from the hook and in each ch across. (8 sc)
Rows 2–45: Ch 1, turn, sc in each st across. (8 sc in each row)
Row 46 (buttonhole): Ch 1, turn, sc in next 3 sts, ch 3, sk 3, sc in next 2 sts. (5 sc + ch-3 sp)
Row 47: Ch 1, turn, sc in next 2 sts, 3 sc in ch-3 sp, sc in next 3 sts. (8 sc)
Rows 48–50: Ch 1, turn, sc in each st across. (8 sc in each row)
Fasten off and leave a 12 in (30.5 cm) tail. The strap measures 2 in (5.1 cm) wide and about 11 in (27.9 cm) long.
Border
The dispenser has two borders: a cream scalloped top edge and a cream rim around the bottom opening. Both are worked in Color B. Border gauge is the same as body gauge, 16 sc = 4 in (10.2 cm).
Top Edging
Rnd 37 (B, trim round): Join Color B with a standing sc in the center dc of any small shell. Work sc in each remaining dc and hdc in each sc around, then join. (72 worked 1 per existing st + 0 added = 72 sts)
Using hdc over the low sc points fills the dips, so the edge comes out level.
Rnd 38 (B, scallop round): Ch 1, sc in the first st, *sk 2, small shell in next st, sk 2, sc in next st; rep from * 10 more times, sk 2, small shell in next st, sk 2, then join. (12 scallops × 5 dc + 12 sc = 72 sts)
Fasten off and weave in the ends.
Why the math works: 72 ÷ 6 = 12. That gives exactly 12 scallops with no partial repeats at the join. The top keeps the same 72-st count as Rnds 31 to 36, so its flat width stays at 7.75 in (19.7 cm).
Bottom Rim
Turn the body upside down. Join Color B with a standing sc in the free loop of the foundation chain at the marker.
Rim Rnd 1 (B): Sc in each remaining free loop around, then join. (32 sc)
Rim Rnd 2 (B): Ch 1, sc in each st around, then join. (32 sc)
Fasten off and weave in the ends. You work exactly one sc per foundation chain, so the rim matches Rnd 1 and the opening stays at 8 in (20.3 cm) around, about 2.6 in (6.6 cm) across. That’s tight enough to grip a bag and loose enough to pull one through.
Attaching the Strap
Lay the body flat and find the center back. Slide Row 1 of the strap inside the top edge. Sew the bottom 1.5 in (3.8 cm) of the strap to the inside back wall below Rnd 37, stitching all four edges for strength.
Sew the button to the outside of the strap, centered, 3 in (7.6 cm) above the top edge. Bring the strap up over the rail and back down, then fasten the buttonhole over the button.
Final Blocking
- Soak the dispenser in cool water for 15 minutes.
- Press the water out gently in a towel. Don’t wring it.
- Stuff the body firmly with a rolled towel or an inflated balloon to get the teardrop shape.
- Pin each top scallop so it points up evenly.
- Shape the bottom rim into a neat circle.
- Pin the strap flat at 2 in (5.1 cm) wide.
- Let it dry completely, at least 24 hours, before you remove the stuffing.
- Measure it: 16.5 in (41.9 cm) tall and 9 in (22.9 cm) wide flat at the widest point.
Final Quality-Control Checklist
- [ ] Base has 72 sts and measures 18 in (45.7 cm) around
- [ ] Every shell round has 12 shells with no skipped or doubled repeats
- [ ] Both cream bands are exactly 2 rounds deep
- [ ] Rnds 31–38 each have 72 sts
- [ ] Top has 12 even scallops
- [ ] Bottom rim has 32 sc, and a bag pulls through smoothly
- [ ] Strap is 8 sc wide, and the buttonhole fits the button snugly
- [ ] Strap is securely sewn on the inside back
- [ ] All ends are woven in at least 2 in (5.1 cm) along the stitches
Troubleshooting
The base cups or ruffles. If it ruffles, your increases are too loose; go down a hook size for Rnds 1 to 16. If it cups too much, check that you increased on every odd round from Rnd 3 to Rnd 11.
The shells slant or the count drifts. Recount after the slip-stitch move at the start of each round. You should end in the 4th dc of a 7-dc shell, or the 3rd dc of a 5-dc shell.
There’s a visible jog at color changes. Join each new color with a standing sc in a shell center, not with slip stitches.
Bags fall out of the bottom. Work a third rim round, working sc 2 together 4 times evenly spaced around, for 28 sts.
The top flares. Work Rnd 37 with a hook one size smaller.
The strap stretches. Use tighter tension, or sew a strip of cotton tape along the back of the strap.
Care
Hand wash or machine wash on a gentle cycle in cool water, then reshape and lay flat to dry. Don’t tumble dry. Heat can shrink cotton and make the scallops misshapen.

Final Notes
Each stage builds on the last. The 32-st ring gives an 8 in (20.3 cm) opening. Rnds 1 to 16 grow it to 72 sts, or 18 in (45.7 cm) around. Those 72 sts divide into 12 shells for the main body, which reaches 12.25 in (31.1 cm). Small shells bring the top to 7.75 in (19.7 cm) flat at 15.25 in (38.7 cm). The top edging and bottom rim finish the dispenser at 16.5 in (41.9 cm). If you check each stage as you go, the finished dispenser will hang straight, hold a good stash of bags, and let you pull them out one at a time.
Happy crocheting!