

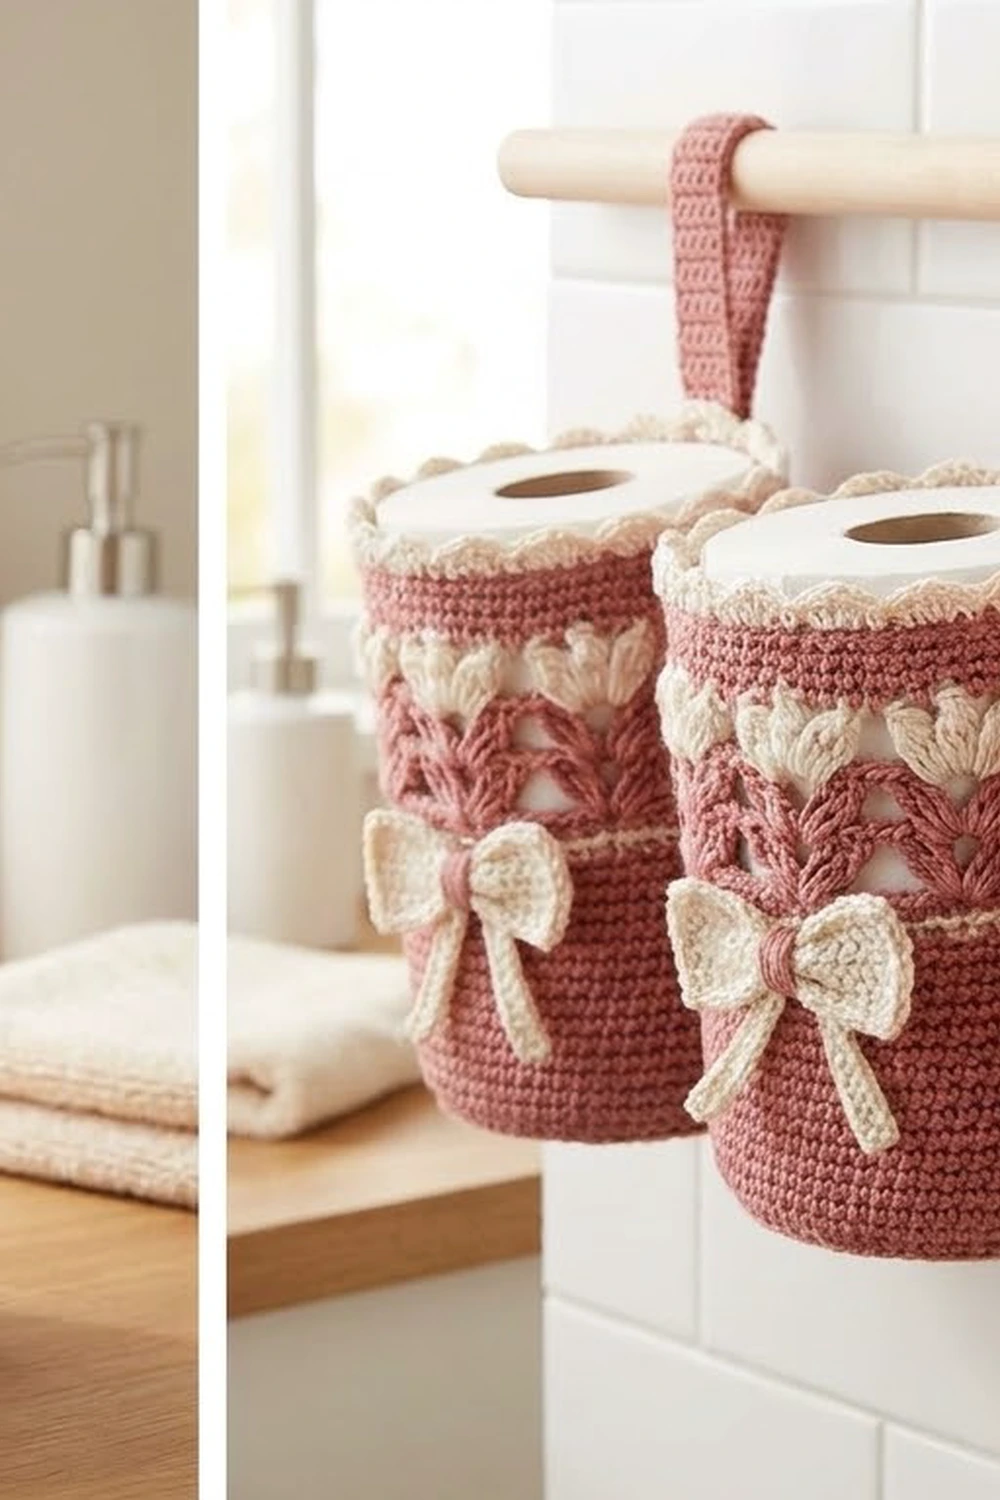
This hanging pocket set gives a bathroom a warm, cozy look for the holidays. Each pocket is a small dusty-rose cylinder that holds one standard toilet paper roll. It has a band of cream tulips, a scalloped cream rim and a sweet cream bow on the front. Three pockets hang side by side from a simple wooden rod.
The palette is just two colors: dusty rose and cream. The rose body is worked in dense single crochet, so it keeps its shape. The tulip band adds openwork texture, and the bow adds a soft, ribbon-like finish. The pattern uses US crochet terms throughout.
Each finished pocket measures 4.75 in (12.1 cm) across and 5.25 in (13.3 cm) tall, not counting the hanging loop. You work the base as a flat circle, then turn the work upward and crochet the walls in rounds. The tulip band and scalloped rim follow. Last, you make the strap and bow separately and sew them on.
The three pockets are not sewn to each other. Each one hangs from the rod on its own loop, so you can space them, move them, or make more.
Finished Size and Construction
- Finished pocket size: 4.75 in (12.1 cm) diameter × 5.25 in (13.3 cm) tall
- Skill level: Intermediate
- Terminology: US crochet terms
- Yarn weight: Worsted (#4)
- Hook: US H-8 (5 mm)
- Number of pieces: 3 pockets, each with 1 strap and 1 bow (plus 1 bow center band)
- Layout: 3 pockets in a single row on one rod, about 1 in (2.5 cm) apart
- Single piece size: 60 stitches around = 15 in (38.1 cm) circumference
- Size before border: 4.25 in (10.8 cm) tall
- Border (rim) depth: 1 in (2.5 cm)
- Overall hanging width: about 16.25 in (41.3 cm) on an 18 in (45.7 cm) rod
Materials
Choose a smooth worsted-weight cotton or cotton blend. Cotton holds its shape well, copes with bathroom humidity, and shows off the tulip clusters clearly. Avoid fuzzy yarns, because they blur the openwork band.
- Dusty rose: 170 g / about 340 yd (311 m)
- Cream: 70 g / about 140 yd (128 m)
Both quantities cover all three pockets and include a margin of roughly 10–15 percent for your gauge swatch and small differences in tension.
Tools:
– US H-8 (5 mm) crochet hook
– Locking stitch marker
– Tapestry needle
– Scissors
– Measuring tape
– Wooden dowel, 18 in (45.7 cm) long and 0.75 in (1.9 cm) diameter, with wall brackets
– Spray bottle and pins for blocking
Abbreviations (US Terms)
- ch – chain
- sl st – slip stitch
- sc – single crochet
- dc – double crochet
- BLO – back loop only
- sk – skip
- sp – space
- st(s) – stitch(es)
- rev sc – reverse single crochet (crab stitch)
- rep – repeat
Special stitches
- V-st (V-stitch): (dc, ch 1, dc) in the same stitch.
- 3-dc cl (3-double crochet cluster): Yarn over, insert hook in the indicated space, pull up a loop, yarn over, pull through 2 loops. Repeat from * 2 more times (4 loops on hook). Yarn over and pull through all 4 loops.
- Tulip: (3-dc cl, ch 2, 3-dc cl, ch 2, 3-dc cl) all in the same ch-1 space. This makes three petals: two side petals and one center petal.
Gauge and Checkpoints
Gauge: 16 sc and 18 rounds = 4 in (10.2 cm) in sc worked in the round.
Make one complete pocket before starting the others. Check it against the measurements below. If it fits a roll and matches the checkpoints, the other two will match too.
Checkpoints:
– After Rnd 5 (30 sts): base measures about 2.4 in (6.1 cm) across.
– After Rnd 10 (60 sts): base measures 4.75 in (12.1 cm) across.
– After Rnd 22: wall measures 2.75 in (7.0 cm) from the base fold.
– After Rnd 24: wall measures about 4 in (10.2 cm).
– After Rnd 25 (before the border): wall measures 4.25 in (10.8 cm).
– After Rnd 28: wall measures 5.25 in (13.3 cm).
If it’s too big: go down one hook size (4.5 mm) and start again. Don’t drop stitches, because the 60-stitch count drives the tulip and scallop repeats.
If it’s too small: go up to a 5.5 mm hook. A roll needs about 4.25 in (10.8 cm) of inside width, so a base smaller than 4.5 in (11.4 cm) will be too tight.

Pocket Base
Use dusty rose. The base is worked in continuous spiral rounds. Place a marker in the first stitch of each round and move it up as you go.
Rnd 1: Make a magic ring. Work 6 sc into the ring and pull it closed. (6 sts)
Rnd 2: 2 sc in each st around. (12 sts)
Rnd 3: Sc in next st, 2 sc in next st; rep from * around. (18 sts)
Rnd 4: Sc in next 2 sts, 2 sc in next st; rep from * around. (24 sts)
Rnd 5: Sc in next 3 sts, 2 sc in next st; rep from * around. (30 sts)
Rnd 6: Sc in next 4 sts, 2 sc in next st; rep from * around. (36 sts)
Rnd 7: Sc in next 5 sts, 2 sc in next st; rep from * around. (42 sts)
Rnd 8: Sc in next 6 sts, 2 sc in next st; rep from * around. (48 sts)
Rnd 9: Sc in next 7 sts, 2 sc in next st; rep from * around. (54 sts)
Rnd 10: Sc in next 8 sts, 2 sc in next st; rep from * around. (60 sts)
The base should lie flat and measure 4.75 in (12.1 cm) across. If it ruffles, your increases are too loose. If it cups, they are too tight. To make the last increases less obvious, you can stagger them by working the increase in the middle of each repeat.
Pocket Walls
Keep working in dusty rose. From here on, you join each round with a sl st so the color changes in the tulip band line up neatly.
Rnd 11: Ch 1. Sc in BLO of each st around, then sl st to the first sc to join. (60 sts)
This round creates a crisp ridge, so the walls stand straight up from the base.
Rnds 12–22: Ch 1. Sc in each st around, then sl st to the first sc to join. (60 sts per round)
The wall should now be 2.75 in (7.0 cm) tall. Test-fit a roll: it should slide in with a little ease.
Tulip Band
Rnd 23 (dusty rose, leaf round): Ch 4 (counts as dc + ch 1). Dc in the same st as the join (first V-st made). Sk 2 sts, V-st in next st; rep from * 18 more times. Sk the last 2 sts and sl st to the 3rd ch of the beginning ch-4. (20 V-sts: 40 dc + 20 ch-1 sps)
These rose V shapes become the leaf stems below the tulips. Fasten off the rose yarn.
Rnd 24 (cream, tulip round): Join cream in the ch-1 sp of any V-st. Ch 2. In the same sp, work a 2-dc cluster (this counts as the first 3-dc cl). Then work (ch 2, 3-dc cl, ch 2, 3-dc cl) in the same sp to finish the first Tulip.
Next: ch 3, sc in the ch-1 sp of the next V-st, ch 3. Tulip in the ch-1 sp of the next V-st, ch 3, sc in the ch-1 sp of the next V-st, ch 3. Rep from * 8 more times. Sl st to the top of the first cluster.
Count: 10 Tulips (30 clusters), 10 sc, 20 ch-2 sps and 20 ch-3 sps.
Fasten off the cream yarn. The wall should now measure about 4 in (10.2 cm).
Rnd 25 (dusty rose, mesh round): Join rose in the top of the first cluster of any Tulip. Ch 1. Sc in the first cluster, sc in the center cluster, sc in the third cluster (skip the ch-2 sps), ch 1, sc in the next sc between Tulips, ch 1. Rep from * around and sl st to the first sc to join.
Each repeat is 4 sc + 2 ch-1 sps = 6 sts. Count: 10 repeats × 6 = 60 sts (40 sc + 20 ch-1 sps).
Fasten off. The wall should measure 4.25 in (10.8 cm). This round pulls the tulip tops in and gives you a 60-stitch base for the rim.
Border (Scalloped Rim)
Border gauge: One scallop repeat is 6 sts wide, which measures 1.5 in (3.8 cm). With 60 sts around, the pocket has 30 sts across the front half and 30 sts across the back half. That gives 5 scallops on each half.
Rnd 26 (cream): Join cream in any st. Ch 1. Work 1 sc in each sc and 1 sc in each ch-1 sp around. Sl st to join.
Count: 40 sc worked one-per-stitch + 20 sc worked into ch-1 sps = 60 sc (30 front, 30 back).
Rnd 27 (cream, scallops): Sl st over to the sc that sits above a “between-tulips” sc from Rnd 25. Ch 1, sc in that st. Sk 2 sts, 5 dc in next st, sk 2 sts, sc in next st. Rep from * around, but on the last repeat skip the final sc and sl st to the first sc instead.
Count: 10 scallops. Each one is 5 dc + 1 sc = 6 sts, for 60 sts total (30 front, 30 back).
Each 5-dc fan lands directly above a center tulip petal.
Rnd 28 (cream, edging): Ch 1. Rev sc in each st around, working from left to right. Sl st to join and fasten off.
Count: 60 rev sc (30 front, 30 back).
Why the math works: 60 divides evenly by 3 for the V-sts (20) and by 6 for the Tulips (10). Rnd 25 brings the count back to exactly 60. That means the 6-stitch scallop repeat fits 10 times with nothing left over, and each scallop lines up with a tulip. The rim adds 1 in (2.5 cm), bringing the pocket from 4.25 in (10.8 cm) to 5.25 in (13.3 cm).
Strap
Use dusty rose.
Row 1: Ch 6. Sc in the 2nd ch from the hook and in each remaining ch. (5 sts)
Rows 2–40: Ch 1, turn. Sc in each st across. (5 sts per row)
Fasten off and leave a 12 in (30.5 cm) tail. The strap measures 1.25 in (3.2 cm) wide by 9 in (22.9 cm) long.
Bow
Use cream.
Cord: Ch 37. Sc in the 2nd ch from the hook and in each ch across. (36 sts, 9 in / 22.9 cm long)
Fasten off and weave in the ends.
Center band: Ch 7. Sc in the 2nd ch from the hook and in each ch across. (6 sts, 1.5 in / 3.8 cm)
Fasten off and leave an 8 in (20.3 cm) tail.
Shaping: Lay the cord out in four sections:
– 6 sts for the left tail
– 12 sts folded into the left loop
– 12 sts folded into the right loop
– 6 sts for the right tail
Cross the two tails at the center so they angle downward. Wrap the center band around the middle, pinch it in, and sew the band’s ends together at the back.
The finished bow measures about 3 in (7.6 cm) wide by 2.25 in (5.7 cm) tall.
Make All Pieces
Dusty rose:
– 3 pocket bodies (Rnds 1–23 and Rnd 25)
– 3 straps
Cream:
– 3 tulip rounds (Rnd 24)
– 3 rims (Rnds 26–28)
– 3 bow cords
– 3 bow center bands
Layout on the rod (front view):
|==================== rod 18 in (45.7 cm) ====================|
   [Pocket 1]  1 in  [Pocket 2]  1 in  [Pocket 3]
   4.75 in           4.75 in           4.75 in
   (12.1 cm)  (2.5)  (12.1 cm)  (2.5)  (12.1 cm)
Joining: Straps, Bows and Hanging
The pockets are never sewn to each other. “Joining” here means attaching each pocket’s strap and bow, then hanging the pockets on the rod.
Strap:
1. Fold the strap in half so the two ends stack on top of each other.
2. Center the stacked ends on the inside back wall, with the top edge just below Rnd 25. The ends will cover about 1.5 in (3.8 cm), which is roughly Rnds 18–25.
3. Whipstitch through both strap layers and the wall, matching the strap’s 5 sts to 5 wall sts on every row. Matching stitch for stitch keeps the strap straight and centered.
4. Sew around all four edges of the overlap.
The loop should stand about 2 in (5.1 cm) above the rim.
Bow: Center the bow on the front, directly opposite the strap, with its center about 1.5 in (3.8 cm) above the base ridge. Using the cream tail, sew through the center band and tack each loop and tail in 2 places.
Tension: Sew firmly but don’t pull until the fabric puckers. The wall should stay smooth around every seam.
Size checkpoint: A hung pocket should still measure 4.75 in (12.1 cm) across. The strap should not pull the rim into an oval.
Final Blocking
- Put a toilet paper roll, or a rolled towel of the same size, into each pocket.
- Mist the pocket with water until it is damp but not soaked.
- Shape the walls straight and press the base flat.
- Pin the scallops so each one stands evenly, 1.5 in (3.8 cm) wide.
- Pat each Tulip so the three petals open slightly.
- Flatten the bow loops and angle the tails.
- Let everything dry completely, then hang the pockets.
Final Quality-Control Checklist
- Base measures 4.75 in (12.1 cm) across and lies flat.
- Each pocket has 60 sts in Rnds 11–22, 25, 26, 27 and 28.
- Each pocket has 10 Tulips, evenly spaced.
- Each pocket has 10 scallops, each centered over a tulip.
- Pocket height is 5.25 in (13.3 cm).
- Strap is centered on the back and sewn through both layers.
- Bow is centered on the front, 1.5 in (3.8 cm) above the base ridge.
- All three pockets match within 0.25 in (0.6 cm).
- All ends are woven in securely.
Troubleshooting
- Base cups: add a 2 sc increase in a few spots, or go up a hook size.
- Base ruffles: your increases are too loose. Go down a hook size.
- Walls lean outward: check that Rnd 11 was worked in BLO.
- Tulips crowd together: make sure you skipped 2 sts between V-sts in Rnd 23, giving exactly 20.
- Scallops are off-center: restart Rnd 27 from the sc above a between-tulips stitch.
- Rim flares: work Rnd 28 with a smaller hook.
- Strap twists: re-sew it, matching 5 strap sts to 5 wall sts.
Care
Hand wash in cool water and lay flat to dry, reshaping the pocket around a roll. Don’t put the pockets in the dryer.
Final Notes
Everything comes back to one chain of measurements:
- Gauge is 16 sts = 4 in (10.2 cm).
- That makes a 60-stitch base 4.75 in (12.1 cm) across, with a 15 in (38.1 cm) circumference.
- The walls reach 4.25 in (10.8 cm) before the border.
- The 1 in (2.5 cm) rim brings the finished pocket to 5.25 in (13.3 cm).
- Three pockets spaced 1 in (2.5 cm) apart take up 16.25 in (41.3 cm) of an 18 in (45.7 cm) rod.
Check each link in the chain as you go, and all three pockets will match.
Happy crocheting!