

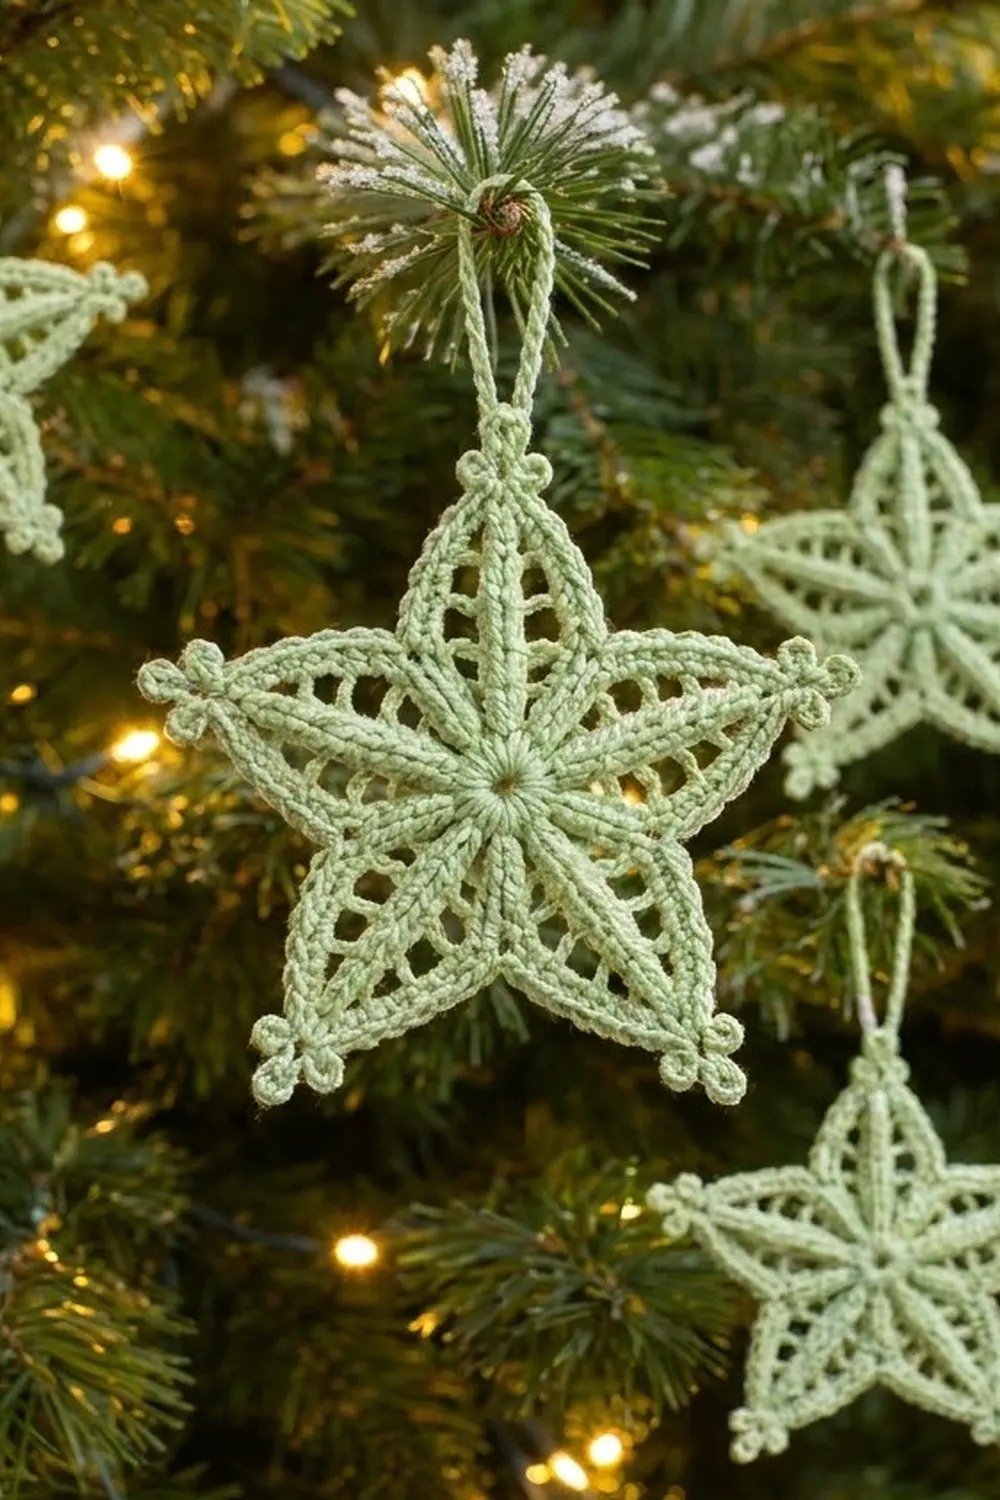
This lacy five-pointed star is a quick holiday make with a vintage look. Each point has a crisp center spine, two rows of small open windows and a neat single-crochet outline. Every tip ends in a tiny clover of three picots, and a slim chain loop at the top point lets you hang it straight on the tree.
The sample uses one soft sage-green cotton thread. The muted green looks fresh against dark pine branches and stays calm next to gold baubles and ribbon. Because it’s one color and one piece, the stitch texture does all the work.
The pattern uses US crochet terms. The finished star measures about 4 in (10.2 cm) from tip to tip across the widest point, and about 3.75 in (9.5 cm) tall without the loop. The hanging loop adds about 1 in (2.5 cm).
The star is worked in one piece, in joined rounds, from the center out. Round 1 is a small ring. Round 2 makes a solid disc. Round 3 sets out the five points. Round 4 opens the lace windows and lifts the tips. Round 5 is the border: a solid single-crochet outline with picot clusters at the tips and the hanging loop. There’s nothing to sew together.
Finished Size and Construction
- Finished size: 4 in (10.2 cm) tip to tip; 3.75 in (9.5 cm) tall without the loop
- Skill level: Advanced beginner to intermediate
- Terminology: US crochet terms
- Yarn weight: Fingering-weight (Super Fine, #1) mercerized cotton or size 3 crochet thread
- Hook: 2.25 mm (US B-1)
- Number of pieces: 1
- Layout: One single star motif, no joining
- Piece size: 4 in (10.2 cm) tip to tip
- Size before border (after Round 4): 3.5 in (8.9 cm) tip to tip
- Border depth: 0.25 in (0.6 cm) on each edge, including the picots
Materials
Yarn: Use a smooth, tightly plied cotton in fingering weight, or a size 3 crochet thread. Mercerized cotton gives the clearest stitch definition and the firmest picots. Avoid fuzzy or loosely spun yarns, because they blur the windows.
- Sage green: 5 g, about 17 m (one star)
The amount includes a margin for your gauge swatch, the tail and weaving in. One star actually uses about 3 g (10 m).
Tools:
- 2.25 mm (US B-1) crochet hook
- Fine tapestry needle
- Small scissors
- Rustproof pins and a blocking board or foam mat
- Spray bottle with water, or a light spray starch
- Stitch marker (optional, for the top point)
Abbreviations (US Terms)
- ch – chain
- sl st – slip stitch
- sc – single crochet
- dc – double crochet
- st(s) – stitch(es)
- sp – space
- MR – magic ring
- rep – repeat
Special stitches:
- Picot: Ch 3, sl st in the 3rd ch from the hook.
- Trefoil: Work (Picot) 3 times, then sl st in the top of the last sc made. This pulls the three picots into a small clover at the tip.
- Loop trefoil (top point only): Work 1 Picot. Ch 20, then sl st in the same st as the base of that picot to make the hanging loop. Work 1 more Picot, then sl st in the top of the last sc made.
Gauge and Checkpoints
Gauge doesn’t need to be exact for an ornament. It does decide how big the star turns out and how open the windows look. Make one test star first, check it against these measurements, and then make the rest.
- After Round 2: The disc measures 1.25 in (3.2 cm) across.
- After Round 3: The star measures about 2.5 in (6.4 cm) tip to tip.
- After Round 4: The star measures 3.5 in (8.9 cm) tip to tip.
- After Round 5: The star measures 4 in (10.2 cm) tip to tip, including the picots.
If it’s too big: Go down to a 2 mm hook, or tighten your chains in Round 4. Loose chains make floppy windows that stretch the points.
If it’s too small: Go up to a 2.5 mm hook. If Round 2 cups instead of lying flat, your dc stitches are too tight for the increases. Fix that with a larger hook, not by adding stitches.

Pattern
Round 1 (center ring)
Make a MR. Ch 1, then work 10 sc into the ring. Pull the ring closed, leaving a tiny center hole. Join with a sl st to the first sc.
(10 sc)
Round 2 (solid disc)
Ch 3 (counts as the first dc). Work 1 dc in the same st, then 2 dc in each sc around. Join with a sl st to the top of the beginning ch-3.
(20 dc)
This is a growth round: it doubles 10 sts to 20. Think of the round as 5 sections of 4 dc each. In every section, label the stitches A, B, C and D. A sits where a valley will be, and C is where the tip of a point starts.
Checkpoint: The disc lies flat and measures 1.25 in (3.2 cm) across.
Round 3 (point setup)
Ch 1. Sc in the same st as the join (this is A, the first valley).
Dc in the next st (B), work (dc, ch 2, dc) in the next st (C, the tip), dc in the next st (D), sc in the next st (A, the next valley). Rep from * 3 more times. Then work dc in B, (dc, ch 2, dc) in C, and dc in D. Join with a sl st to the first sc.
Count per section: 1 sc + 4 dc = 5 sts, plus 1 ch-2 tip sp.
Round total: 25 sts (5 sc, 20 dc) and 5 ch-2 tip sps
All 20 dc from Round 2 are used once each, so the round stays flat. The ch-2 at each tip starts the spine of that point.
Checkpoint: You’ll see five low, rounded points about 2.5 in (6.4 cm) tip to tip.
Round 4 (lace windows)
Ch 1. Sc in the same st as the join (valley sc).
Ch 2, skip nothing, dc in the next dc. Ch 1, dc in the next dc. Ch 1, then in the ch-2 tip sp work (dc, ch 3, dc). Ch 1, dc in the next dc. Ch 1, dc in the next dc. Ch 2, sc in the next valley sc. Rep from * around. On the last repeat, leave out the final sc and instead join with a sl st to the first sc.
Count per section: 1 sc + 4 dc + 2 tip dc = 7 sts. That’s 2 ch-2 sps, 4 ch-1 sps and 1 ch-3 tip sp.
Round total: 35 sts (5 sc, 30 dc), 10 ch-2 sps, 20 ch-1 sps and 5 ch-3 tip sps
The ch-1 and ch-2 spaces between the dc stitches become the open ladder windows on each side of every point. The new tip dc pair sits right on top of the Round 3 tip pair, so the stacked stitches form the raised center spine. The valley sc stays short, which pulls the valleys in and sharpens the star shape.
Checkpoint: The star measures 3.5 in (8.9 cm) tip to tip. This is the size before the border. Each point should look like a small open triangle with a visible center line.
Border (Round 5: Outline, Picot Trefoils and Hanging Loop)
Border gauge: 9 sc = 1 in (2.5 cm) along a straight edge, using the 2.25 mm hook.
Before you start, mark one tip ch-3 sp as the top point. It’ll get the loop trefoil.
Ch 1. Sc in the same st as the join (valley sc).
Each section works like this:
- Rising edge: 2 sc in the ch-2 sp, sc in the next dc, sc in the ch-1 sp, sc in the next dc, sc in the ch-1 sp, sc in the next dc (the first tip dc). That’s 7 sc.
- Tip: In the ch-3 tip sp, work 2 sc, then a Trefoil (or the Loop trefoil at the marked top point), then 2 more sc in the same sp. That’s 4 sc.
- Falling edge: Sc in the next dc (the second tip dc), sc in the ch-1 sp, sc in the next dc, sc in the ch-1 sp, sc in the next dc, 2 sc in the ch-2 sp. That’s 7 sc.
- Valley: Sc in the next valley sc. That’s 1 sc.
Work the section 5 times in total. On the last section, leave out the final valley sc, because the first sc of the round already fills it. Join with a sl st to the first sc. Fasten off and weave in the ends.
Count per section: 1 valley sc + 7 + 4 + 7 = 19 sc, plus 1 trefoil
Round total: 95 sc, 5 trefoils (one of them with the hanging loop)
Counts per star edge: The star outline has 10 straight edges, two per point. Each edge, counted from just after the valley sc up to and including the 2 sc on its side of the tip, has 7 + 2 = 9 sc. Ten edges × 9 sc = 90 sc. Add the 5 valley sc and you get 95 sc, which matches the round total.
Why the math works: Every stitch and space from Round 4 gets exactly what it needs to lie flat:
- 1 sc in each dc and each ch-1 sp
- 2 sc in each ch-2 sp, because a ch-2 is about as wide as two sc
- 4 sc in each ch-3 tip sp, with the trefoil in the middle so the tip turns sharply
Per section, that’s 7 sts from Round 4 + 4 ch-1 sps + (2 ch-2 sps × 2 sc) + 4 tip sc = 7 + 4 + 4 + 4 = 19 sc, which matches. The border adds about 0.25 in (0.6 cm) at each end of the width: 3.5 in + 0.25 in + 0.25 in = 4 in (8.9 cm + 0.6 cm + 0.6 cm ≈ 10.2 cm).
Checkpoint: The star measures 4 in (10.2 cm) tip to tip and 3.75 in (9.5 cm) tall without the loop. The loop stands about 1 in (2.5 cm) above the top trefoil.
Final Blocking
- Weave in all ends along the back of the sc outline. Leave the loop free.
- Dampen the star evenly with the spray bottle, or soak it briefly in cool water and press it gently in a towel.
- Lay it face up on the blocking board.
- Pin the center hole flat with one pin.
- Pin all five tips out to the same distance from the center, about 2 in (5.1 cm) each. Pin the tip through the base of the trefoil, not through a picot.
- Pin each valley so it points straight toward the center, about 1 in (2.5 cm) from the middle.
- Gently open the windows with a fingertip so the dc bars run straight.
- Fluff each trefoil into a clean clover shape.
- Spray lightly with starch if you want a stiffer ornament.
- Let it dry completely before you unpin it, usually 6 to 12 hours.
- Re-measure: 4 in (10.2 cm) tip to tip.
Final Quality-Control Checklist
- Center hole is closed tight, with no gap around the ring.
- Round 2 has exactly 20 dc and lies flat.
- Round 3 has 25 sts and 5 ch-2 tips.
- Round 4 has 35 sts, and every point shows 2 open windows on each side of the spine.
- Round 5 has 95 sc and 5 trefoils.
- All five points are the same length.
- Valleys are sharp, with no bulge.
- Each trefoil shows three clear picots.
- The hanging loop is centered on the top point and twist-free.
- Ends are hidden and trimmed.
- The finished star measures 4 in (10.2 cm) tip to tip.
Troubleshooting
The star cups or curls up: Your dc stitches in Rounds 2 to 4 are too tight. Go up a hook size, or relax your tension on the chains.
The star ruffles: Your chains are too long, or you’ve added extra sc in Round 5. Recount: there should be 19 sc per section.
The points are blunt: Check that the ch-3 tip sp got exactly 2 sc, the trefoil, then 2 sc, and that the trefoil is pulled snug with a sl st in the last sc.
The windows close up: Your ch-1 sps are too tight. Make each chain the same height as a loose loop on your hook.
The points are uneven: You probably lost the A–B–C–D order in Round 3. Count the 4 dc per section before working the tip.
The loop flops over: Block the loop standing upright, or starch it lightly.
Care
Hand-wash gently in cool water and lay flat to dry, reshaping the points as it dries. Store the star flat or hanging so the picots don’t get crushed.
Final Notes
The size of this star comes from a short chain of checkpoints:
- Round 2 = 1.25 in (3.2 cm) across
- Round 3 = 2.5 in (6.4 cm) tip to tip
- Round 4 = 3.5 in (8.9 cm) tip to tip
- Round 5 adds 0.25 in (0.6 cm) at each end, for 4 in (10.2 cm) finished
The stitch counts follow the same steps: 10 sc, 20 dc, 25 sts, 35 sts, 95 sc. Check them at each round and your star will lie flat with five even points. Make one, block it, and then stitch up a whole set for the tree.
Happy crocheting!