

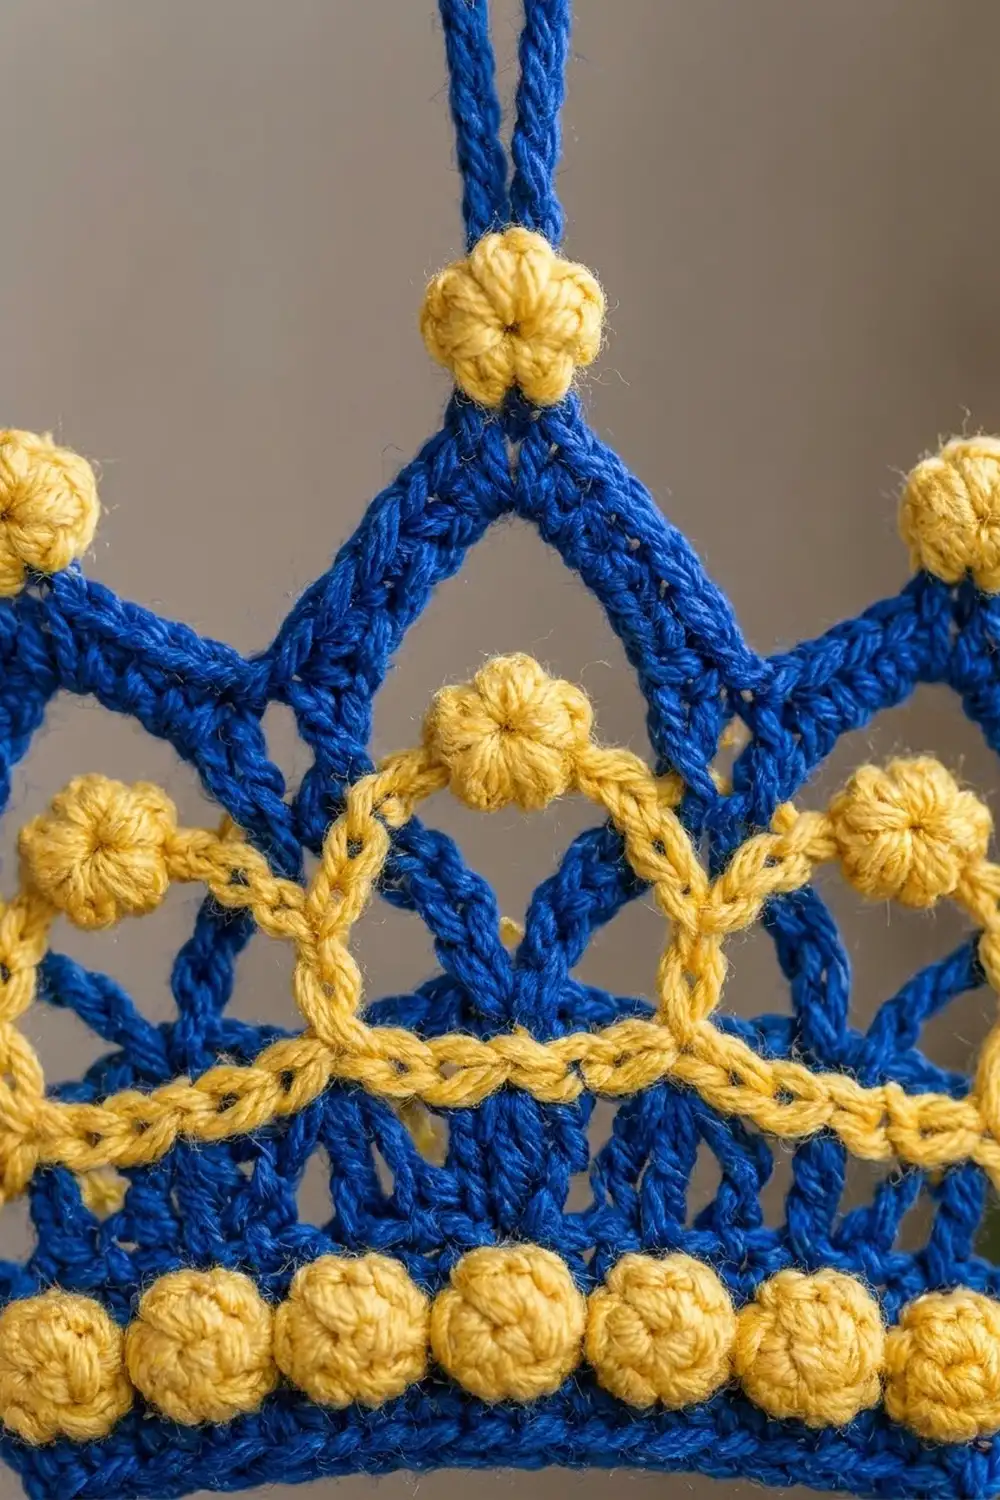
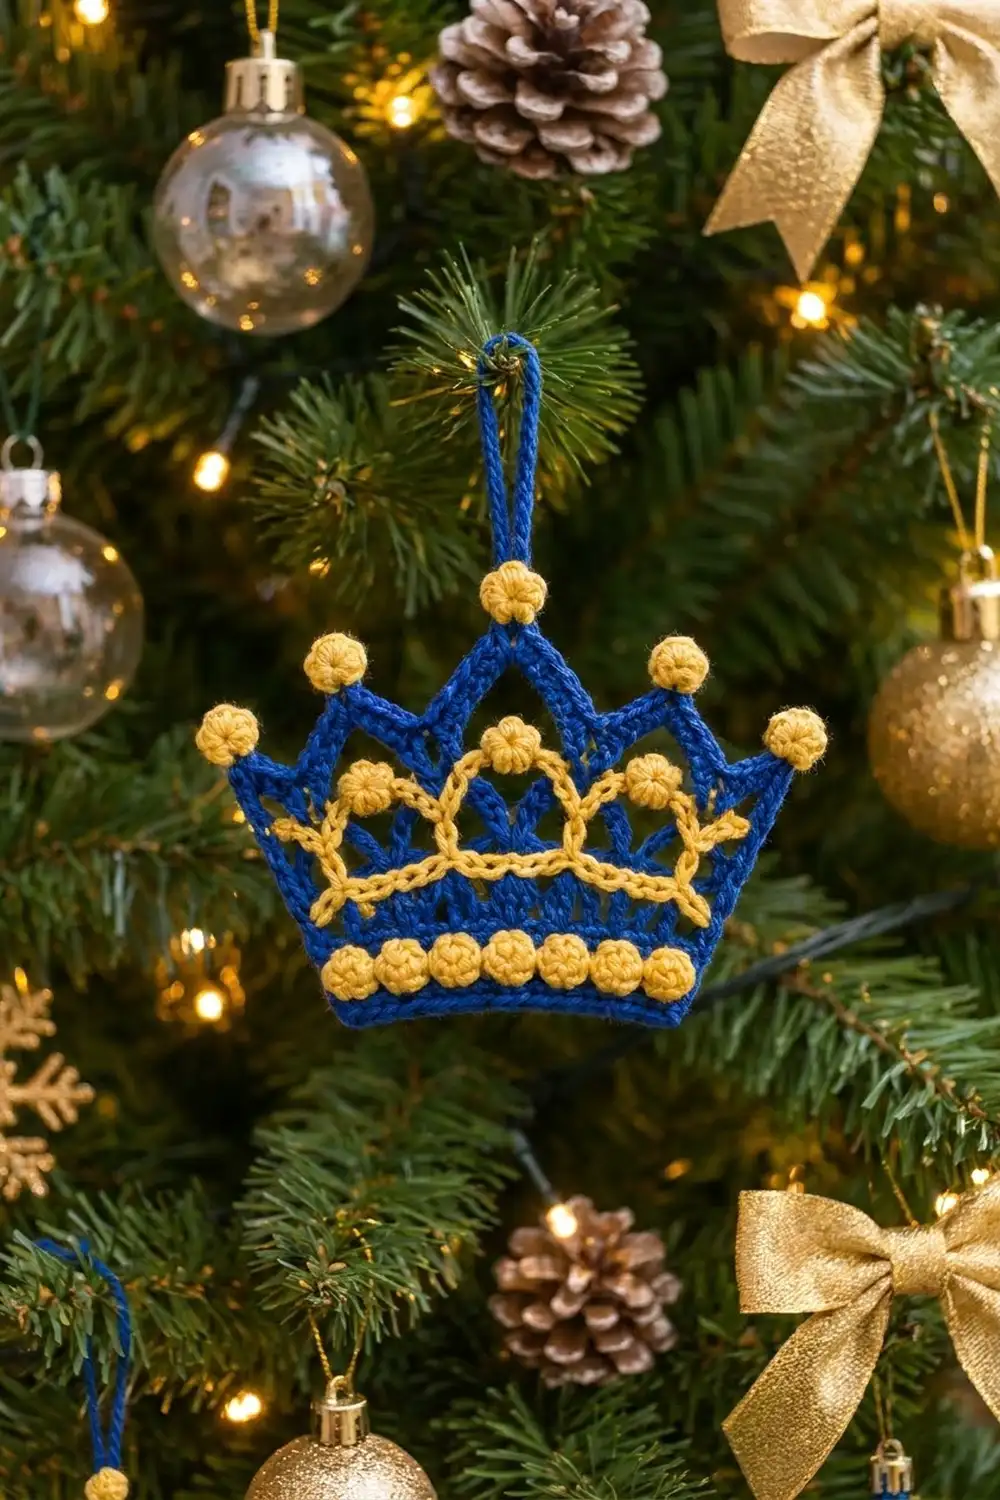
The Royal Jewel Crown is a small, flat Christmas ornament in deep royal blue with bright golden-yellow accents. It has five pointed peaks, each tipped with a round yellow ball. At the bottom is a solid blue band set with eight yellow bobble “jewels.” Three interlaced yellow chain arches frame the open upper section.
It has a crisp, graphic look, a little like an embroidered heraldic crown. Mercerized cotton gives clean stitch definition and a slight sheen that catches the tree lights.
This pattern uses US crochet terms. The finished crown measures about 5.5 in (14.0 cm) wide across the tip balls, 4.5 in (11.4 cm) wide at the bottom edge, and 2.6 in (6.6 cm) tall to the top of the center ball. The blue hanging loop adds 1.5 in (3.8 cm), so the ornament hangs about 4.1 in (10.4 cm) tall.
You work the crown body flat in rows from the bottom up: band, bobble row, fan row, then five small points made one at a time. One blue border round outlines everything and forms the hanging loop. To finish the front, you add yellow tip balls, a surface slip-stitch line, and three separate chain arches.
Finished Size and Construction
- Finished size: 5.5 in (14.0 cm) wide x 2.6 in (6.6 cm) tall, plus a 1.5 in (3.8 cm) loop
- Skill level: Intermediate
- Terminology: US crochet terms
- Yarn weight: Sport (2), mercerized cotton
- Hook: 2.75 mm (C/2)
- Number of pieces: 1 crown body, plus 3 small yellow chain arches sewn to its front
- Layout: one ornament with five points; the center point is tallest
- Piece size before border: about 5.2 in (13.2 cm) wide at the top, 4.3 in (10.9 cm) wide at the bottom, and 2.1 in (5.3 cm) tall at the center point
- Border depth: 1 round of sc, about 0.125 in (0.3 cm) on every edge
Materials
Choose a smooth, mercerized sport-weight cotton. Cotton holds sharp points and stays flat on a branch. Acrylic works, but the points tend to curl. A typical ball is about 50 g / 150 m.
- Color A, Royal Blue: 10 g, about 30 m
- Color B, Golden Yellow: 5 g, about 15 m
These quantities include a comfortable margin for checking gauge and weaving in ends.
Tools:
- 2.75 mm (C/2) crochet hook
- Tapestry needle
- Scissors
- Rust-proof pins and a foam blocking board
- Stitch markers
- Optional: spray starch or a light fabric stiffener
Abbreviations (US Terms)
- ch – chain
- sl st – slip stitch
- sc – single crochet
- dc – double crochet
- dc3tog – double crochet 3 together
- yo – yarn over
- st(s) – stitch(es)
- sp – space
- sk – skip
- RS / WS – right side / wrong side
Special stitches:
- Bobble: Work the following 5 times, all in the same st: yo, insert hook in the indicated st, yo and pull up a loop, yo and draw through 2 loops. Then yo and draw through all 6 loops on the hook.
- Fan: 5 dc in the same st.
- dc3tog: In each of the 3 indicated places: yo, insert hook, pull up a loop, yo and draw through 2 loops. Then yo and draw through all 4 loops.
- Ball: Ch 3, then work a Bobble in the 3rd ch from the hook.
Gauge and Checkpoints
Gauge: 24 sc and 28 rows = 4 in (10.2 cm), which is 6 sc = 1 in (2.5 cm).
This is a single small piece, so the crown itself is your test piece. Work Rows 1–2 and measure before you continue.
- After Row 1: 26 sc = 4.3 in (10.9 cm) wide.
- After Row 5: the band is about 0.9 in (2.3 cm) tall.
- After Row 6: the body is about 1.2 in (3.0 cm) tall and 5.2 in (13.2 cm) wide across the fans.
- After the points: the outer points reach about 1.8 in (4.6 cm), and the center point reaches 2.1 in (5.3 cm).
- After the border: about 5.4 in (13.7 cm) wide at the tips and 2.4 in (6.1 cm) tall at the center tip, not counting the tip ball.
Too big? Go down to a 2.5 mm hook. Too small? Go up to a 3 mm hook. Work the whole body on one hook so the fans line up with the points.
Crown Body
Leave a 6 in (15.2 cm) tail at every join and every fasten-off.
Foundation: With A, ch 27.
Row 1 (RS): Sc in the 2nd ch from hook and in each ch across. Change to B in the last yo of the final st. Turn. (26 sc)
Row 2 (WS), B: Ch 1, sc in the first 2 sts, *Bobble in the next st, sc in the next 2 sts; repeat from * 7 more times. Change to A in the last yo. Turn. (26 sts: 8 Bobbles + 18 sc)
Working bobbles on a WS row pushes them to the RS, where they sit as eight round yellow jewels. Check: 2 + (8 x 3) = 26. You can carry B loosely up the side or cut it, because the border hides the edge.
Row 3 (RS), A: Ch 1, sc in each st across. Turn. (26 sc)
Work into the top of each bobble exactly once. Its closing loop is easy to miss.
Row 4 (WS): Ch 3 (counts as dc), dc in the same st, dc in the next 24 sts, 2 dc in the last st. Turn. (28 dc)
This growth row works all 26 sts and adds 1 increase at each end, which gives the crown its outward flare.
Row 5 (RS): Ch 1, 2 sc in the first st, sc in the next 12 sts, 2 sc in the next st, sc in the next 13 sts, 2 sc in the last st. Turn. (31 sc)
Check: 1 + 12 + 1 + 13 + 1 = 28 sts worked into, plus 3 increases = 31.
Row 6 (WS), fan row: Ch 1, sc in the first st, *sk 2 sts, Fan in the next st, sk 2 sts, sc in the next st; repeat from * 4 more times. Fasten off. (5 Fans + 6 sc = 31 sts)
Each repeat uses 6 sts, and 1 + (5 x 6) = 31. The fans open upward on the RS. The 4 sc between the fans become the valleys between the points, and the 2 end sc become the outer corners.
Points
Each point sits on one fan and uses all 5 dc of that fan. Work Row 1 of every point with the RS facing.
Points 1, 2, 4, and 5
Point Row 1 (RS): Join A with a sl st in the first dc of the fan. Ch 3 (counts as dc), ch 3, sk the next 3 dc, dc in the last dc of the fan. Turn. (2 dc + ch-3 sp)
The ch-3 sp forms the point’s open triangular window.
Point Row 2 (WS): Ch 2 (does not count), then dc3tog over the first dc, the ch-3 sp, and the 3rd ch of the turning ch. Fasten off. (1 st, which is the tip)
Point 3 (Center)
Point Row 1 (RS): Work as for the other points. (2 dc + ch-3 sp)
Point Row 2 (WS): Ch 3 (counts as dc), ch 2, sk the ch-3 sp, dc in the 3rd ch of the turning ch. Turn. (2 dc + ch-2 sp)
Point Row 3 (RS): Ch 2 (does not count), then dc3tog over the first dc, the ch-2 sp, and the 3rd ch of the turning ch. Fasten off. (1 st)
The extra row lifts the center point about 0.3 in (0.8 cm) above its neighbors.
Checkpoint: You should have five triangular points with open windows, separated by four V-shaped valleys. Weave in the point ends down the sides of the points now, before the border.
Border
Border gauge:
- 1 sc in each sc row end
- 2 sc in each dc row end, because a dc row is as tall as 2 sc rows
- 1 sc in each foundation ch
- 3 sc in each bottom corner and point tip
Rnd 1 (RS): With A, join in the first foundation ch at the bottom right corner.
- Bottom edge: 3 sc in the first ch, sc in each of the next 24 ch, 3 sc in the last ch. (30 sc, including both corner groups)
- Left side: Work up the row ends: 1 sc each in Rows 1, 2, and 3, 2 sc in Row 4, 1 sc in Row 5, and 1 sc in the end sc of Row 6. (7 sc)
- Point 1: 2 sc in the Row 1 end, 2 sc in the Row 2 end, 3 sc in the tip, 2 sc in the Row 2 end, 2 sc in the Row 1 end. (11 sc)
- Valley: Sc in the valley sc of Row 6. (1 sc)
- Point 2: Work as for Point 1. (11 sc)
- Valley: 1 sc.
- Point 3: 2 sc in each of the 3 row ends going up (6 sc). In the tip, work: sc, then (sc, ch 20, sl st in the sc just made), then sc. Then 2 sc in each of the 3 row ends going down (6 sc). (15 sc, not counting the loop chain)
- Valley: 1 sc.
- Point 4: Work as for Point 1. (11 sc)
- Valley: 1 sc.
- Point 5: Work as for Point 1. (11 sc)
- Right side: 1 sc in the end sc of Row 6, 1 sc in Row 5, 2 sc in Row 4, then 1 sc each in Rows 3, 2, and 1. (7 sc)
Join with a sl st to the first sc. (107 sc)
Why the math works: The top edge is 11 + 1 + 11 + 1 + 15 + 1 + 11 + 1 + 11 = 63 sc. Adding bottom 30 and sides 7 + 7 gives 63 + 30 + 14 = 107. Each sc matches the height of the row end it sits on, so the edges lie flat. The 3 sc at each tip turn the point sharply, and the single valley sc keeps each V crisp.
Loop: Sl st into the ch-20 loop, work 26 sc around the loop, then sl st into the base sc. Fasten off. This makes a sturdy blue loop about 1.5 in (3.8 cm) tall.
Tip Balls
With B, join with a sl st in the center sc of a tip. On Point 3, work in front of the loop base. Make a Ball, then sl st in the same tip sc. Fasten off. Repeat on all 5 tips. (5 Balls)
Yellow Trim
Surface Line
With the RS facing and B held behind the work, surface slip stitch across the top of Row 5, between Row 5 and Row 6. (31 surface sl sts)
Keep the stitches loose. The line should match the 5.2 in (13.2 cm) width of the fan row without puckering it.
Chain Arches (make 3)
With B, ch 8, make a Ball, then ch 8. Fasten off, leaving a 6 in (15.2 cm) tail at each end.
Each arch spans 14 sts of Row 5, about 2.3 in (5.8 cm), and rises about 0.5 in (1.3 cm).
Placement: Number the 31 sts of Row 5 starting from the right edge.
- Arch 1: feet at sts 3 and 17, with the ball at st 10, below Point 2
- Arch 2: feet at sts 9 and 23, with the ball at st 16, below Point 3
- Arch 3: feet at sts 15 and 29, with the ball at st 22, below Point 4
Pin all three arches in place. Where they cross, weave Arch 2 over Arch 1 and under Arch 3 so they look interlaced. With B, tack each foot to the surface line, then tack each ball and 2 spots along each side of the arch. Weave the tails in on the WS.
Final Blocking
- Weave in all remaining ends on the WS.
- Mist the crown lightly, or dip it in diluted starch and squeeze out the excess.
- Lay it RS up on the blocking board.
- Pin the bottom edge straight at 4.5 in (11.4 cm).
- Pin the tips out to 5.4 in (13.7 cm) across, not counting the balls.
- Pin each valley down to keep the V shapes sharp.
- Smooth the arches into even curves.
- Let it dry completely, then unpin and roll the tip balls round between your fingers.
Final Quality-Control Checklist
- The bottom edge is straight and measures 4.5 in (11.4 cm).
- Width across the tip balls is about 5.5 in (14.0 cm).
- Height to the top of the center ball is about 2.6 in (6.6 cm).
- All eight bobbles show on the RS.
- There are five fans and five points, and the center point is tallest.
- The border has 107 sc.
- All five tip balls sit upright.
- The three arches are evenly spaced and interlaced.
- The loop is secure and the crown hangs straight.
- No ends show on the RS.
Troubleshooting
Bobbles are on the back. Row 2 must be a WS row. Rip back and check how many times you turned.
The fan row doesn’t end with a sc. Recount Row 5. It must have 31 sts.
Points lean sideways. Each point must start in the first dc of its fan and end in the last dc.
The sides ruffle. You have too many border stitches. Use 1 sc per sc row end and 2 sc per dc row end.
Arches sag. Add tack stitches at the ball and halfway down each side.
The crown curls. Block it with starch and let it dry flat under a light book.
Care
Hand wash in cool water with mild soap, roll it in a towel, and dry it flat, re-pinning the points if needed. Store it flat in tissue paper between seasons.
Final Notes
Here is the full measurement chain. Twenty-six sc at 6 sc per inch give a 4.3 in (10.9 cm) base. The flared fan row reaches 5.2 in (13.2 cm), and the points raise the center to 2.1 in (5.3 cm). The 107-st border brings the crown to 5.4 in (13.7 cm) by 2.4 in (6.1 cm). With the tip balls it finishes at 5.5 in (14.0 cm) by 2.6 in (6.6 cm), and it hangs from a 1.5 in (3.8 cm) loop.
Happy crocheting!