

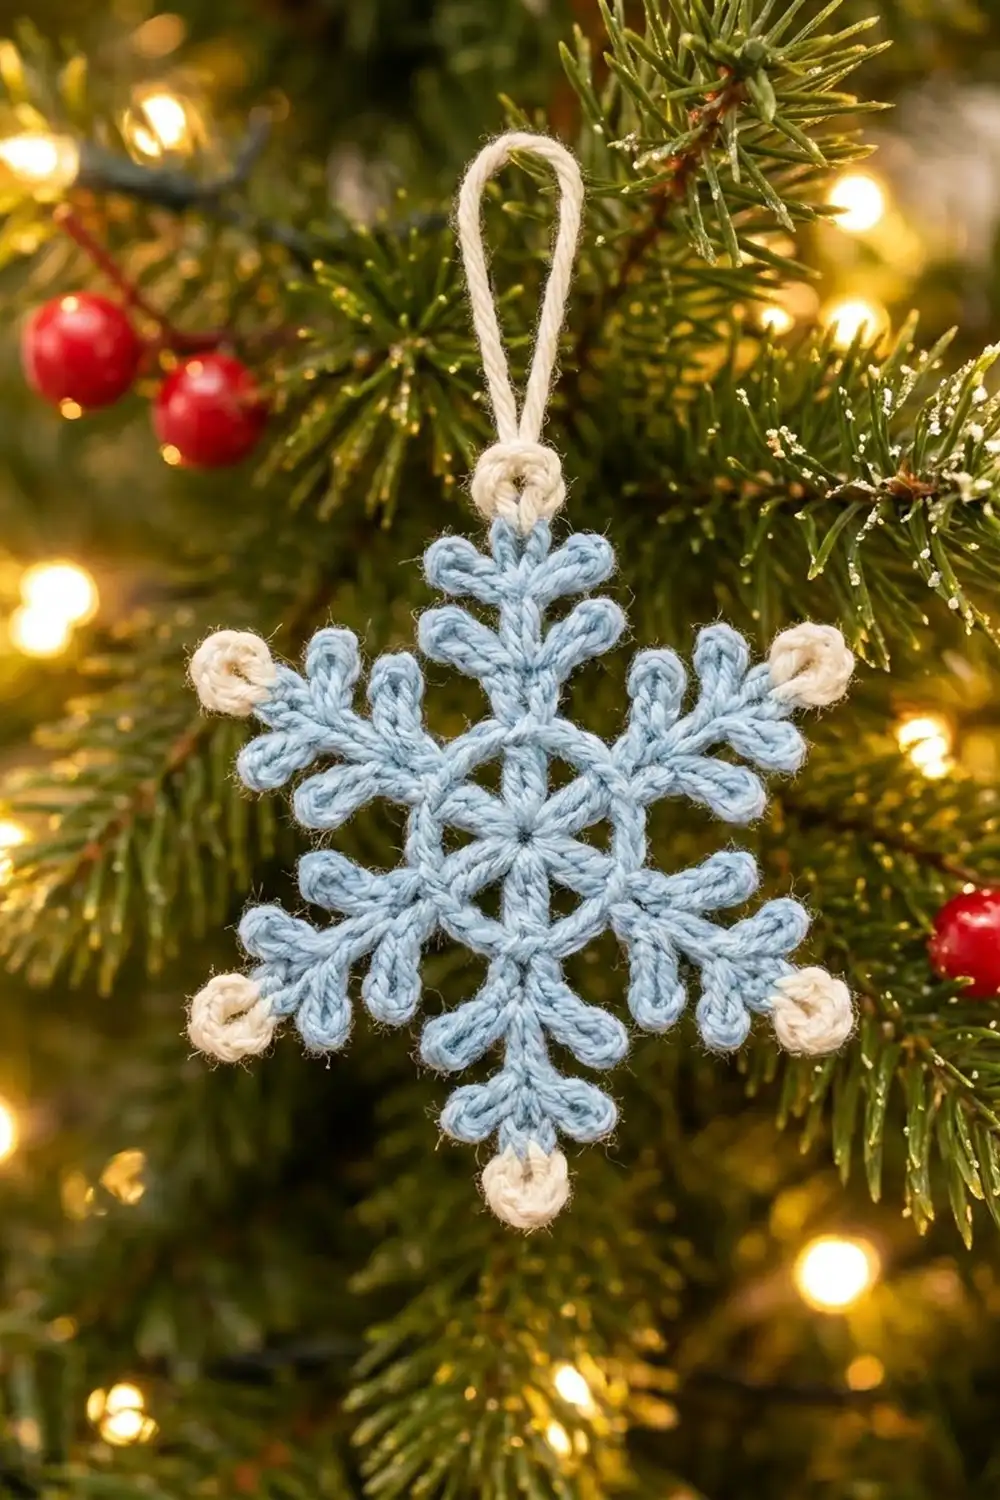
The Frostbloom Snowflake is a small, lacy ornament with a calm Nordic look. A powder-blue six-pointed star sits around an open wheel centre. Each arm carries two pairs of feathery branches, and a little cream ring caps every tip like a frosted bead.
There are two colours: light blue for the snowflake body and cream for the six tip rings and the hanging loop. Cotton yarn in these colours looks crisp against green branches and warm lights, and it holds its shape after blocking.
This pattern uses US crochet terms. The finished ornament measures about 4.75 in (12.1 cm) from tip to tip, plus a 1.25 in (3.2 cm) hanging loop.
You make it in one piece, worked in the round. A treble-crochet wheel is circled by a single crochet ring. Chain-and-single-crochet arms grow out from that ring, and a slip-stitch round adds the branches. Last, small cream rings are worked into each tip, and one of them carries the hanging loop. There is no sewing and no joining.
Finished Size and Construction
- Finished size: 4.75 in (12.1 cm) tip to tip, cream tips included
- Size before cream tips: 4.25 in (10.8 cm) tip to tip
- Hanging loop: 1.25 in (3.2 cm) long, folded
- Skill level: Easy to intermediate
- Terminology: US crochet terms
- Yarn weight: DK (light worsted / #3)
- Hook: 3.5 mm (E-4)
- Number of pieces: 1 (single motif)
- Layout: One six-pointed snowflake
- Centre wheel diameter: 1.75 in (4.4 cm) after Round 2
- Cream tip edging depth: 0.25 in (0.6 cm) at each tip
Materials
Yarn: Choose a smooth DK cotton or cotton blend. Cotton shows the slip-stitch branches clearly and blocks flat. Acrylic also works, but it can curl at the branch tips, so it needs firmer blocking.
- Light blue (Color A): 8 g / 18 m
- Cream (Color B): 3 g / 7 m
These quantities include a margin of about 30% for your gauge swatch, weaving in ends, and small tension differences.
Tools:
– 3.5 mm (E-4) crochet hook
– Tapestry needle
– Scissors
– Stitch marker
– Blocking mat or folded towel
– Rust-proof pins
– Spray bottle with water
– Optional: diluted fabric stiffener
Abbreviations (US Terms)
- ch – chain
- sl st – slip stitch
- sc – single crochet
- tr – treble crochet
- st(s) – stitch(es)
- sp – space
- rep – repeat
- rnd – round
Special stitches:
- Long branch (LB): Ch 5, then sl st into the same stitch or loop where you made your last sl st. This makes one closed ch-5 loop that points outward.
- Short branch (SB): Ch 4, then sl st into the same stitch or loop where you made your last sl st. This makes one closed ch-4 loop.
- Tip loop: The ch-3 ring at the end of each arm, formed in Round 3.
Gauge and Checkpoints
Gauge is not critical for an ornament, but it controls the final size. Make one snowflake first and measure it at each checkpoint before making a set.
- After Round 1: 1.25 in (3.2 cm) across, tr tip to tr tip
- After Round 2: 1.75 in (4.4 cm) across the sc ring
- After Round 3: 4.25 in (10.8 cm) from arm tip to opposite arm tip
- After Round 4: still 4.25 in (10.8 cm) tip to tip, because the branches stick out sideways and don’t add length
- After the cream tips: 4.75 in (12.1 cm) tip to tip
Allow ±0.25 in (0.6 cm) at any checkpoint.
If your piece is too big: go down to a 3.25 mm hook, or keep your chains snugger. Chains are the most common cause of long, floppy arms.
If your piece is too small, or the centre is cupping: go up to a 3.75 mm hook. Also make sure each tr is pulled to full height.
Pattern
Round 1 – Wheel Spokes (Color A)
Make a magic ring with Color A.
Ch 4 (counts as first tr). *Ch 3, tr into the ring; rep from * 4 more times. Ch 3, then sl st into the top of the beginning ch-4. Pull the ring closed tightly.
Count: 6 tr and 6 ch-3 spaces.
The six tr are the spokes of the wheel.
Round 2 – Closed Ring (Color A)
Ch 1. Sc into the same stitch as the join, which is the top of a spoke. Work 4 sc into the next ch-3 sp. *Sc into the next tr, then 4 sc into the next ch-3 sp; rep from * 4 more times. Sl st into the first sc to join.
Count: 30 sc (6 sc on top of the spokes + 24 sc in the spaces).
Place a marker in the first sc. The 6 sc sitting directly on top of the spokes are the base sc, and each one anchors an arm. Between every two base sc there are 4 ring sc.
Checkpoint: the wheel should lie flat at 1.75 in (4.4 cm) across.
Round 3 – Arms (Color A)
You start this round in the marked base sc.
Ch 1. *Sc into the base sc. Ch 10. Sl st into the 4th ch from the hook to make the tip loop. Work 1 sc into each of the next 6 ch back down the stem. Sl st into the same base sc. Sl st into each of the next 4 ring sc; rep from * 5 more times. Join with a sl st to the first sc.
Per arm: 1 base sc, a 6-chain stem with 6 sc worked back along it, and 1 ch-3 tip loop.
Count: 6 arms, 36 stem sc, 6 tip loops and 24 ring sl sts.
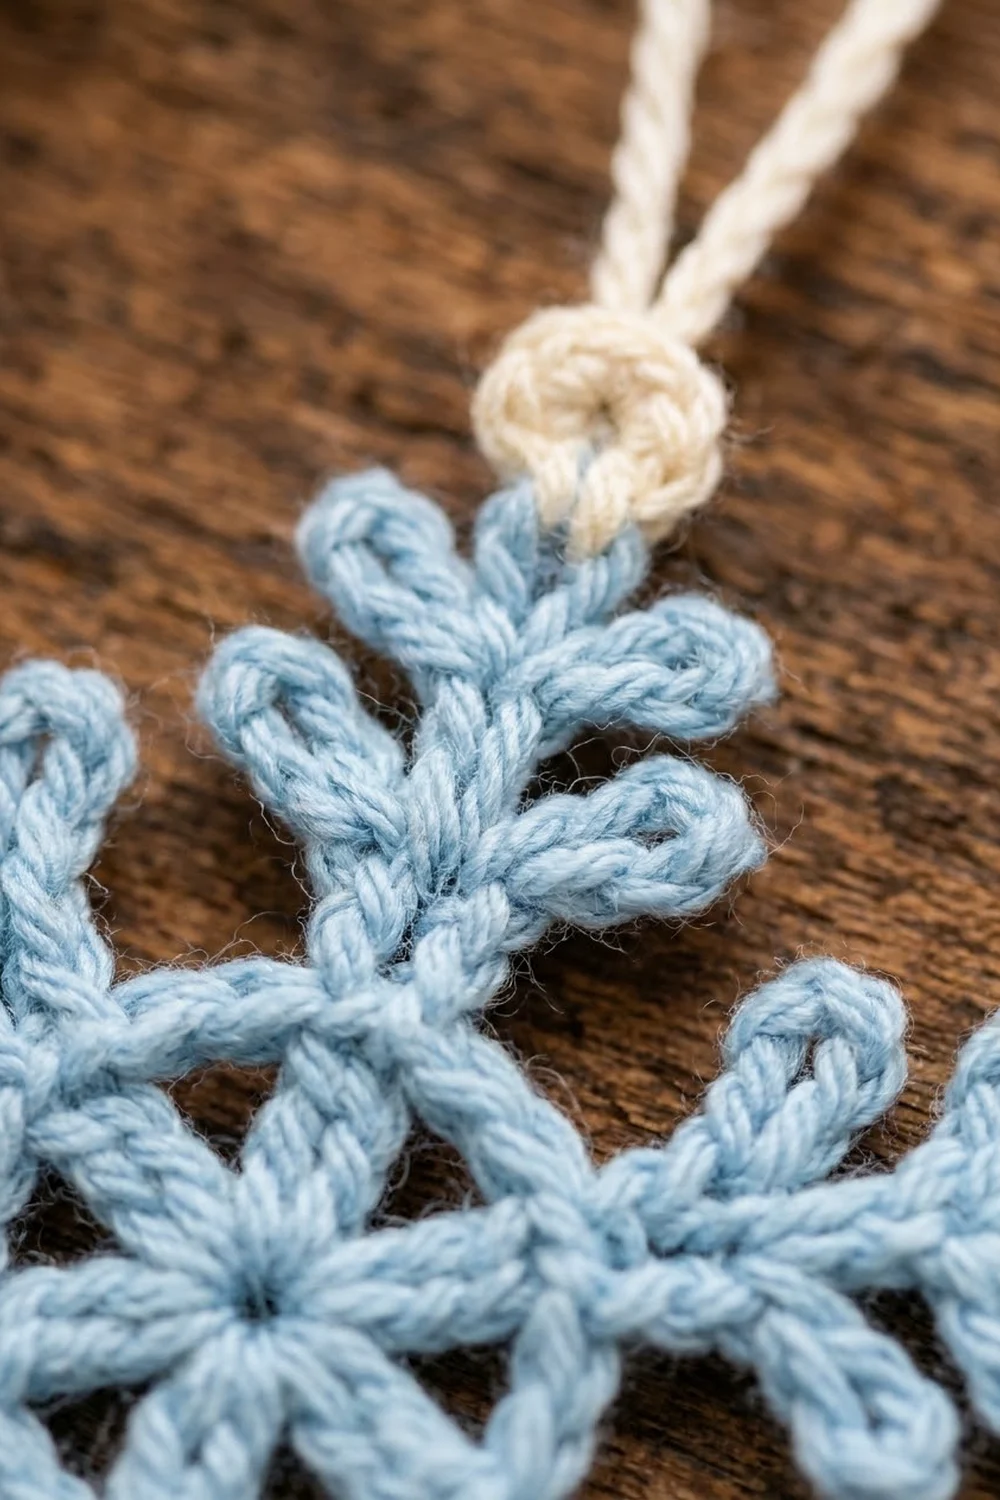
Each arm now has two strands. One side shows the free loops of the foundation chain, and the other side shows the tops of the stem sc. Each arm should reach about 1.25 in (3.2 cm) beyond the ring.
Checkpoint: 4.25 in (10.8 cm) from tip to opposite tip.
Round 4 – Branches (Color A)
You start this round in the first base sc, where the Round 3 join sits. The stem positions are numbered 1 to 6, starting from the base.
*Work up one side of the arm into the free loops of the foundation chain: sl st into the next 2 loops (positions 1–2), LB, sl st into the next 2 loops (positions 3–4), SB, sl st into the next 2 loops (positions 5–6).
At the tip: (sl st, ch 1, sl st) into the tip loop.
Work down the other side into the stem sc: sl st into the next 2 sc (positions 6–5), SB, sl st into the next 2 sc (positions 4–3), LB, sl st into the next 2 sc (positions 2–1).
Sl st into the base sc. Sl st into each of the next 4 ring stitches. Sl st into the next base sc.* Rep from * to * 5 more times. On the last rep, the final sl st joins into the first base sc.
Per arm: 12 stem sl sts, 2 tip sl sts, 6 ring sl sts, 2 long branches and 2 short branches.
Count: 120 sl sts, 12 long branches and 12 short branches (24 branches in total).
The branches mirror each other. The long branches sit between positions 2 and 3, and the short branches sit between positions 4 and 5. Fasten off Color A and weave in the ends.
Border – Cream Tip Rings (Color B)
On this snowflake the “border” is the cream edging at the six tips. It is worked into the tip loops, not around a straight edge.
Border gauge: 7 sc worked into one ch-3 tip loop makes a closed ring about 0.25 in (0.6 cm) deep beyond the blue tip.
Each tip, 5 tips in all: Attach Color B with a sl st into a tip loop. Ch 1 and work 7 sc into the same tip loop, over the blue sl sts from Round 4. Sl st into the first sc to join. Fasten off and leave a 6 in (15.2 cm) tail.
Count per tip: 7 sc.
Top tip, with hanging loop: Work the tip ring the same way (7 sc, then join). Next, ch 16 and sl st into the same sc as the join. Fasten off with a 6 in (15.2 cm) tail.
The ch-16 loop folds into a hanging loop about 1.25 in (3.2 cm) long.
Total: 6 tips × 7 sc = 42 cream sc, plus 16 ch for the loop.
Why the math works: A ch-3 loop is about as long as 3 sc, so 7 sc crowds it to a bit more than double. That extra fullness makes the stitches curl into a small round bead instead of a flat fan. If you use 5 sc, the cap stays flat and looks like a bump. If you use 9 sc, it ruffles. Each ring adds about 0.25 in (0.6 cm) to its arm. Two opposite arms together add 0.5 in (1.3 cm), which takes the snowflake from 4.25 in (10.8 cm) to 4.75 in (12.1 cm).
Weave each cream tail into the inside of its own ring so no cream shows on the blue stem.
Final Blocking
- Weave in all the ends before you block. Cotton holds tails well once it is set.
- Spray the snowflake until it is evenly damp, but not dripping. Or dip it in diluted fabric stiffener and squeeze out the extra.
- Lay it right side up on a blocking mat.
- Pin the centre first: put one pin through the centre hole.
- Pin the six cream tips 2.375 in (6.0 cm) from the centre pin, spacing them evenly. Opposite tips should be 4.75 in (12.1 cm) apart.
- Pin each long branch outward at an angle of about 45° to its arm. Then pin each short branch at a slightly smaller angle so it points a little more toward the tip.
- Open each tip loop and each branch loop with a pin tip so the holes show.
- Leave the snowflake to dry completely, at least 6 hours, or overnight if you used stiffener.
- Unpin it and hang it by the cream loop.
Final Quality-Control Checklist
- The centre wheel has 6 spokes and a 30-sc ring that lies flat.
- All 6 arms are the same length, about 1.25 in (3.2 cm) beyond the ring.
- Every arm has 2 long and 2 short branches, mirrored on both sides.
- All 6 cream rings have 7 sc and look round and similar in size.
- The hanging loop sits on one tip and is about 1.25 in (3.2 cm) long.
- The snowflake measures 4.75 in (12.1 cm) tip to tip, ±0.25 in (0.6 cm).
- No ends show on the front.
- The snowflake hangs straight and doesn’t twist.
Troubleshooting
The centre cups upward: Your tr are too short, or your Round 2 sc are too tight. Go up a hook size for Rounds 1–2 only.
The centre ruffles: Your ch-3 spaces are too loose. Keep 4 sc per space, but tighten the chains.
The arms are different lengths: Count exactly 10 ch for every arm, and check that every sl st goes into the 4th ch from the hook.
The arms twist: Make sure you work the stem sc into the same part of each chain every time, either the back bump or the top loop, on all 6 arms.
The branches look uneven: You lost count of the 2-2-2 rhythm. Count positions from the base on the way up, and from the tip on the way down.
The cream ring looks flat: Your sc are too loose. Work 7 sc firmly and pull the join tight.
The ornament tilts when hung: The loop is off-centre. Re-attach it to the middle sc of the top tip ring.
Care
Hand wash in cool water with mild soap, press out the water in a towel, and dry it flat, pinned to shape. Store the ornament flat between tissue paper so the branches don’t get crushed.
Final Notes
The measurement chain is short and reliable:
- 1.25 in (3.2 cm) wheel after Round 1
- 1.75 in (4.4 cm) ring after Round 2
- 4.25 in (10.8 cm) from tip to tip once the arms are added
- Branches spread sideways without changing that length
- Cream tips add 0.25 in (0.6 cm) at each end, for a finished 4.75 in (12.1 cm) snowflake with a 1.25 in (3.2 cm) hanging loop
Check those numbers on your first snowflake, then make as many as you like for your tree, gift tags, or window.
Happy crocheting!