

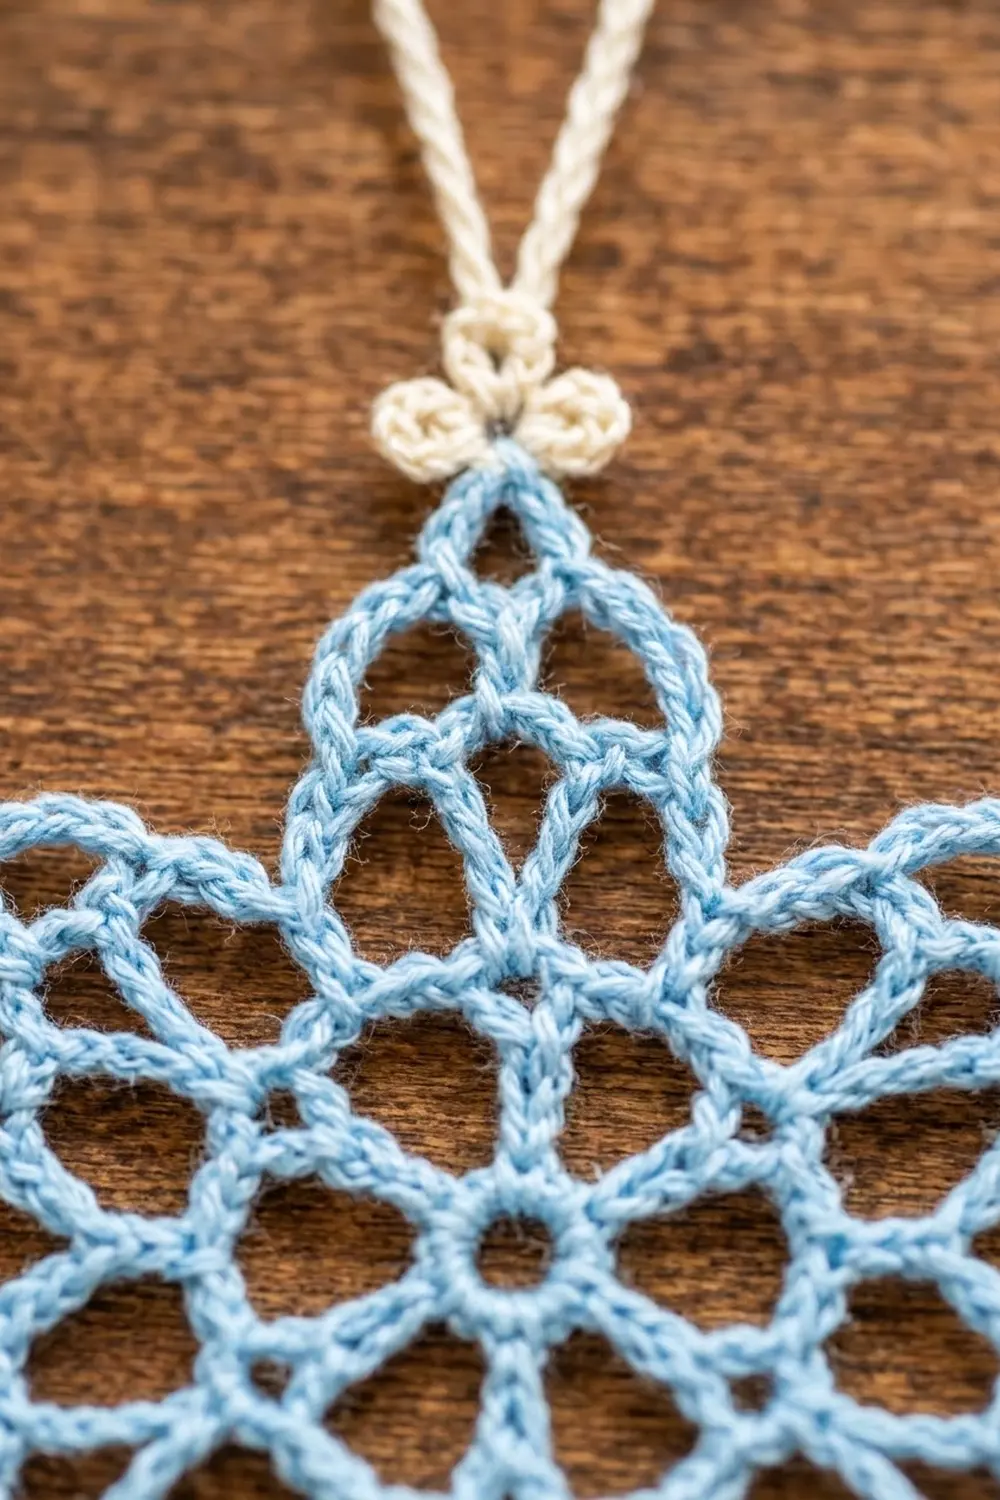
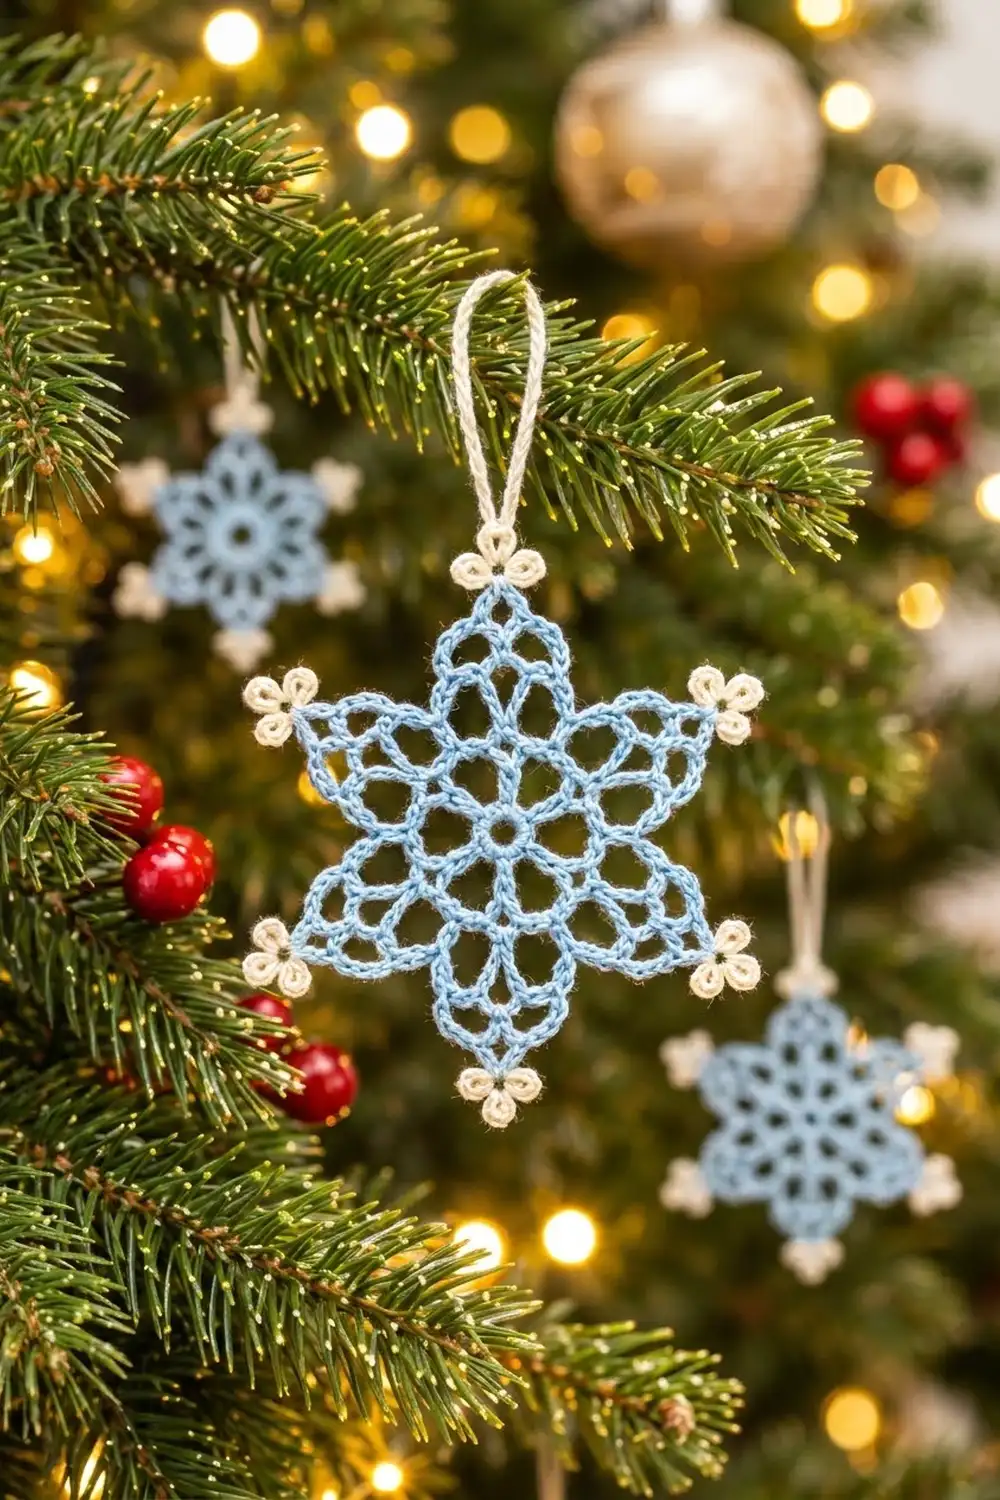
This little snowflake is a light, airy six-pointed star worked in sky blue cotton, with cream picot trefoils at every point. A matching cream chain loop sits at the top, so it is ready to hang on a tree, in a window, or from a gift package.
The style is a classic lace snowflake: an open center ring, six spokes, and chain-arch arms that form a clean star outline. The cream tips give it a frosty, beaded look without any extra pieces or sewing. The soft blue and cream also suit winter decor that runs past the holidays.
The pattern uses US crochet terms. The finished ornament measures about 4.6 in (11.7 cm) from tip to tip, plus a hanging loop about 1.5 in (3.8 cm) tall.
The whole ornament is worked in rounds. You make a center ring, add six tall spokes and a solid rim, extend the spokes into tip loops, build the star arms with chain arches, and then add the cream trefoils one point at a time. It is one single piece, so there is no joining.
Finished Size and Construction
- Finished size: 4.6 in (11.7 cm) tip to tip, including trefoils
- Skill level: Easy-intermediate
- Terminology: US crochet terms
- Yarn weight: Fingering-weight cotton (Super Fine #1) or size 3 crochet thread
- Hook: 2.5 mm (US B-1/C-2)
- Number of pieces: 1
- Layout: Single six-pointed snowflake, worked in the round
- Piece size before trim (end of Round 6): 4 in (10.2 cm) tip to tip
- Trim depth (cream trefoils): about 0.3 in (0.8 cm) added at each point
- Hanging loop: about 1.5 in (3.8 cm) tall when folded
Materials
Choose a smooth, tightly plied mercerized cotton. It shows the chain lace clearly, takes starch well, and keeps the points sharp after blocking. Avoid fuzzy or very soft yarns, because they blur the open spaces and make the star outline harder to see.
- Color A, light sky blue: 8 g, about 27 m (about 30 yd)
- Color B, cream: 3 g, about 10 m (about 11 yd)
These quantities include a comfortable margin for a gauge test and for weaving in ends. One small ball of each color will make several ornaments.
Tools:
- 2.5 mm (US B-1/C-2) crochet hook
- Tapestry needle
- Scissors
- Blocking board or foam mat
- Rustproof pins
- Fabric stiffener or spray starch
- Ruler or measuring tape
Abbreviations (US Terms)
- ch: chain
- sl st: slip stitch
- sc: single crochet
- dtr: double treble crochet
- sk: skip
- sp: space
- st(s): stitch(es)
- rnd: round
dtr (double treble): Yarn over 3 times, insert the hook in the stitch, and pull up a loop (5 loops on hook). [Yarn over, pull through 2 loops] 4 times.
Trefoil (special stitch): In the indicated space, work: sc, [ch 4, sl st in 4th ch from hook] 3 times, sc. All three picots sit on the same base, so they cluster into a small three-leaf shape.
Gauge and Checkpoints
Gauge is not critical for a single ornament, but it does control the final size. Work Rounds 1 to 3 first as your test piece and measure before you go on.
Gauge: Rounds 1 to 3 measure 2 in (5.1 cm) across.
Checkpoints:
- After Round 1: center ring about 0.6 in (1.5 cm) across
- After Round 3: solid circle 2 in (5.1 cm) across
- After Round 4: 3.5 in (8.9 cm) from one spike tip to the opposite spike tip
- After Round 6: 4 in (10.2 cm) tip to tip
- After the trim: 4.6 in (11.7 cm) tip to tip
If your circle is too big after Round 3, switch to a 2.25 mm hook or work tighter chains. If it is too small, switch to a 2.75 mm hook. If the circle ruffles, your chains are too loose. If it cups, your chains are too tight or you are missing stitches. Recount before you change hooks, because a missed stitch is the most common cause.
Measure flat, without stretching, on a hard surface. Lace relaxes a little after blocking, so aim for the checkpoint or slightly under it.
Snowflake Body
Use Color A for Rounds 1 to 6.
Round 1: Center Ring
Make a magic ring. Ch 1, then work 12 sc in the ring. Pull the ring closed but leave a small open center. Sl st to the first sc.
(12 sc)
Do not cinch the ring completely shut. The small hole in the middle is part of the look.
Round 2: Spokes
Ch 5 (counts as first dtr), ch 5, *sk 1 sc, dtr in next sc, ch 5; repeat from * 4 more times. Sl st to the top of the beginning ch-5.
(6 dtr and 6 ch-5 sps; 36 sts total)
The six dtr are the spokes. The ch-5 spaces will become the rim. Keep the dtr straight and even so the spokes point outward evenly, like a wheel.
Round 3: Solid Rim (conversion round)
Ch 1, sc in the same st, *7 sc in next ch-5 sp, sc in next dtr; repeat from * around, ending with 7 sc in the last ch-5 sp. Sl st to the first sc.
(48 sc = 36 worked 1 per existing st + 12 extra, 2 extra in each ch-5 sp)
This puts 1 sc above each spoke and 7 sc between spokes: 8 sc per repeat x 6 = 48. The circle should lie flat and measure 2 in (5.1 cm). This is your main gauge checkpoint.
Round 4: Spikes with Tip Loops (conversion round)
Ch 1. *In the sc above the spoke, work (sc, ch 9, sl st in 5th ch from hook, ch 4, sc). Sc in each of the next 7 sc. Repeat from * around. Sl st to the first sc. Fasten off.
(54 sc = 48 worked 1 per existing st + 6 extra, plus 6 spikes)
Each spike is a 4-ch leg going out, a small 4-ch tip loop, and a 4-ch leg coming back. Both legs are anchored in the same sc. The doubled chain makes each spoke read as one thick ray. The rim now looks slightly hexagonal.
Check: 3.5 in (8.9 cm) from tip loop to opposite tip loop. Lay the piece flat and make sure all six spikes are the same length before you continue.
Round 5: Star Arms
Join Color A in any spike tip loop.
Ch 1, (sc, ch 3, sc) in the same tip loop. *Ch 6, sk the first 3 sc of the next 7-sc group, sc in the 4th sc (the middle one), ch 6, (sc, ch 3, sc) in the next tip loop; repeat from * 4 more times. Ch 6, sc in the middle sc of the last 7-sc group, ch 6, sl st to the first sc.
(6 ch-3 tip sps, 12 ch-6 arches, 6 valley sc)
Per repeat: 3 sc + 15 ch = 18 sts. Total: 18 x 6 = 108 sts.
The ch-6 arches run from each point down into a valley anchored at the middle of the rim between spikes. This creates the V-shaped dips between the star points. Note that the “4th sc” counts only the 7 sc between spikes. Do not count the 2 sc that anchor each spike.
Round 6: Lace Outline
Sl st into the first ch-3 tip sp. Ch 1, (sc, ch 5, sc) in the same sp. *Ch 4, sc in the next ch-6 arch, ch 3, sc in the following ch-6 arch, ch 4, (sc, ch 5, sc) in the next ch-3 tip sp; repeat from * 4 more times. Ch 4, sc in the next ch-6 arch, ch 3, sc in the last ch-6 arch, ch 4, sl st to the first sc. Fasten off.
(6 ch-5 tip sps, 12 ch-4 sps, 6 ch-3 valley sps)
Per repeat: 4 sc + 16 ch = 20 sts. Total: 20 x 6 = 120 sts.
This round adds the second outline that gives each arm its lacy, layered look and sharpens the points. The ch-3 valley spaces pull the two arches on either side of each valley together, so the V-shape stays crisp. Check: 4 in (10.2 cm) tip to tip.
Border: Cream Trefoil Tips and Hanging Loop
On this single snowflake, the border is the cream trim, and it is worked only at the six points.
Border gauge: One trefoil measures about 0.4 in (1.0 cm) wide and extends each point by about 0.3 in (0.8 cm).
Trefoils (make 5)
Join Color B with a sl st in any ch-5 tip sp of Round 6. Work 1 Trefoil in the same sp: sc, [ch 4, sl st in 4th ch from hook] 3 times, sc. Sl st in the same sp. Fasten off.
Count per point: 2 sc + 3 picots (each 4 ch + 1 sl st) = 17 sts, plus the joining and closing sl sts.
Repeat at 5 of the 6 points. Leave one point empty for the top.
Top Trefoil and Hanging Loop
Join Color B in the last ch-5 tip sp. Work 1 Trefoil as above. Do not fasten off. Ch 30, then sl st in the same ch-5 tip sp to close the loop. Fasten off.
The 30 chains measure about 3 in (7.6 cm), so the folded loop stands about 1.5 in (3.8 cm) tall.
Why the math works: Round 6 has exactly 6 ch-5 tip spaces, one per point. One trefoil goes in each, so 6 trefoils x 3 picots = 18 picots, and 6 x 17 = 102 trim sts. Each trefoil adds about 0.3 in (0.8 cm) at its point, so 4 in + 0.3 in + 0.3 in = 4.6 in (11.7 cm) from tip to opposite tip. Because each point is worked separately, the cream thread never runs along the blue edges.
Weave each end into a chain arch of the same color so nothing shows through the lace.
Final Blocking
- Soak the ornament in fabric stiffener, or dampen it with water if you plan to use starch.
- Gently squeeze out the extra liquid. Do not wring.
- Lay it face up on the blocking board.
- Pin the center ring open with one pin.
- Pin each of the six points straight out, 2.3 in (5.8 cm) from the center, so they are evenly spaced.
- Pin each valley so all six V-shapes match.
- Open each trefoil picot with a pin.
- Pin the hanging loop straight up.
- Spray with starch if you did not use stiffener.
- Let it dry completely, at least 12 hours, before unpinning.
Final Quality-Control Checklist
- Six points, evenly spaced and the same length
- Tip to tip measures 4.6 in (11.7 cm)
- Center ring is open and round
- All six spokes are straight
- Rim lies flat with no ruffling
- All six valleys sit at the same depth
- Every point has one cream trefoil with three open picots
- Hanging loop sits at the top point and stands about 1.5 in (3.8 cm) tall
- All ends are hidden and trimmed
- The ornament is stiff enough to hold its shape when hung
Troubleshooting
Round 3 ruffles. Your ch-5 spaces are too long for 7 sc. Tighten your chains, or redo Round 2 with a smaller hook.
Round 3 cups. Your chains are too tight. Loosen them or go up one hook size.
The points are uneven. Count the chains in each spike and arch. One extra chain makes a visible difference in length.
The valleys look lopsided. Check that each valley sc is in the 4th (middle) sc of its 7-sc group.
The trefoils twist. Work all three picots into the same base, and pin them open while blocking.
The hanging loop flops over. Starch the loop and let it dry standing straight up.
The ornament softens over time. Re-stiffen and re-block it.
Care
Spot clean only, or hand wash gently in cool water and re-block with stiffener. Store it flat in tissue paper so the points stay crisp.
Final Notes
Each round sets up the measurement for the next one. Round 1 makes a 0.6 in (1.5 cm) ring. Round 3 makes a 2 in (5.1 cm) circle of 48 sc. Round 4 extends the spikes to 3.5 in (8.9 cm). Round 6 brings the star to 4 in (10.2 cm). The cream trefoils bring it to 4.6 in (11.7 cm) tip to tip, with a 1.5 in (3.8 cm) loop on top.
If your Round 3 checkpoint matches, the rest of the measurements should follow. Once you’ve made one, you can make a whole set for the tree.
Happy crocheting!