

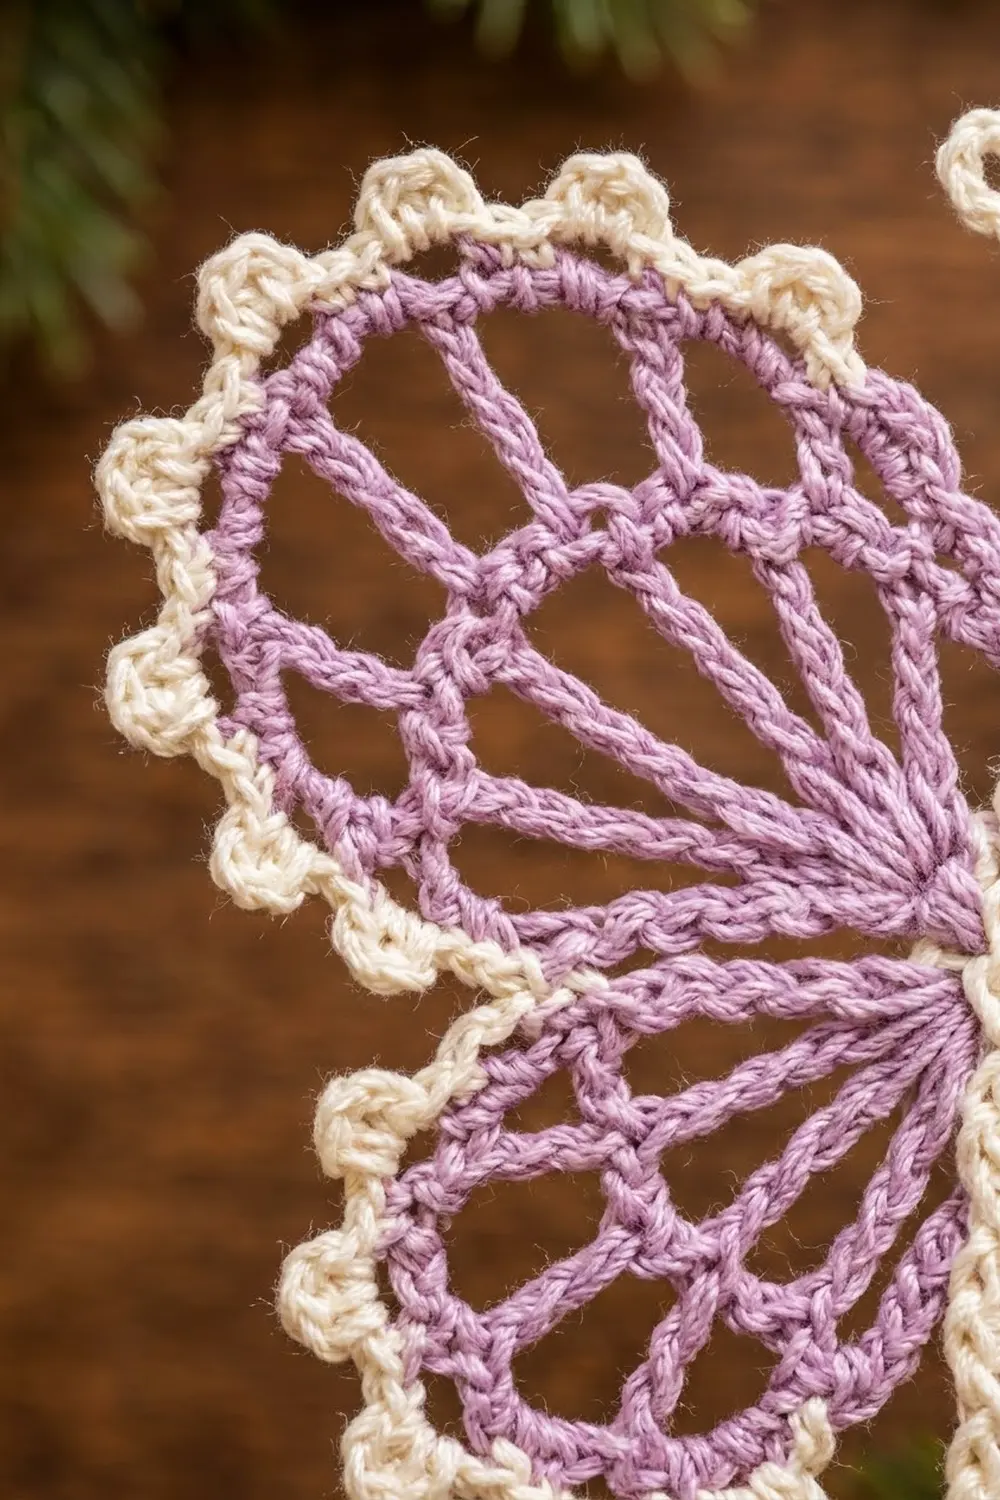
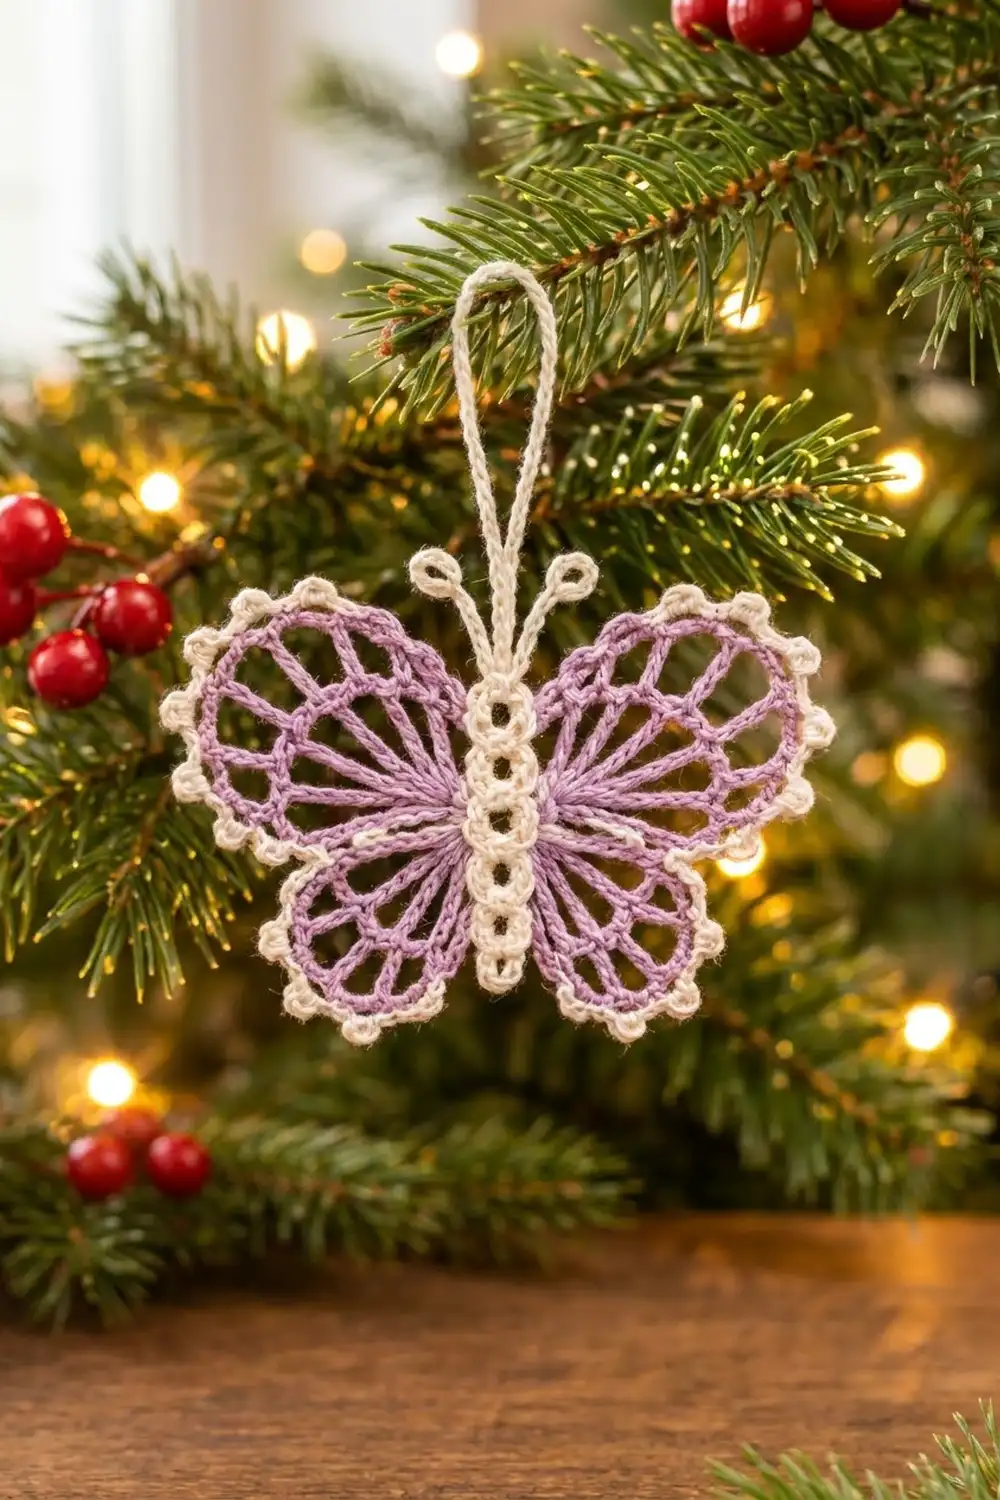
This delicate butterfly ornament combines a cream beaded-ring body with four lavender lace wings. Each wing is a fan of long spokes linked by chain arches, so it looks like a stained-glass window. A cream picot edging outlines every wing and frames the lavender.
The palette is soft and wintry: lavender for the wings, cream for the body, antennae, edging and hanging loop. It works on a Christmas tree, as a gift topper, or hung in a window all year.
This pattern uses US crochet terms. The finished ornament measures 4.5 in (11.4 cm) across the wings and 4 in (10.2 cm) tall from the bottom of the lower wings to the antenna tips. The hanging loop adds about 2 in (5.1 cm).
Construction is all one piece. First you crochet the ring body and antennae in cream. Then you work each of the four wings straight off the side of the body in lavender, in short turned rows. Finally you add a cream picot edging to each wing and finish with a hanging loop. There is no sewing and no joining of separate motifs.
Finished Size and Construction
- Finished size: 4.5 in (11.4 cm) wingspan × 4 in (10.2 cm) tall, not counting the hanging loop
- Skill level: Intermediate (long stitches, working into a single stitch, lace tension)
- Terminology: US crochet terms
- Yarn weight: Size 3 cotton crochet thread (Lace / Category 0)
- Hook: 2.25 mm (US B-1)
- Number of pieces: 1 (single ornament, worked continuously)
- Layout: Vertical body with one upper wing and one lower wing on each side
- Body: 6 rings, 0.5 in (1.3 cm) wide × 2.5 in (6.4 cm) long
- Size before border: 4 in (10.2 cm) wingspan × 3 in (7.6 cm) wing height
- Border depth: 0.25 in (0.6 cm) on every wing edge
Materials
Choose a firm, mercerized cotton thread in size 3. The stitch definition keeps the spokes and arches crisp, and cotton blocks flat and holds its shape on a tree. Avoid fuzzy or very stretchy fibers, which blur the lace.
- Color A, Cream: 6 g, about 16 m (body, antennae, picot edging, hanging loop)
- Color B, Lavender: 8 g, about 22 m (all four wings)
These quantities include a margin of roughly 25% for your gauge swatch and for weaving in ends.
Tools:
– 2.25 mm (US B-1) crochet hook
– Tapestry needle with an eye small enough for thread
– Scissors
– Rustproof pins and a foam blocking mat
– Spray bottle with water
– Optional: liquid fabric stiffener or spray starch
Abbreviations (US Terms)
- ch – chain
- sl st – slip stitch
- sc – single crochet
- tr – treble crochet (yarn over twice)
- dtr – double treble crochet (yarn over 3 times)
- st(s) – stitch(es)
- sp – space
- rep – repeat
- RS – right side
Special stitch – picot: Ch 3, sl st in the 3rd ch from the hook. This makes one small raised bump.
Gauge and Checkpoints
The finished size matters less here than it would for a garment, but the wings only lie flat when your gauge is close. Before you start, make a test ring: ch 5, sl st in the first ch to form a ring, then work 12 sc into it. It should measure 0.5 in (1.3 cm) across. A chain of 10 ch should measure about 1 in (2.5 cm).
Measurement checkpoints:
- Body complete: 2.5 in (6.4 cm) long, 0.5 in (1.3 cm) wide
- Upper wing, Row 1: each dtr spoke about 0.75 in (1.9 cm) long
- Upper wing, Row 4: the wing reaches 1.75 in (4.4 cm) out from the side of the body
- Lower wing, Row 1: each tr spoke about 0.5 in (1.3 cm) long
- Lower wing, Row 4: the wing reaches 1.5 in (3.8 cm) out from the side of the body
- After the border: 4.5 in (11.4 cm) wingspan, 3.5 in (8.9 cm) wing height
If your piece is too big, go down to a 2.0 mm hook or tighten your chains slightly. If it is too small, try a 2.5 mm hook. Long stitches stretch a lot, so if only your spokes are off, adjust how high you pull up each loop before changing hooks.
The Body (Color A, Cream)
The body is worked in two passes. On the way down you make each ring and cover its left half with sc. On the way back up you cover each ring’s right half. Each finished ring has 12 sc: sc 1–6 on the left half and sc 7–12 on the right half. On both halves, the 3rd sc of the half sits at the outer side of the ring.
Ring 1 (head): With Color A, ch 5, sl st in the first ch to form a ring. Work 6 sc into the ring (left half).
Rings 2–6, down pass: Ch 5, sl st in the 5th ch from the hook to form the next ring, 6 sc into the new ring. Rep from * to * 4 more times. You now have 6 rings, each with 6 sc on its left half.
Ring 6, turn at the tail: Work 6 more sc into Ring 6 (12 sc in this ring). Sl st in the first sc of Ring 6.
Rings 5–1, up pass: Sl st into the base of the ring you just finished, where it joins the ring above. Work 6 sc into the uncovered right half of the next ring up, then sl st in the first sc of that ring. Rep from * to * until Ring 1 is complete.
Stitch count: 6 rings × 12 sc = 72 sc in total.
Antennae: Sl st in the next sc at the top of Ring 1. Ch 12, sl st in the 4th ch from the hook to form the tip loop, then sl st in each of the remaining 8 ch back to the head. Sl st in each of the next 2 sc along the top of Ring 1, then rep from * to * once. Fasten off, leaving a 6 in (15.2 cm) tail.
The tip loop uses 4 of the 12 chains and the stalk uses the other 8, which gives each antenna about 0.75 in (1.9 cm) of length.
Checkpoint: The body should measure 2.5 in (6.4 cm) long and 0.5 in (1.3 cm) wide.
Upper Wings (Color B, Lavender)
Lay the body RS up with the antennae at the top. Work the right upper wing first, then the left upper wing using the same rows.
Row 1 (spokes): Join Color B with a sl st in the 3rd sc of Ring 2’s right half. Ch 5 (counts as the first dtr). [Ch 2, dtr in the same sc] 7 times.
Count: 8 dtr, 7 ch-2 sps.
Working all 8 spokes into one stitch makes them crowd at the base and fan open at the top. That is what gives the radiating effect. Fan them so the first spoke points up toward the antennae and the last one points down toward the waist of the wing.
Row 2 (inner arches): Ch 1, turn. Sc in the first dtr, [ch 5, sc in the next dtr] 7 times, working the last sc in the top of the beginning ch-5.
Count: 8 sc, 7 ch-5 arches.
Row 3 (outer loops): Ch 1, turn. Sc in the first sc, [ch 6, sc in the next ch-5 arch, ch 6, sc in the next sc] 7 times.
Count: 15 sc, 14 ch-6 loops.
Row 4 (outline): Ch 1, turn. Work 6 sc in each ch-6 loop across. Do not work into the sc between the loops.
Count: 14 loops × 6 sc = 84 sc. Fasten off.
Checkpoint: The wing reaches 1.75 in (4.4 cm) out from the side of the body.
Left upper wing: Join Color B in the 3rd sc of Ring 2’s left half, then work Rows 1–4 the same way. Because the rows turn, the wing automatically mirrors the right one.
Lower Wings (Color B, Lavender)
Row 1 (spokes): Join Color B with a sl st in the 3rd sc of Ring 5’s right half. Ch 4 (counts as the first tr). [Ch 2, tr in the same sc] 5 times.
Count: 6 tr, 5 ch-2 sps.
Row 2 (inner arches): Ch 1, turn. Sc in the first tr, [ch 4, sc in the next tr] 5 times, working the last sc in the top of the beginning ch-4.
Count: 6 sc, 5 ch-4 arches.
Row 3 (outer loops): Ch 1, turn. Sc in the first sc, [ch 5, sc in the next ch-4 arch, ch 5, sc in the next sc] 5 times.
Count: 11 sc, 10 ch-5 loops.
Row 4 (outline): Ch 1, turn. Work 6 sc in each ch-5 loop across.
Count: 10 loops × 6 sc = 60 sc. Fasten off.
Checkpoint: The wing reaches 1.5 in (3.8 cm) out from the side of the body. The top edge of the lower wing should sit just under the bottom spoke of the upper wing.
Left lower wing: Join in the 3rd sc of Ring 5’s left half and work Rows 1–4 the same way.
Checkpoint before the border: The wingspan is 4 in (10.2 cm) and the wing height is 3 in (7.6 cm).
Border (Color A, Cream)
You edge each wing separately along its curved Row 4 outline. The straight sides of each wing (the first and last spokes) are left unedged.
Border gauge: 3 sc + 1 picot covers about 0.33 in (0.8 cm) of edge. The border row adds 0.25 in (0.6 cm) beyond the lavender outline.
Upper wing border (each): With RS facing, join Color A with a sl st in the first sc of Row 4. Ch 1. [Sc in each of the next 3 sc, picot] 28 times. Fasten off.
Count: 84 sc, 28 picots.
Lower wing border (each): With RS facing, join Color A in the first sc of Row 4. Ch 1. [Sc in each of the next 3 sc, picot] 20 times. Fasten off.
Count: 60 sc, 20 picots.
Why the math works: Every outer loop holds exactly 6 sc, and the border uses 3 sc per picot, so each loop gets exactly 2 picots. On the upper wings, 14 loops × 2 = 28 picots across 84 sc. On the lower wings, 10 loops × 2 = 20 picots across 60 sc. There are no leftover stitches, and the picots stay evenly spaced over the peaks and dips of the scallops.
Totals: 2 × 28 + 2 × 20 = 96 picots on the whole ornament.
Checkpoint: Wingspan 4 in + 2 × 0.25 in = 4.5 in (11.4 cm). Wing height 3 in + 2 × 0.25 in = 3.5 in (8.9 cm).
Hanging Loop (Color A, Cream)
Join Color A with a sl st in the center top sc of Ring 1, between the two antennae. Ch 40, then sl st in the same sc. Sl st in each ch around the loop (40 sl st), then sl st in the center sc again. Fasten off.
The sl st pass firms up the chain so it doesn’t twist. The finished loop stands about 2 in (5.1 cm) above the head.
Final Blocking
- Weave in all ends along the body rings or inside the Row 4 sc so they don’t show through the open lace.
- Mist the ornament with water until it is evenly damp, or soak it briefly and roll it in a towel.
- Place it RS up on the blocking mat. Pin the body straight, 2.5 in (6.4 cm) long.
- Pin out each spoke so the fans spread evenly and every ch-2 space opens.
- Pin the outer edge of each wing at every picot so the scallops curve smoothly. Check the wingspan: 4.5 in (11.4 cm).
- Shape the antenna loops into neat circles and pin them slightly apart.
- Optional: brush or spray on fabric stiffener for an ornament that holds its shape on the tree.
- Let it dry completely, at least 12 hours, before you unpin it.
Final Quality-Control Checklist
- Body: 6 rings, 12 sc each, 72 sc in total
- Antennae: 2, each with a round tip loop
- Upper wings: 8 spokes, 7 inner arches, 14 outer loops, 84 sc outline
- Lower wings: 6 spokes, 5 inner arches, 10 outer loops, 60 sc outline
- Picots: 28 on each upper wing, 20 on each lower wing, 96 in total
- Wingspan 4.5 in (11.4 cm); wing height 3.5 in (8.9 cm)
- Left and right wings mirror each other in size
- Hanging loop is centered between the antennae
- All ends are secured and hidden
Troubleshooting
The spokes bunch up and won’t fan open. Make sure every spoke goes into the same single sc, then spread them firmly when you block. If they still crowd, make the ch-2 spaces between spokes a little looser.
The wing cups or ruffles. Your arches are too long for your stitch height. Work the chains in Rows 2 and 3 a little tighter, or go down half a hook size for those rows only.
The wing curls inward. Your chains are too tight. Loosen them or go up half a hook size.
The picots are uneven. Pull each sl st snug against the base of its chain, and keep strictly to the 3-sc rhythm.
The rings twist on the body. Keep the RS facing you on both passes, and press the rings flat when you block.
The wings are uneven sizes. Compare spoke lengths. Long stitches pulled to different heights are the usual cause, so rework the shorter wing.
Care
Hand wash in cool water with a mild soap, press out the water in a towel, and re-block flat. If you used stiffener, reapply it after washing.
Final Notes
Here is the full measurement chain. A 0.5 in (1.3 cm) body ring builds a 2.5 in (6.4 cm) body. The upper wings reach 1.75 in (4.4 cm) out and the lower wings 1.5 in (3.8 cm), giving a 4 in (10.2 cm) wingspan before the border. The 0.25 in (0.6 cm) picot border brings the finished size to 4.5 in (11.4 cm) wide and 3.5 in (8.9 cm) tall across the wings, or 4 in (10.2 cm) tall including the antennae. If you check your gauge at each checkpoint, the butterfly will block flat and symmetrical every time.
Happy crocheting!