

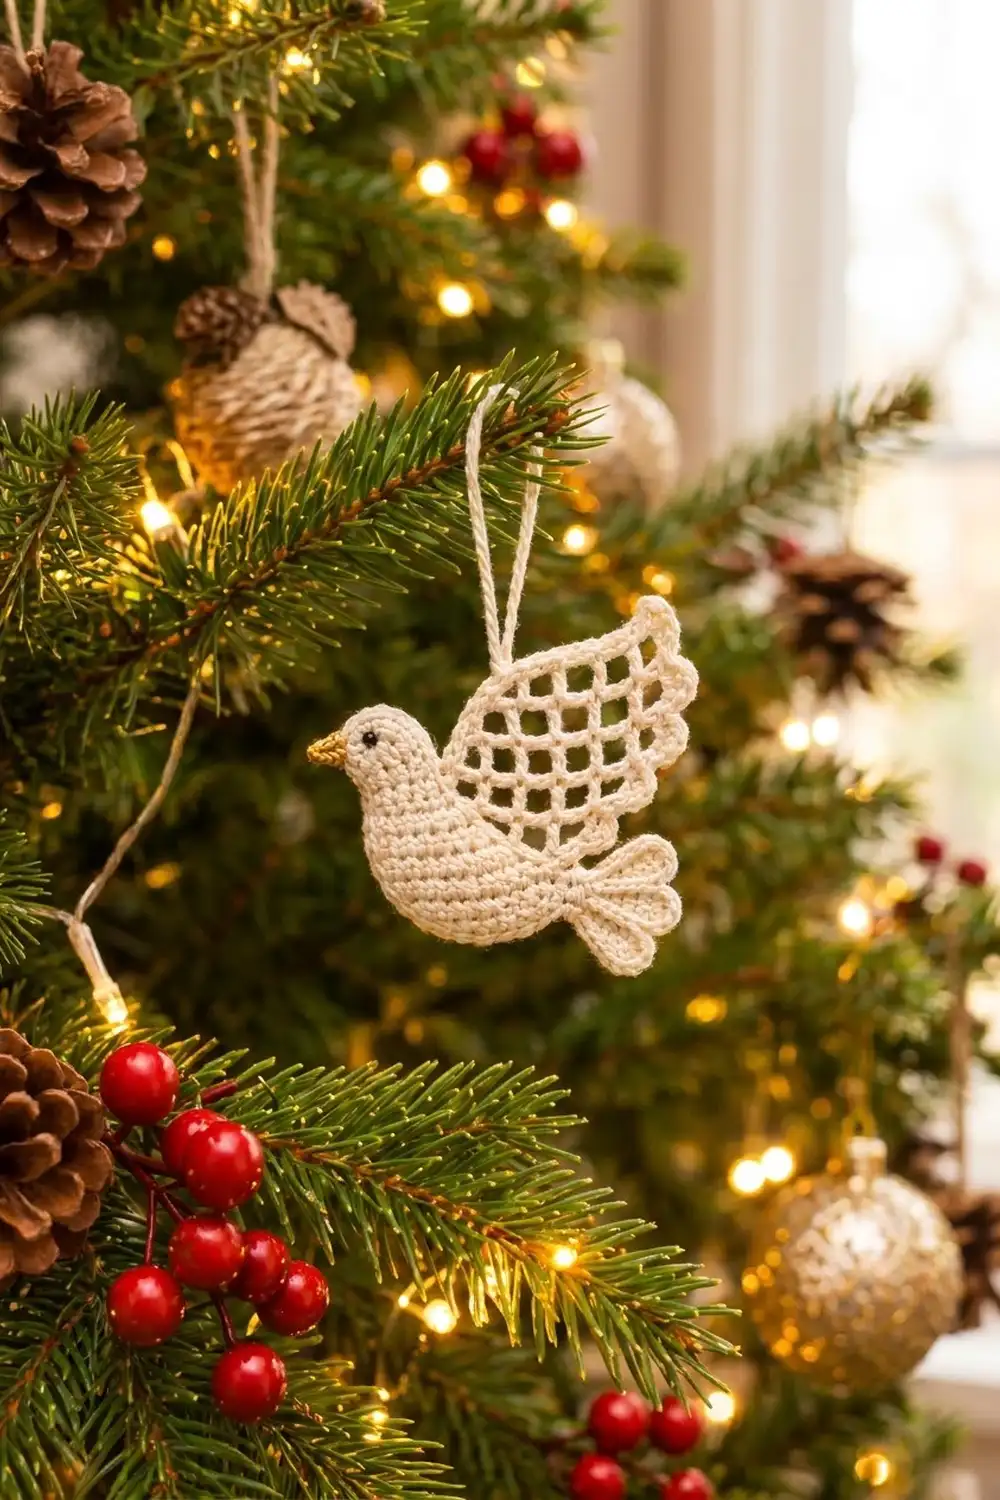
This dove ornament pairs a solid, rounded body with an airy openwork wing. The body is worked in dense single crochet so it holds its shape. The wing is a small filet mesh of square windows framed by a firm edge, with four soft scallops along the top like feather tips. A three-lobed fan tail and a tiny gold beak complete the bird.
The palette is simple: cream cotton for the dove, a touch of metallic gold for the beak, and one black French knot for the eye. The finished ornament looks good on a tree, on a gift tag, or hanging in a window.
The pattern uses US crochet terms. The assembled dove measures about 5.8 in (14.7 cm) wide and 4.7 in (11.9 cm) tall, not counting the hanging loop, which adds about 3 in (7.6 cm).
You will make five small pieces: body, wing, tail, beak, and hanging loop. The tail and beak are sewn to the body, the wing gets its border and is sewn behind the body’s back, and the loop goes on last.
Finished Size and Construction
- Finished size: 5.8 in (14.7 cm) wide x 4.7 in (11.9 cm) tall, plus a 3 in (7.6 cm) loop
- Skill level: Easy-intermediate (shaping in rows, basic filet mesh)
- Terminology: US
- Yarn weight: DK (light worsted, #3) cotton
- Hook: 3.5 mm (E-4)
- Number of pieces: 5 crocheted pieces plus an embroidered eye
- Layout: Wing behind the upper back, tail behind the tail tip, beak on the head
- Piece sizes: body 4.4 x 2.7 in (11.2 x 6.9 cm); wing 3.8 x 3.5 in (9.7 x 8.9 cm); tail 2.0 x 1.5 in (5.1 x 3.8 cm)
- Wing size before border: 3.0 x 2.4 in (7.6 x 6.1 cm)
- Border depth: Rnd 1 adds 0.2 in (0.5 cm) per side; the Rnd 2 scallops add 0.5 in (1.3 cm) along the top
Materials
Choose a smooth, mercerized DK cotton. It shows the mesh windows clearly and blocks crisply. Avoid fuzzy or very stretchy yarn, because the wing would lose its sharp grid.
- Cream DK cotton: 15 g (about 30 m) for body, wing, tail, and loop
- Gold metallic DK or sport yarn: 1 g (about 2 m) for the beak
- Black yarn or embroidery floss: 0.5 m for the eye (or one 4 mm black bead)
Tools:
- 3.5 mm (E-4) crochet hook
- Tapestry needle
- Scissors
- Stitch markers
- Blocking mat and rust-proof pins
- Spray bottle with water
These quantities include a margin of about 20 percent, so you will have yarn left for a gauge test and seaming.
Abbreviations (US Terms)
- ch = chain
- sl st = slip stitch
- sc = single crochet
- dc = double crochet
- tr = treble crochet
- sc2tog = single crochet 2 together
- sk = skip
- sp = space
- st(s) = stitch(es)
- RS / WS = right side / wrong side
Special stitch: open square (filet mesh). One open square is a dc, ch 2, and the next dc. Neighboring squares share their dc, so every square uses 3 sts of width: 1 dc plus 2 ch.
Gauge and Checkpoints
Gauge: 20 sc and 24 rows = 4 in (10.2 cm) with a 3.5 mm hook. In mesh, 5 open squares = 3.0 in (7.6 cm) wide and 5 mesh rows = 2.4 in (6.1 cm) tall.
The body works as your gauge piece. Make it first and measure at each checkpoint below before you go on.
- Body after Row 5: 20 sts measure 4.0 in (10.2 cm) wide.
- Body after Row 14: about 2.3 in (5.8 cm) tall.
- Body after edging: 4.4 x 2.7 in (11.2 x 6.9 cm).
- Wing mesh after Row 5: 3.0 x 2.4 in (7.6 x 6.1 cm).
If your body is too wide, go down to a 3.25 mm hook. If it is too narrow, go up to a 3.75 mm hook. If only the mesh is off, change the hook for the wing alone. A small difference doesn’t matter, but the wing should stay a little smaller than the body.

Body
The body is worked flat in rows. The dove faces left. On RS rows you work from the tail end toward the head end, and on WS rows from the head end toward the tail end.
Row 1 (RS): With cream, ch 15. Sc in 2nd ch from hook and in each ch across. (14 sc)
Row 2 (WS): Ch 1, turn. 2 sc in first st, sc in next 12 sts, 2 sc in last st. (16 sc)
Row 3: Ch 1, turn. 2 sc in first st, sc in next 14 sts, 2 sc in last st. (18 sc)
Row 4: Ch 1, turn. 2 sc in first st, sc in next 16 sts, 2 sc in last st. (20 sc)
Row 5: Ch 1, turn. Sc in each st across. (20 sc)
Checkpoint: The piece should be 4.0 in (10.2 cm) wide. The increases round off the belly at both ends.
Rows 6 to 11 slope the back down toward the tail.
Row 6 (WS): Ch 1, turn. Sc in next 16 sts, sc2tog twice. (18 sts)
Row 7: Ch 1, turn. Sc2tog twice, sc in next 14 sts. (16 sts)
Row 8: Ch 1, turn. Sc in next 12 sts, sc2tog twice. (14 sts)
Row 9: Ch 1, turn. Sc2tog twice, sc in next 10 sts. (12 sts)
Row 10: Ch 1, turn. Sc in next 8 sts, sc2tog twice. (10 sts)
Row 11: Ch 1, turn. Sc2tog twice, sc in next 6 sts. (8 sts)
Rows 12 to 14 shape the round head.
Row 12 (WS): Ch 1, turn. 2 sc in first st (forehead), sc in next 5 sts, sc2tog. (8 sts)
Row 13: Ch 1, turn. Sc2tog, sc in next 4 sts, sc2tog. (6 sts)
Row 14: Ch 1, turn. Sc2tog, sc in next 2 sts, sc2tog. (4 sts)
Do not fasten off.
Edging round: Ch 1. With RS facing, sc evenly around the whole body:
- 4 sc across the top of Row 14
- 14 sc down the head-end edge, 1 in each row end
- 14 sc along the underside of the foundation chain
- 23 sc up the tail-end edge: 1 in each row end of Rows 1 to 5 and 2 in each row end of Rows 6 to 14, because the stepped decreases need extra coverage
- 2 extra sc in the Row 5 row end at the tail tip, which makes 3 sc there
Sl st to the first sc. Count: 55 base sc plus 2 extra = 57 sc. Fasten off and weave in the ends.
Checkpoint: The body measures 4.4 x 2.7 in (11.2 x 6.9 cm).
Eye: With black, work a French knot (wrapped twice) between Rows 11 and 12, 3 sts in from the head-end edge. If you use a bead, sew it to the same spot.
Tail
Row 1: With cream, ch 4. Sc in 2nd ch from hook and in next 2 ch. (3 sc)
Row 2: Ch 1, turn. 2 sc in each st. (6 sc)
Row 3: Ch 1, turn. Sc in next st, 2 sc in next st; repeat from * 2 more times. (9 sc)
Checkpoint: About 1.8 in (4.6 cm) wide and 0.5 in (1.3 cm) tall.
Row 4 (feathers): Ch 1, turn. Sc in next st, 7 tr in next st, sc in next st; repeat from * 2 more times. (3 lobes of 9 sts each, 27 sts)
Row 5: Ch 1, turn. Sc in each st, working 2 sc in the center (4th) tr of each lobe. Count: 27 sc plus 3 extra = 30 sc. Fasten off and leave a 10 in (25.4 cm) tail for sewing.
The tr fans make the raised feather ridges, and the edging row outlines each lobe. Checkpoint: 2.0 x 1.5 in (5.1 x 3.8 cm).
Beak
Row 1: With gold, ch 3. Sc in 2nd ch from hook and in next ch. (2 sc)
Row 2: Ch 1, turn. Sc2tog. (1 st)
Fasten off and leave an 8 in (20.3 cm) tail. The beak is a tiny triangle about 0.4 in (1.0 cm) long.
Wing Mesh
The mesh is worked from the top edge down. All decreases are on the right-hand edge, so the wing narrows to a point at the lower left, where it tucks behind the body.
Row 1 (RS): With cream, ch 20. Dc in 8th ch from hook, ch 2, sk 2 ch, dc in next ch; repeat from * 3 more times. (5 open squares)
Row 2: Ch 5 (counts as dc plus ch 2), turn. Dc in next dc, ch 2, dc in next dc; repeat across. Place the last dc in the skipped chains at the end of Row 1, directly above the first square’s edge. (5 squares)
Row 3: Turn. Sl st in each of the first 2 ch and in the next dc (1 square decreased). Ch 5, dc in next dc, ch 2, dc in next dc; repeat across, placing the last dc in the 3rd ch of the turning ch-5. (4 squares)
Row 4: Ch 5, turn. Dc in next dc, ch 2, dc in next dc; repeat until 3 squares are made, then leave the last square unworked. (3 squares)
Row 5: Turn. Sl st across the first square as in Row 3. Ch 5, dc in next dc, ch 2, dc in 3rd ch of the turning ch-5. (2 squares)
The total is 19 open squares. Do not fasten off. Checkpoint: 3.0 x 2.4 in (7.6 x 6.1 cm) at the widest points.
Hanging Loop
With cream, ch 36. Sl st in the back bump of the 2nd ch from hook and in each ch across. (35 sl st)
The strip is about 6 in (15.2 cm) long. Folded in half, it makes a 3 in (7.6 cm) loop. Leave an 8 in (20.3 cm) tail.
Make All Pieces
- Cream: 1 body (with eye), 1 wing, 1 tail, 1 hanging loop
- Gold: 1 beak
- Black: 1 French knot eye
Placement layout, front view:
            [ LOOP ]
       [ WING: scallops up ]
      [ WING root ]
[BEAK][ HEAD | BODY | tail tip ][ TAIL fan ]
Joining
Sew everything with whipstitch, using the yarn tails and a tapestry needle. Sew through the back loops of the body’s edging so the stitches stay hidden on the front.
- Tail: Lay the tail’s Row 1 edge 0.4 in (1.0 cm) behind the body’s tail tip, lobes pointing right. Sew the 3 sts of Row 1 to the back of the 3 tip sc, one stitch to one stitch, then tack the outer corners.
- Beak: Center the beak’s Row 1 edge on the head-end edging at eye height, point facing forward. Sew its 2 sts to 2 edging sc.
- Tension: Pull each stitch snug, but not so tight that the body edging puckers. The front should stay flat.
Checkpoint: Body plus tail plus beak measures about 5.8 in (14.7 cm) wide.
The wing is sewn on after its border is finished, as described below.
Border (Wing)
Border gauge: 5 sc = 1 in (2.5 cm), which matches the body gauge.
Rnd 1: Ch 1 and continue from the end of wing Row 5 at the lower left. Sc around the mesh in this order:
- Bottom edge (Row 5): 1 sc in each dc and 2 sc in each ch-2 sp = 7 sc
- Right stepped edge: 2 sc around each row-end post of Rows 5, 3, and 1, and 3 sc around Rows 4 and 2 (12 sc), plus 3 sc across each of the 3 exposed square tops (9 sc) = 21 sc
- Top edge: 1 sc in each of the 16 base chains on the underside of the foundation = 16 sc
- Left straight edge: 2 sc around each row-end post of Rows 1, 3, and 5, and 3 sc around Rows 2 and 4 = 12 sc
- Corners: 1 extra sc at each of the 4 outer corners = 4 sc
Sl st to the first sc. Count: 7 + 21 + 16 + 12 + 4 = 60 sc.
Rnd 2: Ch 1. Sc in each st around until you reach the 16 top-edge sc. Along the top edge, sc in next st, sk 1, 5 dc in next st, sk 1; repeat from * 3 more times. Sc in each remaining st. Sl st to the first sc.
Count: 44 sc (1 per existing st) plus 4 scallops of 1 sc and 5 dc (6 sts each) worked over the 16 top sts = 68 sts. Fasten off and leave a 12 in (30.5 cm) tail.
Why the math works: One open square is 3 sts wide, and the sc gauge is 5 sts per inch. Working 3 sc across each square (1 in the dc and 2 in the space) keeps the edge exactly as wide as the mesh. The 5 mesh rows are 2.4 in (6.1 cm) tall, which is 12 sc at border gauge, so the 2-3-2-3-2 row-end pattern keeps the sides flat. The 16 top sts divide evenly into 4 scallops of 4 sts each.
Checkpoint: After Rnd 1 the wing measures 3.4 x 2.8 in (8.6 x 7.1 cm). After Rnd 2 it measures 3.8 x 3.5 in (9.7 x 8.9 cm).
Attach the wing: Slide the narrow lower-left part 0.6 in (1.5 cm) behind the body’s back, with the scallops on top. Whipstitch the body’s edging to the wing along the overlap. Sew the folded ends of the loop to the back of the wing’s top edge, between the 2nd and 3rd scallops.
Final Blocking
- Weave in all the ends along matching stitches and trim them.
- Mist the ornament until it is damp, not soaked.
- Pin it face up on the mat. Put a pin in each mesh corner so the windows open into squares.
- Pin each scallop and tail lobe into a rounded curve.
- Check the finished size: 5.8 x 4.7 in (14.7 x 11.9 cm).
- Let it dry completely, at least 4 hours, before unpinning.
- For extra stiffness, brush on diluted fabric stiffener, re-pin, and let it dry again.
Final Quality-Control Checklist
- Body edging count is 57 and the tail tip has 3 sc
- Tail has 3 even lobes and 30 edge sts
- Wing has 19 open squares, Rnd 1 has 60 sc, and Rnd 2 has 68 sts with 4 scallops
- Eye is level with the beak and sits on the head
- No seam stitches show on the front
- Loop hangs straight when held up and the dove sits level
Troubleshooting
- Body edge ruffles: Work 1 sc instead of 2 in some of the stepped row ends, then confirm the new count.
- Body edge pulls in: Add 1 sc at the head curve.
- Mesh squares lean: Block firmly with a pin in every square corner.
- Tail lobes curl: Your tr stitches are tight. Go up half a hook size for Row 4 only.
- Dove tips forward: Move the loop one scallop toward the tail.
- Wing too large: Redo the mesh with a hook one size smaller.
Care
Hand wash in cool water with mild soap, press out the water in a towel, and dry flat, reshaping the mesh. Store it flat or hanging so the scallops stay crisp.
Final Notes
The measurement chain is short. Gauge of 20 sc = 4 in (10.2 cm) gives a 4.0 in (10.2 cm) body after Row 5, which becomes 4.4 x 2.7 in (11.2 x 6.9 cm) after edging. The 3.0 x 2.4 in (7.6 x 6.1 cm) mesh grows to 3.8 x 3.5 in (9.7 x 8.9 cm) with its border. With the tail and beak added, the dove measures 5.8 x 4.7 in (14.7 x 11.9 cm). Check each step and the finished ornament will come out at that size.
Happy crocheting!