

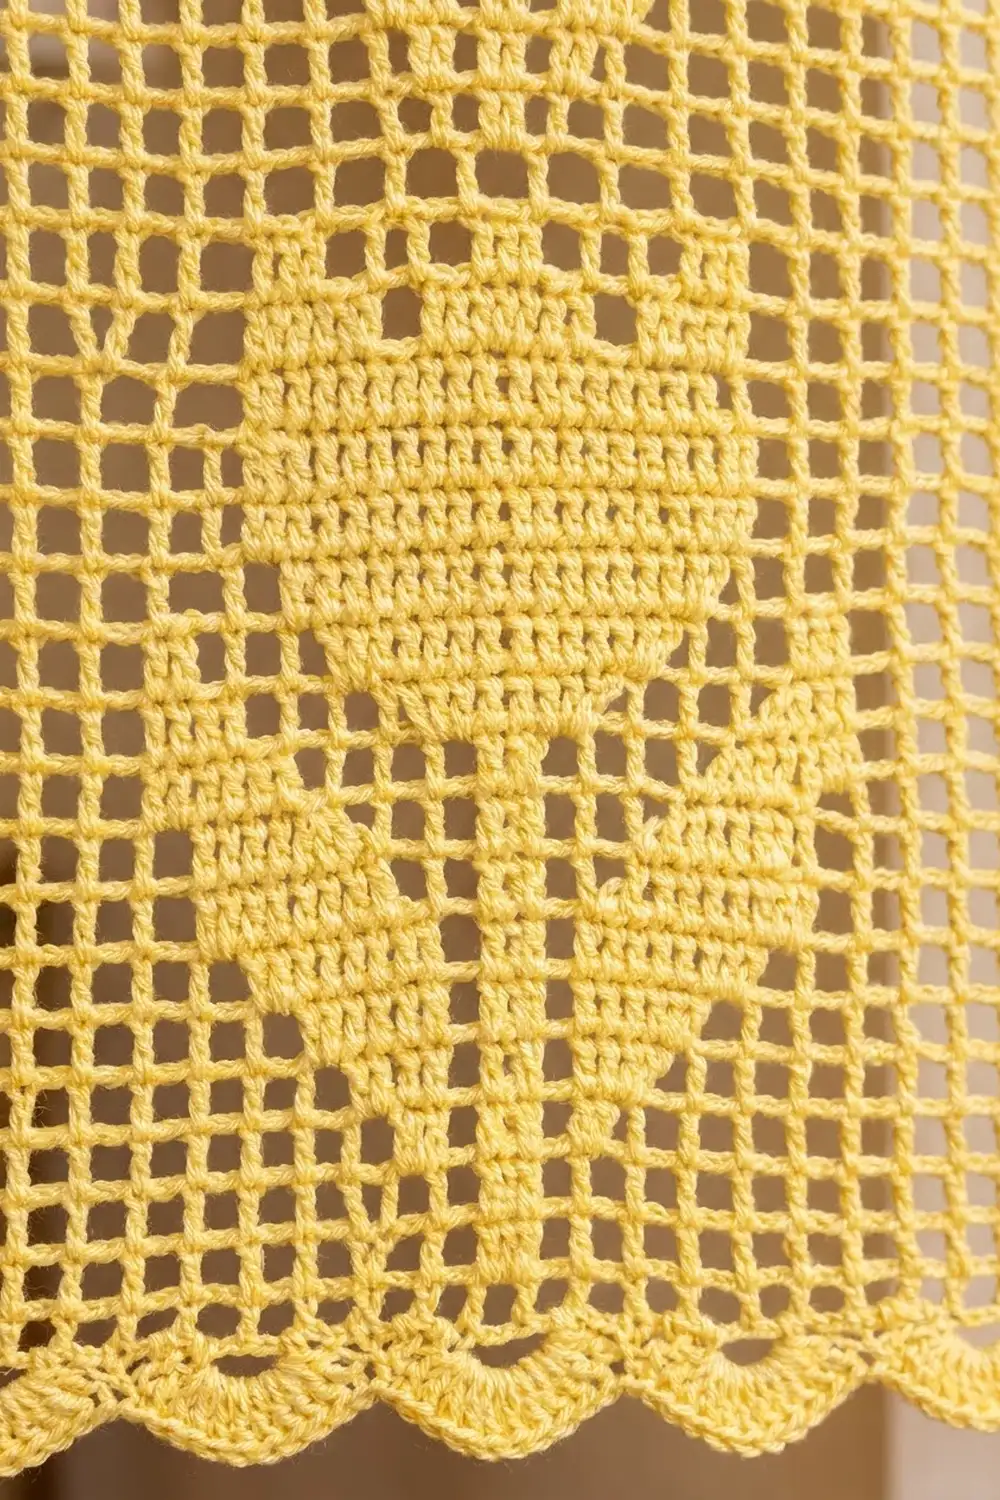
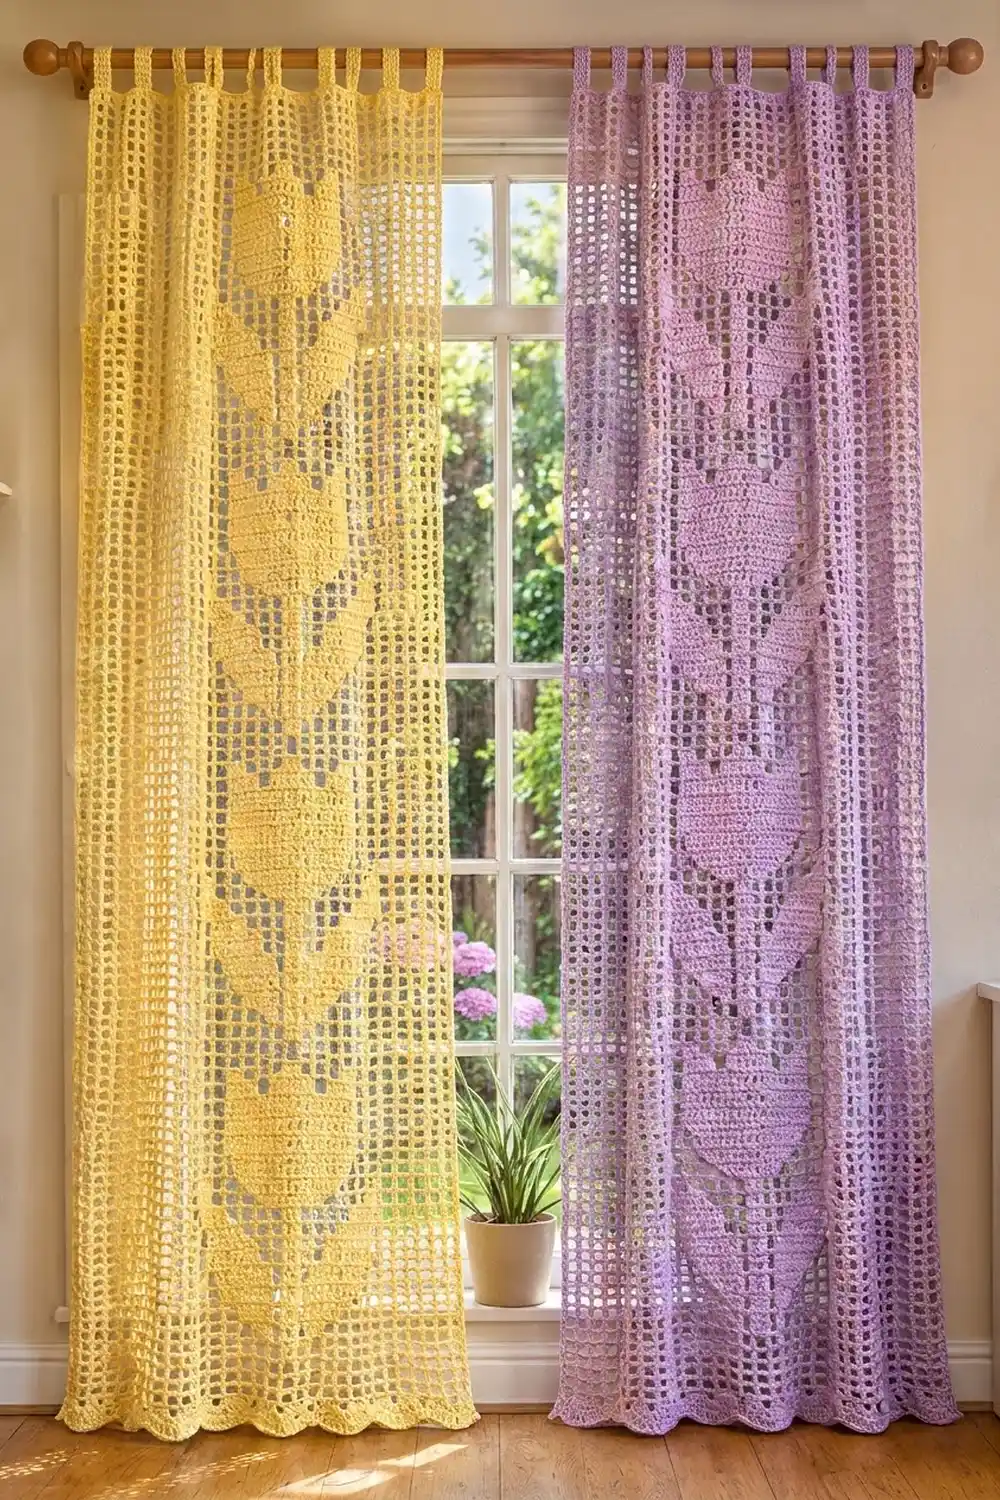
These airy filet curtain panels have a single column of tulips running down the middle. Each flower has a rounded cup-shaped head with three petal points, a straight stem, and two pointed leaves. Open mesh on both sides of the tulips lets plenty of light through.
The panels shown are buttery yellow and soft lavender. The two colors work well as a mismatched pair, but two panels in the same color work too. The style is cottage-garden and a little vintage, and it suits a sunny window.
This pattern uses US crochet terms. Each finished panel measures 21 in (53.3 cm) wide by 81 in (205.7 cm) long, not counting the tab loops. The loops add about 2.75 in (7.0 cm) above the top edge.
Each panel is one piece, worked from the bottom up in filet mesh, with the tulip motif placed by row. A simple border then adds a single-crochet edge, a scalloped hem, and seven tabs. You make two panels, and they hang separately.
Finished Size and Construction
- Finished size (each panel): 21 in x 81 in (53.3 cm x 205.7 cm), excluding tabs
- Skill level: Intermediate
- Terminology: US
- Yarn weight: DK (light worsted / 3) cotton
- Hook: 3.5 mm (E-4)
- Number of pieces: 2 separate panels (not joined)
- Layout: panels hang side by side on one rod
- Grid per panel: 41 squares wide x 160 rows tall
- Size before border: 20.5 in x 80 in (52.1 cm x 203.2 cm)
- Border depth: 0.25 in (0.6 cm) on the sides and top; 0.75 in (1.9 cm) at the bottom hem
Materials
Use a smooth mercerized or combed cotton in DK weight. Cotton holds the filet grid crisply, hangs straight, and stands up to sunlight and washing. Avoid fuzzy or very stretchy yarns, because they blur the tulip outline and make long panels sag.
- Yellow: 750 g, approximately 1800 m (one panel)
- Lavender: 750 g, approximately 1800 m (one panel)
These quantities include about a 10% margin for the gauge swatch and small differences in tension. Buy all balls of each color from the same dye lot.
Tools:
– 3.5 mm (E-4) crochet hook
– Tapestry needle
– Stitch markers (at least 10)
– Measuring tape
– Rust-proof pins and a large blocking surface (a floor with towels works)
– Spray bottle
Abbreviations (US Terms)
- ch – chain
- sl st – slip stitch
- sc – single crochet
- hdc – half double crochet
- dc – double crochet
- sk – skip
- sp – space
- RS / WS – right side / wrong side
Special stitches (filet):
– Open square (mesh): ch 2, sk 2 sts, dc in next dc.
– Block (filled square): dc in each of the next 2 sts (or 2 dc in the ch-2 sp), then dc in next dc.
– Square: every square uses 3 stitches plus the shared dc it ends on. A row of 41 squares therefore contains 1 + (41 x 3) = 124 stitches.
Gauge and Checkpoints
Filet gauge: 8 squares and 8 rows = 4 in (10.2 cm). Each square is 0.5 in (1.3 cm) wide and 0.5 in (1.3 cm) tall.
Border gauge (sc): 24 sc and 26 rows = 4 in (10.2 cm).
Before starting a full panel, make a test swatch. Ch 50 (3 x 15 + 5) and work 12 rows of open mesh with the instructions below. It should measure 7.5 in x 6 in (19.1 cm x 15.2 cm).
- Swatch too big: go down to a 3.25 mm hook.
- Swatch too small: go up to a 3.75 mm hook.
- Width right but rows too tall: pull the first loop of each dc snug before yarning over again.
Panel checkpoints (width should stay 20.5 in / 52.1 cm throughout):
– After Row 4: 2 in (5.1 cm) tall
– After Row 34 (first tulip complete): 17 in (43.2 cm) tall
– After Row 94: 47 in (119.4 cm) tall
– After Row 160: 80 in (203.2 cm) tall
Measure flat on a table without stretching. If the panel is more than 0.5 in (1.3 cm) off at any checkpoint, adjust before going further.
Panel Body (Make 2 – One in Each Color)
Foundation and Opening Rows
Row 1: Ch 128. Dc in 8th ch from hook. Ch 2, sk 2 ch, dc in next ch 40 times. (41 open squares; 124 sts)
Row 2: Ch 5 (counts as dc + ch 2), turn. Sk the ch-2 sp, dc in next dc. Ch 2, dc in next dc across, ending with the last dc in the 3rd ch of the beginning skipped chains. (41 open squares; 124 sts)
Rows 3–4: Repeat Row 2. (41 open squares each)
From now on, start every row with ch 5. That works because columns 1–15 and 27–41 are always open. Each row ends with a dc in the 3rd ch of the previous row’s turning ch-5. Every row in the panel has 124 stitches and 41 squares.
Tulip Motif
The tulip column sits in panel columns 16–26, centered on column 21. That leaves 15 open squares on each side. Place a marker in the dc that begins column 16 and another in the dc that ends column 26, and move them up as you go.
The motif is symmetrical, so you read it the same way on RS and WS rows. In each row below, the listed columns are blocks and every other square is open.
Motif repeat (30 rows):
| Repeat row | Block columns | Blocks |
|---|---|---|
| 1–2 | 21 | 1 |
| 3 | 20–22 | 3 |
| 4 | 19–23 | 5 |
| 5 | 18–19, 21, 23–24 | 5 |
| 6 | 17–19, 21, 23–25 | 7 |
| 7 | 17–18, 21, 24–25 | 5 |
| 8 | 16–17, 21, 25–26 | 5 |
| 9–12 | 21 | 1 |
| 13 | 19–23 | 5 |
| 14 | 18–24 | 7 |
| 15–22 | 17–25 | 9 |
| 23 | 17–18, 20–22, 24–25 | 7 |
| 24 | 17, 21, 25 | 3 |
| 25–30 | none (all open) | 0 |
Repeat rows 1–12 form the stem and the pair of leaves, with the leaf tips reaching out to columns 16 and 26 in row 8. Rows 13–22 build the rounded cup of the flower head, 4.5 in (11.4 cm) wide. Rows 23–24 split the top into three petal points. Rows 25–30 leave open space before the next tulip.
Rows 5–154: Work the 30-row motif repeat 5 times. Repeat 1 covers Rows 5–34, repeat 2 covers Rows 35–64, and so on up to repeat 5, Rows 125–154. Each repeat is 15 in (38.1 cm) tall.
Rows 155–160: Repeat Row 2 (all open). (41 open squares; 124 sts)
Don’t fasten off. Continue into the border.
Stitch check: whatever the block count, each row still has 124 sts. A row with 9 blocks has 27 dc in blocks plus open squares, and the total doesn’t change. If a row comes out at 123 or 125, find the error before moving on.
Make Both Panels
- Panel A: Yellow, 1 panel (750 g)
- Panel B: Lavender, 1 panel (750 g)
Layout on the rod:
[ ROD ===================================== ]
[ Yellow panel A ]   [ Lavender panel B ]
   (7 tabs)             (7 tabs)
The panels aren’t joined to each other. Each one hangs from its own seven tabs, so no joining is needed. Compare the two panels side by side after Row 160. They should match within 0.5 in (1.3 cm) in both directions.
Border
Border gauge: 24 sc = 4 in (10.2 cm), or 3 sc per filet square in both directions.
Round 1 (Single-Crochet Edge, All Sides)
With RS facing and continuing from Row 160:
- Top: Ch 1, then sc in each dc and each ch across: 124 sc. Ch 2 for the corner.
- Side 1: Work 3 sc around each row-end post, going down: 160 rows x 3 = 480 sc. Ch 2 for the corner.
- Bottom: Sc in the base of each dc and each ch of Row 1: 124 sc. Ch 2 for the corner.
- Side 2: Work 3 sc around each row-end post, going up: 480 sc. Ch 2, sl st in the first sc.
Total: 1208 sc + 4 corner ch-2 spaces. In this pattern, the side counts exclude the corner ch-2 spaces, so nothing is counted twice. Fasten off.
Why the math works: a square is 3 stitches wide and 0.5 in (1.3 cm) tall. Working 3 sc per row-end gives 6 sc per inch, which matches the 24 sc / 4 in border gauge. The sides then lie flat without ruffling or pulling in. 480 sc / 6 = 80 in (203.2 cm), the same as the body length.
Rows 2–3 (Bottom Scallop Hem)
Row 2: With RS facing, join the yarn in the first sc of the bottom edge. Sc in the same st. Ch 3, sk 2 sc, sc in next sc 41 times. (41 ch-3 arches; 42 sc; 1 + 41 x 3 = 124 sc used)
Row 3: Ch 1, turn. Sc in first sc. (Hdc, 3 dc, hdc) in next ch-3 sp, sc in next sc 41 times. (41 scallops; 247 sts) Fasten off.
Each scallop sits under one filet square, so the hem lines up exactly with the grid. Five stitches in a 3-stitch-wide arch cups gently into a rounded scallop without ruffling.
Tabs (Make 7 per Panel)
Count the 124 top sc from right to left. Place markers in sc 1, 20, 39, 58, 77, 96, and 115.
Tab rows 1–36: Join at a marker. Ch 1, sc in the same st and the next 9 sc (10 sc). For rows 2–36: ch 1, turn, sc in each sc. (10 sc per row) Fasten off, leaving a 12 in (30.5 cm) tail.
Each tab is about 1.7 in (4.3 cm) wide and 5.5 in (14.0 cm) long. There are 9 sc gaps between tabs, each 1.5 in (3.8 cm). The check: 7 x 10 + 6 x 9 = 70 + 54 = 124 ✓.
Fold each tab to the WS. Whipstitch the last row to the top of Row 160 so it sits directly behind the tab base. The finished loop stands about 2.75 in (7.0 cm) tall and fits a rod up to 1.5 in (3.8 cm) in diameter.
Final Blocking
- Weave in all ends along solid blocks or the border, never across open mesh.
- Soak the panel in cool water with a little wool wash for 15 minutes.
- Press out the water gently. Roll the panel in towels, but don’t wring it.
- Lay it flat on towels and pin it to 21 in x 81 in (53.3 cm x 205.7 cm).
- Pin along the sides every 4 in (10.2 cm), keeping the grid lines straight.
- Pin each scallop at its center point so the hem curves evenly.
- Pull the tulip blocks into crisp rectangles with your fingers.
- Leave it to dry completely, which takes about 24 hours. Repeat with the second panel.
Final Quality-Control Checklist
- Each panel has 41 squares across and 160 rows.
- Every row has 124 stitches.
- Five tulips are centered on column 21, with 15 open squares on each side.
- Leaf tips reach columns 16 and 26.
- Flower heads are 9 squares wide, with three petal points.
- Border Round 1: 124 / 480 / 124 / 480 sc.
- 41 scallops along the hem.
- 7 tabs, evenly spaced, each sewn securely.
- Blocked size is 21 in x 81 in (53.3 cm x 205.7 cm).
- Both panels match within 0.5 in (1.3 cm).
Troubleshooting
- Panel getting narrower: you’re probably missing the last dc into the turning chain. Count 42 dc posts in a row.
- Tulip off-center: recount from the edge to column 16 and move your markers.
- Mesh squares look tall and slanted: tighten your ch-2 spaces, or go down a hook size for the chains only.
- Sides ruffle: use 2 sc on every third row-end instead of 3, and keep the count the same on both sides.
- Scallops flare: change the shells to (hdc, 2 dc, hdc).
- Tabs stretch: go down a hook size for the tabs.
Care
Hand wash or machine wash cool on a gentle cycle in a mesh bag, then reshape and dry flat. Don’t hang the panels while wet, because the weight of the water will stretch them.
Final Notes
The measurement chain is simple. A 0.5 in (1.3 cm) square gives 41 squares at 20.5 in (52.1 cm) and 160 rows at 80 in (203.2 cm). The border brings each panel to 21 in x 81 in (53.3 cm x 205.7 cm), with seven tab loops on top. Check your gauge, count 124 stitches, and the tulips will line up.
Happy crocheting!