

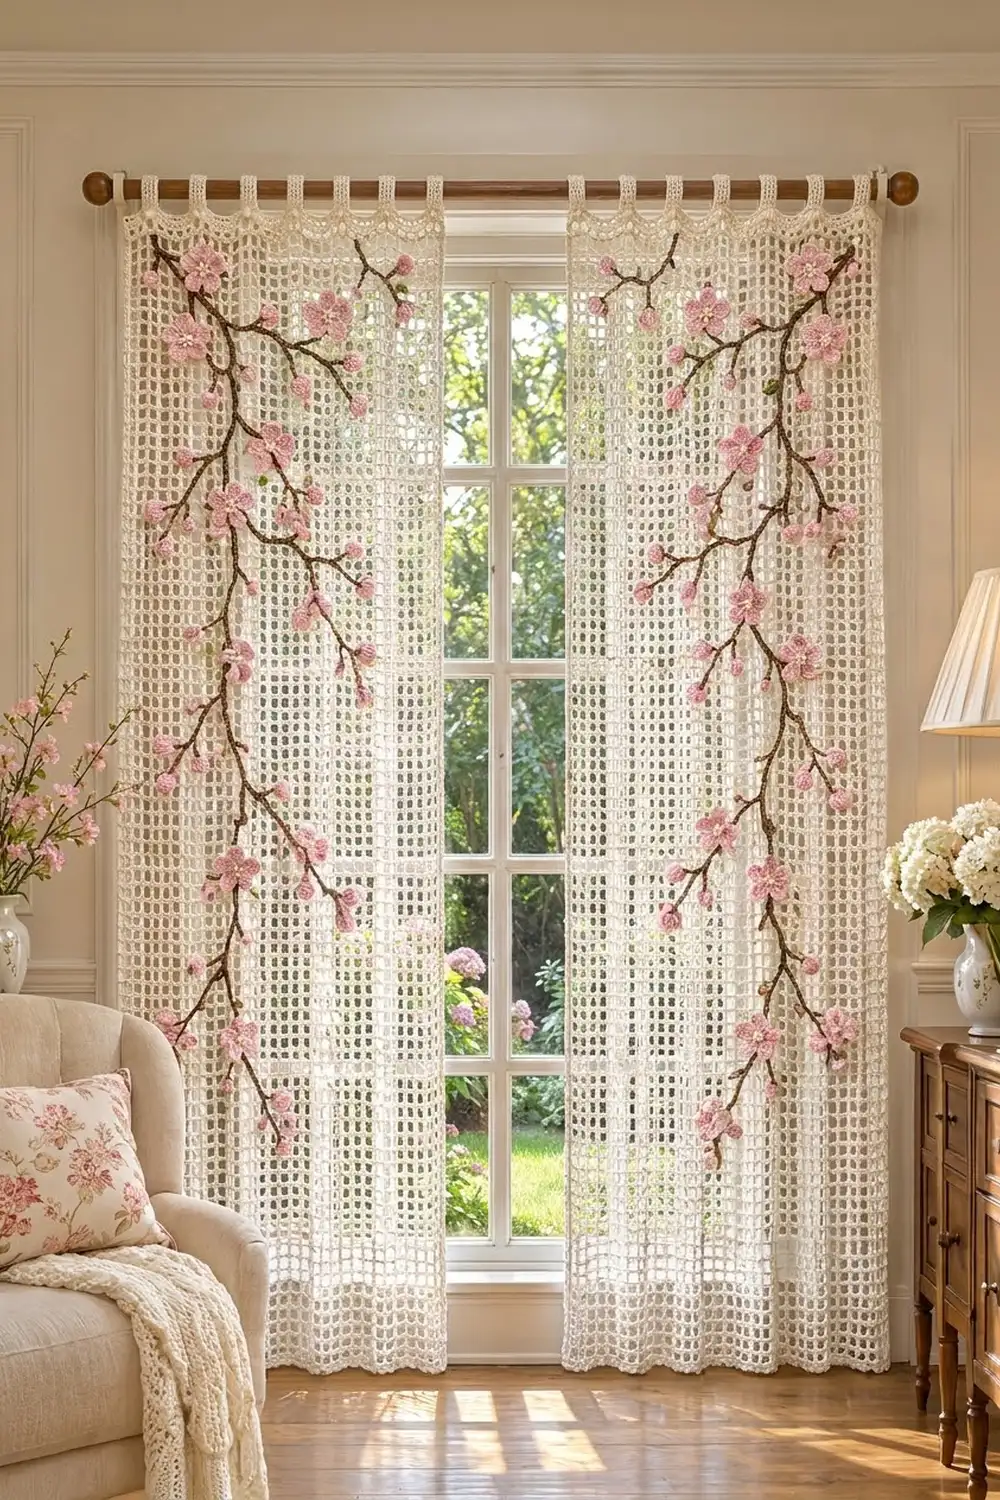
These tab-top curtains combine soft cream filet mesh with a cherry blossom branch that you place by hand. Each panel is an open grid that lets the light through. A dark brown corded branch crosses it diagonally, and pink five-petal blossoms and round buds are sewn along the twigs.
The palette is simple: cream for the mesh and flower centers, dusty pink for the blossoms and buds, and chocolate brown for the branches. The look is light, romantic, and slightly vintage.
This pattern uses US crochet terms. Each finished panel measures 29 in (73.7 cm) wide by 66.5 in (168.9 cm) long, not counting the tabs. The tab loops add about 2 in (5.1 cm), so each panel hangs about 68.5 in (174.0 cm) from the rod.
Each panel is worked from the bottom up in dc filet mesh. You then add a scalloped top band and seven tabs, and finish with two rows of sc edging. The branches are slip-stitch cords and the flowers and buds are small motifs. All of them are sewn on at the end, and the layout is mirrored on the second panel.
Finished Size and Construction
- Finished size (each panel): 29 in x 66.5 in (73.7 cm x 168.9 cm), plus about 2 in (5.1 cm) of tab loops
- Skill level: Intermediate
- Terminology: US crochet terms
- Yarn weight: DK / light worsted (#3) cotton
- Hooks: 4.5 mm (US 7) for the panels, 4.0 mm (US G-6) for the cords, 3.5 mm (US E-4) for the flowers and buds
- Number of pieces: 2 curtain panels, plus appliqués (cords, flowers, buds)
- Layout: Two panels hung side by side, not joined, with mirrored branches
- Panel body: 35 meshes x 80 rows = 28 in x 64 in (71.1 cm x 162.6 cm)
- Size before border: 28 in x 66 in (71.1 cm x 167.6 cm), including the 2 in (5.1 cm) top band
- Border depth: 0.5 in (1.3 cm) on the sides and bottom
Materials
Choose a smooth, mercerized or combed DK cotton. Cotton keeps the open grid crisp, washes well, and stretches less than acrylic when it hangs.
- Cream: 350 g / about 805 m (7 balls of 50 g / 115 m) for both panels, the borders, the tabs, and the flower centers
- Pink: 100 g / about 230 m for 28 blossoms and 24 buds
- Dark brown: 50 g / about 115 m for the branches, twigs, stems, and bud bases
These quantities include a margin of about 15 percent for swatching and differences in tension.
Tools:
– 4.5 mm (US 7), 4.0 mm (US G-6), and 3.5 mm (US E-4) crochet hooks
– Tapestry needle and stitch markers
– Rust-proof pins and a large blocking surface
– Measuring tape and a spray bottle
Abbreviations (US Terms)
- ch – chain
- sl st – slip stitch
- sc – single crochet
- hdc – half double crochet
- dc – double crochet
- sk – skip
- st(s) – stitch(es)
- sp – space
- RS / WS – right side / wrong side
Special stitches:
– Mesh: Ch 2, sk 2 sts, dc in next st. One mesh is 3 sts wide.
– Popcorn: Work 4 dc in the same place and remove the hook from the loop. Insert the hook from front to back in the first dc (or the top of the beginning ch-3), then pull the dropped loop through.
Gauge and Checkpoints
Panel gauge: 5 meshes x 5 rows = 4 in (10.2 cm) in dc filet mesh with the 4.5 mm hook, measured after blocking. Each mesh is 0.8 in (2.0 cm) square, and 15 sts = 4 in (10.2 cm) across.
Band gauge: 15 sc x 16 rows = 4 in (10.2 cm).
Cord gauge: 5 ch = 1 in (2.5 cm) with the 4.0 mm hook.
Make a test swatch before you start. Ch 35, work Row 1 (10 meshes), then repeat Row 2 until you have 10 rows. After blocking, the swatch should measure 8 in x 8 in (20.3 cm x 20.3 cm).
Checkpoints:
– After Row 1: 28 in (71.1 cm) wide, unstretched
– After Row 25: 20 in (50.8 cm) long
– After Row 80: 64 in (162.6 cm) long
– After the top band: 66 in (167.6 cm) long
– After the border: 29 in x 66.5 in (73.7 cm x 168.9 cm)
If your swatch is too big, go down one hook size. If it’s too small, go up one size. Don’t change the stitch counts: the band, tabs, and border all depend on 106 sts.
Panel (Make 2)
With cream and the 4.5 mm hook, ch 110.
Row 1 (RS): Dc in the 8th ch from hook. The skipped chs count as dc, ch 2, and 2 skipped base chs. *Ch 2, sk 2 ch, dc in next ch; rep from * across. Turn. (35 meshes: 36 dc + 35 ch-2 sps = 106 sts)
Row 2: Ch 5 (counts as dc and ch 2). Sk the first dc and next 2 chs, dc in next dc, *ch 2, sk 2 chs, dc in next dc; rep from * across, working the last dc in the 3rd ch of the turning ch. Turn. (35 meshes, 106 sts)
Rows 3–80: Repeat Row 2. (35 meshes, 106 sts per row)
Check your length: it should be 64 in (162.6 cm).
Top Band
Row 81: Ch 3 (counts as dc), *2 dc in next ch-2 sp, dc in next dc; rep from * across, working the last dc in the 3rd ch of the turning ch. Turn. (106 dc: 1 + 35 x 3)
Row 82 (arch row): Ch 1, sc in first st, *ch 5, sk 4 sts, sc in next st; rep from * across. Turn. (22 sc and 21 ch-5 arches)
Row 83 (scallop fill): Ch 1, sc in first sc, *4 sc in next ch-5 arch, sc in next sc; rep from * across. Turn. (106 sc: 1 + 21 x 5)
Gathering each ch-5 arch into 4 sc makes it pucker slightly. This creates the soft scalloped texture across the band.
Rows 84–85: Ch 1, sc in each st across. Turn. (106 sc)
The band should measure 2 in (5.1 cm). Fasten off.
Tabs (7 per panel)
With RS facing, count the Row 85 sts from the right edge. The tabs start on sts 3, 19, 35, 51, 67, 83, and 99. Each tab is 6 sts wide, with 10 sts between tabs and 2 sts at each edge (7 x 6 + 6 x 10 + 2 + 2 = 106).
Row 1: Join cream in the starting st, ch 1, sc in the same st and in the next 5 sts. Turn. (6 sc)
Rows 2–20: Ch 1, sc in each st across. Turn. (6 sc)
The tab should measure 5 in (12.7 cm). Fasten off, leaving a 12 in (30.5 cm) tail. Fold the tab to the WS and whip-stitch the last row to the back of Row 83 directly below it. The loop fits a rod up to 1.5 in (3.8 cm) in diameter.
Appliqués
Blossom (Make 14 per panel)
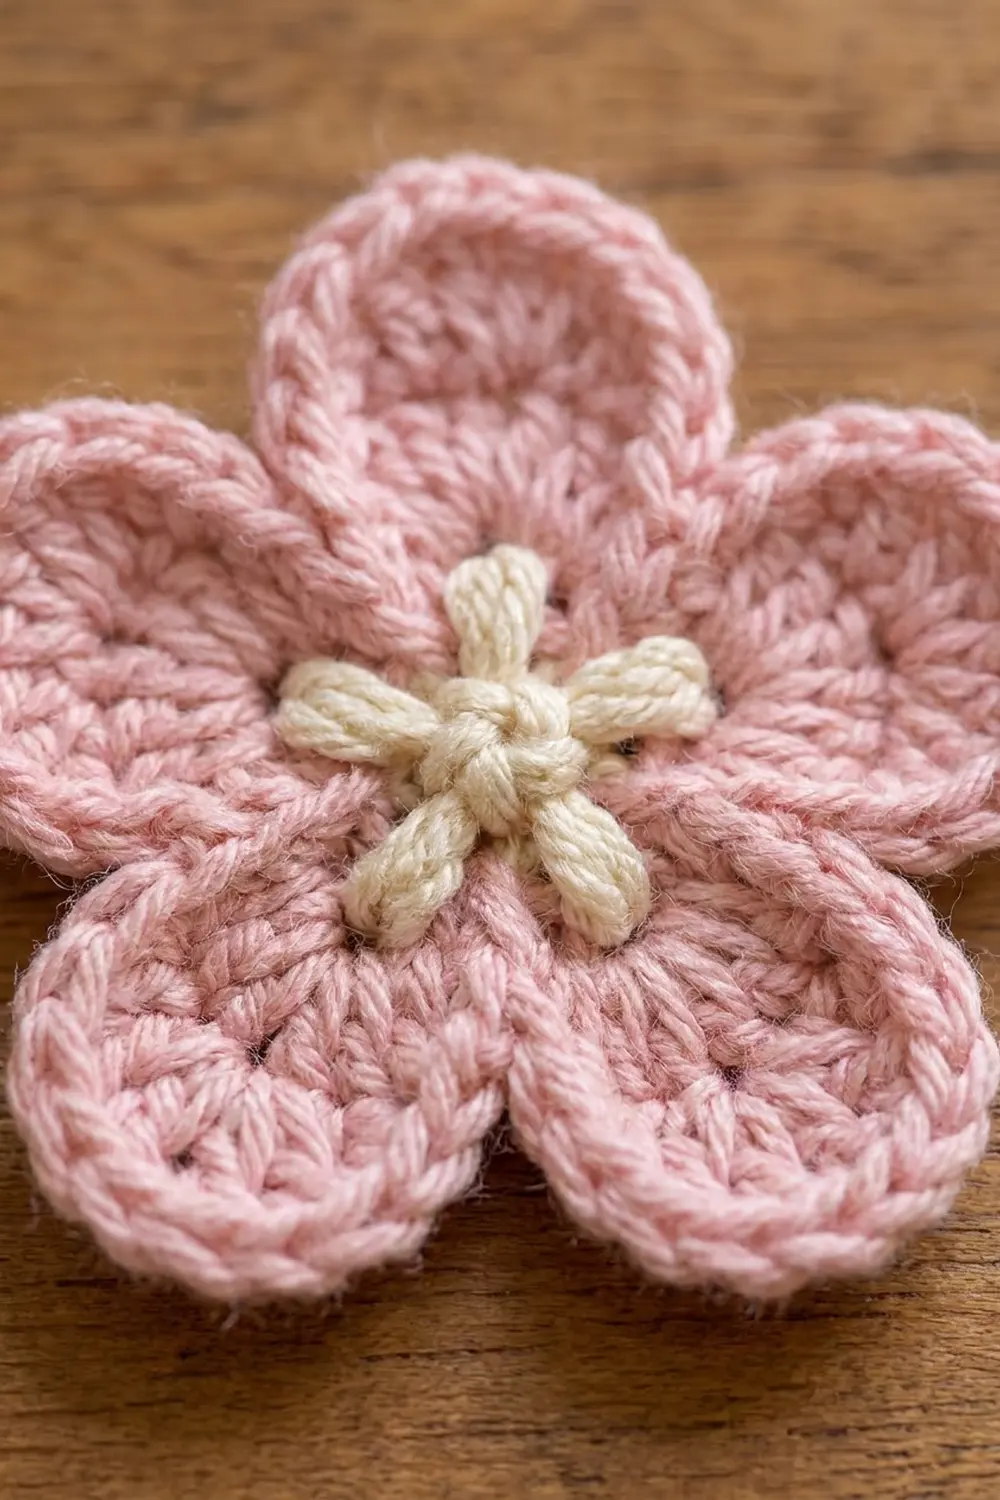
With pink and the 3.5 mm hook, make a magic ring.
Rnd 1: Ch 1, 10 sc in ring, sl st to first sc. (10 sc)
Rnd 2: Ch 1, *sc in next st, ch 3, sk next st; rep from * 4 more times, sl st to first sc. (5 sc, 5 ch-3 sps)
Rnd 3: In each ch-3 sp work (sc, hdc, 3 dc, hdc, sc), sl st to first sc. (5 petals, 35 sts)
Fasten off, leaving a 12 in (30.5 cm) tail. With cream, embroider 5 French knots in a ring at the center, plus 1 knot in the middle. Rnd 1 should measure about 0.75 in (1.9 cm), and the finished blossom 2.5 in (6.4 cm) across.
Bud (Make 12 per panel)
With pink and the 3.5 mm hook, make a magic ring and ch 3. Work a popcorn into the ring, using the ch-3 as the first dc, then ch 1. Pull the ring closed and fasten off. With brown, work 3 straight stitches up from the base to make a calyx. Each bud is 0.75 in (1.9 cm) across.
Branch Cords (per panel)
With brown and the 4.0 mm hook, chain the number given. Then sl st in the back bump of the 2nd ch from hook and each ch across.
- Main branch (make 1): Ch 201. (200 sl sts, 40 in / 101.6 cm)
- Long twigs (make 3): Ch 41. (40 sl sts, 8 in / 20.3 cm)
- Short twigs (make 3): Ch 21. (20 sl sts, 4 in / 10.2 cm)
- Bud stems (make 12): Ch 6. (5 sl sts, about 1 in / 2.5 cm)
Make All Pieces
Totals for the pair:
– Cream: 2 panels and 14 tabs
– Pink: 28 blossoms and 24 buds
– Brown: 2 main branches, 6 long twigs, 6 short twigs, and 24 bud stems
Hanging layout (RS facing, viewed from the room):
 [ LEFT PANEL ]            [ RIGHT PANEL ]
 +---------------+         +---------------+
 |   *  o  \  *  |         |  *  /  o  *   |
 |  *   \    o   |         |   o    /   *  |
 |   o   \  *    |         |    *  /   o   |
 |  *     \      |         |      /     *  |
 |         o     |         |     o         |
 |   (mesh only) |         | (mesh only)   |
 +---------------+         +---------------+
 * = blossom   o = bud   \ / = main branch
On the left panel, the main branch starts at the band near mesh column 32 (counting from the left) and runs down to about column 6 at Row 30. The right panel is the mirror image. Space the twigs about 8 in (20.3 cm) apart along the branch.
Joining: Attaching the Appliqués
The two panels are not joined to each other. Here, “joining” means sewing the appliqués onto the mesh.
- Lay the panel flat with the RS up. Pin the main branch along its diagonal.
- Using a brown tail, tack the cord at every dc post and every ch-2 sp it crosses. That puts a tack about every 0.4 in (1.0 cm), following the mesh rhythm of 3 sts per 0.8 in.
- Tuck one end of each twig under the main branch and sew the twigs down the same way.
- Sew the bud stems to the twigs, then sew a bud to the end of each stem.
- Sew the blossoms over the branch joints and along the twigs. Stitch through Rnd 1 and the base of each petal so the petal tips stay free.
Keep your sewing tension relaxed, because tight stitches gather the mesh. After sewing, the panel should still measure 28 in (71.1 cm) across at the branch.
Border
Border gauge is 15 sc = 4 in (10.2 cm), the same as the mesh width.
Row 1: With RS facing, join cream with the 4.5 mm hook at the top-left corner of the band.
– Left side, band: Work 1 sc in each of the Row 85, 84, 83, and 82 row-ends, then 3 sc in the Row 81 row-end (7 sc).
– Left side, mesh: Work 3 sc in each mesh row-end (80 x 3 = 240 sc). This gives 247 sc on the left side.
– Bottom: Work 3 sc in the corner foundation ch, 1 sc in each of the next 104 foundation chs, and 3 sc in the last corner ch.
– Right side: Work 247 sc up the right side to mirror the left.
Turn. (247 + 3 + 104 + 3 + 247 = 604 sc)
Row 2: Ch 1, sc in each st across, working 3 sc in the center sc of each corner group. Fasten off. (247 + 5 + 104 + 5 + 247 = 608 sc)
Why the math works: A mesh row is 0.8 in (2.0 cm) tall, and 3 sc cover 0.8 in at 15 sc per 4 in. The sides therefore match the width gauge and won’t ruffle or pull in. Along the bottom, the 104 chs plus the 2 corner chs equal the 106 sts in every row. The top edge isn’t bordered because the tabs are there.
Final Blocking
- Weave in all ends.
- Soak the panel in cool water for 15 minutes, then gently press out the water without wringing.
- Roll it in towels to remove more moisture.
- Lay it RS up and pin it to 29 in x 66.5 in (73.7 cm x 168.9 cm).
- Pin the sides every 4 in (10.2 cm), keeping the mesh lines straight.
- Open the petals gently with your fingers.
- Let it dry completely, then unpin. Repeat for the second panel.
Final Quality-Control Checklist
- Each panel measures 29 in x 66.5 in (73.7 cm x 168.9 cm)
- Every mesh row has 35 meshes
- Each panel has 7 tabs in matching positions
- The branches mirror each other when the panels hang
- The petal tips are free and the centers are secure
- No ends show from the room side
Troubleshooting
- Mesh slants: Make sure the last dc of each row goes into the 3rd ch of the turning ch.
- Band flares: Check that Row 83 has 106 sc.
- Side edges ripple: Work 3 sc per mesh row-end, not 4.
- Panel puckers around the branch: Loosen the tacking stitches and re-block.
- Tabs twist: Line up all 6 sts squarely when you sew the fold to Row 83.
Care
Hand wash in cool water with mild soap, roll in a towel, and dry flat before rehanging. Lightly re-block if the mesh shifts.
Final Notes
Everything follows from the mesh gauge. Each 0.8 in (2.0 cm) mesh gives 35 meshes = 28 in (71.1 cm) across and 80 rows = 64 in (162.6 cm) long. The 2 in (5.1 cm) band brings the panel to 66 in (167.6 cm). The 0.5 in (1.3 cm) border finishes it at 29 in x 66.5 in (73.7 cm x 168.9 cm). Get the gauge right first, and every later step will fit.
Happy crocheting!