

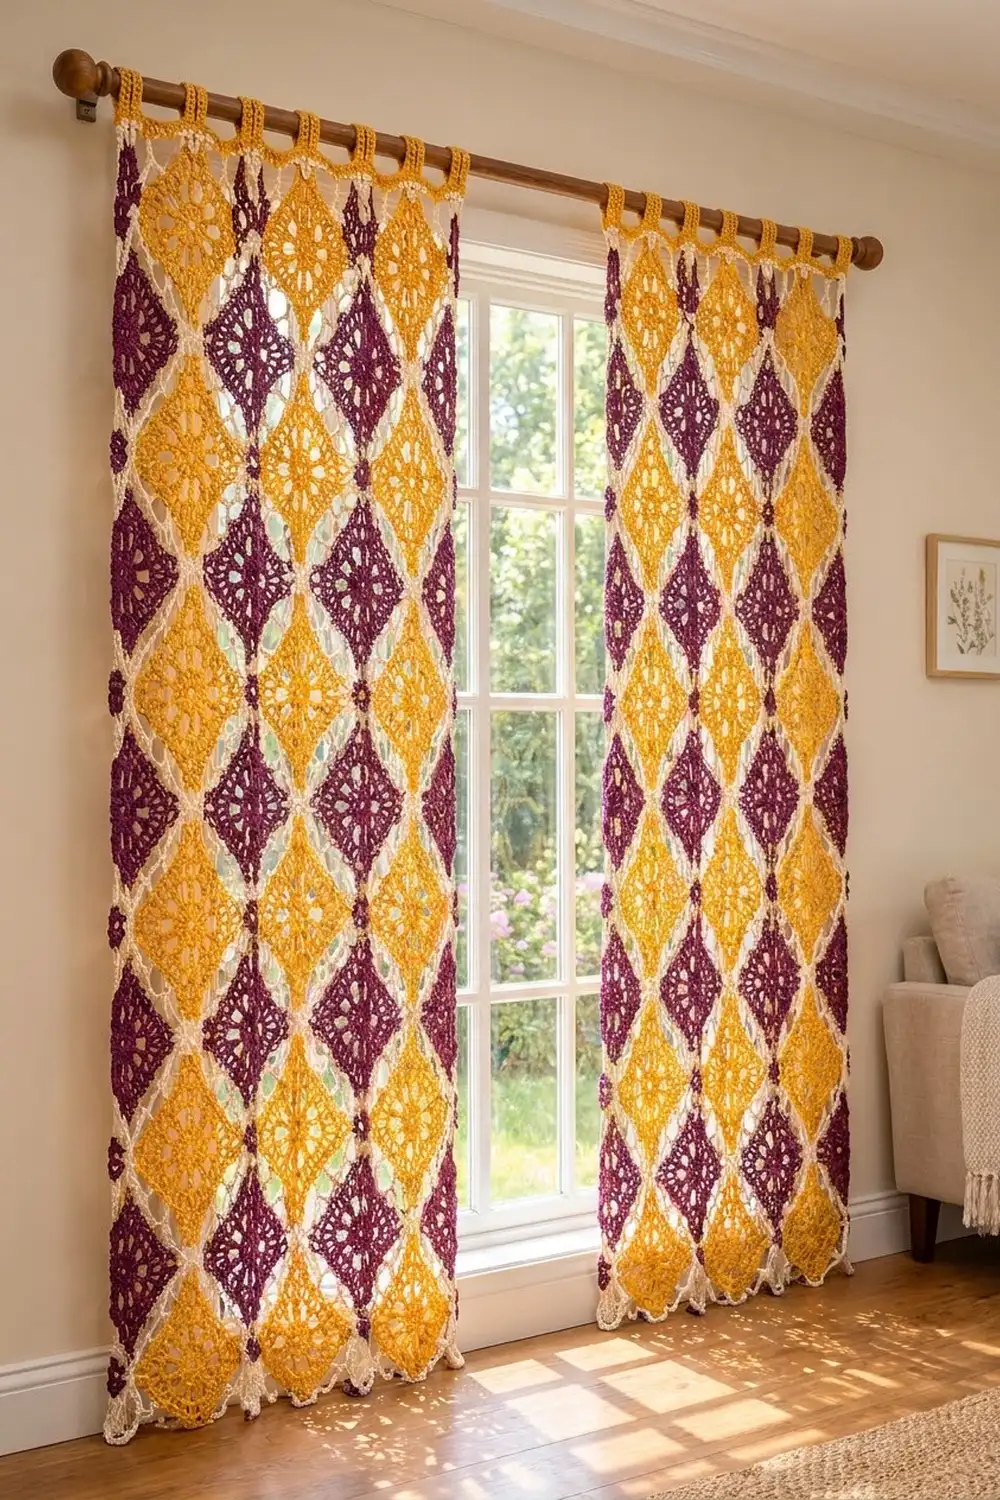
These Harlequin Bloom curtain panels turn a classic square motif into a bold diamond lattice. Mustard and plum diamonds alternate row by row, and a fine cream lace line runs between them. Where four corners meet, the cream joins gather into little knotted flowers.
The color scheme is warm and slightly retro. Light shows through the lacy gaps of each motif, so the panels filter sun without blocking it. The pattern uses US crochet terms throughout.
Each finished panel measures 26.5″ x 77.5″ (67.3 x 196.9 cm) before tabs. With the 3″ (7.6 cm) tab loops, the total drop is 80.5″ (204.5 cm). The pattern makes two panels.
You crochet the mustard and plum motifs separately, then add a cream outline round to each one. That cream round joins the pieces as you go. Half-diamond triangles and corner pieces fill the edges, then a cream border and mustard tabs finish each panel.
Finished Size and Construction
- Finished panel size: 26.5″ x 77.5″ (67.3 x 196.9 cm), plus 3″ (7.6 cm) tabs
- Skill level: Intermediate
- Terminology: US
- Yarn weight: Worsted (#4), cotton or cotton blend
- Hook: US H-8 (5 mm)
- Pieces per panel: 43 square motifs, 20 setting triangles, 4 corner pieces
- Layout: squares set on point; 9 rows of 3 mustard diamonds alternating with 8 rows of 2 plum diamonds
- Motif size: 5.5″ (14.0 cm) square before the cream round; 6″ (15.2 cm) once joined
- Size before border: 25.5″ x 76.5″ (64.8 x 194.3 cm)
- Border depth: 0.5″ (1.3 cm)
Materials
Choose a smooth mercerized cotton or a cotton-acrylic blend. These hold their shape when hanging and show stitch detail clearly. The amounts below assume about 190 m per 100 g.
- Mustard yellow: 750 g (approx. 1,425 m)
- Plum: 700 g (approx. 1,330 m)
- Cream: 550 g (approx. 1,045 m)
All quantities cover two panels and include a margin of about 10–15%.
Tools:
– US H-8 (5 mm) hook
– Tapestry needle
– Stitch markers
– Blocking mats and rust-proof pins
– Spray bottle
– Measuring tape
– Curtain rod, up to 1.5″ (3.8 cm) diameter
Abbreviations (US Terms)
- ch – chain
- sl st – slip stitch
- sc – single crochet
- dc – double crochet
- tr – treble crochet
- sp(s) – space(s)
- sk – skip
- RS / WS – right side / wrong side
Joining loop (special stitch): When a cream loop must connect to a finished neighbor, work ch 1, sl st into the neighbor’s matching ch-3 loop, ch 1. This replaces the ch 3.
Gauge and Checkpoints
Gauge: 18 sc x 20 rows = 4″ (10.2 cm) in sc.
Make one full square motif first, steam it lightly, and measure it:
- After Round 1: 1.5″ (3.8 cm) across
- After Round 2: 2.75″ (7.0 cm)
- After Round 3: 3.5″ (8.9 cm)
- After Round 4: 4.5″ (11.4 cm) square
- After Round 5: 5.25″ (13.3 cm)
- After Round 6: 5.5″ (14.0 cm)
If your motif is too big, go down a half or full hook size. If it is too small, go up one size. A 0.25″ (0.6 cm) error per motif grows to about 2.1″ (5.3 cm) across the width and 6.4″ (16.3 cm) down the length, so fix it now.
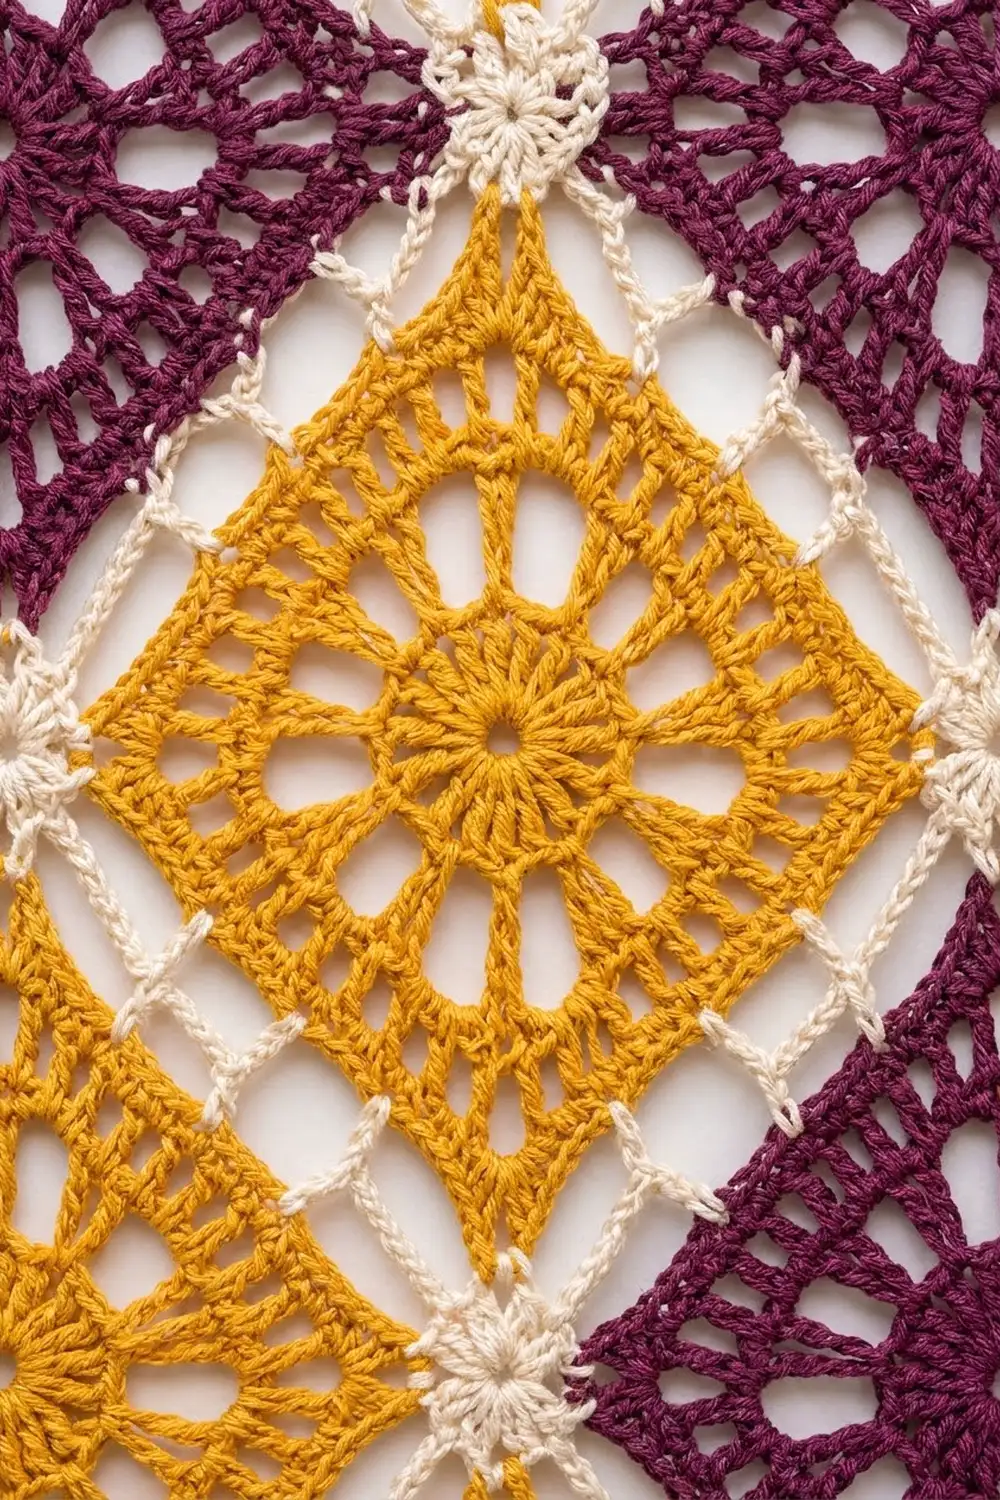
Square Motif
Make 27 in mustard and 16 in plum per panel.
Round 1: Make a magic ring. Ch 3 (counts as dc), work 15 dc in the ring and join to the top of ch-3. (16 dc)
Round 2: Ch 5 (counts as dc + ch 2). Dc in the next dc, ch 2. Repeat from * around and join to the 3rd ch of ch-5. (16 dc, 16 ch-2 sps) These are the wheel spokes.
Round 3: Sl st into the first ch-2 sp. Ch 3, 2 dc in the same sp, ch 1. 3 dc in the next sp, ch 1. Repeat from * 14 more times and join. (16 groups of 3 dc = 48 dc; 16 ch-1 sps) These groups are the petals.
Round 4 (squaring): Sl st across to the first ch-1 sp. Ch 4 (counts as tr), then (2 tr, ch 3, 3 tr) in the same sp. Ch 1, (3 dc in the next sp, ch 1) 3 times, then (3 tr, ch 3, 3 tr) in the next sp. Repeat from * 2 more times. Ch 1, (3 dc in the next sp, ch 1) 3 times, and join.
(Per side between corner ch-3 sps: 3 tr + 1 + 3 + 1 + 3 + 1 + 3 + 1 + 3 tr = 19 sts. Total 76 sts + 4 corner sps.)
Round 5: Sl st into the corner sp. Ch 3, then (dc, ch 2, 2 dc) in the same sp. Dc in each st and ch-1 sp across (19), then (2 dc, ch 2, 2 dc) in the corner sp. Repeat around and join.
(Per side: 2 + 19 + 2 = 23 dc. Total 92 dc + 4 ch-2 sps.)
Round 6: Ch 1. (Sc, ch 2, sc) in the corner sp, then sc in each of the 23 dc. Repeat around, join, and fasten off.
(Per side: 1 + 23 + 1 = 25 sc between corner ch-2 sps; corner sps are not counted. Total 100 sc.)
Setting Triangle (Half-Diamond)
Make 20 per panel in plum. You will use 16 for the sides and 4 for the top and bottom.
The triangle is worked in rows, and you turn at the end of each row. The long side is formed by the row ends. The right-angle apex is the point opposite the long side.
Row 1: Make a magic ring. Ch 3 (counts as dc) and work 8 dc in the ring, then turn. (9 dc)
Row 2: Ch 5 (counts as dc + ch 2), dc in the next dc, then (ch 2, dc in the next dc) 7 times. Turn. (9 dc, 8 ch-2 sps)
Row 3: Ch 4 (counts as dc + ch 1), 3 dc in the first ch-2 sp, then (ch 1, 3 dc in the next sp) 7 times. Ch 1 and dc in the 3rd ch of the turning ch. Turn. (8 groups, 9 ch-1 sps)
Row 4: Ch 4 (counts as tr) and work 2 tr in the first ch-1 sp. Ch 1, then (3 dc in the next sp, ch 1) 3 times. Work (3 tr, ch 3, 3 tr) in the next sp; this is the apex. Ch 1, (3 dc in the next sp, ch 1) 3 times, then 3 tr in the last sp. Turn. (19 sts on each short side)
Row 5: Ch 3 and work 2 dc in the first tr. Dc in each st to the apex, work (2 dc, ch 2, 2 dc) in the apex sp, then dc in each st to the last tr. Work 3 dc in the last tr and turn. (Each short side: 3 + 18 + 2 = 23 dc)
Row 6: Ch 1 and work 2 sc in the first dc. Sc in each dc to the apex, work (sc, ch 2, sc) in the apex sp, then sc to the last dc. Work 2 sc in the last dc and fasten off. (Each short side: 25 sc)
Checkpoint: each short side is 5.5″ (14.0 cm), and the long side is about 7.8″ (19.8 cm).
Corner Piece
Make 4 per panel in plum. Each one is a quarter of a motif. The ring sits at the panel corner, and the last row forms the long side (hypotenuse).
Row 1: Make a magic ring. Ch 3 and work 4 dc in the ring, then turn. (5 dc)
Row 2: Ch 5, dc in the next dc, then (ch 2, dc in the next dc) 3 times. Turn. (5 dc, 4 ch-2 sps)
Row 3: Ch 4, 3 dc in the first sp, then (ch 1, 3 dc in the next sp) 3 times. Ch 1, dc in the turning ch and turn. (4 groups, 5 ch-1 sps)
Row 4: Ch 4 and work 2 tr in the first sp. Ch 1, then (3 dc in the next sp, ch 1) 3 times. Work 3 tr in the last sp and turn. (19 sts)
Row 5: Ch 3 and work 2 dc in the first tr. Dc in the next 17 sts, then 3 dc in the last tr. Turn. (23 dc)
Row 6: Ch 1 and work 2 sc in the first dc. Sc in the next 21 dc, then 2 sc in the last dc. Fasten off. (25 sc)
Checkpoint: the long side is 5.5″ (14.0 cm), and each leg is about 3.9″ (9.9 cm).
Make All Pieces
Per panel, make:
– Mustard: 27 squares
– Plum: 16 squares, 20 triangles and 4 corner pieces
Double these numbers for the pair.
Layout grid (one panel, top to bottom):
C   T   T   C      (top: corners + 2 triangles)
  Y   Y   Y        A-row (x9 total)
S   P   P   S      B-row (x8 total)
  Y   Y   Y
S   P   P   S
  ...repeat...
  Y   Y   Y        9th A-row
C   T   T   C      (bottom)
In the grid, Y = mustard square, P = plum square, S = side triangle (long side out), T = top/bottom triangle and C = corner piece.
Joining (Cream Round 7)
Every piece gets one cream round. The first piece is worked plain, with all loops as ch 3. Each later piece replaces its ch-3 loops with joining loops wherever it touches a finished piece. Work in layout order: left to right, then top to bottom.
Square, Round 7: Join cream in any corner sp. (Sc, ch 3, sc) in the corner sp. Sc in the first sc, then (ch 3, sk 2 sc, sc in the next sc) 8 times, ending in the 25th sc. Repeat around, join and fasten off.
(Per side: 9 sc, 8 ch-3 loops, plus 1 corner loop at each corner)
Triangle, Round 7:
1. Join cream at the apex sp and work (sc, ch 3, sc) there.
2. Along the short side, work the 9 sc and 8 loops exactly as on the square, ending in the last sc.
3. Ch 3 and sc in the side of that same stitch to form the end corner loop.
4. Along the long side: (ch 3, sc in the end of the next row) for Rows 5, 4, 3, 2 and 1. Ch 3 and sc around the ring. Then (ch 3, sc in the row end) for Rows 1, 2, 3, 4 and 5. Ch 3 to reach the far corner. (12 loops)
5. Make the end corner loop, work the second short side to match, and join.
Corner piece, Round 7:
– Hypotenuse: work it like a square side (9 sc, 8 loops), with a corner loop at each end.
– Each leg: work 6 loops into the row ends of Rows 5 to 1 and the ring.
– Ring point: work (sc, ch 3, sc) at the ring point.
Stitch-to-stitch logic: each side of a piece has the same count, 9 sc and 8 loops. Loop 1 always meets loop 1, so the seams line up with no extra stitches. At a meeting point of 3 or 4 corners, every later piece sl sts into the first piece’s corner loop. This builds the cream “flower” knot.
Tension: keep the joining sl sts loose. Tight joins pucker the lattice and shorten the panel.
Checkpoint: after joining the first A-row, the B-row and the top edge pieces, the width should be 25.5″ (64.8 cm). Each A-to-A row repeat adds 8.5″ (21.6 cm) to the length. The full panel is 25.5″ x 76.5″ (64.8 x 194.3 cm).
Border
Border gauge: 3 sc per ch-3 loop, which keeps 18 sc = 4″ (10.2 cm). This matches the motifs: 25 sc across 5.5″ (14.0 cm) works out to about 4.5 sc per inch.
Edge loops on each side:
– Top or bottom edge: 2 corner legs of 6 loops, 2 triangles of 12 loops, and 3 junction points that each count as 1 loop. That gives 6 + 12 + 12 + 6 + 3 = 39 loops.
– Each long side: 2 corner legs of 6 loops, 8 triangles of 12 loops, and 9 junction points. That gives 6 + 96 + 6 + 9 = 117 loops.
Border Round 1 (cream): Join in a panel corner loop. (Sc, ch 2, sc) in the corner loop, then 3 sc in each loop and junction along the side. Repeat around and join.
– Top and bottom: 39 x 3 = 117 sc, plus 1 sc from each corner = 119 sc.
– Long sides: 117 x 3 = 351 sc, plus 2 = 353 sc.
Border Round 2: Ch 1. (Sc, ch 2, sc) in the corner sp, then sc in each sc along the side. Repeat around and join.
– Top and bottom: 119 + 2 = 121 sc.
– Long sides: 353 + 2 = 355 sc.
Fasten off.
Why the math works: 39 loops over 25.5″ and 117 loops over 76.5″ both give about 0.65″ (1.7 cm) per loop. So 3 sc per loop gives the same density on every side, and the border lies flat. The two rounds add 0.5″ (1.3 cm) on each side, so the panel becomes 26.5″ x 77.5″ (67.3 x 196.9 cm).
Tabs (mustard, 8 per panel): The 121 top sc hold 8 tabs of 9 sc each (72 sc) and 7 gaps of 7 sc each (49 sc). That totals 121.
1. With the RS facing, join mustard in sc 1.
2. Row 1: Ch 1 and sc in 9 sts. Turn.
3. Rows 2–30: Ch 1, sc in each sc and turn. (9 sc)
4. Fasten off with a long tail.
5. Skip 7 sc and start the next tab in sc 17. Continue the same way, ending with the last tab in sc 113–121.
6. Fold each tab to the WS and sew it to the base of Border Round 1.
Each tab is 2″ (5.1 cm) wide and 6″ (15.2 cm) long, which makes a 3″ (7.6 cm) loop.
Final Blocking
- Pin the panel RS up on mats in sections. Measure to 26.5″ (67.3 cm) wide.
- Pin each diamond point and each cream flower junction so the lattice lines are straight.
- Spray until the yarn is damp but not soaked.
- Leave it to dry fully, then unpin and move on to the next section.
- Check the length after the last section: it should be 77.5″ (196.9 cm).
- Don’t block the tabs; just steam them lightly flat.
Final Quality-Control Checklist
- [ ] Every square has 25 sc per side after Round 6
- [ ] Every cream side has 9 sc and 8 loops
- [ ] The corner flowers sit centered, with no gaps
- [ ] The edges are straight, with no scalloping at the triangles
- [ ] Border counts: 121 sc top and bottom, 355 sc on each long side
- [ ] The 8 tabs are evenly spaced and securely sewn
- [ ] Both panels match in size within 0.5″ (1.3 cm)
- [ ] All ends are woven into same-color stitches
Troubleshooting
- Motif cups: Round 4 trebles are too tight. Loosen them, or chain 4 at the corners.
- Motif ruffles: Your tension is loose. Go down a hook size.
- The lattice puckers: The joining sl sts are too tight. Rework them more loosely.
- The side edge waves: Check for 12 long-side loops on each triangle. Don’t add or skip any.
- Gaps at corner junctions: Make sure every piece sl sts into the first piece’s corner loop, not into a neighbor’s side loop.
- The tabs twist: Sew them straight down the center of each 9-sc base.
Care
Hand wash cool, or machine wash on a gentle cycle in a mesh bag. Lay flat to dry, reshape while damp, and press lightly with a warm iron through a cloth if needed.
Final Notes
The measurement chain is simple:
– Each motif is 5.5″ (14.0 cm) and becomes 6″ (15.2 cm) when joined.
– Its diagonal is about 8.5″ (21.6 cm).
– Three diagonals across make 25.5″ (64.8 cm), and nine down make 76.5″ (194.3 cm).
– The border brings the panel to 26.5″ x 77.5″ (67.3 x 196.9 cm).
If you get the first motif right, every count after it falls into place. Happy crocheting!