
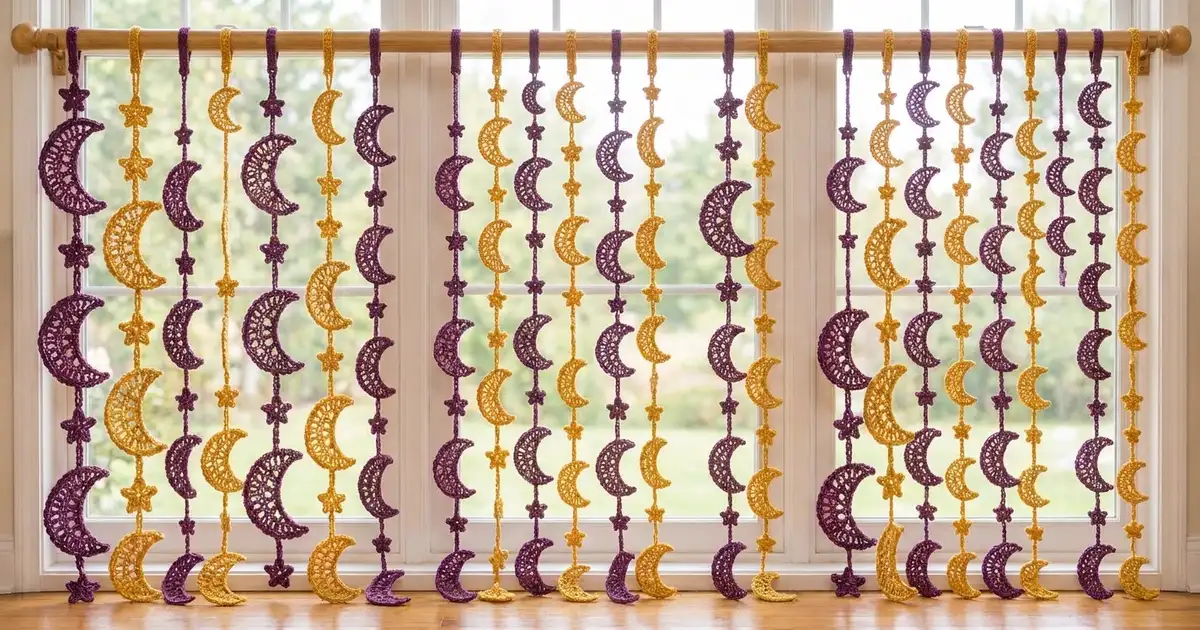
The Moonlit Garden Curtain is a hanging strand curtain made from lacy crescent moons and small five-point stars. Plum and gold strands alternate across a rod, and daylight shows through the open spokes of each moon and the gaps between the strands.
The palette has two colors: deep plum purple and golden mustard. Each strand uses one color, so the stripes read clearly from across the room. The style is light and celestial without being fussy. It works on a window, a closet opening or a reading nook.
This pattern uses US crochet terms. The finished curtain measures about 35.25 in (89.5 cm) wide and 78.25 in (198.8 cm) long, measured from the top of the rod to the lowest motif.
You will crochet every moon and star separately, add a single crochet border to each moon, and then build each strand from the top down. A chain connector joins each motif to the next one. Twelve strands hang side by side, with their colors alternating.
Finished Size and Construction
- Finished size: about 35.25 in (89.5 cm) wide x 78.25 in (198.8 cm) long
- Skill level: Easy-intermediate
- Terminology: US crochet terms
- Yarn weight: DK (#3) cotton or cotton blend
- Hook: 4.0 mm (G-6)
- Number of pieces: 84 moons, 84 stars and 12 strand cords
- Layout: 12 strands, spaced 3 in (7.6 cm) apart center to center, alternating purple and gold
- Piece size (moon): 5.5 in (14.0 cm) tip to tip x 2.25 in (5.7 cm) at the widest point
- Piece size (star): 1.75 in (4.4 cm) from point to point
- Moon size before border: 5 in (12.7 cm) x 2 in (5.1 cm)
- Border depth: 0.25 in (0.6 cm), one round of sc
Materials
Choose a smooth, mercerized or matte cotton in DK weight. Cotton holds its shape, shows the lace spokes clearly and won’t stretch much under gravity. Avoid acrylics with lots of drape, because long strands can grow over time.
Yarn:
– Plum purple: 250 g / 600 m (about 5 balls of 50 g / 120 m)
– Golden mustard: 250 g / 600 m (about 5 balls of 50 g / 120 m)
These quantities include a margin of about 15% for gauge differences and swatching.
Tools:
– 4.0 mm (G-6) crochet hook
– Tapestry needle
– Scissors
– Stitch markers
– Rust-proof pins and a blocking mat
– Spray bottle
– Tape measure
– Curtain rod up to 1.5 in (3.8 cm) in diameter
Abbreviations (US Terms)
- ch – chain
- sl st – slip stitch
- sc – single crochet
- hdc – half double crochet
- dc – double crochet
- sk – skip
- sp – space
- st(s) – stitch(es)
- BLO – back loop only
- RS / WS – right side / wrong side
Special technique: Connector. Ch 9 loosely. At gauge, the connector measures 2 in (5.1 cm).
Gauge and Checkpoints
- Stitch gauge: 18 dc and 8 dc rows = 4 in (10.2 cm)
- Chain gauge: 9 ch = 2 in (5.1 cm)
Make one moon and one star before you start production. Block them and measure.
Moon checkpoints:
– After Row 1, the strip measures about 4.75 in (12.1 cm) along the foundation.
– After Row 4, the moon measures 5 in (12.7 cm) tip to tip x 2 in (5.1 cm) wide.
– After the border, the moon measures 5.5 in (14.0 cm) x 2.25 in (5.7 cm).
Star checkpoint: 1.75 in (4.4 cm) from point to point.
If your pieces are too big, go down to a 3.75 mm hook. If they are too small, go up to a 4.5 mm hook. Over 7 moons per strand, being 0.25 in (0.6 cm) off per moon adds up to 1.75 in (4.4 cm) of strand length, so check carefully.

Moon (Make 84: 42 Purple, 42 Gold)
The moon is worked in rows along a foundation chain that becomes the inner (hollow) edge. As the outer edge grows from 21 to 33 to 45 sts, it curves the strip into a crescent. Rows 2–4 start and end with a sl st, which keeps the tips pointed.
Foundation: Ch 22.
Row 1 (RS): Sc in 2nd ch from hook and in next ch, hdc in next 3 ch, dc in next 11 ch, hdc in next 3 ch, sc in last 2 ch. (21 sts)
Row 2 (WS): Ch 1, turn. Sl st in first st, sc in next st, hdc in next 2 sts, [dc in next st, ch 1] 12 times, dc in next st, hdc in next 2 sts, sc in next st, sl st in last st. (21 sts + 12 ch-1 sps)
These ch-1 spaces start the curve.
Row 3 (RS): Ch 1, turn. Sl st in first st, sc in next st, hdc in next 2 sts, dc in next dc, [ch 2, sk ch-1 sp, dc in next dc] 12 times, hdc in next 2 sts, sc in next st, sl st in last st. (21 sts + 12 ch-2 sps)
This row makes the open spokes.
Row 4 (WS): Ch 1, turn. Sl st in first st, sc in next st, hdc in next 2 sts, dc in next dc, [2 dc in ch-2 sp, dc in next dc] 12 times, hdc in next 2 sts, sc in next st, sl st in last st. (45 sts)
Count check for Row 4: 1 + 1 + 2 + 1 + (12 x 3 = 36) + 2 + 1 + 1 = 45. This forms the solid outer band.
Don’t fasten off. Go straight to the moon border in the Border section below. Every moon needs its border before joining, because the strands attach to the border’s tip stitches.
Star (Make 84: 42 Purple, 42 Gold)
Round 1: Make a magic ring. Ch 1, work 10 sc in the ring, then sl st to the first sc. Pull the ring closed. (10 sc)
Round 2: Ch 4, sl st in 2nd ch from hook, sc in next ch, hdc in next ch, sk next sc, sl st in next sc. Repeat from * to * 4 more times. The last sl st lands in the joining st. (5 points)
Fasten off and weave in the ends. The tip of each point is the sl st worked in the 2nd ch from the hook.
Make All Pieces
| Piece | Purple | Gold |
|---|---|---|
| Moons (with border) | 42 | 42 |
| Stars | 42 | 42 |
| Strands | 6 | 6 |
Batch-make the pieces color by color, and bag them in groups of 7 moons and 7 stars (one strand’s worth).
Layout across the rod (left to right):
P G P G P G P G P G P G
Vertical order (M = moon, S = star, C = connector):
Purple strand:  Loop-C-M-C-S-C-M-C-S-C-M-C-S-C-M-C-S-C-M-C-S-C-M-C-S-C-M-C-S
Gold strand:    Loop-C-S-C-M-C-S-C-M-C-S-C-M-C-S-C-M-C-S-C-M-C-S-C-M-C-S-C-M
Each strand has 7 moons, 7 stars and 14 connectors. Because the gold strands start with a star, their moons sit offset from the purple moons, which gives the staggered look.
Joining
Build each strand from the top down with one continuous strand of yarn in the matching color. Lay the motifs on a table in order, with every moon’s hollow opening to the right and the moon’s RS facing up.
Hanging loop: Ch 27, then sl st in the first ch to form a ring. Folded over the rod, the loop hangs 3 in (7.6 cm), and it fits rods up to 1.5 in (3.8 cm) across.
Connector: Ch 9.
To join a moon: Turn the moon WS up. Sl st into the center sc of the top tip. Then sl st in the BLO of the next 24 sc down the inner arc, ending in the center sc of the bottom tip.
The 24 sl sts are: 1 remaining tip sc, 21 inner-arc sc, and 2 sc of the bottom tip, ending in its center sc. Count is the same in either direction, because the border is symmetrical. The sl st ridge sits on the WS, so the front stays clean.
To join a star: Sl st into the tip of the top point. Then ch 5 behind the star and sl st into the sl st between the two lower points. Keep that chain flat, not tight.
Continue: Work a connector after each motif, following the vertical order above. After the final motif, fasten off and weave the tail into that motif.
Tension advice: Make the connectors loose and even. Tight connectors make the strand pucker and get shorter. Once the strand is hanging, tight sl sts will tilt the moons.
Strand length checkpoint: Let the strand hang from a doorknob for 10 minutes, then measure.
- Purple: 3 in loop + (14 connectors x 2 in) + (7 x 5.5 in) + (7 x 1.25 in) = 78.25 in (198.8 cm)
- Gold: the same parts in a different order, so it is also 78.25 in (198.8 cm)
Each star takes up 1.25 in (3.2 cm) of the strand’s length, from its top tip down to the lower valley. If a strand is more than 1 in (2.5 cm) off, redo its connectors before making the next strand.
Width: 11 gaps x 3 in (7.6 cm) = 33 in (83.8 cm) between the outer strands. Add half a moon’s width (2.25 in / 5.7 cm in total) and the curtain is 35.25 in (89.5 cm) wide.
Border (Moon Edging)
Work this round on every moon immediately after Row 4, before joining.
Border gauge: 1 sc per stitch, matching the Row 4 stitch gauge of 18 sts = 4 in (10.2 cm).
Border Round (RS): Ch 1, turn.
– Outer arc: Sc in each st across Row 4. (45 sc)
– Tip A: Work 3 sc in the side of the Row 1 sc at the tip. (3 sc)
– Inner arc: Working in the free loops of the foundation chain, sc in each ch. (21 sc)
– Tip B: Work 3 sc in the side of the Row 1 sc at the other tip. (3 sc)
Sl st to the first sc. (72 sc total)
Fasten off and weave in the ends. The center sc of each 3-sc tip group is the joining point.
Why the math works:
– The outer arc has 45 sts, so 45 sc keeps it the same length, without ruffling or cupping.
– The inner arc has 21 foundation loops, so 21 sc stops the hollow from tightening.
– Each tip works like a corner. Three sc in one spot turn the edge and make a sharp point.
– Total: 45 + 3 + 21 + 3 = 72.
The round adds 0.25 in (0.6 cm) all around. That takes the moon from 5 in x 2 in (12.7 cm x 5.1 cm) to 5.5 in x 2.25 in (14.0 cm x 5.7 cm).
Final Blocking
- Block the motifs before joining, if possible. It’s much easier than blocking finished strands.
- Spray each moon until it is damp, not dripping.
- Pin the moon’s outer arc into a smooth curve, 5.5 in (14.0 cm) from tip to tip.
- Pin each tip to a sharp point.
- Open each ch-2 spoke space so it looks even.
- Pin each star’s 5 points out to 1.75 in (4.4 cm) across.
- Let everything dry completely, about 6–12 hours.
- After joining, hang each strand, spray it lightly, and let gravity straighten the connectors.
Final Quality-Control Checklist
- [ ] All moons measure 5.5 in (14.0 cm) tip to tip, within 0.125 in (0.3 cm)
- [ ] Every moon border has 72 sc with sharp 3-sc tips
- [ ] All stars have 5 even points
- [ ] All connectors are 9 ch and 2 in (5.1 cm) long
- [ ] All moons open the same way
- [ ] The sl st ridges sit on the WS
- [ ] Every strand hangs at 78.25 in (198.8 cm)
- [ ] The strand colors alternate correctly, and the gold strands start with a star
- [ ] All ends are woven in securely
Troubleshooting
The moon ruffles along the outer arc. Your dc are too loose, or you added stitches. Recount Row 4 (it should be 45), or go down a hook size.
The moon won’t curve. The ch-2 spaces in Row 3 are too short or tight. Chain more loosely.
The tips are blunt. Make sure Rows 2–4 start and end with a sl st, then pin the tips firmly when blocking.
A strand is too short. The connectors are tight. Redo them with a larger hook for the chains only.
A moon tilts sideways. The sl sts down the inner arc are pulling. Work them looser, in the BLO.
The star point tips curl. Block them flat, or work the hdc more loosely.
Care
Hand wash in cool water with mild soap. Roll in a towel to remove excess water, then dry flat or hang over the rod.

Final Notes
The measurement chain runs like this:
- Gauge (18 dc = 4 in / 10.2 cm) gives a moon of 5 in x 2 in (12.7 cm x 5.1 cm) before the border.
- The 72-sc border brings it to 5.5 in x 2.25 in (14.0 cm x 5.7 cm).
- One 3 in (7.6 cm) loop, 14 connectors of 2 in (5.1 cm), 7 moons and 7 stars of 1.25 in (3.2 cm) make a strand of 78.25 in (198.8 cm).
- Twelve strands spaced 3 in (7.6 cm) apart make a curtain 35.25 in (89.5 cm) wide.
Check each link in that chain, and the curtain will hang straight and even.
Happy crocheting!