

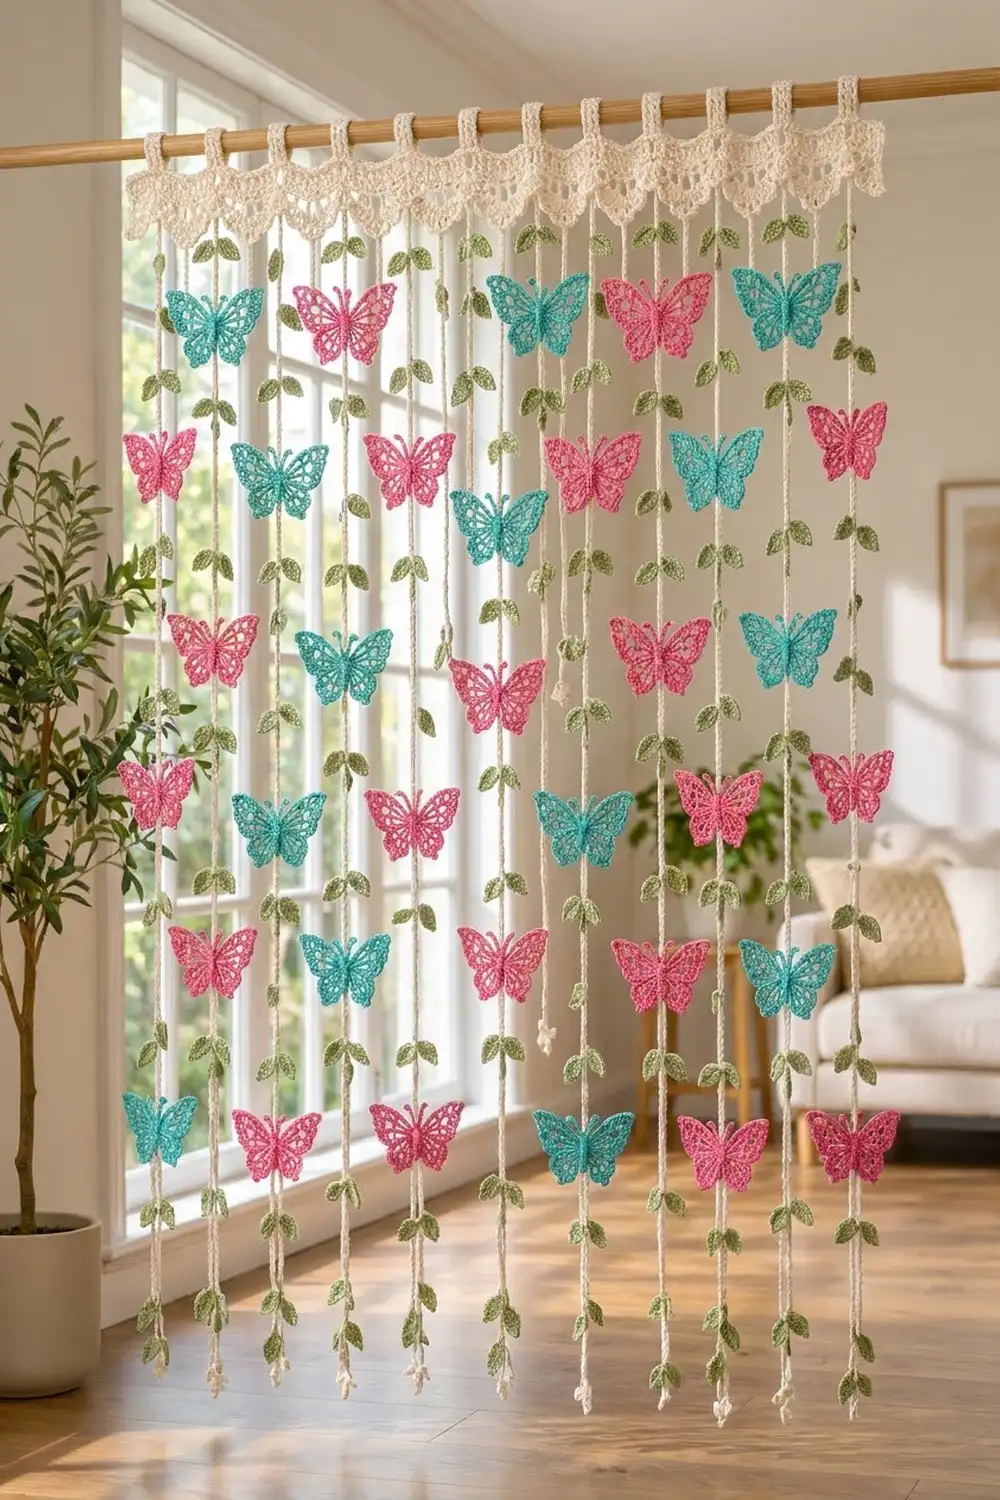
This curtain brings a garden to your window. A cream scalloped header hangs from a wooden rod, and eleven cream cords fall from it. Pink and teal lace butterflies are staggered across the cords, and small sage-green leaves sit between them.
The colors are cream, hot pink, teal and sage green, so the curtain looks fresh and springlike without being heavy. Daylight passes between the cords, and the butterfly wings have open windows, so the curtain lets light through instead of blocking it. This pattern uses US crochet terms.
The finished curtain is 40¼ in (102.2 cm) wide and 58 in (147.3 cm) long, measured from the top of the header to the cord tips. The tab loops add about 2 in (5.1 cm) above the header.
Construction overview: crochet a flat header in rows and add tab loops along its top edge. Make 11 slip-stitch cords, 33 butterflies and 88 leaves. Sew the butterflies and leaves onto the cords. Last, work the scalloped edge along the bottom of the header and catch the top of each cord into that edge as you go.
Finished Size and Construction
- Finished size: 40¼ in × 58 in (102.2 cm × 147.3 cm), not counting the tabs
- Skill level: Intermediate
- Terminology: US crochet terms
- Yarn weight: Worsted (#4) cotton
- Hook: 4.5 mm (US 7)
- Number of pieces: 1 header, 11 cords, 33 butterflies (17 pink, 16 teal), 88 leaves
- Layout: 11 cords spaced 4 in (10.2 cm) apart, with butterflies staggered on alternating cords
- Butterfly size: 4½ in × 3½ in (11.4 cm × 8.9 cm)
- Header before the scalloped edge: 40¼ in × 1½ in (102.2 cm × 3.8 cm)
- Scalloped edge depth: 2½ in (6.4 cm), so the full header depth is 4 in (10.2 cm)
- Cord length: 54 in (137.2 cm)
Materials
Use a smooth, mercerized worsted cotton of about 170 m per 100 g. Cotton holds the picots crisply and hangs straight, and it won’t stretch much in the sun the way acrylic can.
- Cream: 250 g / 425 m (header, tabs and cords)
- Hot pink: 150 g / 255 m (17 butterflies)
- Teal: 150 g / 255 m (16 butterflies)
- Sage green: 100 g / 170 m (88 leaves)
Tools:
- 4.5 mm (US 7) crochet hook
- Tapestry needle
- Locking stitch markers
- Rustproof pins and a blocking board
- Spray bottle
- Measuring tape
- Wooden curtain rod, up to 1¼ in (3.2 cm) in diameter
All quantities include a margin of roughly 20–40% for a gauge swatch and for differences between dye lots.
Abbreviations (US Terms)
- ch: chain
- sl st: slip stitch
- sc: single crochet
- hdc: half double crochet
- dc: double crochet
- tr: treble crochet
- sk: skip
- sp: space
- st(s): stitch(es)
- RS: right side
Special stitch – back-bump slip stitch: insert your hook under the bump on the back of the chain, yarn over, and pull through both the chain and the loop on your hook. Worked this way, the cord has a firm, rounded, slightly twisted look on both sides.
Picot: ch 3, worked as part of a (sc, ch 3, sc) group.
Gauge and Checkpoints
Header gauge: 16 sc and 18 sc rows = 4 in (10.2 cm).
Cord gauge: 5 back-bump sl sts = 1 in (2.5 cm).
Make one butterfly before anything else. It is the quickest test of your tension.
Checkpoints:
- Butterfly Rnd 1: 1¼ in (3.2 cm) across.
- Finished butterfly: 4½ in × 3½ in (11.4 cm × 8.9 cm) after a light steam.
- Leaf: 1½ in × ¾ in (3.8 cm × 1.9 cm).
- Header Row 1: 40¼ in (102.2 cm) wide.
- Header after Row 4: 1½ in (3.8 cm) deep.
- Cord: 54 in (137.2 cm) long after hanging overnight.
If your pieces are too big, go down 0.5 mm. If they are too small, go up 0.5 mm. A butterfly that is ¼ in (0.6 cm) off is fine, but the header width has to be accurate so that the cords line up with the scallops.
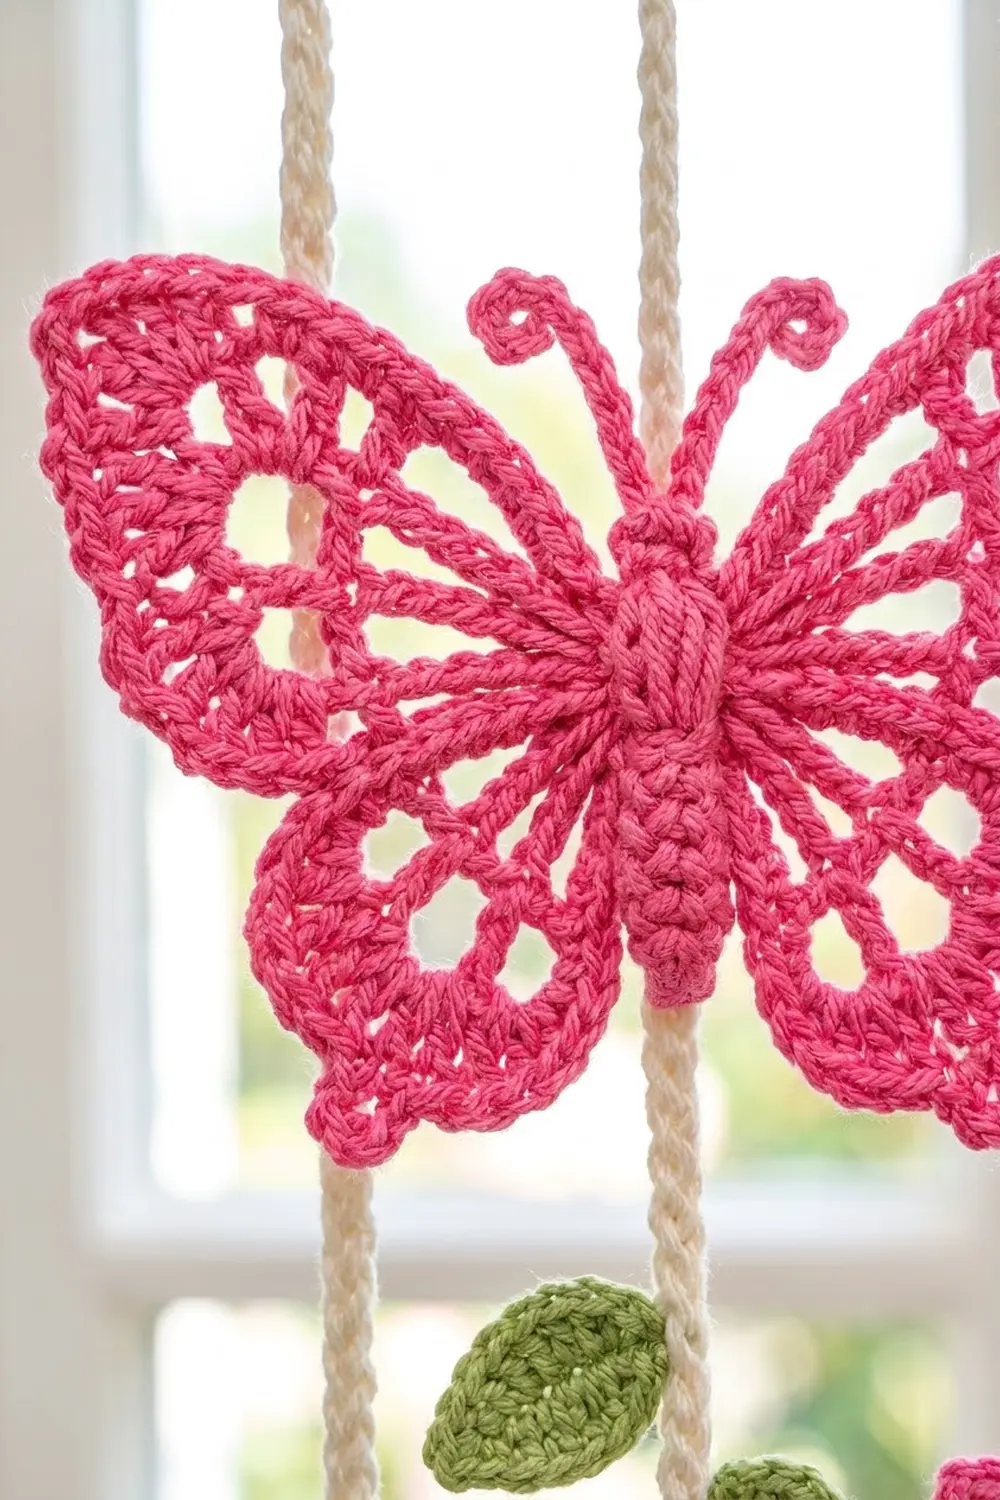
Butterfly (Make 33: 17 Pink, 16 Teal)
Wing base:
Ch 4, sl st to the first ch to form a ring.
Rnd 1: Ch 3 (counts as dc), 15 dc in ring, sl st to the top of the ch-3. (16 dc)
Rnd 2 (wing loops): Ch 1, sc in the same st. Then work:
- ch 10, sk 3, sc in next st (upper left wing loop)
- ch 7, sk 3, sc in next st (lower left wing loop)
- ch 7, sk 3, sc in next st (lower right wing loop)
- ch 10, sk 3, sl st to the first sc (upper right wing loop)
(4 sc, 2 ch-10 loops, 2 ch-7 loops)
Turn the ring so that the two ch-10 loops are at the top. The space between each loop and the ring becomes the open window in that wing.
Rnd 3 (wing fill):
- Each ch-10 loop: (sc, hdc, 2 dc, ch 2, 2 tr, ch 2, 2 tr, ch 3, 2 tr, ch 2, 2 tr, ch 2, 2 dc, hdc, sc). Each upper wing has 16 sts and 5 ch-sps.
- Each ch-7 loop: (sc, hdc, 2 dc, ch 2, 3 dc, ch 2, 2 dc, hdc, sc). Each lower wing has 11 sts and 2 ch-2 sps.
- Between wings: sl st in each Rnd 2 sc.
Rnd 4 (picot edge):
- Each upper wing: sc in each of the first 4 sts. Work (2 sc, ch 3, 2 sc) in the next ch-2 sp, then sc in each of the next 2 tr; repeat once more. In the ch-3 tip sp, work (2 sc, ch 3, 2 sc, ch 3, 2 sc). Then work [sc in each of the next 2 tr, (2 sc, ch 3, 2 sc) in the next ch-2 sp] twice. Finish with sc in each of the last 4 sts. Each upper wing has 38 sc and 6 picots.
- Each lower wing: sc in each of the first 4 sts, (2 sc, ch 3, 2 sc) in the ch-2 sp, sc in each of the 3 dc, (2 sc, ch 3, 2 sc) in the ch-2 sp, sc in each of the last 4 sts. Each lower wing has 19 sc and 2 picots.
- Between wings: sl st in each sl st.
Fasten off and weave in the ends.
Body (same color):
Ch 10. Sc in the 2nd ch from the hook and in each of the next 7 ch, 3 sc in the last ch (head), then sc in each of the 8 ch along the other side. (19 sc)
Antennae:
- Sl st in the center sc of the head.
- Ch 7, 3 sl st in the 2nd ch from the hook (this makes the knob tip), then sl st in each of the next 5 ch.
- Sl st in the same center sc and repeat Step 2 for the second antenna.
Fasten off and leave a 12 in (30.5 cm) tail. Center the body over the ring, head up, and whipstitch it down along both long edges so it stands up from the wings. Twist each antenna outward between your fingers to curl it.
Leaf (Make 88 in Sage Green)
Ch 8. Sl st in the 2nd ch from the hook, then work sc, hdc, dc, dc, hdc, sc in the next 6 ch. (7 sts)
Ch 2 for the tip. Working along the other side of the chain, work sc, hdc, dc, dc, hdc, sc, sl st. (7 sts)
Sl st to the first sl st. Fasten off and leave an 8 in (20.3 cm) tail. Each leaf has 14 sts and a ch-2 tip.
Cord (Make 11 in Cream)
Ch 271. Back-bump sl st in the 2nd ch from the hook and in each ch across. (270 sl sts)
At 5 sts per inch, 270 sts = 54 in (137.2 cm).
Fasten off and leave a 6 in (15.2 cm) tail at each end. Hang each cord overnight with a clothespin on the bottom so it settles to its final length.
Header
With cream, ch 162.
Row 1 (RS): Sc in the 2nd ch from the hook and in each ch across. (161 sc)
Checkpoint: 40¼ in (102.2 cm) wide.
Row 2: Ch 3 (counts as dc), turn, dc in each st across. (161 dc)
Row 3: Ch 1, turn, sc in each st across. (161 sc)
Row 4: Ch 3 (counts as dc), turn, dc in each st across. (161 dc)
Checkpoint: 1½ in (3.8 cm) deep. Do not fasten off; the scalloped edge starts from here.
Place a marker in the working loop and set the header aside.
Tabs (make 10): Rotate the header to work across the opposite side of the foundation chain. The 161 sts divide into 10 tabs of 8 sts with a 9-st gap between neighboring tabs: 10 × 8 + 9 × 9 = 161. The tabs begin on sts 1, 18, 35, 52, 69, 86, 103, 120, 137 and 154.
For each tab:
- Join cream in the first st of the tab and sc in each of the 8 sts. (8 sc)
- Work 17 more rows of ch 1, turn, 8 sc, for 18 rows in all. The strip should measure 4 in (10.2 cm).
- Fold the strip to the back and whipstitch the last row to the back of Row 1 across the same 8 sts.
Each finished tab is 2 in (5.1 cm) wide and forms a loop about 2 in (5.1 cm) tall.
Make All Pieces
Totals:
- Cream: 1 header with 10 tabs and 11 cords
- Pink: 17 butterflies
- Teal: 16 butterflies
- Green: 88 leaves (8 per cord)
Butterfly layout: each row of the grid is a distance measured down from the top of the cord (T = teal, P = pink, . = no butterfly).
Cord:     1  2  3  4  5  6  7  8  9 10 11
10 in:    T  .  P  .  T  .  P  .  T  .  P
18 in:    .  P  .  T  .  P  .  T  .  P  .
26 in:    P  .  T  .  P  .  T  .  P  .  T
34 in:    .  T  .  P  .  T  .  P  .  T  .
42 in:    T  .  P  .  T  .  P  .  T  .  P
50 in:    .  P  .  T  .  P  .  T  .  P  .
In centimeters, the six levels are 25.4, 45.7, 66.0, 86.4, 106.7 and 127.0 cm.
The odd-numbered cords carry 9 pink and 9 teal butterflies, and the even-numbered cords carry 8 pink and 7 teal. That makes 17 pink and 16 teal.
Joining
Butterflies to cords: lay a cord flat and mark the butterfly levels. Center the back of the butterfly body over the cord. Whipstitch through the body’s back loops and the cord, working from the antennae base to the tail. The cord then runs behind the body and is hidden from the front.
Leaves to cords: sew single leaves at 6, 14, 22, 30, 38 and 46 in (15.2, 35.6, 55.9, 76.2, 96.5 and 116.8 cm), alternating left and right. Sew the base of each leaf to the cord with 3 stitches and angle the tip slightly downward. At 54 in (137.2 cm), sew 2 leaves as a pair over the cord tip.
Every leaf is at least 4 in (10.2 cm) from the nearest butterfly center, so leaves and wings never overlap.
Tension: pull your sewing stitches snug but not tight. If they are too tight, the cord will pucker and lose length. Afterward, hang the cord and check that it still measures 54 in (137.2 cm).
The cords are attached to the header while you work the scalloped edge below.
Border: Scalloped Header Edge
Border gauge: each scallop takes 8 sts of the header and is 2 in (5.1 cm) wide. Rows 5–7 together add 2½ in (6.4 cm) of depth at the scallop centers.
Pick up the marked loop at the end of Row 4.
Row 5 (shells): Ch 1, turn, sc in the first st. *Sk 3, 9 dc in the next st, sk 3, sc in the next st; repeat from * 19 more times. (20 shells of 9 dc and 21 sc = 201 sts)
Why the math works: each repeat uses 8 sts, and the row starts with 1 sc, so 1 + 20 × 8 = 161. That matches the header count exactly, and the edge comes out with no partial scallops.
Row 6 (lace): Ch 1, turn, sc in the first sc. *Ch 2, (dc in the next dc, ch 1) 8 times, dc in the next dc, ch 2, sc in the next sc; repeat from * across.
Each scallop has 9 dc, 8 ch-1 sps and 2 ch-2 sps. The row totals 180 dc, 21 sc and 160 ch-1 sps.
Row 7 (picots and cord join): Ch 1, turn. Join the first cord at the first sc as described below. Then:
*2 sc in the ch-2 sp, (sc, ch 3, sc) in each of the 8 ch-1 sps, 2 sc in the ch-2 sp, sl st in the next sc; repeat from * across.
Each scallop has 20 sc and 8 picots. The row totals 400 sc, 160 picots and 21 sl sts.
Cord join: the 21 sl-st points sit between scallops, 2 in (5.1 cm) apart. Join a cord at every other point (points 1, 3, 5 and so on to 21) to place 11 cords 4 in (10.2 cm) apart. At each of these points:
- Lay the cord’s top end behind the sc, with the cord’s RS facing the same way as the header’s RS.
- Insert the hook through the sc and through the cord, ½ in (1.3 cm) below the cord’s top, and work the sl st.
The first cord lands at the left edge and the eleventh at the right edge, which is 40 in (101.6 cm) of spacing (10 gaps × 4 in). Fasten off. Weave each cord’s top tail up into the header.
Final Blocking
- Lay the header and scalloped edge face down and pin them to 40¼ in × 4 in (102.2 cm × 10.2 cm).
- Pin out each scallop point and each picot.
- Spray until damp and let it dry completely.
- Hang the curtain from its rod.
- Mist the butterflies lightly while they hang. Use your fingers to flatten the wings and push the bodies forward.
- Re-curl the antennae while they are damp.
- Let it dry hanging, then check that the cords are 54 in (137.2 cm) long.
Final Quality-Control Checklist
- [ ] Header is 40¼ in (102.2 cm) wide and 4 in (10.2 cm) deep
- [ ] 20 even scallops with 8 picots each
- [ ] 10 tabs, evenly spaced, each sewn securely at the back
- [ ] 11 cords, each 54 in (137.2 cm) long, 4 in (10.2 cm) apart
- [ ] 33 butterflies placed to match the grid, with colors alternating
- [ ] 8 leaves per cord, alternating sides, with a pair at the tip
- [ ] All tails woven in and none showing from the front
- [ ] Bodies stand up and antennae curl outward
Troubleshooting
Header too wide: go down a hook size for Rows 1–4. If the cords don’t line up with the scallop points, the header is not 161 sts; count again.
Scallops ruffle: your 9-dc shells are too loose. Go down 0.5 mm for Rows 5–7 only.
Wings curl inward: the ch loops in Rnd 2 are too tight. Chain more loosely or go up 0.5 mm for the loops.
Cords stretch over time: use mercerized cotton and hang the cords before you sew anything to them. If one is still too long, pull out the extra sl sts from the bottom end.
Butterflies tilt sideways: sew the full length of the body, not just the center.
Care
Hand wash in cool water with a mild detergent and roll it in a towel to remove water. Dry it hanging on the rod, reshaping the butterflies while they are damp.
Final Notes
Each measurement in this pattern sets up the next one. Header Row 1 has 161 sc at 16 sts per 4 in, which gives 40¼ in (102.2 cm). Twenty 8-st scallops plus 1 sc divide that width with nothing left over. Joining cords at every other scallop point spaces 11 cords 4 in (10.2 cm) apart. Cords of 270 sl sts give 54 in (137.2 cm), and a 4 in (10.2 cm) header brings the total length to 58 in (147.3 cm).
If you check your gauge at each stage, the curtain will come out to these measurements. Happy crocheting!