
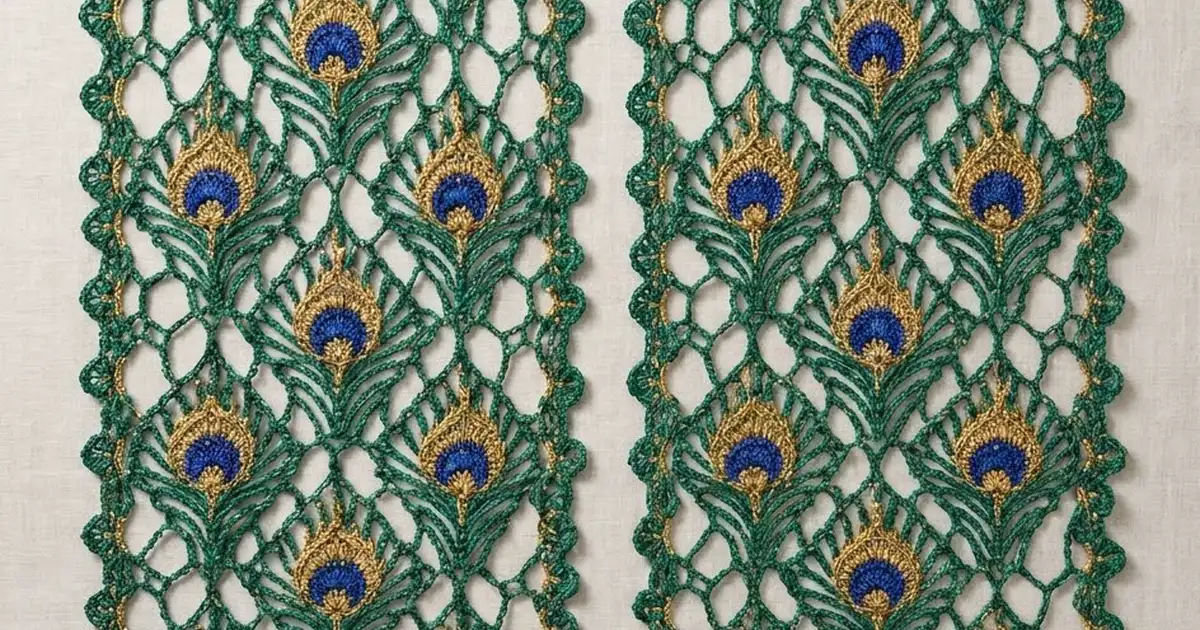
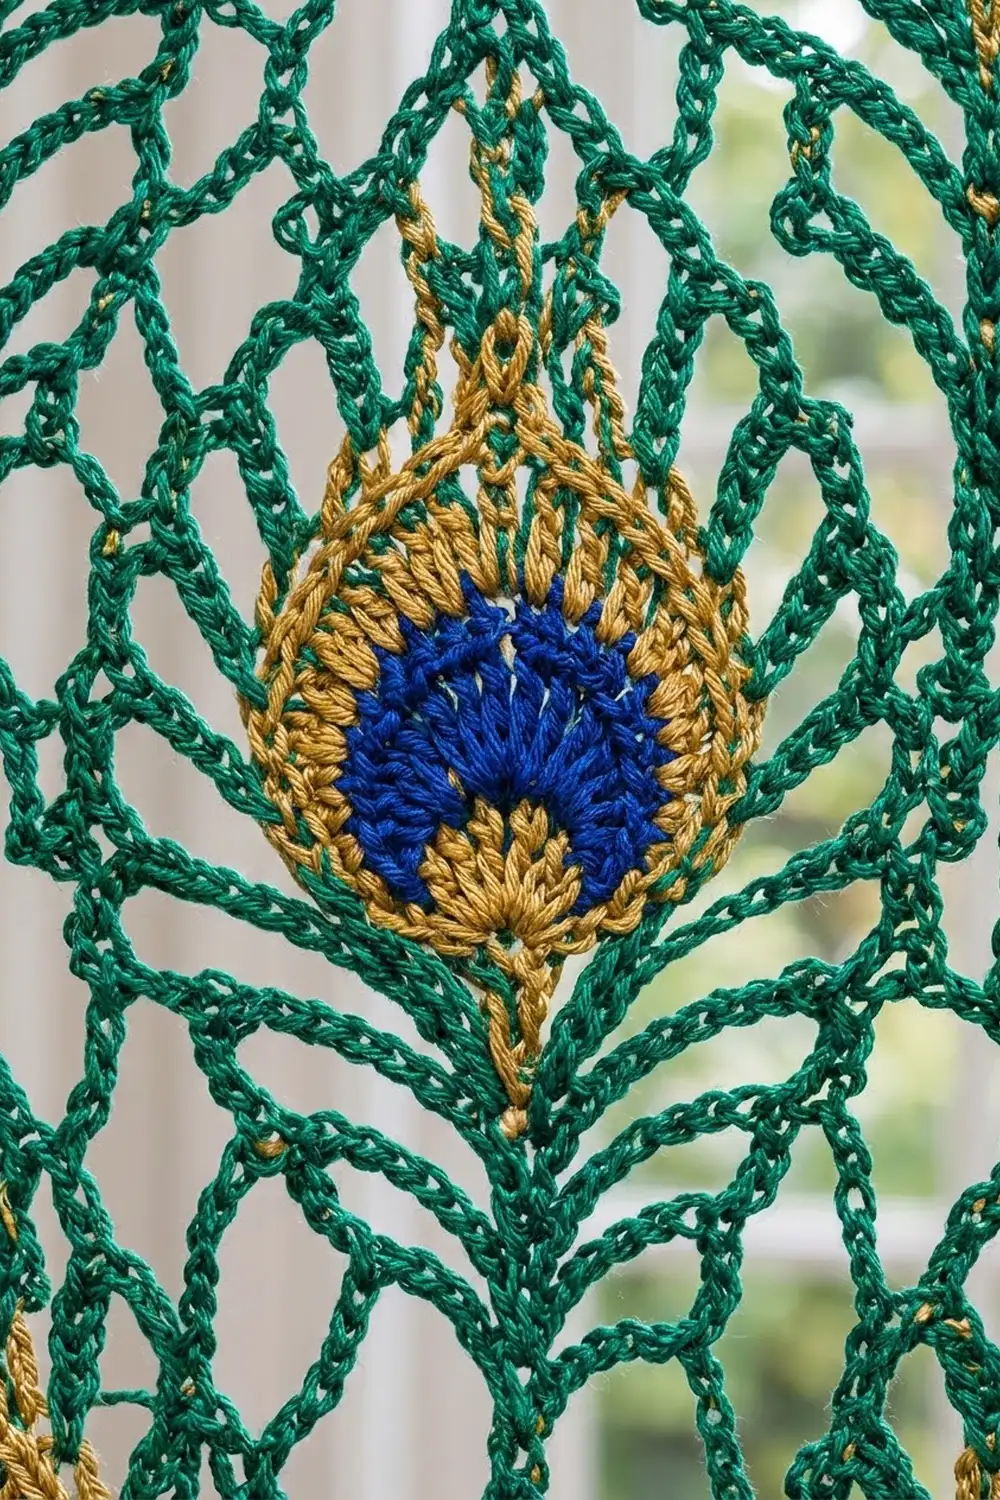
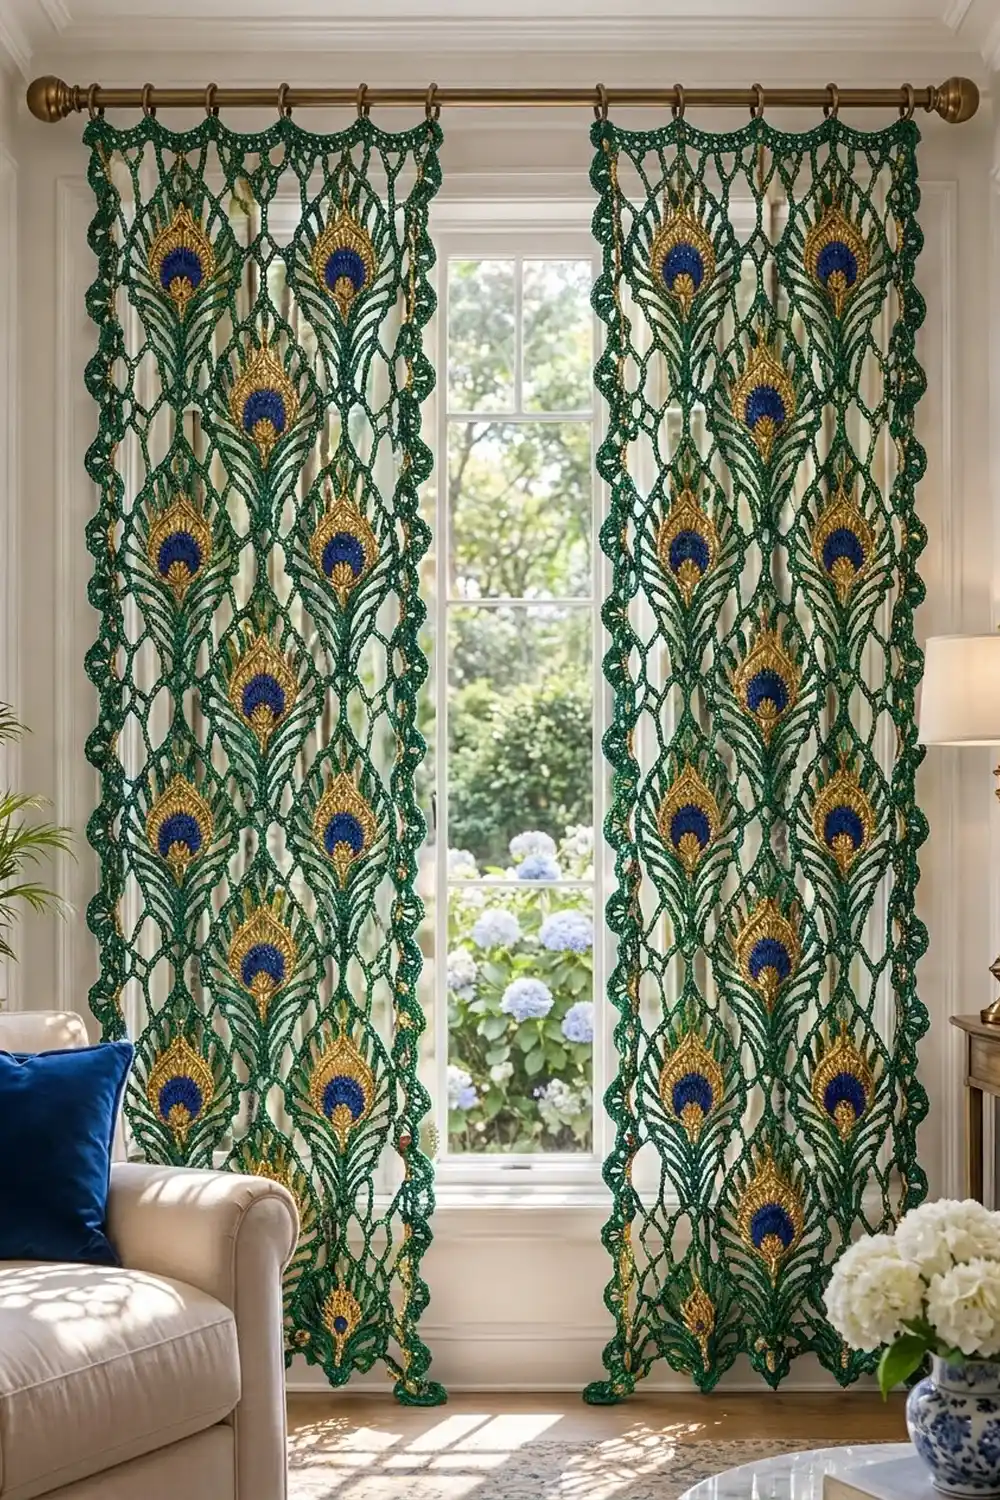
These curtains are made of rows of peacock feathers in open green lace. Each feather has a deep royal-blue eye, a warm gold ring, and emerald chain loops that pull up into a pointed teardrop. A last round of mesh squares each feather into a rectangle, so the motifs join into a light net that lets the window light through.
The palette has three colors: emerald green, golden mustard, and royal blue. Mercerized cotton gives the stitches a soft sheen and good definition, which matters in lace that hangs in daylight.
This pattern uses US crochet terms. Each finished panel measures 26 in × 74 in (66.0 cm × 188.0 cm), not counting the hanging tabs. Each motif is 8 in × 9 in (20.3 cm × 22.9 cm).
Construction is simple. You crochet each motif in the round, from the blue eye outward. From the second motif on, you join each one to its neighbors during its last round (join-as-you-go). Each panel is 3 motifs wide and 8 motifs tall. Three border rounds finish the edges and add the hanging tabs.
Finished Size and Construction
- Finished panel size: 26 in × 74 in (66.0 cm × 188.0 cm), plus tabs
- Skill level: Intermediate
- Terminology: US
- Yarn weight: Fingering (#1 super fine) mercerized cotton
- Hook: 2.75 mm (C-2)
- Number of pieces: 24 motifs per panel, 48 motifs for the pair
- Layout: 3 motifs wide × 8 motifs tall per panel
- Motif size: 8 in × 9 in (20.3 cm × 22.9 cm)
- Size before border: 24 in × 72 in (61.0 cm × 182.9 cm)
- Border depth: 1 in (2.5 cm) on each side
Materials
Use a smooth, tightly plied mercerized cotton in fingering weight, about 170 m per 50 g. Cotton holds its shape when it hangs and handles window sunlight better than acrylic. Choose a green with some blue in it so it reads as true peacock emerald.
Yarn for the pair of panels:
- Color A – Royal Blue: 125 g, about 425 m
- Color B – Golden Mustard: 175 g, about 595 m
- Color C – Emerald Green: 550 g, about 1,870 m
For one panel only, halve each amount. All quantities include a margin of about 20% for gauge swatches and differences in tension.
Tools:
- 2.75 mm (C-2) crochet hook
- Tapestry needle
- Stitch markers (at least 4)
- Scissors
- Tape measure
- Blocking mats and rustproof pins
- Spray bottle with clean water
- Curtain rod with 16 rings (8 per panel)
Abbreviations (US Terms)
- ch – chain
- sl st – slip stitch
- sc – single crochet
- hdc – half double crochet
- dc – double crochet
- tr – treble crochet
- dtr – double treble crochet
- sk – skip
- sp – space
- st(s) – stitch(es)
- JAYG – join-as-you-go
Special stitch – JAYG join on a ch-5 loop: Ch 2, sl st into the matching loop of the finished neighbor motif, ch 2. On a ch-7 corner loop, work ch 3, sl st into the neighbor’s corner loop, ch 3.
Gauge and Checkpoints
Make one complete motif and block it before you start the rest. A curtain with 24 motifs per panel magnifies any small error.
- After Rnd 2: eye measures 2 in (5.1 cm) across.
- After Rnd 4: gold ring measures 3.25 in (8.3 cm) across.
- After Rnd 5: loop round measures 4.25 in (10.8 cm) across.
- After Rnd 7: teardrop measures 6 in × 7.5 in (15.2 cm × 19.1 cm).
- After Rnd 8: framed shape measures 7.25 in × 8.25 in (18.4 cm × 21.0 cm).
- After Rnd 9 (blocked): motif measures 8 in × 9 in (20.3 cm × 22.9 cm).
If the motif is too big, go down 0.25 mm in hook size. If it is too small, go up 0.25 mm. If only the eye is off but the chain rounds are correct, change hooks for Rnds 1–4 only.
Motif (Make 24 per Panel)
The Eye
Rnd 1 (Color A): Ch 4, sl st to first ch to form a ring. Ch 3 (counts as dc), 15 dc in ring, join with sl st to top of ch-3. (16 dc)
Rnd 2 (Color A): Ch 3 (counts as dc), dc in same st, 2 dc in each st around, join. (32 dc) The paired dc form the visible blue spokes. Fasten off.
Rnd 3 (Color B): Join B in any st. Ch 3 (counts as dc), 2 dc in next st, dc in next st, 2 dc in next st; repeat from * around, join. (48 dc)
Rnd 4 (Color B): Ch 1, sc in next 2 sts, 2 sc in next st; repeat from * 16 times total, join to first sc. (64 sc) Fasten off.
The Teardrop
Rnd 5 (Color C): Join C in any sc. Ch 1, sc in same st, ch 5, sk 3 sts, sc in next st; repeat from * 14 more times, ch 5, sk 3 sts, join to first sc. (16 ch-5 loops)
Rnd 6: Sl st in next 3 ch. Ch 1. In this loop, work (sc, ch 9, sc); this is the tip loop, so place a marker in it. Ch 7, sc in next ch-5 loop; repeat from * 14 more times, ch 7, join to first sc. (1 ch-9 tip loop + 16 ch-7 loops = 17 loops)
Rnd 7: Sl st into the ch-9 tip loop. Ch 1. In the tip loop, work (sc, ch 11, sc). Ch 7, sc in next ch-7 loop; repeat from * 15 more times, ch 7, join to first sc. (1 ch-11 tip loop + 17 ch-7 loops = 18 loops)
The tip loop is now the top center point, and the feather has its teardrop shape. Number the ch-7 loops 1 to 17 in working order, starting after the tip.
The Frame
This round squares the teardrop into a rectangle. Work ch 5 between every stitch.
Rnd 8: Sl st into the tip loop. Ch 1, then work the following stitches in order, with ch 5 between each:
- Tip loop: sc
- Loop 1: dc
- Loop 2 (corner): tr, ch 5, tr
- Loop 3: dc
- Loop 4: hdc
- Loop 5: hdc
- Loop 6: dc
- Loop 7 (corner): dtr, ch 5, dtr
- Loop 8: tr
- Loop 9: dtr
- Loop 10: tr
- Loop 11 (corner): dtr, ch 5, dtr
- Loop 12: dc
- Loop 13: hdc
- Loop 14: hdc
- Loop 15: dc
- Loop 16 (corner): tr, ch 5, tr
- Loop 17: dc
After loop 17, ch 5 and join to the first sc. (22 sts, 22 ch-5 sps: 4 corner sps, 4 sps on top, 5 on the right, 4 on the bottom, 5 on the left)
The stitches get taller toward the corners and the bottom. That’s because the rounded eye sits low and wide, so those areas need more height to reach the rectangle.
Rnd 9 (final round of the first motif): Sl st in next 3 ch. Ch 1, sc in same sp, ch 5, sc in next sp, ch 5. Then:
- Top-right corner: (sc, ch 7, sc) in corner sp.
- Right side: ch 5, sc in next sp, 5 times, then ch 5.
- Bottom-right corner: (sc, ch 7, sc).
- Bottom: ch 5, sc in next sp, 4 times, then ch 5.
- Bottom-left corner: (sc, ch 7, sc).
- Left side: ch 5, sc in next sp, 5 times, then ch 5.
- Top-left corner: (sc, ch 7, sc).
- Finish the top: ch 5, sc in next sp, 2 times, then ch 5 and join to first sc.
(26 sc; 22 ch-5 loops + 4 ch-7 corner loops = 26 loops)
Per-side count: The top and bottom each have 7 loops (5 ch-5 + 2 corners). The left and right each have 8 loops (6 ch-5 + 2 corners). These counts include the corner loops. Fasten off and weave in ends.
Make All Pieces
Each panel needs 24 motifs. Work Rnds 1–8 the same way for every motif. Change only Rnd 9 to join each motif as you go.
Per panel: 24 motifs, using about 48 g of A, 72 g of B, and 216 g of C. For the pair, make 48 motifs.
Panel layout (3 wide × 8 tall; every motif has its tip pointing up):
Row 1:  [1]  [2]  [3]
Row 2:  [4]  [5]  [6]
Row 3:  [7]  [8]  [9]
Row 4:  [10] [11] [12]
Row 5:  [13] [14] [15]
Row 6:  [16] [17] [18]
Row 7:  [19] [20] [21]
Row 8:  [22] [23] [24]
Joining
Motif 1 is finished as written. Join every other motif during its Rnd 9.
Stitch-to-stitch logic: Each side has a fixed number of loops, so neighboring sides match one to one. When joining side to side, each motif has 8 loops on its joining side, giving 8 joins. When joining top to bottom, each motif has 7 loops on its joining side, giving 7 joins. Never skip a loop or join two loops to one.
How to join:
- Work Rnd 9 as normal until you reach the first loop that touches a finished neighbor.
- Replace each ch-5 along the shared side with the JAYG ch-5 join (ch 2, sl st, ch 2).
- At a shared corner, replace the ch 7 with ch 3, sl st into the neighbor’s corner loop, ch 3.
- Where four corners meet, sl st into the corner join that already exists. That way all four corners share one point.
- Finish the rest of Rnd 9 as written.
Tension: Keep the sl st joins as loose as your normal chains. Tight joins make the net pucker, and the effect adds up over 8 rows.
Size checkpoint: Before the border, lay the panel flat and measure. It should be 24 in × 72 in (61.0 cm × 182.9 cm), which is 3 × 8 in wide and 8 × 9 in long.
Border
Border gauge: About 5 sc = 1 in (2.5 cm) along the edge.
Edge loop counts:
- Top and bottom: 3 motifs × 7 loops = 21 loops each.
- Left and right: 8 motifs × 8 loops = 64 loops each.
Each motif keeps its own corner loop at a seam, so no loops are added at seams. Each corner loop of the whole panel belongs to both of its sides.
Rnd 1 (Color C): Join in the top-right panel corner loop. Work (3 sc, ch 2, 3 sc) in this loop. Work 6 sc in every other edge loop, including the joined corner halves at the seams, which count as one loop each. Work (3 sc, ch 2, 3 sc) in each panel corner loop, then join.
Per-side count: top and bottom 3 + (19 × 6) + 3 = 120 sc; left and right 3 + (62 × 6) + 3 = 378 sc, plus 4 corner ch-2 sps. (996 sc total)
Rnd 2: Sl st into the corner ch-2 sp. Ch 1, (sc, ch 5, sc) in the corner sp. Along each side, ch 5, sk 2 sc, sc in next sc, ending in the last sc before the next corner. Work (sc, ch 5, sc) in each corner sp, then join.
Per-side count: top and bottom 120 ÷ 3 = 40 ch-5 loops; left and right 378 ÷ 3 = 126 ch-5 loops, plus 4 corner loops. (336 loops total)
Rnd 3: In each corner loop, work (3 sc, ch 3, 3 sc). The other loops are worked as follows.
- Sides and bottom: Work (2 sc, ch 3, 2 sc) in each loop, which gives 126 picot scallops on each side and 40 on the bottom.
- Top: Make a hanging tab in loops 3, 8, 13, 18, 23, 28, 33, and 38, counting from the left.
- To make a tab: 2 sc in the loop, ch 30, sl st in the 2nd sc just made, 40 sc into the ch-30 loop, sl st in the same sc, 2 sc in the border loop.
- Other 32 top loops: Work a picot scallop in each.
Join and fasten off. (8 tabs, each about 1.75 in [4.4 cm] long)
Why the math works: 6 sc per edge loop puts 120 sc across 24 in (61.0 cm), which is 5 sc per inch. That lies flat without ruffling or pulling in. Both 120 and 378 divide evenly by 3, so the ch-5 repeat in Rnd 2 ends exactly at each corner. The tabs are 5 loops apart and 3 loops in from each end, so the panel hangs evenly. The three border rounds add 1 in (2.5 cm) on each side, giving a finished panel of 26 in × 74 in (66.0 cm × 188.0 cm).
Final Blocking
- Weave in all ends inside the solid eye stitches, not along the green chains, where they would show.
- Mist the panel evenly with water until it is damp, not soaked.
- Lay it flat on blocking mats in sections, pinning the top edge first.
- Pin each motif’s corner joins into a straight grid, with motifs 8 in (20.3 cm) apart across and 9 in (22.9 cm) apart down.
- Pin out each feather’s tip loop so it points straight up.
- Pin each picot along the border.
- Pin the edges to 26 in × 74 in (66.0 cm × 188.0 cm).
- Let it dry completely before you unpin. Block the second panel to the same measurements.
Final Quality-Control Checklist
- Every motif has a 16-dc center, a 32-dc blue eye, and a 64-sc gold ring.
- Every motif has 26 loops in Rnd 9, with 7 on the top and bottom and 8 on each side.
- All tips point up.
- No missed joins on any shared side.
- Before blocking, the panel measures 24 in × 72 in (61.0 cm × 182.9 cm).
- Border Rnd 1 has 120 sc on the top and bottom and 378 sc on each side.
- There are 8 evenly spaced tabs on top.
- Both panels match in length to within 0.5 in (1.3 cm).
Troubleshooting
- Eye cups or ruffles: Recount Rnd 2 (32 dc) and Rnd 4 (64 sc), and change hooks for Rnds 1–4 only.
- Teardrop leans sideways: The tip loop isn’t centered. Check that Rnd 7 begins in the ch-9 tip loop.
- Motif isn’t rectangular: Check the stitch heights in Rnd 8, especially the four corners.
- Panel puckers at seams: Loosen your JAYG sl sts and chain more loosely.
- Border ripples: Work 5 sc per loop in Rnd 1. Keep Rnd 2 at 2 sts skipped per loop and give the last ch-5 before each corner the stitches left over.
- Tabs stretch: Pack the 40 sc firmly around the ch-30 loop.
Care
Hand wash in cool water with mild soap, press out the water in a towel, and re-block flat. Don’t hang the panels wet, because the weight of the water will stretch the lace.
Final Notes
The measurement chain links each stage to the next. A 2 in (5.1 cm) eye grows into an 8 in × 9 in (20.3 cm × 22.9 cm) motif. Twenty-four motifs make a 24 in × 72 in (61.0 cm × 182.9 cm) panel. The 1 in (2.5 cm) border brings it to 26 in × 74 in (66.0 cm × 188.0 cm). If your first motif matches its checkpoints, the rest of the curtain will follow.
Happy crocheting!