

These Climbing Leaf Lace curtain panels have columns of solid leaves that join tip to stem and run from the scalloped hem up to the plain band at the top. Raised, twisted ribbons separate the leaf columns, and open mesh lets the light come through. In the photos, one panel is butter yellow and the other is sage green, hung side by side on a wooden rod.
The pattern uses US crochet terms. Each finished panel measures 21.5 in (54.6 cm) wide by 72 in (182.9 cm) long, not counting the tabs. The tabs add a 2.5 in (6.4 cm) loop above the top band.
Each panel is worked flat in rows from the bottom up. You make a lace body, then a plain band across the top, then seven tabs. After that you add a corded edging along both long sides and a scalloped edge along the bottom. The two panels are made separately and hung separately.
The leaf pattern repeats every 8 rows. Every second row is a simple wrong-side row, so the lace is easy to memorize.
Finished Size and Construction
- Finished size (per panel): 21.5 in (54.6 cm) wide × 72 in (182.9 cm) long, plus 2.5 in (6.4 cm) tabs
- Skill level: Intermediate
- Terminology: US
- Yarn weight: DK / light (3), cotton
- Hook: 4.0 mm (G-6)
- Number of pieces: 2 separate panels (1 yellow, 1 green), not joined
- Layout: Two panels side by side on one rod
- Panel body before border: 20.75 in (52.7 cm) × 70.5 in (179.1 cm)
- Border depth: 0.375 in (1.0 cm) on each side, 1.5 in (3.8 cm) scallop hem
Materials
Use a smooth mercerized or combed cotton in DK weight. Cotton shows the leaf shapes clearly, hangs straight, and holds up to washing in a sunny window. Avoid fuzzy yarns, because they blur the eyelet veins.
- Color A, butter yellow: 650 g (1,495 m), for one panel
- Color B, sage green: 650 g (1,495 m), for one panel
- 4.0 mm (G-6) crochet hook
- Tapestry needle
- Locking stitch markers
- Measuring tape
- Rust-proof pins and blocking mats or a clean carpet
- Wooden curtain rod, up to 1.25 in (3.2 cm) in diameter
The yarn amounts include a margin of about 15% for your gauge swatch and small differences in tension.
Abbreviations (US Terms)
- ch – chain
- sk – skip
- sl st – slip stitch
- sc – single crochet
- hdc – half double crochet
- dc – double crochet
- fpdc – front post double crochet
- bpdc – back post double crochet
- rev sc – reverse single crochet (crab stitch), worked left to right
- st(s) – stitch(es)
- RS / WS – right side / wrong side
Special stitches
- Right Cross (RC): Skip the next 2 sts. Fpdc around the following st. Then, working behind the stitch you just made, fpdc around the first skipped st and then the second skipped st. This makes 3 sts.
- Left Cross (LC): Skip the next st. Fpdc around each of the next 2 sts. Then, working in front of those 2 sts, fpdc around the skipped st. This makes 3 sts.
Stitch count rule: Every ch-1 counts as 1 stitch. When a row says “dc,” work into the stitch or ch-1 space directly below. When it says “ch 1, sk 1,” skip the stitch or space directly below.
Gauge and Checkpoints
Gauge: 16 sts = 4 in (10.2 cm), which is one leaf column plus one ribbon. 8 rows = 4 in (10.2 cm), which is one leaf repeat. Measure after a gentle wet block.
Test swatch: Ch 37. Work Row 1 (35 dc). Then work Rows 2–9 twice, treating the 35 sts as 3 + 13 + 3 + 13 + 3: edge ribbon, leaf, interior ribbon, leaf, edge ribbon.
The blocked swatch should measure 8.75 in (22.2 cm) wide by 8.5 in (21.6 cm) tall.
- Too big? Go down 0.5 mm in hook size.
- Too small? Go up 0.5 mm.
- Width right but height off? Change how far you pull up the loop before finishing each dc. Don’t change the hook.
Checkpoints for the full panel:
- After Row 1: 20.75 in (52.7 cm) wide
- After Row 9: 4.5 in (11.4 cm) tall
- After Row 137: 68.5 in (174.0 cm) tall
- After the top band: 70.5 in (179.1 cm) tall
- After the border: 21.5 in (54.6 cm) × 72 in (182.9 cm)
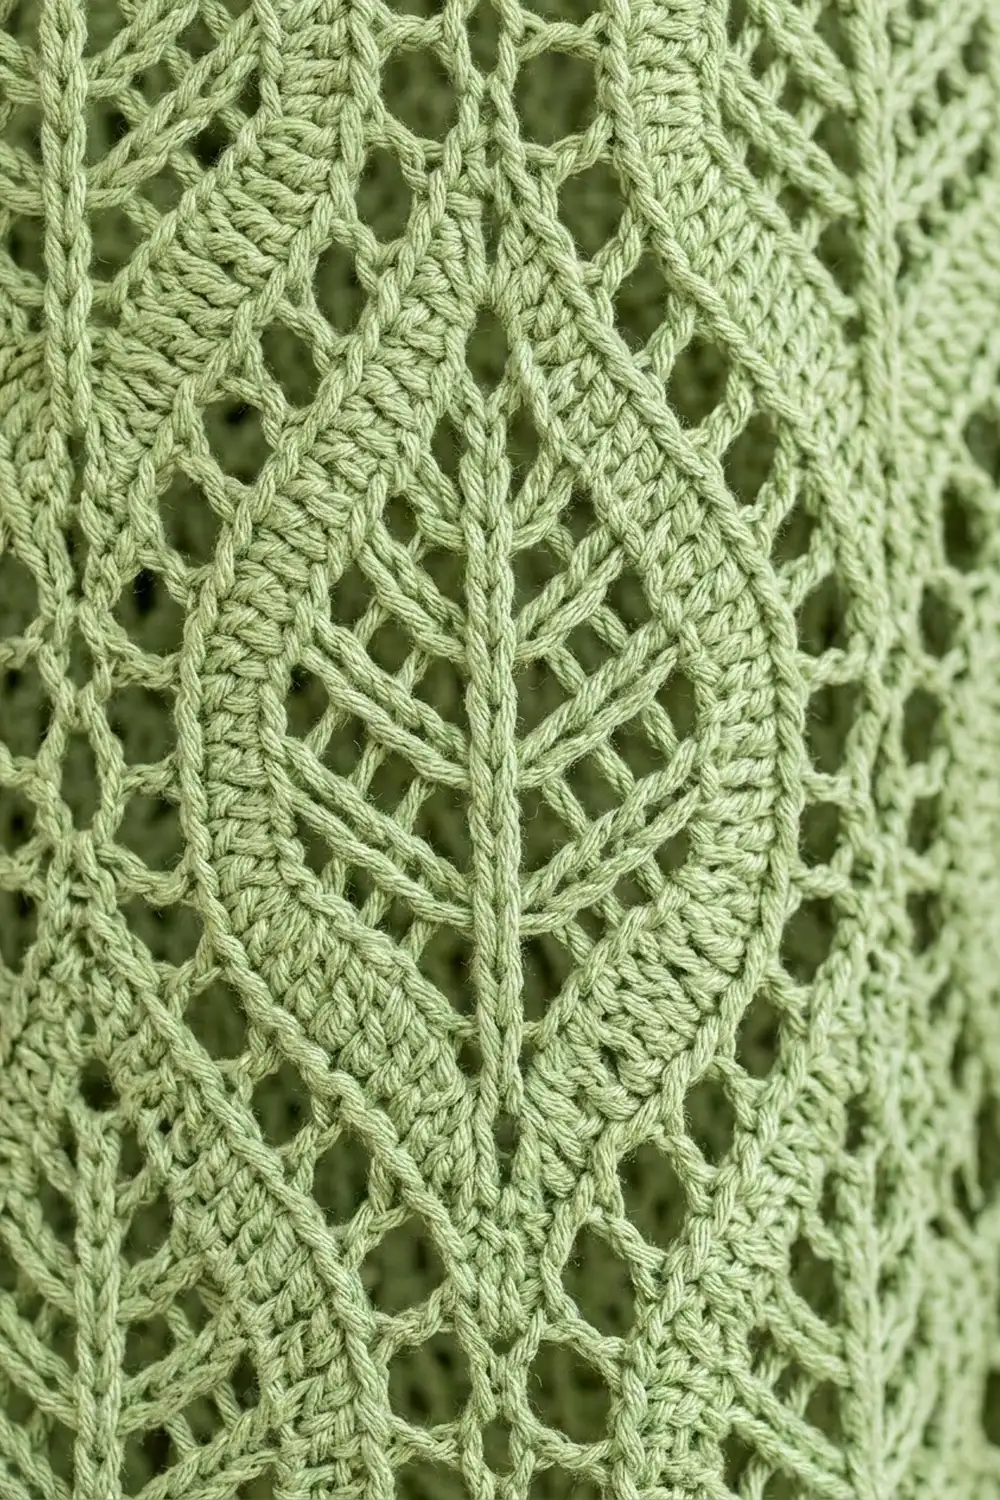
Panel Body
Make one panel in Color A and one in Color B. The instructions are the same for both.
Every pattern row is laid out like this: an edge ribbon (3 sts), then 4 times [leaf section (13 sts), interior ribbon (3 sts)], then a leaf section (13 sts), then an edge ribbon (3 sts). That’s 3 + 64 + 13 + 3 = 83 sts.
Foundation: Ch 85.
Row 1 (WS): Dc in the 4th ch from the hook and in each ch across. The skipped ch-3 counts as the first dc. Turn. (83 sts)
Row 2 (RS): Ch 3 (counts as dc). Fpdc around each of the next 2 sts.
Now work 4 times: [ch 1, sk 1, dc in next] 3 times, fpdc around next, dc in next, [ch 1, sk 1, dc in next] 2 times, ch 1, sk 1, RC.
Work the leaf section once more. Then fpdc around each of the next 2 sts and dc in the top of the turning ch. Turn. (83 sts: each leaf section has 13 sts, with 3 solid sts at its center)
Row 3 (WS): Ch 3. Bpdc around each of the next 2 sts.
Across the row, dc in each dc. Bpdc around each fpdc (the ribbon sts and the center vein), so that they stay raised on the RS. Over each ch-1, work ch 1, sk 1.
End with bpdc around each of the next 2 sts and dc in the top of the turning ch. Turn. (83 sts)
Row 4 (RS): Ch 3. Fpdc around each of the next 2 sts.
Now work 4 times: ch 1, sk 1, dc in next, ch 1, sk 1, dc in next 3, fpdc around next, dc in next 3, ch 1, sk 1, dc in next, ch 1, sk 1, then fpdc around each of the next 3 sts.
Work the leaf section once more, then finish the edge as in Row 2. Turn. (83 sts: the leaf is now 7 sts wide)
Row 5 (WS): Work as Row 3. (83 sts)
Row 6 (RS): Ch 3. Fpdc around each of the next 2 sts.
Now work 4 times: ch 1, sk 1, dc in next 3, ch 1, sk 1, dc in next, fpdc around next, dc in next, ch 1, sk 1, dc in next 3, ch 1, sk 1, LC.
Work the leaf section once more, then finish the edge. Turn. (83 sts: the leaf is at its widest, 11 sts with two eyelet veins)
Row 7 (WS): Work as Row 3. (83 sts)
Row 8 (RS): Ch 3. Fpdc around each of the next 2 sts.
Now work 4 times: ch 1, sk 1, dc in next, ch 1, sk 1, dc in next 2, ch 1, sk 1, fpdc around next, ch 1, sk 1, dc in next 2, ch 1, sk 1, dc in next, ch 1, sk 1, then fpdc around each of the next 3 sts.
Work the leaf section once more, then finish the edge. Turn. (83 sts: the eyelets step in toward the vein, making the V-shaped veins)
Row 9 (WS): Work as Row 3. (83 sts)
Rows 10–137: Repeat Rows 2–9 sixteen more times, for 17 leaf repeats in total. Stop after a Row 9 repeat (Row 137, WS).
The 3-st center of each new Row 2 forms the tip of the leaf below and the stem of the next leaf, so the leaves join into an unbroken column. The right crosses and left crosses alternate every 4 rows, which twists the ribbons into a soft wave.
Adjusting the length: Each repeat you add or remove changes the length by 4 in (10.2 cm).
Top Band
Row 138 (RS): Ch 2 (does not count as a st). Hdc in each st and ch-1 space across. Turn. (83 hdc)
Rows 139–143: Ch 2. Hdc in each st across. Turn. (83 hdc each row)
The 6 hdc rows make a 2 in (5.1 cm) band. Checkpoint: 70.5 in (179.1 cm) tall. Fasten off.
Tabs
Make 7 tabs. Each tab is 5 sts wide, with 8 sts between tabs. Check: 7 × 5 + 6 × 8 = 83.
Place markers to show where each tab starts and ends. The tabs sit on sts 1–5, 14–18, 27–31, 40–44, 53–57, 66–70, and 79–83.
Tab Row 1: With the RS facing, join yarn in the first st of the tab. Ch 1, then sc in the same st and in each of the next 4 sts. (5 sc)
Tab Rows 2–25: Ch 1, turn, sc in each st. (5 sc)
You should now have a strip 5 in (12.7 cm) long. Fasten off and leave a 12 in (30.5 cm) tail.
Fold the tab to the WS. Use the tail to whipstitch Row 25 to the back of Row 143, matching stitch to stitch over the same 5 sts. The finished loop is 2.5 in (6.4 cm) tall.
Make Both Panels
- Color A (yellow): 1 panel, with 7 tabs
- Color B (green): 1 panel, with 7 tabs
Layout on the rod (viewed from the room):
| ROD ======================================= |
| [ A: Yellow panel ]   [ B: Green panel ]    |
|   21.5 in wide          21.5 in wide        |
Joining
The two panels are not joined. They hang separately, so you can slide them apart or swap their positions.
The only sewing in this pattern is attaching the tabs. Sew each stitch of Tab Row 25 to the matching stitch of Row 143. Keep the whipstitches snug but not tight, so the top band doesn’t pucker.
Checkpoint: All 7 loops should measure 2.5 in (6.4 cm), and the top band should still measure 20.75 in (52.7 cm) across.
Border
Border gauge: 4 sc = 1 in (2.5 cm).
Work the side edging first, then the scallop hem.
Side Edging (work on each long side)
Side Row 1: With the RS facing, join yarn at the top corner of the top band. Ch 1. Working down the side, sc in the row-ends like this:
- Top band (6 hdc rows): [2 sc in the first row-end, sc in each of the next 2 row-ends] twice, for 8 sc.
- Body (137 dc rows): 2 sc in each row-end, for 274 sc.
Do not turn. (282 sc)
Side Row 2: Ch 1. Rev sc in each sc back up the side. Fasten off. (282 rev sc)
Why the math works: Each dc row is 0.5 in tall and gets 2 sc, which is 4 sc per inch. The top band is 2 in (5.1 cm) tall and gets 8 sc, which is also 4 per inch. So 282 sc ÷ 4 = 70.5 in, exactly the length of the body. The edge won’t ruffle or pull tight.
Each side edging adds 0.375 in (1.0 cm), so the panel becomes 21.5 in (54.6 cm) wide.
Scallop Hem
Hem Row 1 (RS): With the RS facing, join yarn at the bottom corner, at the end of a side edging. Ch 1. Working into the free loops of the foundation chain, sc in each of the 83 loops, and work 2 sc in the first and last loop.
Count: 83 + 2 extra = 85 sc. The 2 extra sc cover the ends of the side edging. Turn.
Hem Row 2: Ch 1. Sc in the first sc. Then work 14 times: sk 2, 5 dc in next, sk 2, sc in next. Turn.
Count: 1 + (14 × 6) = 85 sts. That’s 14 shells of 5 dc and 15 sc.
Hem Row 3: Ch 1. Sc in the first sc. Then, for each shell: ch 1, [dc in next dc, ch 1] 5 times, sc in next sc. Fasten off.
Count: 15 sc + 70 dc + 84 ch = 169 sts.
Why the math works: 85 sc ÷ 4 = 21.25 in. The hem is just 0.25 in (0.6 cm) narrower than the bordered panel, so the scallops sit flat and don’t flare. The hem adds 1.5 in (3.8 cm), so the panel becomes 72 in (182.9 cm) long.
Final Blocking
- Weave in all ends along solid stitches, never across the mesh.
- Soak the panel in cool water with a little wool wash for 15 minutes.
- Press out the water gently. Then roll the panel in towels to remove more. Don’t wring it.
- Lay it flat on mats and pin it to 21.5 in (54.6 cm) × 72 in (182.9 cm).
- Pin the tip of each of the 14 scallops so it points straight down.
- Smooth the ribbon columns so they run straight, and open each eyelet with a fingertip.
- Let it dry completely, which usually takes 24–48 hours. Repeat for the second panel.
Final Quality-Control Checklist
- Every pattern row has 83 sts, with 5 leaf sections and 6 ribbons.
- Each panel has 17 leaf repeats, and the leaves join tip to stem.
- The center veins and ribbons are raised on the RS.
- The crosses alternate between RC and LC.
- Each side edging has 282 sc, and the hem has 14 scallops.
- There are 7 tabs, and each loop is 2.5 in (6.4 cm).
- Each panel measures 21.5 in (54.6 cm) × 72 in (182.9 cm).
- Both panels match in length to within 0.5 in (1.3 cm).
Troubleshooting
- The leaves lean to one side: You probably dropped or added a ch-1 at the edge of a leaf section. Count each section on the next RS row (13 sts).
- The ribbons look flat: On WS rows, use bpdc around the ribbon sts, not dc.
- The side edges ripple: You worked more than 2 sc in some row-ends. Pull the edging back and recount.
- The hem curls up: Block the scallops firmly. If it still curls, work Hem Row 3 with a hook one size larger.
- One panel is longer than the other: Tension can drift between colors. Match the panels by adding or removing a row of the top band.
Care
Hand wash or machine wash on a cool, gentle cycle in a mesh bag, then dry flat. Hang the panels while they are slightly damp so the weight of the cotton straightens them.
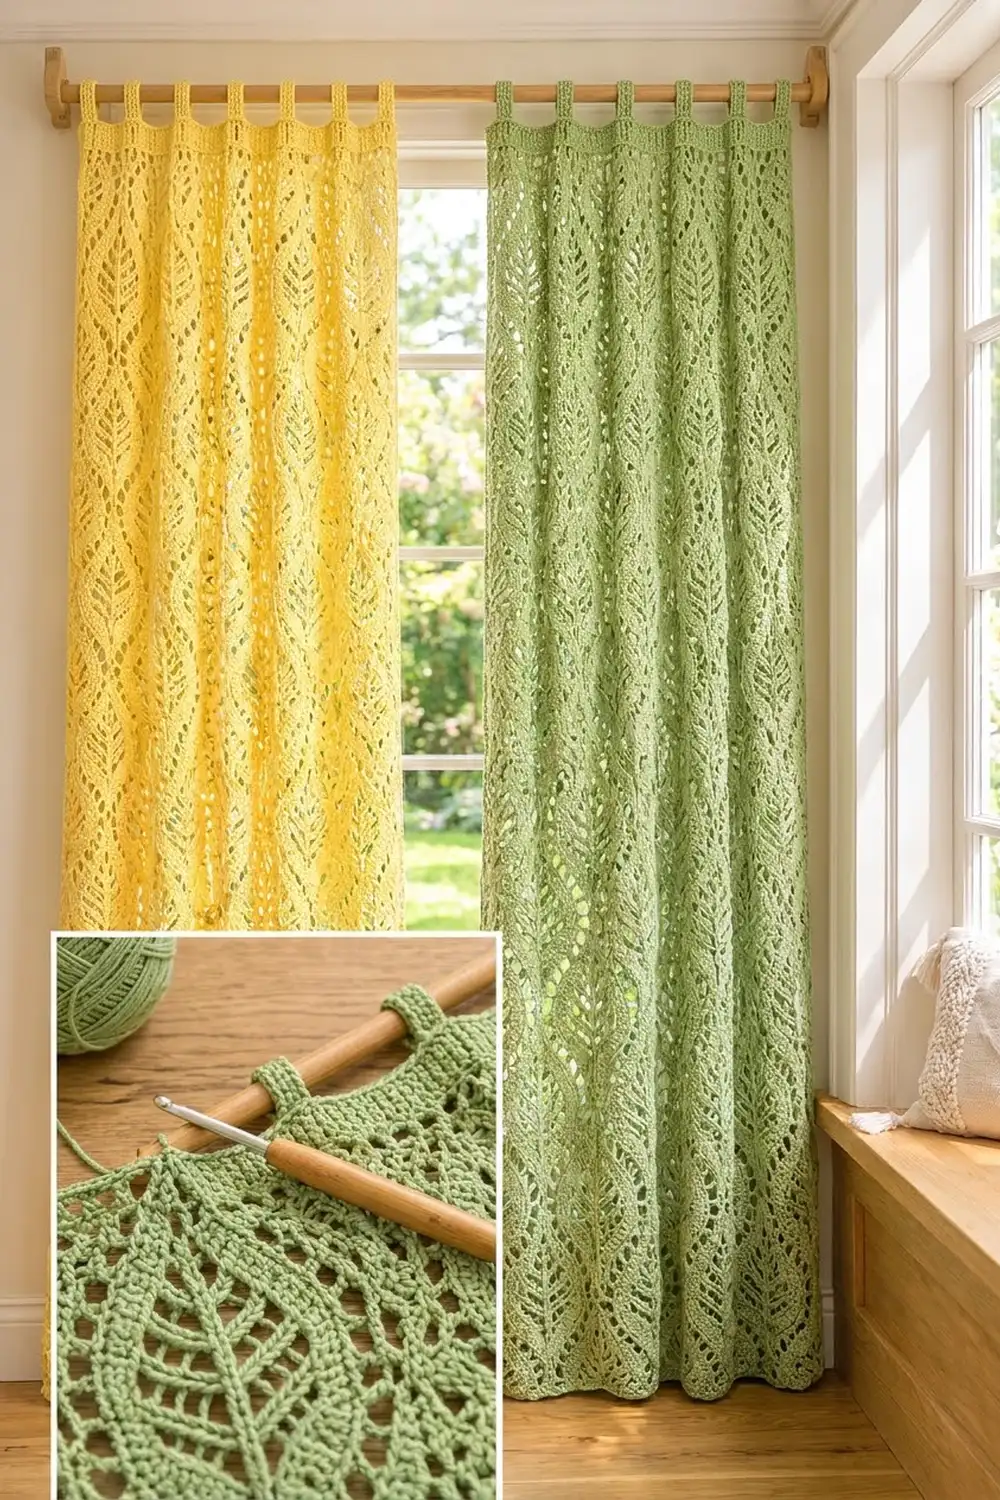
Final Notes
Here is the full measurement chain. One leaf repeat of 16 sts and 8 rows is 4 in (10.2 cm) square. Seventeen repeats plus Row 1 make 68.5 in (174.0 cm), and the top band brings the body to 70.5 in (179.1 cm). The edging adds 0.375 in (1.0 cm) on each side for 21.5 in (54.6 cm) of width, and the hem adds 1.5 in (3.8 cm) for a total of 72 in (182.9 cm). If your swatch is correct, each later checkpoint should come out right too.
Happy crocheting!