

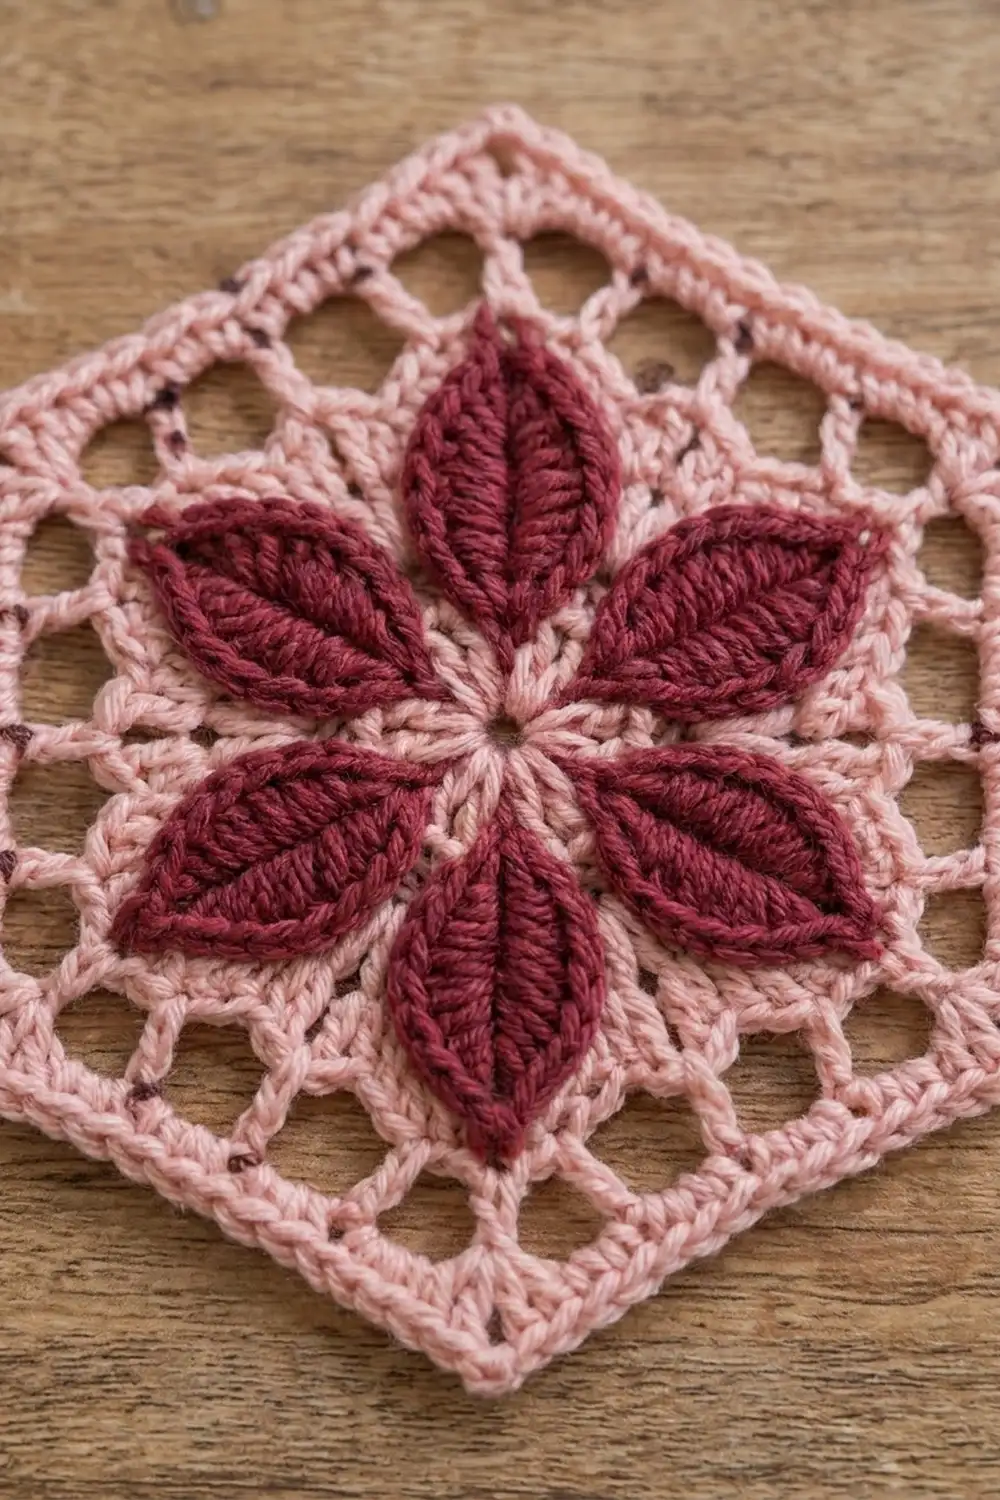
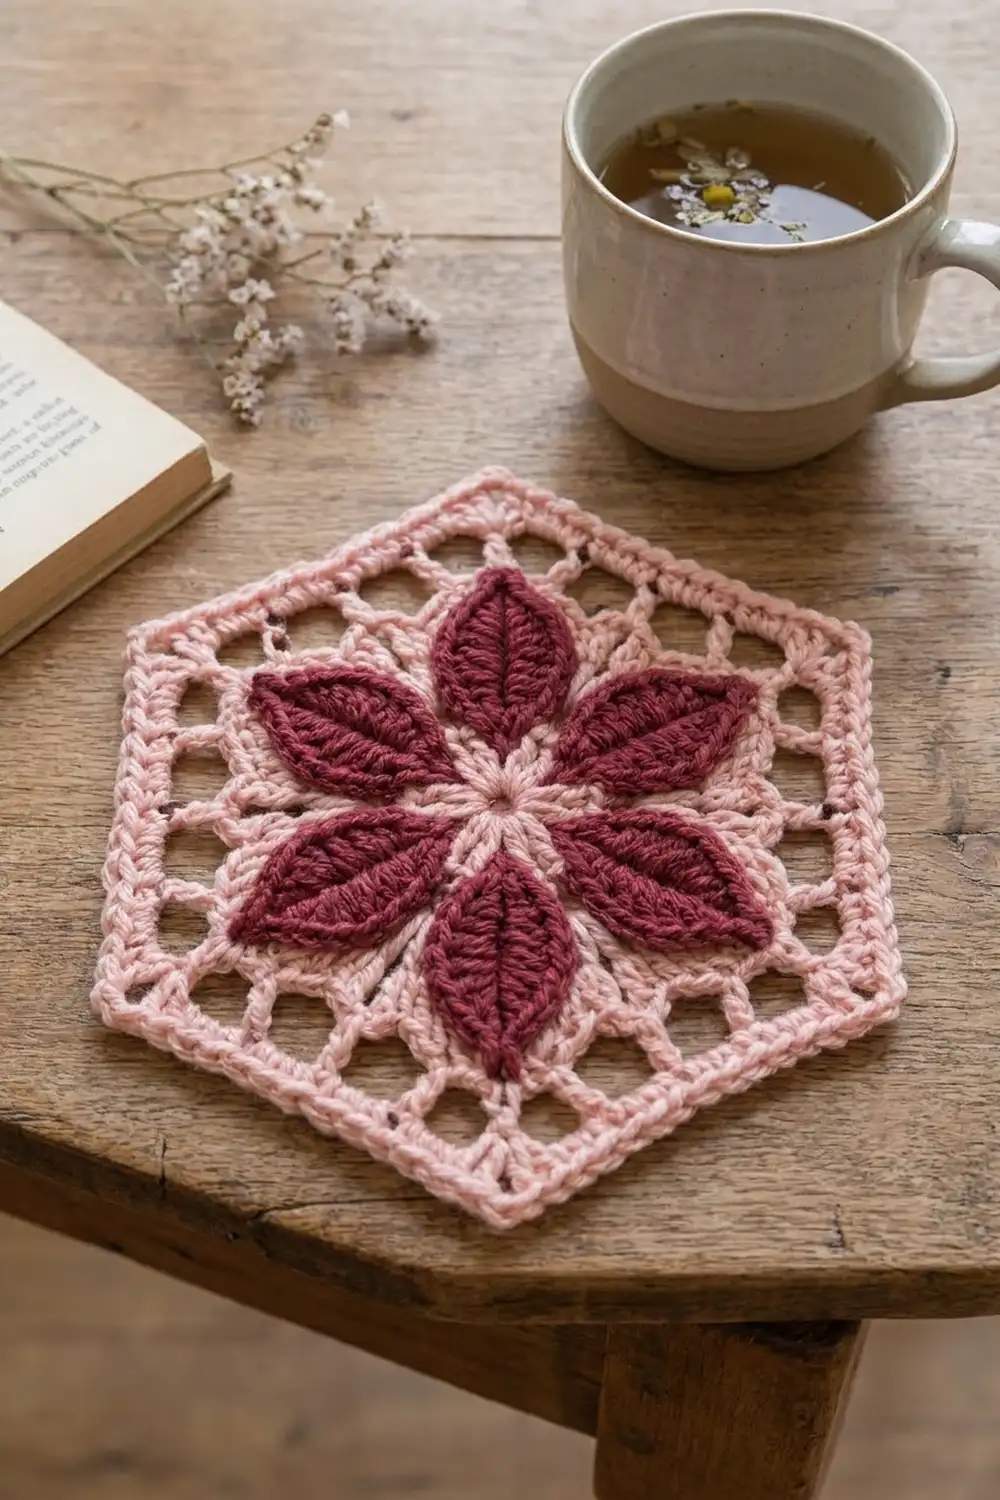
The Rosewood Bloom Hexagon is one textured motif. Eight wine-red petals open from a small blush-pink center, and a lacy pink hexagon frame surrounds them. Each petal has a raised vein down the middle and ribbed sides, so the flower stands out against the open mesh behind it.
The palette is soft and a little vintage: deep wine for the flower and blush pink for everything else. The pink frame alternates solid and open rounds, and a beaded crab-stitch edge finishes the outside so the corners stay crisp.
This pattern uses US crochet terms. The finished motif measures 7 in (17.8 cm) from point to point and 6 in (15.2 cm) from flat side to flat side, with each side 3.5 in (8.9 cm) long.
Here is the construction in brief. You work a pink center ring first, then make eight petals in one continuous red round. The pink frame comes next: arches between the petal tips, a solid ring, and a mesh round that shapes the hexagon. A two-round border finishes the piece.
Finished Size and Construction
- Finished size: 7 in (17.8 cm) point to point; 6 in (15.2 cm) flat to flat
- Skill level: Intermediate
- Terminology: US crochet terms
- Yarn weight: Worsted (#4)
- Hook: 4.5 mm (US 7)
- Number of pieces: 1 (single motif)
- Layout: One hexagon, no joining
- Piece size: Sides 3.5 in (8.9 cm)
- Size before border: 5 in (12.7 cm) flat to flat; 5.75 in (14.6 cm) point to point
- Border depth: 0.5 in (1.3 cm) on each side
Materials
Yarn: Use a smooth worsted-weight yarn. Mercerized cotton or a cotton-acrylic blend shows the petal ribbing and vein best. Fuzzy or heavily brushed yarns will hide the texture.
- Color A, Blush Pink: 15 g / 30 m (33 yd)
- Color B, Wine Red: 6 g / 12 m (13 yd)
These amounts include a margin of about 20% for gauge differences and weaving in ends.
Tools:
– 4.5 mm (US 7) crochet hook
– Tapestry needle
– Scissors
– Stitch markers (2–3)
– Blocking mat and rustproof pins
– Spray bottle or steamer
– Ruler or tape measure
Abbreviations (US Terms)
- ch – chain
- sl st – slip stitch
- sc – single crochet
- hdc – half double crochet
- dc – double crochet
- tr – treble crochet
- sk – skip
- sp(s) – space(s)
- st(s) – stitch(es)
- rev sc – reverse single crochet (crab stitch)
- MR – magic ring
- rep – repeat
Special stitches:
Surface slip stitch (surface sl st): Hold the working yarn behind the petal. Insert the hook from front to back through the center line of the petal, between the two halves, and draw up a loop. Then pull that loop through the loop already on the hook. Each surface sl st sits on top of the fabric and forms the raised vein.
Reverse single crochet (rev sc): Work single crochet from left to right (right to left if you crochet left-handed). Insert the hook into the next stitch to the right, draw up a loop, yarn over and pull through both loops. This makes the beaded, corded edge.
Gauge and Checkpoints
Gauge: 18 sc and 20 rows = 4 in (10.2 cm) in Color A, which is 4.5 sc per inch.
The motif itself is the best gauge test, so make Rounds 1–2 first and measure before going on:
- After Round 1: The center ring measures 1 in (2.5 cm) across.
- After Round 2: The flower measures 4 in (10.2 cm) from one petal tip to the opposite tip. Each petal is 1.5 in (3.8 cm) long.
- After Round 3: The arches pull the tips into an even octagon about 4.25 in (10.8 cm) across.
- After Round 4: The solid ring measures 4.5 in (11.4 cm) across and lies flat.
- After Round 5: The hexagon measures 5 in (12.7 cm) flat to flat and 5.75 in (14.6 cm) point to point.
- After Round 7: The motif measures 6 in (15.2 cm) flat to flat and 7 in (17.8 cm) point to point.
Too big? Go down to a 4 mm (US G-6) hook. Too small? Go up to a 5 mm (US H-8) hook. If only the petals are off and the frame matches, adjust just the petal hook by half a size.
Pattern
Round 1 – Center (Color A)
Make an MR with Color A.
Ch 1, then work 16 sc into the ring. Pull the ring closed and sl st to the first sc to join. (16 sc)
Fasten off and leave a 6 in (15.2 cm) tail.
Checkpoint: The ring should be 1 in (2.5 cm) across and lie flat.
Round 2 – Ribbed Petals (Color B)
Each petal is worked on 2 center stitches, so the 16 sc give exactly 8 petals. Each petal is made from a chain spine. You work down one side to the base, up the other side to the tip, and then add the vein with surface slip stitches on the way back down.
Join Color B with a sl st in any sc of Round 1. Call this sc 1.
Petal:
- Spine: Ch 9.
- Side 1 (tip to base): Working in the back bumps of the chain, sk the first ch from the hook (this is the tip ch). Then work sc in the next ch, hdc in the next ch, dc in each of the next 3 ch, hdc in the next ch, sc in the next ch, and sl st in the last ch. (8 sts)
- Turn the base: Sl st in the next sc of Round 1 (sc 2).
- Side 2 (base to tip): Rotate the work. Working into the free loops on the other side of the same chain, work sl st in the first ch, sc in the next ch, hdc in the next ch, dc in each of the next 3 ch, hdc in the next ch, and sc in the next ch. (8 sts)
- Tip: Work (sc, ch 2, sc) in the tip ch you skipped. (2 sc + 1 ch-2 sp)
- Vein: Work 8 surface sl sts down the center line of the petal. End at the base, at sc 2.
Each petal is 8 + 2 + 8 = 18 sts plus 1 ch-2 tip sp.
Next petal: Sl st in the next sc of Round 1. This becomes the new “sc 1.” Repeat the petal steps.
Make 8 petals in total. After the last vein, sl st into the first sl st of the round and fasten off.
Round 2 count: 8 petals, 144 petal sts, 8 ch-2 tip sps. All 16 center sc are used.
The ribbing comes from the two different loop paths: side 1 is worked in the back bumps and side 2 in the free loops. The rising dc heights angle the stitches out from the spine, and the surface sl sts raise the vein.
Checkpoint: The flower measures 4 in (10.2 cm) from tip to tip. The petals should be evenly spaced and not twisted.
Round 3 – Petal Arches (Color A)
Join Color A with a sc in any petal tip ch-2 sp.
Ch 7, then sc in the next tip ch-2 sp. Repeat from * 6 more times. Ch 7 and sl st to the first sc. (8 sc + 8 ch-7 sps = 64 sts)*
These arches create the open windows between the petals.
Checkpoint: About 4.25 in (10.8 cm) across. Every arch should be straight and lightly taut, without sagging.
Round 4 – Solid Ring (Color A)
Ch 1. *Sc in the next sc, then 8 sc in the next ch-7 sp. Repeat from * 7 more times. Sl st to the first sc.
This is a conversion round: 8 sc worked 1 per existing sc, plus 64 sc packed into the arches (8 × 8), for 72 sc in total.
Place a marker in the first sc. Starting there, mark every 12th sc (sts 1, 13, 25, 37, 49 and 61) so the ring is divided into 6 sections of 12 sts. These marked stitches become the hexagon corners.
Checkpoint: The ring measures 4.5 in (11.4 cm) across. It should not ruffle or cup.
Round 5 – Hexagon Mesh (Color A)
This round shapes the hexagon. Taller tr corners push the six points out, and the stitches get shorter toward the middle of each side to keep the sides flat.
Sl st into the first marked st.
First corner: Ch 4 (counts as tr), ch 3, tr in the same st.
Side: Ch 1, sk 1, dc in next st. Ch 1, sk 1, hdc in next st. Ch 1, sk 1, sc in next st. Ch 1, sk 1, hdc in next st. Ch 1, sk 1, dc in next st. Ch 1, sk the last st of the section.
Corner: (Tr, ch 3, tr) in the next marked st.
Repeat Side and Corner around. End with a final Side, then sl st to the top of the beginning ch-4.
Round 5 count: Between each pair of corner ch-3 sps there are 2 tr, 5 mesh posts (dc, hdc, sc, hdc, dc) and 6 ch-1 sps, which makes 13 sts per side. The round has 6 × 13 = 78 sts plus 6 ch-3 corner sps.
Check against Round 4: each 12-st section uses st 1 for the corner and sts 2–12 for the mesh. That is five pairs of (sk 1, work 1), with the 12th st skipped under the last ch-1. Nothing is left over.
Checkpoint: 5 in (12.7 cm) flat to flat and 5.75 in (14.6 cm) point to point. Each side is about 2.9 in (7.4 cm).
Border
Border gauge: 4.5 sc per inch, the same as the main gauge. Fifteen sc plus a corner ch-2 sp fill one 3.5 in (8.9 cm) side.
Round 6 – Solid Band (Color A)
Sl st into the first corner ch-3 sp. Ch 1 and sc in the same sp.
Sc in the next tr. (Sc in the next ch-1 sp, sc in the next post) 5 times. Sc in the next ch-1 sp, then sc in the next tr. In the corner ch-3 sp, work (sc, ch 2, sc). Repeat from * around. In the last corner, work (sc, ch 2) and sl st to the first sc.
Per side: 13 sc (1 into each of the 13 sts and spaces of Round 5), plus 2 corner sc, gives 15 sc per side, corner sts included.
Round 6 total: 6 × 13 = 78, plus 12 corner sc = 90 sc and 6 corner ch-2 sps.
Round 7 – Crab-Stitch Edge (Color A)
Do not turn. Ch 1. Working from left to right, rev sc in each sc around, and work 2 rev sc in each corner ch-2 sp. Sl st to the first rev sc and fasten off.
Per side: 15 rev sc (1 in each sc of that side) plus 2 rev sc in each corner sp.
Round 7 total: 90 + (6 × 2) = 102 rev sc.
Why the math works: Round 4’s 72 sc divide evenly into 6 sections of 12. Each section becomes exactly 13 border-ready stitches in Round 5. Round 6 adds only the 2 corner sc per side, giving 15. Round 7 repeats Round 6 one for one and adds just 2 stitches at each corner to ease around the point. No stitches are added or lost in the middle of a side, so the sides stay straight and the edge doesn’t wave.
Checkpoint: 6 in (15.2 cm) flat to flat, 7 in (17.8 cm) point to point, sides 3.5 in (8.9 cm).
Final Blocking
- Weave in all ends along stitches of the same color. Hide the B tails inside the petals.
- Lightly mist the motif, or wet it fully and squeeze it out gently in a towel.
- Lay it right side up on the blocking mat.
- Pin the six corners into a regular hexagon 7 in (17.8 cm) point to point.
- Check that each flat-to-flat measurement is 6 in (15.2 cm), then pin the middle of each side.
- Pin each petal tip straight out toward its arch, and make the eight petals evenly spaced.
- For acrylic blends, hold a steamer 0.75 in (1.9 cm) above the piece without touching it. For cotton, let it air-dry.
- Leave it pinned until it is completely dry.
Final Quality-Control Checklist
- 16 sc in the center ring
- 8 petals, each 18 sts with a ch-2 tip and a raised vein
- 8 arches of ch 7, all the same length
- 72 sc in the solid ring
- 6 corners in Round 5, with 13 sts per side
- 15 sc per side in Round 6; 102 rev sc in total in Round 7
- Final size 7 in (17.8 cm) point to point and 6 in (15.2 cm) flat to flat
- Motif lies flat, with no cupping or ruffling
- All ends secure and invisible from the front
Troubleshooting
Petals curl sideways: Side 1 and side 2 were probably worked at different tensions. Keep the side 2 free-loop stitches as loose as the side 1 stitches.
Vein is hard to see: Work the surface sl sts a little more firmly, and make sure the yarn stays behind the work.
Arches sag: Use ch 6 instead of ch 7, but still work 8 sc into each arch in Round 4.
Round 4 ruffles: Your hook is too large for the packed spaces. Go down half a size for this round only.
Corners are rounded: The tr may be too short. Pull up the first loop fully and pin the points hard when blocking.
Edge flares: Work Round 7 more firmly. Crab stitch spreads easily.
Care
Hand wash in cool water with mild soap, press out the water gently, and dry flat in shape. Re-pin the corners if they relax.
Final Notes
The measurement chain is what keeps this motif true:
- 1 in (2.5 cm) center
- 4 in (10.2 cm) flower
- 4.25 in (10.8 cm) arches
- 4.5 in (11.4 cm) solid ring
- 5 in (12.7 cm) hexagon
- 6 in (15.2 cm) bordered motif, flat to flat, which is 7 in (17.8 cm) point to point
If you hit each checkpoint, the stitch counts take care of the rest: 16, then 8 petals, then 64, 72, 78, 90 and 102. Enjoy the contrast between the wine petals and the pink lace.
Happy crocheting!