

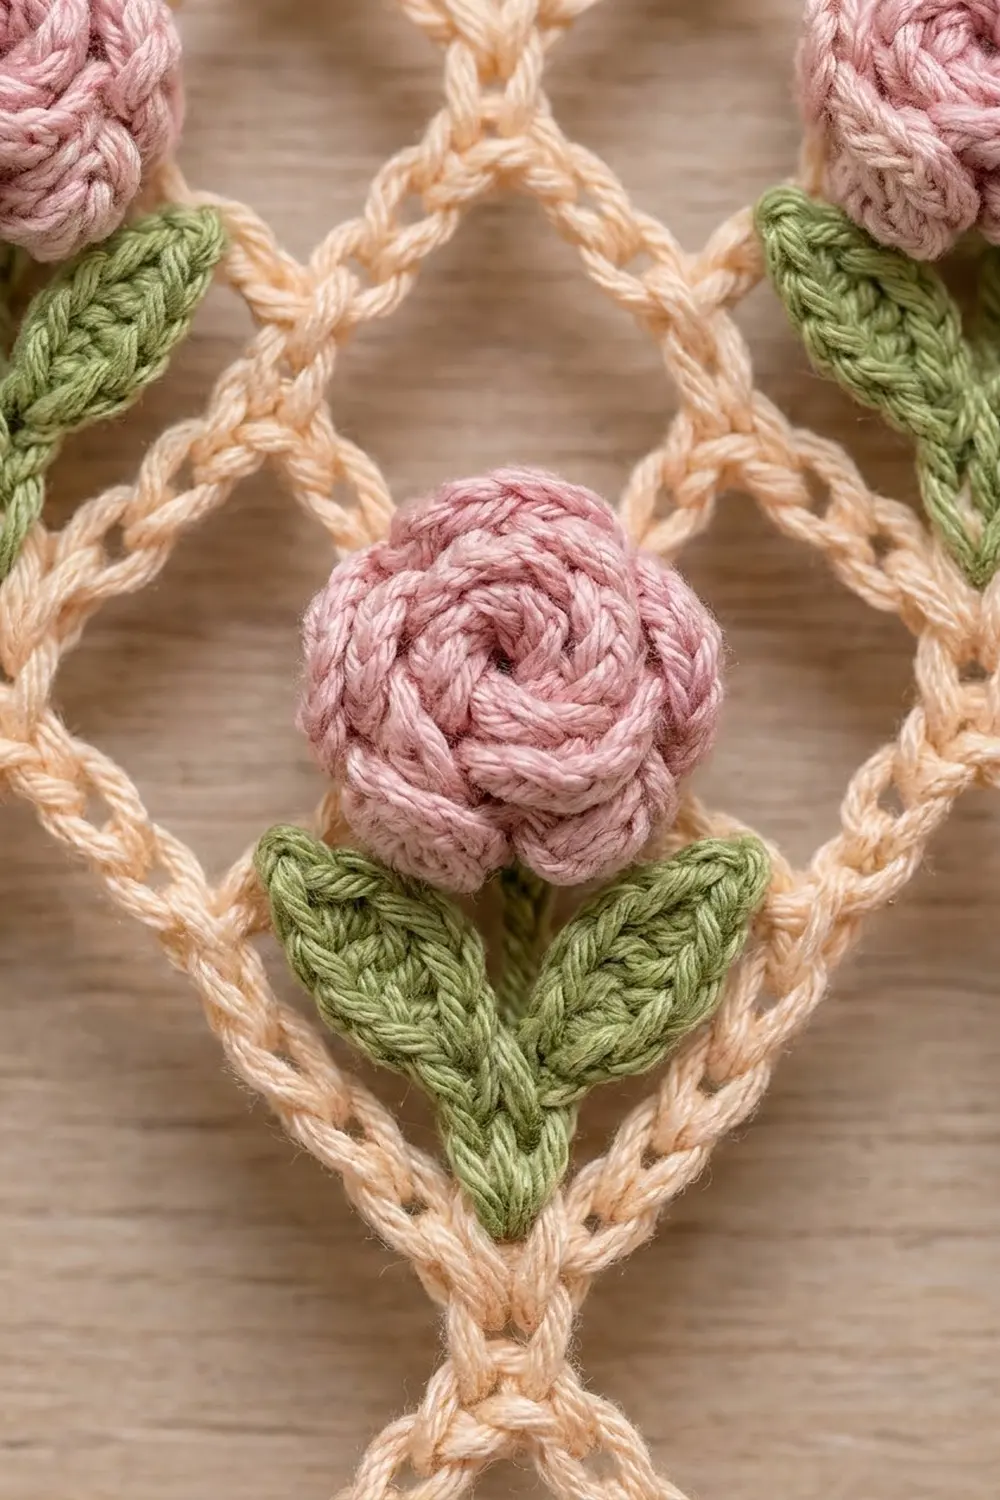
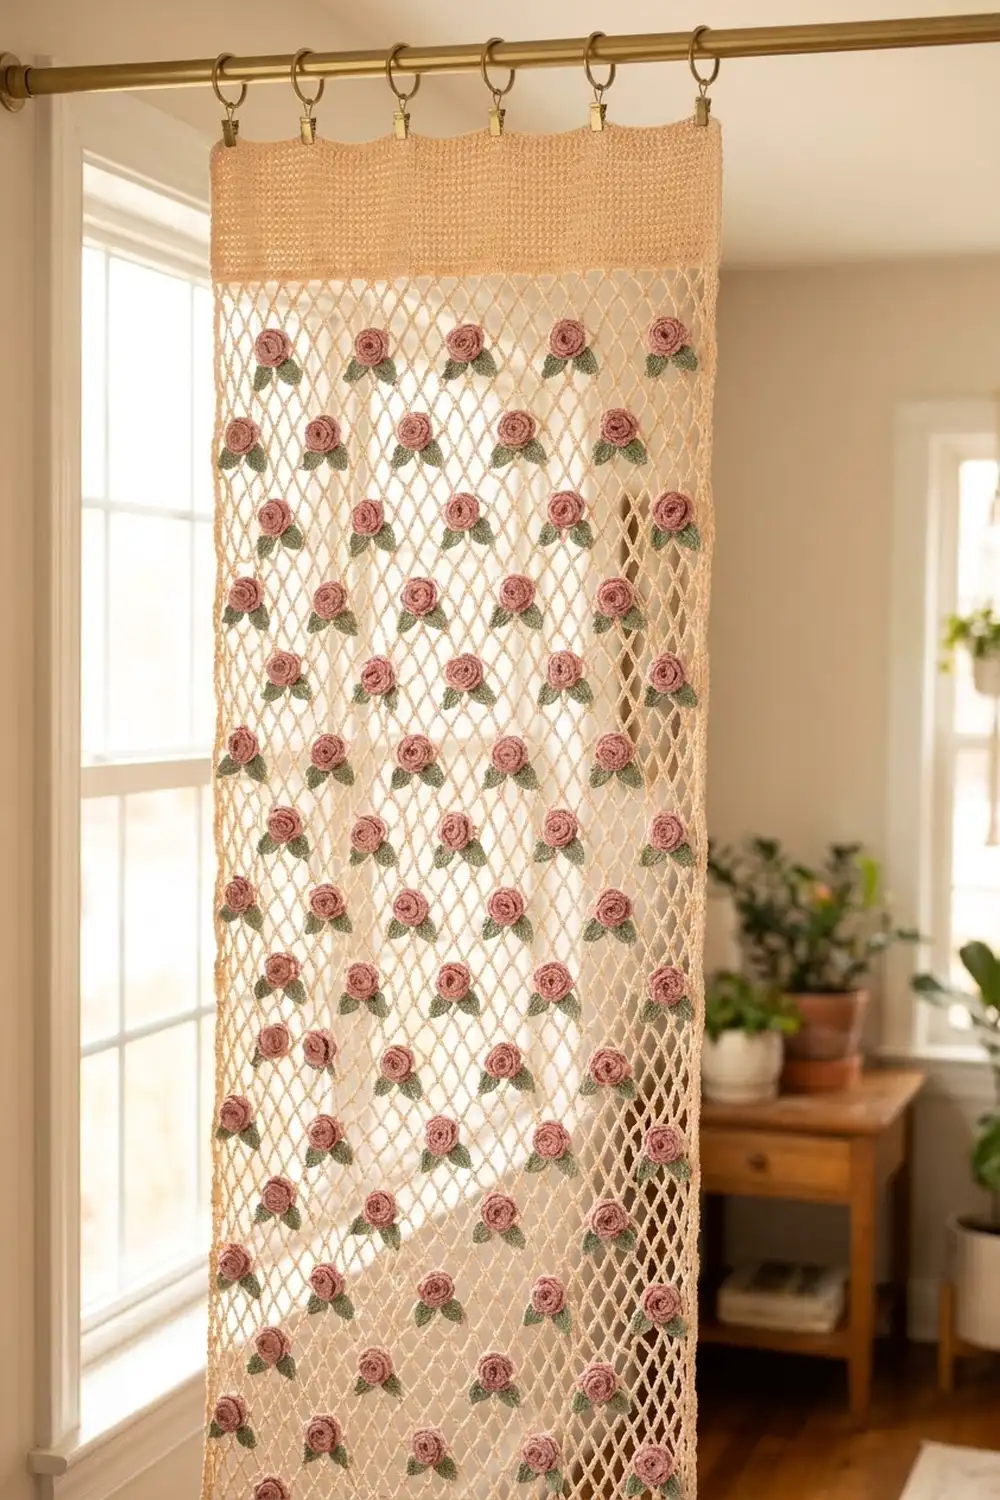
This curtain panel is a light, airy diamond net in soft peach-cream cotton. Small dusty-pink rolled roses sit on the mesh in a staggered grid, and each one has a pair of sage-green leaves fanning down beneath it in a V. A solid band at the top takes clip rings, so the panel hangs straight from a curtain rod and lets daylight through.
The look is romantic cottage style, a little vintage, and easy to live with. Three colors carry the design: peach-cream for the net, dusty pink for the roses, and sage green for the leaves.
This pattern uses US crochet terms. The finished panel measures 28 in (71.1 cm) wide by 60 in (152.4 cm) long after the border and blocking.
You crochet the panel in one piece from the bottom up. First comes a foundation row of single crochet, then a fishnet mesh of chain-5 loops, then a 7-row solid header band. One round of single crochet border goes all the way around. Last, you make the roses and leaf pairs separately and sew them onto the mesh nodes.
Finished Size and Construction
- Finished size: 28 in x 60 in (71.1 cm x 152.4 cm)
- Skill level: Easy to intermediate (simple stitches, lots of repetition, careful finishing)
- Terminology: US crochet terms
- Yarn weight: DK (light worsted, weight 3) cotton
- Hooks: 4.0 mm (G-6) for the panel; 3.5 mm (E-4) for the roses and leaves
- Number of pieces: 1 panel, plus 231 rose appliqués and 231 leaf-pair appliqués sewn on
- Layout: 22 mesh loops across, 91 mesh rows tall, with a solid header at the top
- Mesh unit: each loop is 1.25 in (3.2 cm) wide; 8 mesh rows = 5 in (12.7 cm)
- Size before border: 27.5 in x 59.5 in (69.9 cm x 151.1 cm)
- Border depth: 0.25 in (0.6 cm) on every side
Materials
Pick a smooth, mercerized or combed DK cotton. Cotton holds the mesh crisp, takes blocking well, and doesn’t stretch out as it hangs. Avoid fuzzy or very slippery yarns, because the open diamonds will lose their shape.
- Color A, peach-cream (net, header, border): 200 g, about 440 m
- Color B, dusty pink (roses): 250 g, about 550 m
- Color C, sage green (leaves): 150 g, about 330 m
These amounts assume about 2.2 m per gram and include a margin of roughly 20 percent for swatching and sewing tails.
Tools:
– 4.0 mm (G-6) and 3.5 mm (E-4) crochet hooks
– Tapestry needle
– Locking stitch markers
– Scissors and a measuring tape
– Blocking mats or a clean sheet on carpet, plus rust-proof pins
– Spray bottle
– About 10 clip curtain rings to hang the panel
Abbreviations (US Terms)
- ch – chain
- sl st – slip stitch
- sc – single crochet
- hdc – half double crochet
- dc – double crochet
- sp – space
- st(s) – stitch(es)
- rep – repeat
Special stitch – mesh node: a “node” is any sc in a mesh row that sits in the middle of a ch-5 loop from the row below. The diamonds meet at the nodes, and that’s where the roses are sewn.
Gauge and Checkpoints
Swatch first. With the 4.0 mm hook and Color A, ch 30. Work Row 1 (29 sc) and Row 2 (7 loops) as written below, then repeat Rows 3–4 four times.
- Stitch gauge: 16 sc = 5 in (12.7 cm)
- Mesh gauge: 4 loops = 5 in (12.7 cm) wide; 8 mesh rows = 5 in (12.7 cm) tall
- Swatch width: 8.75 in (22.2 cm) across the 7 loops, lightly pinned
Checkpoints for the full panel:
– After Row 1: 27.5 in (69.9 cm) wide
– After Row 20: about 12.1 in (30.7 cm) long
– After Row 50: about 30.9 in (78.5 cm) long
– After Row 92: about 57.1 in (145.0 cm) long
– After Row 99: 27.5 in x 59.5 in (69.9 cm x 151.1 cm)
If your swatch is too big, go down a hook size. If it’s too small, go up one. If the width is right but the mesh rows come out short, loosen the ch-5 loops instead of switching hooks. Length is easy to adjust by adding or taking out pairs of mesh rows. Width is set by Row 1, so check it before you go any further.
Panel Pattern
Use Color A and the 4.0 mm hook.
Foundation: Ch 90.
Row 1: Sc in 2nd ch from hook and in each ch across. Turn. (89 sc)
Row 2 (mesh set-up): Ch 1, sc in first sc, ch 5, skip 3 sc, sc in next sc; rep from * across. Turn. (23 sc, 22 ch-5 loops)*
Row 3 (half-loop row): Ch 5 (counts as dc + ch 2), sc in first ch-5 sp, ch 5, sc in next ch-5 sp; rep from * across, ch 2, dc in last sc. Turn. (22 sc, 21 ch-5 loops, 2 ch-2 half loops)*
Row 4 (full-loop row): Ch 1, sc in first dc, ch 5, sc in next ch-5 sp; rep from * across, ch 5, sc in 3rd ch of turning ch. Turn. (23 sc, 22 ch-5 loops)*
Each Row 4 sc lands in the middle of a loop below. That’s what forms the diamonds. The half loops on Row 3 keep both side edges straight.
Rows 5–92: Rep Rows 3–4 another 44 times, so Rows 3–4 are worked 45 times in all. Row 92 is a full-loop row. (23 sc, 22 ch-5 loops)
That gives you 91 mesh rows (Rows 2–92), about 56.9 in (144.5 cm) tall. Count the loops on every full-loop row. You should always have 22.
Row 93 (conversion row): Ch 1, sc in first sc, 3 sc in next ch-5 sp, sc in next sc; rep from * across. Turn. (23 sc worked 1 per existing sc + 66 sc worked 3 per ch-5 sp = 89 sc)*
Rows 94–98: Ch 2 (does not count as a st), hdc in each st across. Turn. (89 hdc)
Row 99: Ch 1, sc in each st across. Do not fasten off. (89 sc)
The header band (Rows 93–99) measures about 2.4 in (6.1 cm), and the panel now measures 27.5 in x 59.5 in (69.9 cm x 151.1 cm). Rows 1 and 99 have the same 89 stitches, so the top and bottom edges match.
Border
Keep going with Color A and the 4.0 mm hook.
Border gauge: 16 sc = 5 in (12.7 cm), which is 3.2 sc per inch. A corner is 3 sc in one stitch, and the middle sc of the three is the corner stitch. Each side count below includes both of its corner stitches.
Round 1:
– Top edge: Ch 1, 3 sc in first st of Row 99, sc in each of the next 87 sts, 3 sc in last st. (91 sc from corner to corner)
– First side: Work down the row ends. Work 1 sc in the end of each of Rows 98–93 (6 sc), then 2 sc in the end of each of Rows 92–2 (182 sc), working around the dc posts and turning chains. (188 sc between corners; 192 including both corners)
– Bottom edge: 3 sc in the first free loop of the foundation ch (under the first st of Row 1), sc in each of the next 87 free loops, 3 sc in the last free loop. (91 sc from corner to corner)
– Second side: Work up the row ends, 2 sc in the end of each of Rows 2–92 (182 sc), then 1 sc in the end of each of Rows 93–98 (6 sc). Sl st in first sc to join. (188 sc between corners; 192 including both corners)
Round total: 91 + 192 + 91 + 192 = 566, minus the 4 corner stitches counted twice = 562 sc. As a check: 12 corner-group sc + 87 + 87 + 188 + 188 = 562.
Fasten off and weave in the end.
Why the math works: Each mesh row is 0.625 in (1.6 cm) tall. At 3.2 sc per inch, that’s exactly 2 sc per row, so 91 mesh rows take 182 sc and the side lies flat. The 6 header row ends get 1 sc each, and corner groups take care of the foundation and top rows. Along the top and bottom you work 1 sc per stitch, so the edges keep the 27.5 in (69.9 cm) width. The border adds 0.25 in (0.6 cm) on every side, bringing the panel to 28 in x 60 in (71.1 cm x 152.4 cm).
Rolled Roses (Make 231)
Use Color B and the 3.5 mm hook.
Ch 13.
Row 1: 2 dc in 4th ch from hook (the skipped ch count as 1 dc), 3 dc in each of the remaining 9 ch. (30 sts: 3 + 27)
The strip ruffles as you work. Fasten off and leave a 10 in (25.4 cm) tail. Starting at the end farthest from the tail, roll the strip into a tight spiral with the wrong side in. Push the tail through all layers at the base two or three times to lock the roll. The finished rose is about 1 in (2.5 cm) across. Keep the tail for sewing.
Leaf Pairs (Make 231)
Use Color C and the 3.5 mm hook.
Leaf 1: Ch 6, sc in 2nd ch from hook, hdc in next ch, dc in next ch, hdc in next ch, sl st in last ch. (5 sts)
Leaf 2: Ch 6, then work the same as Leaf 1. (5 sts)
Sl st into the base of Leaf 1 so the two leaves meet at one point. Fasten off and leave an 8 in (20.3 cm) tail. Each leaf is about 0.75 in (1.9 cm) long and has a pointed tip.
Placement and Sewing
Lay the panel flat with Row 1 at the bottom. Roses go only on full-loop rows, at the nodes.
- Rows 4, 12, 20, … 84 (11 rows): sew a rose on sc 2, 4, 6, … 22 of the row, counting from the right edge. (11 roses per row, 121 total)
- Rows 8, 16, 24, … 88 (11 rows): sew a rose on sc 3, 5, 7, … 21. (10 roses per row, 110 total)
That’s 231 roses in total. Every rose is 2.5 in (6.4 cm) from its neighbors in the same row, and the rows alternate so the roses stagger. Rows 89–92 stay plain, which leaves a clean strip of mesh below the header.
Sew the leaf pair on first. Set its joining point right on the node and spread the two leaves down and outward along the two chains that run down from that node, making a V. Tack each leaf tip to its chain. Then sew the rose over the node, covering where the leaves join. Sew through the rose base and around the node sc, not through the open chains, so the mesh still hangs freely. Weave the tails into the rose or leaf they came from.
Placing markers on all the rose nodes in a row before you sew keeps the grid even.
Final Blocking
- Soak the panel in cool water with a little wool wash or gentle soap for 15 minutes.
- Press out the water. Don’t wring. Roll the panel in towels to take out more moisture.
- Lay it face up on mats or a sheet and pin out to 28 in x 60 in (71.1 cm x 152.4 cm).
- Pin the header and bottom edges straight first, then the side borders.
- Lightly stretch the mesh so each diamond is about 1.25 in (3.2 cm) wide, and line up the loops by eye.
- Fluff each rose and point each leaf down into its V.
- Leave it to dry completely, then unpin.
Final Quality-Control Checklist
- Panel measures 28 in x 60 in (71.1 cm x 152.4 cm)
- Every full-loop row has 22 loops and 23 sc
- Rows 1 and 99 each have 89 sts
- Border has 562 sc with 3-sc corners
- Side edges are straight, without ruffles or puckers
- 231 roses are evenly staggered and each has a leaf pair in a V below it
- All tails are woven in and nothing shows on the back
- Header band is firm enough for clip rings
Troubleshooting
Edges slant or wander: you probably missed a half loop on a Row 3-type row. Each one has to start with ch 5 and end with ch 2, dc.
Loop count changes: check that you sc into every ch-5 sp and don’t skip the last one before the turning chain.
Side border ruffles: cut back to 2 sc on most mesh rows and 1 sc on every fifth row. Side border pulls in: add 1 extra sc every tenth row.
Header is wider than the mesh: work Row 93 with 2 sc in each ch-5 sp, then add stitches evenly on Row 94 until you have 89.
Mesh sags under the roses: sew the roses to the node sc only, and keep the stitches small.
Roses are flat: pull the base tail tighter as you roll, or work the strip with a 3.25 mm hook.
Care
Hand wash in cool water, press out the water, and dry flat, then rehang while it’s slightly damp so the panel settles straight. Don’t tumble dry, because the heat can shrink the cotton and crush the roses.
Final Notes
The measurement chain runs like this. 89 sc in Row 1 gives 27.5 in (69.9 cm). Each of the 22 loops is 1.25 in (3.2 cm). 91 mesh rows at 0.625 in (1.6 cm) bring the panel to about 57.1 in (145.0 cm). The 2.4 in (6.1 cm) header brings it to 59.5 in (151.1 cm), and the 0.25 in (0.6 cm) border finishes it at 28 in x 60 in (71.1 cm x 152.4 cm). If you check your swatch, the Row 1 width, and the loop count on the way, the panel will come out true. For a pair like the one shown at a window, simply make a second panel the same way.
Happy crocheting!